
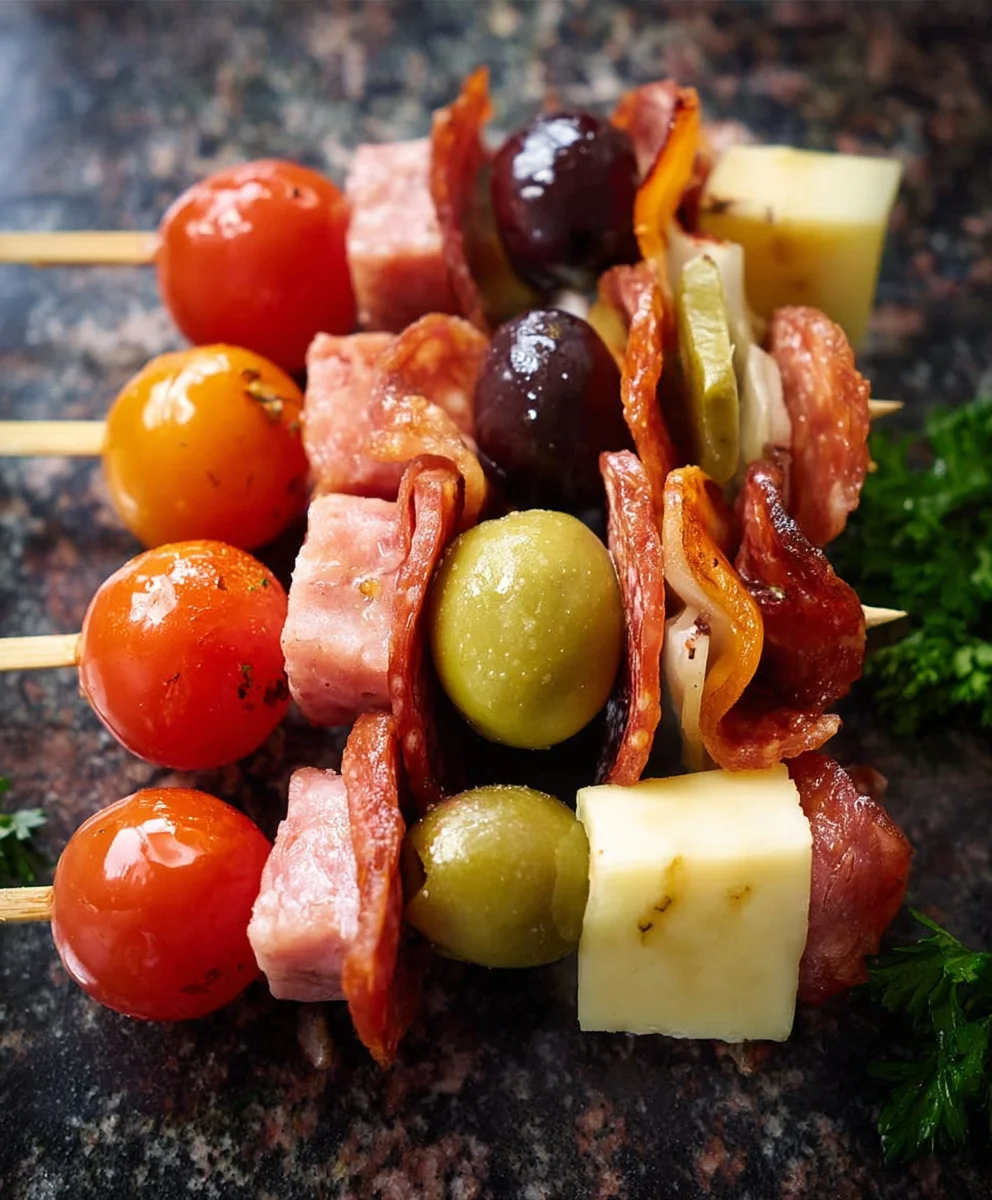
Charcuterie skewers are the ultimate party starter, a delightful and effortless way to impress your guests without spending hours in the kitchen. Forget the traditional, often intimidating, charcuterie board; these individual, bite-sized creations offer a playful and accessible twist on a beloved classic. People adore them because they’re incredibly customizable, allowing for endless flavor combinations to suit any palate, from savory meat lovers to adventurous vegetarians. What truly makes these charcuterie skewers special is their inherent portability and ease of enjoyment. Guests can mingle, chat, and graze without ever needing a plate or fork, making them a hit at everything from casual backyard barbecues to elegant cocktail parties.
The Magic of a Perfectly Assembled Charcuterie Skewer
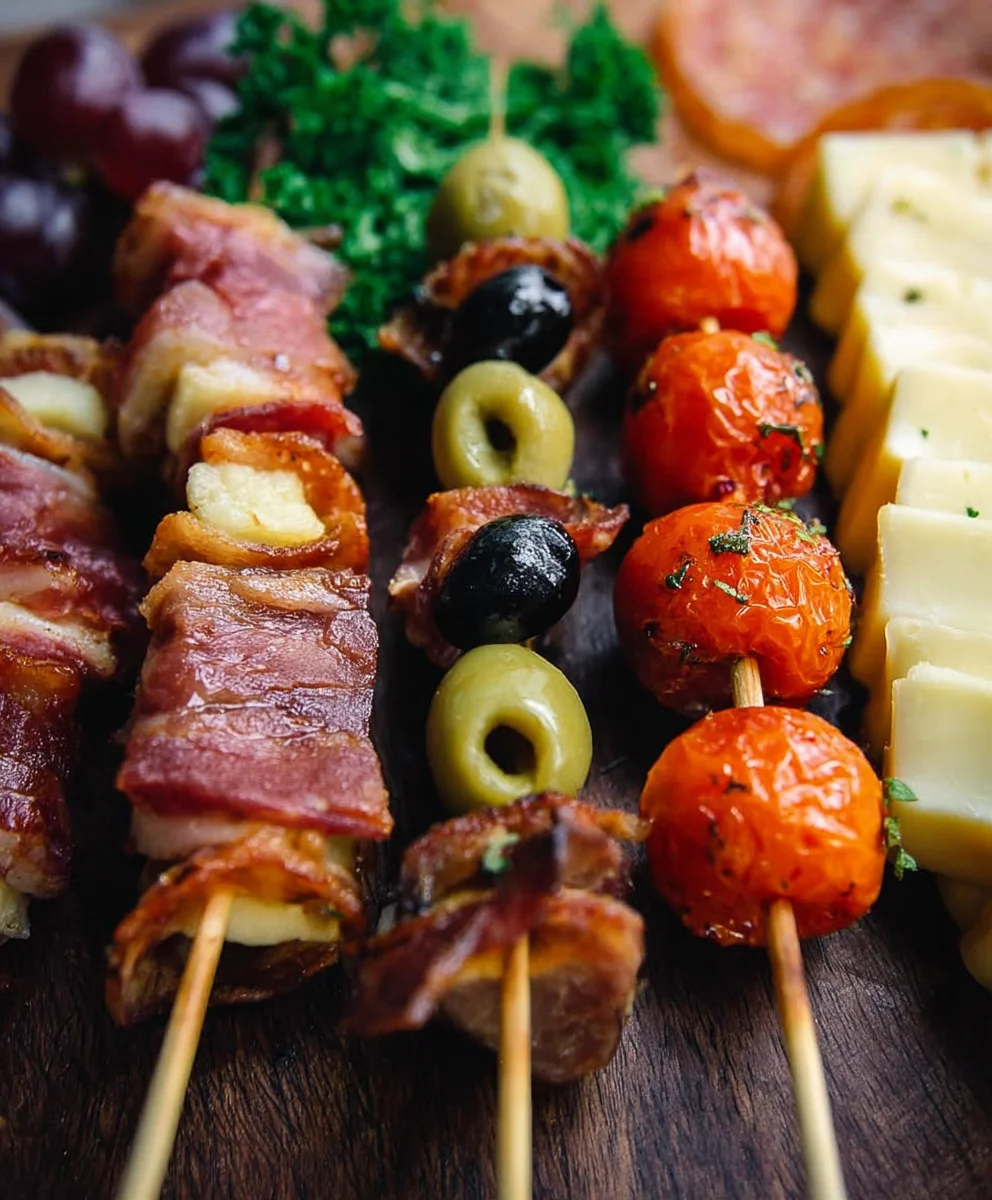
Imagine vibrant colors, contrasting textures, and a burst of deliciousness in every single bite. That’s the promise of well-crafted charcuterie skewers. We’re talking about succulent cured meats, creamy cheeses, briny olives, sweet fruits, and crisp vegetables, all artfully arranged on a slender stick. It’s not just about the ingredients, though; it’s about the experience. These aren’t just appetizers; they’re miniature edible masterpieces that spark conversation and ignite appetites.
Why You’ll Love Making (and Eating!) Them
The beauty of charcuterie skewers lies in their simplicity and versatility. You can tailor them to any occasion, dietary need, or personal preference. Planning a holiday gathering? Opt for festive colors like cranberries and rosemary. Hosting a summer soiree? Think fresh berries and vibrant green grapes. The possibilities are truly endless, and the joy of building these little flavor bombs is almost as satisfying as devouring them. Get ready to elevate your entertaining game with these incredibly easy yet undeniably chic charcuterie skewers.
Ingredients:
- 24 cubes of cheese (such as cheddar, mozzarella, or Swiss), cut into bite-sized pieces
- 12 small slices of salami or pepperoni, folded in half or quarters
- 12 olives or pickles (small ones, or larger ones cut into bite-sized pieces)
- 12 pieces of roasted red pepper (from a jar, drained and patted dry), cut into roughly 1-inch squares
- Small wooden skewers or toothpicks
- Fresh herbs (like parsley, basil, or chives), optional, for garnish
- Balsamic glaze, optional, for drizzling
Assembling Your Charcuterie Skewers
This is where the magic happens! We’re going to build these delightful Charcuterie Skewers layer by delicious layer. The beauty of these skewers is their versatility and ease of assembly. You can truly customize them to your liking, but this guide will walk you through a classic and crowd-pleasing arrangement. Get ready to have some fun with your food!
Step 1: Prepare Your Skewers and Base Layer
First, gather all your prepared ingredients. Ensure your cheese cubes are roughly the same size for a uniform look. If you’re using larger olives or pickles, make sure they’ve been cut into manageable, skewer-friendly pieces. For the roasted red peppers, gently pat them dry with a paper towel to remove any excess liquid, which helps them adhere better to the other ingredients.
Now, take one of your small wooden skewers or toothpicks. We’ll start by threading a cube of cheese onto the skewer first. This provides a sturdy base and a satisfying bite right at the beginning. Push the cheese cube firmly onto the skewer, leaving a little space at the bottom for easy handling. Think of this as the foundation of your edible masterpiece. If you prefer a different starting point, feel free to experiment! Some people like to start with a pepper or an olive, but the cheese offers excellent stability.
Step 2: Adding the Savory Folded Meats
Next, it’s time to introduce the star of many charcuterie boards: the cured meats! Take one of your folded slices of salami or pepperoni. The folding technique is key here; it creates a little pocket that’s visually appealing and adds texture. Gently thread the folded meat onto the skewer, positioning it just above the cheese. You can orient the fold in various ways – some people like it to fan out, while others prefer it to tuck in. Experiment to see what looks best to you.
Make sure the meat is secure on the skewer but not so tight that it tears. We want each element to have its own space and identity. As you add the meat, consider the colors. The rich red of the salami or pepperoni will contrast beautifully with the pale cheese. This visual appeal is a huge part of what makes Charcuterie Skewers so inviting.
Step 3: Incorporating the Briny Bites and Vibrant Peppers
Now, let’s add some pop! For the next layer, choose either an olive or a pickle piece. Thread it onto the skewer, placing it above the folded meat. The saltiness of the olives or pickles will cut through the richness of the cheese and meat, creating a delightful flavor balance. If you’re using pickles, ensure they are firm enough not to crumble.
Following the olive or pickle, it’s time to add the vibrant roasted red pepper. Carefully thread a piece of roasted red pepper onto the skewer, above the olive or pickle. These peppers offer a sweet and slightly smoky flavor that complements the other ingredients wonderfully. They also add a lovely burst of color, transforming your skewer into a mini rainbow of deliciousness. The slightly chewy texture of the pepper also adds another dimension to the overall eating experience.
Step 4: Completing the Skewer and Repeating the Process
We’re almost there with our first skewer! Depending on the length of your skewers and your desired density, you might have room for another cheese cube or even a second piece of meat or pepper. For this recipe, we’ll aim for a balanced skewer with distinct layers. So, we’ll add another cube of cheese on top of the roasted red pepper. This creates a visually appealing top layer and ensures you get a good amount of cheese with every bite.
Once your first skewer is fully assembled, admire your handiwork! Then, simply repeat steps 1 through 4 for the remaining ingredients. The goal is to create 12 perfectly balanced and attractive Charcuterie Skewers. As you assemble more, you’ll find your rhythm, and the process will become even quicker. Don’t be afraid to slightly vary the order of ingredients on some skewers if you feel adventurous – perhaps an olive then cheese, then pepper, then meat. This adds a touch of uniqueness to your platter.
Step 5: Presentation and Optional Enhancements
Once all 12 Charcuterie Skewers are assembled, it’s time for the final flourish. Arrange them attractively on a serving platter. You can stand them up, lay them down, or even arrange them in a fan shape. The visual presentation is a key part of the charcuterie experience!
For an extra touch of elegance and flavor, consider adding some fresh herbs as a garnish. Sprigs of parsley, basil, or finely chopped chives can add a pop of green and a subtle herbaceous note. They tuck in beautifully between the skewers or can be scattered around the platter. And finally, for a truly gourmet touch, lightly drizzle some balsamic glaze over the assembled skewers. The sweet and tangy reduction will add a sophisticated layer of flavor that ties all the elements together. This optional step elevates your simple Charcuterie Skewers into a truly impressive appetizer that guests will rave about. Serve immediately and enjoy the compliments!
Conclusion:
And there you have it – your guide to creating stunning and delicious Charcuterie Skewers! We’ve explored the art of balancing flavors and textures, from the savory cured meats and cheeses to the bright pops of fruit and the satisfying crunch of crackers. These Charcuterie Skewers are incredibly versatile, perfect for a casual get-together, an elegant appetizer spread, or even a fun and interactive family meal. Don’t be afraid to experiment and make them your own; the possibilities are truly endless!
For serving suggestions, I love presenting them upright in a decorative jar or arranged artfully on a platter. They’re also fantastic for picnics and outdoor gatherings, as they minimize mess and are easy to eat on the go. When it comes to variations, think about seasonal ingredients! Summer calls for berries and melon, while fall might inspire apples and figs. Consider adding marinated olives, pickled vegetables, or even a dollop of gourmet mustard to the mix. The goal is to have fun and create something that delights your taste buds.
I truly encourage you to give these Charcuterie Skewers a try. They are a guaranteed crowd-pleaser and offer a wonderful way to showcase your culinary creativity with minimal fuss. Enjoy the process and the delicious results!
FAQs about Charcuterie Skewers:
Q1: What kind of skewers are best to use?
For Charcuterie Skewers, standard wooden bamboo skewers work perfectly. If you’re serving hot elements, you might opt for metal skewers, but for this recipe, bamboo is ideal. Ensure they are long enough to hold a good variety of ingredients.
Q2: Can I prepare Charcuterie Skewers in advance?
Yes, you can! You can assemble most of the components of your Charcuterie Skewers a few hours ahead of time. Store them covered in the refrigerator. It’s best to add any delicate or crunchy items like crackers right before serving to prevent them from becoming soggy.
Q3: What are some good vegetarian options for Charcuterie Skewers?
Absolutely! For vegetarian Charcuterie Skewers, replace the meats with grilled halloumi cheese, marinated artichoke hearts, roasted red peppers, robust mushrooms, or firm tofu cubes. You can also focus on a wider variety of cheeses, fruits, and vegetables like cherry tomatoes, cucumber slices, and olives.
Easy Beef Charcuterie Skewers – Party Perfect Bites
Delightful and easy-to-assemble beef charcuterie skewers, perfect for parties and gatherings. A crowd-pleasing appetizer with layers of flavor.
Ingredients
-
24 cubes of beef cheese (such as cheddar, mozzarella, or Swiss), cut into bite-sized pieces
-
12 small slices of beef salami or pepperoni, folded in half or quarters
-
12 olives or pickles (small ones, or larger ones cut into bite-sized pieces)
-
12 pieces of roasted red pepper (from a jar, drained and patted dry), cut into roughly 1-inch squares
-
Small wooden skewers or toothpicks
-
Fresh herbs (like parsley, basil, or chives), optional, for garnish
-
Balsamic glaze, optional, for drizzling
Instructions
-
Step 1
Gather and prepare all ingredients. Ensure cheese cubes are uniform. Cut larger olives/pickles and pat roasted red peppers dry. -
Step 2
Thread a cube of cheese onto a skewer to create a stable base. Push firmly, leaving space for handling. -
Step 3
Gently thread a folded slice of beef salami or pepperoni onto the skewer above the cheese. Experiment with folding orientation for visual appeal. -
Step 4
Add an olive or pickle piece next, threading it above the meat. This adds a briny counterpoint to the other flavors. -
Step 5
Carefully thread a piece of roasted red pepper onto the skewer above the olive or pickle. This adds sweetness, color, and a slightly chewy texture. -
Step 6
Add another cheese cube on top to complete the skewer. Repeat steps 2-5 for all ingredients to create 12 skewers. -
Step 7
Arrange the assembled skewers attractively on a serving platter. Optionally, garnish with fresh herbs and drizzle with balsamic glaze before serving.
Important Information
Nutrition Facts (Per Serving)
It is important to consider this information as approximate and not to use it as definitive health advice.
Allergy Information
Please check ingredients for potential allergens and consult a health professional if in doubt.


Leave a Comment