
Brookie Layered Brownie Cookie Bars truly represent the ultimate solution to a timeless dessert dilemma: brownie or cookie? Why choose when you can have both, perfectly melded into one irresistible treat? I still recall the first time I encountered the concept of a “brookie,” and it felt like a culinary revelation – a stroke of genius that combined the fudgy richness of a classic brownie with the chewy, chocolate-studded delight of a cookie. This isn’t merely a simple stacking of two beloved desserts; it’s a harmonious marriage where each layer impeccably complements the other, crafting a texture and flavor profile that is utterly divine.
Why This Dish Captures Hearts
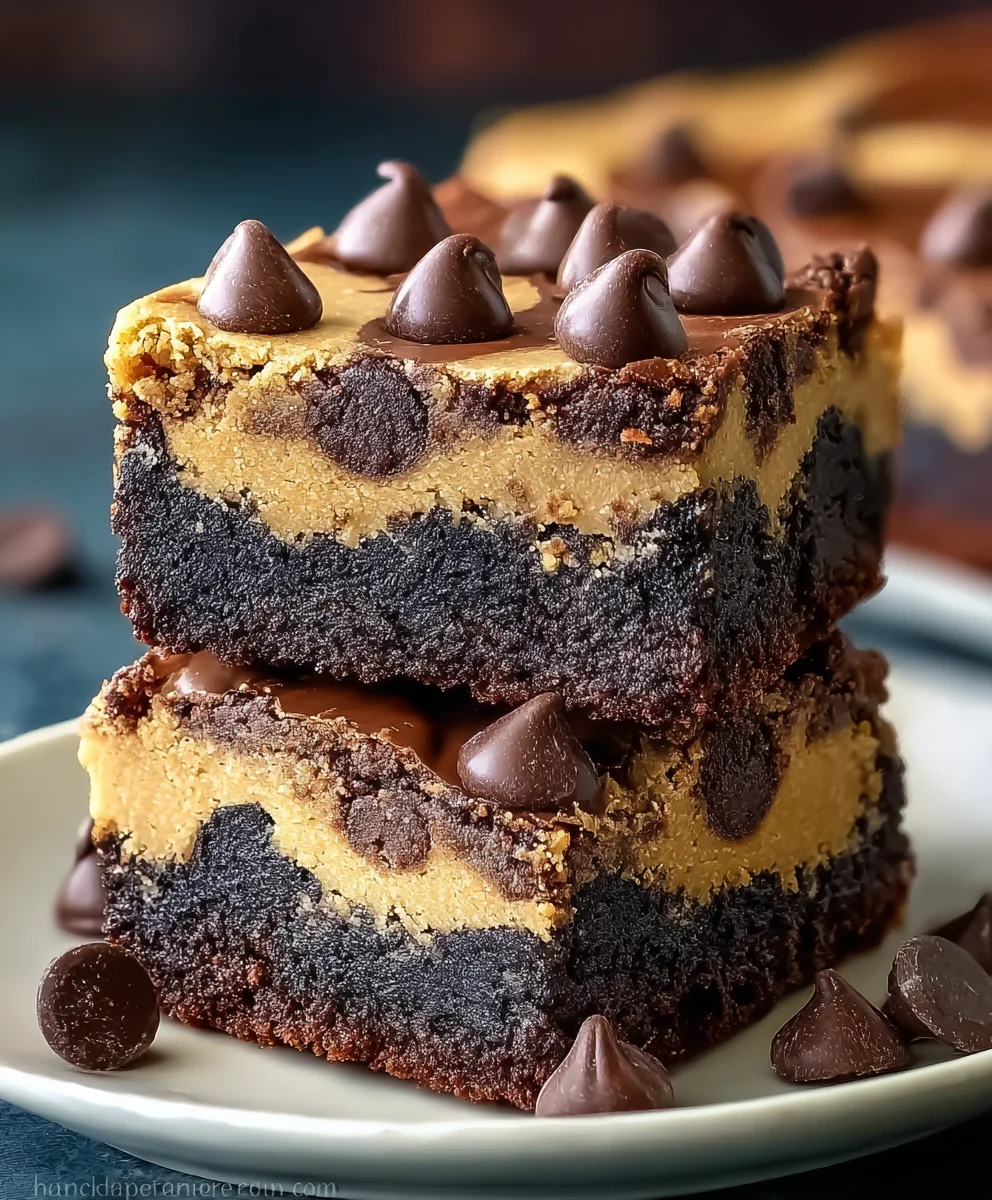
People universally adore these bars not only for their incredible taste – that perfect blend of deep cocoa and sweet vanilla, adorned with pockets of melting chocolate chips – but also for their sheer convenience. They are effortlessly sliceable, making them an ideal choice for potlucks, celebrations, or simply a delightful treat to share with loved ones at home. The enduring appeal of these Brookie Layered Brownie Cookie Bars lies in their unique ability to evoke the comforting nostalgia for two distinct yet beloved comfort foods, all while presenting them in an exciting, innovative format. Prepare to bake a dessert that promises to become an instant classic in your culinary collection.
Ingredients:
-
For the Rich, Fudgy Brownie Layer:
- 1 cup (2 sticks or 226g) unsalted butter: We’ll be melting this down, so unsalted is key to control the overall salinity of our wonderful Brookie Layered Brownie Cookie Bars.
- 4 ounces (113g) unsweetened chocolate: Look for a good quality baking chocolate, ideally 100% cocoa. This provides the deep, intense chocolate flavor that is the backbone of a truly great brownie.
- 2 cups (400g) granulated sugar: This not only sweetens our brownies but also contributes to that desirable shiny, crackly crust on top.
- 4 large eggs: These bind everything together, adding moisture and richness, and contributing to the brownies’ structure and chewiness.
- 1 teaspoon vanilla extract: A crucial flavor enhancer. Use pure vanilla extract for the best results; it really makes the chocolate sing!
- 1 cup (125g) all-purpose flour: Measured correctly, this provides just enough structure without making our brownies cakey. Remember to spoon and level!
- ½ teaspoon baking powder: Just a touch, to give our brownies a slight lift without becoming overly airy.
- ½ teaspoon salt: Essential for balancing the sweetness and intensifying the chocolate flavor. Don’t skip it!
- 1 cup (170g) chocolate chips: Your choice of semi-sweet, dark, or even milk chocolate chips to fold into the batter for extra pockets of melted chocolate goodness.
-
For the Chewy, Golden Cookie Layer:
- 1 cup (2 sticks or 226g) unsalted butter: Softened to room temperature. This is vital for properly creaming with the sugars, creating a light and airy base for our cookies.
- ¾ cup (150g) granulated sugar: For sweetness and a delightful crispness around the edges of our cookie layer.
- ¾ cup (160g) packed light brown sugar: The molasses in brown sugar adds moisture, chewiness, and a lovely caramel note, which is essential for that classic chocolate chip cookie texture.
- 2 large eggs: Room temperature eggs incorporate better and create a smoother, more emulsified dough.
- 1 tablespoon vanilla extract: Again, pure vanilla is best here to complement the brown sugar and butter flavors beautifully.
- 2 ¼ cups (280g) all-purpose flour: The main structural component for our cookie layer. Spoon and level for accuracy.
- 1 teaspoon baking soda: This helps the cookies spread and become tender, reacting with the acidic brown sugar.
- ½ teaspoon salt: Balances the sweetness and enhances the overall flavor profile, just like in the brownie layer.
- 1 ½ cups (255g) chocolate chips: A generous amount! I love using a mix of semi-sweet and milk chocolate chips here for complexity, but feel free to use your favorite.
-
Optional Garnish:
- Extra chocolate chips: A handful or two, sprinkled on top before baking, adds a beautiful aesthetic and an extra chocolatey burst.
- Flaky sea salt: A sprinkle over the top of the baked bars can really elevate the flavors, offering a wonderful salty-sweet contrast.
Equipment You’ll Need:
To ensure your Brookie Layered Brownie Cookie Bars come out perfectly, having the right tools on hand makes the process smooth and enjoyable. You’ll want a sturdy 9×13 inch baking pan, preferably a light-colored metal one for even baking, as dark pans can sometimes lead to overbrowning on the edges. Parchment paper is absolutely essential for easy removal and cleanup – I always use it! You’ll need at least two large mixing bowls, one for your brownie batter and one for your cookie dough, plus a smaller saucepan or microwave-safe bowl for melting chocolate and butter. A whisk, a rubber spatula, and an electric mixer (either hand-held or stand mixer) will be your best friends for mixing. Measuring cups and spoons are, of course, a given. Finally, a wire cooling rack is crucial for allowing your bars to cool completely and prevent them from getting soggy.
Prepping for Your Brookie Layered Brownie Cookie Bars:
- Preheat Your Oven: Begin by preheating your oven to 350°F (175°C). This ensures the oven is at a consistent temperature when your Brookie Layered Brownie Cookie Bars go in, which is key for even baking and proper rise.
- Prepare Your Baking Pan: Take your 9×13 inch baking pan and line it generously with parchment paper. I like to leave an overhang on the two longer sides; this creates “slings” that will make lifting the cooled bars out of the pan incredibly easy. You can lightly grease the pan first to help the parchment stick, but it’s not strictly necessary if your parchment is cooperative. Trust me, this step saves so much hassle later!
Crafting the Decadent Brownie Layer:
This is where we lay the foundation for the ultimate Brookie Layered Brownie Cookie Bars. A rich, fudgy brownie layer is non-negotiable!
- Melt Chocolate and Butter: In a medium, heavy-bottomed saucepan over low heat, or in a microwave-safe bowl, combine your 1 cup (2 sticks) unsalted butter and 4 ounces unsweetened chocolate. Stir frequently if on the stovetop, or microwave in 30-second intervals, stirring well after each, until the mixture is completely melted and smooth. The goal here is a glossy, homogeneous chocolate mixture. Remove it from the heat and set it aside to cool slightly while you prepare the wet ingredients. You don’t want to scramble your eggs!
- Combine Wet Ingredients: In a large mixing bowl, whisk together the 2 cups granulated sugar and the 4 large eggs until they are well combined and a pale yellow. This usually takes about 1-2 minutes of vigorous whisking. Then, pour in the slightly cooled chocolate-butter mixture and the 1 teaspoon vanilla extract. Whisk thoroughly until everything is beautifully combined and smooth. The mixture should be thick and glossy.
- Introduce Dry Ingredients: In a separate small bowl, whisk together the 1 cup all-purpose flour, ½ teaspoon baking powder, and ½ teaspoon salt. This ensures the leavening agent and salt are evenly distributed throughout the flour, preventing pockets of unmixed ingredients in your final brownie.
- Gently Fold in Dry Ingredients: Gradually add the dry ingredient mixture to the wet chocolate mixture. Using a rubber spatula, gently fold until just combined. It’s very important not to overmix here! Overmixing develops gluten, which can lead to a tough, cake-like brownie instead of the fudgy texture we’re aiming for. Stop as soon as you no longer see any dry streaks of flour.
- Stir in Chocolate Chips: Finally, gently fold in the 1 cup of chocolate chips. These will melt into luscious pockets throughout your brownie layer.
- Spread into Pan: Pour the rich brownie batter into your prepared 9×13 inch pan, spreading it evenly with your spatula. Make sure it reaches all corners. This base layer is going to be amazing for our Brookie Layered Brownie Cookie Bars!
Preparing the Chewy Cookie Layer:
Now for the other half of our dynamic duo! This cookie layer needs to be perfectly chewy and loaded with chocolate chips to complement the fudgy brownie.
- Cream Butter and Sugars: In another large mixing bowl, using an electric mixer (stand or hand-held), cream together the 1 cup (2 sticks) softened unsalted butter, ¾ cup granulated sugar, and ¾ cup packed light brown sugar. Beat on medium speed for about 2-3 minutes until the mixture is light, fluffy, and pale in color. This creaming process incorporates air, which contributes to the cookies’ texture.
- Add Eggs and Vanilla: Beat in the 2 large eggs, one at a time, mixing well after each addition. Scrape down the sides of the bowl as needed to ensure everything is fully incorporated. Then, beat in the 1 tablespoon vanilla extract until just combined. The mixture should look smooth and creamy.
- Combine Dry Cookie Ingredients: In a separate medium bowl, whisk together the 2 ¼ cups all-purpose flour, 1 teaspoon baking soda, and ½ teaspoon salt. Just like with the brownies, this ensures even distribution of the leavening and seasoning.
- Gradually Add Dry to Wet: With the mixer on low speed, gradually add the dry ingredients to the wet ingredients, mixing until just combined. Again, avoid overmixing! Mix only until no dry streaks of flour remain. Overworking cookie dough can lead to tough cookies, and we want these Brookie Layered Brownie Cookie Bars to be wonderfully tender.
- Fold in Chocolate Chips: Remove the bowl from the mixer and, using your rubber spatula, fold in the 1 ½ cups chocolate chips until they are evenly distributed throughout the dough. You want a good amount of chocolate in every bite of our Brookie Layered Brownie Cookie Bars!
Assembling Your Brookie Layered Brownie Cookie Bars:
This is where the magic happens – combining the two delicious layers into one harmonious treat!
- Layer the Cookie Dough: Now for the slightly tricky part – gently layering the cookie dough over the brownie batter. The cookie dough is thicker, so it’s best to drop spoonfuls of cookie dough evenly over the entire surface of the brownie batter.
Technique for Even Spreading:
Once you have dollops spread out, lightly wet your hands or use another piece of parchment paper to gently press and spread the cookie dough into an even layer over the brownie batter. You want to cover the brownie layer completely, but be careful not to press too hard or mix the two layers together. The goal is two distinct, delicious layers for your Brookie Layered Brownie Cookie Bars.
- Optional: Add More Chocolate Chips: If desired, sprinkle an additional handful or two of chocolate chips over the top of the cookie dough layer. This adds extra chocolatey appeal and makes for a prettier presentation once baked.
Baking and Cooling to Perfection:
Patience is a virtue, especially when baking these glorious Brookie Layered Brownie Cookie Bars!
- Bake the Bars: Place the pan into your preheated 350°F (175°C) oven. Bake for approximately 45-55 minutes. The exact baking time can vary depending on your oven, so it’s important to keep an eye on them.
How to Check for Doneness:
The edges of the cookie layer should be golden brown, and the center should appear set. A wooden skewer or toothpick inserted into the cookie layer (not all the way down into the brownie) should come out with moist crumbs, but not wet batter. If you insert it into the brownie layer, it should come out a bit gooey, which is perfect for fudgy brownies. The top cookie layer should have a nice golden hue and maybe even some slight cracks, indicating it’s cooked through.
- Cool Completely (This is Crucial!): Once baked, remove the pan from the oven and place it on a wire cooling rack. This is arguably the most important step for perfectly cut Brookie Layered Brownie Cookie Bars. Allow the bars to cool in the pan completely, which can take anywhere from 2 to 3 hours, or even longer. For the cleanest cuts and the best texture, I often recommend chilling them in the refrigerator for at least an hour after they’ve cooled to room temperature. Trying to cut them warm will result in a crumbly mess, as the brownie layer will be too soft and the chocolate chips will still be molten.
Serving and Storing Your Brookie Layered Brownie Cookie Bars:
The final steps to enjoying your incredible creation!
- Lift and Cut: Once completely cooled and firm, use the parchment paper overhangs to carefully lift the entire slab of Brookie Layered Brownie Cookie Bars out of the pan and onto a cutting board.
Tips for Clean Cuts:
For super clean edges, use a large, sharp knife. Heat the knife under hot water, wipe it dry, and then make your cuts. Repeat this process for each cut. This prevents sticking and dragging, giving you beautifully defined squares or rectangles. I usually cut them into 12 large bars or 24 smaller squares, depending on who I’m serving and how indulgent I want to be!
- Optional Finishing Touch: If you’re using flaky sea salt, sprinkle a little over the top of the cut bars for that irresistible salty-sweet combination.
- Serve and Enjoy: These Brookie Layered Brownie Cookie Bars are absolutely perfect on their own, perhaps with a tall glass of milk. For an extra treat, warm them slightly in the microwave for a few seconds and serve with a scoop of vanilla bean ice cream – pure bliss!
- Storage: Store any leftover Brookie Layered Brownie Cookie Bars in an airtight container at room temperature for up to 3-4 days. For longer storage, you can keep them in the refrigerator for up to a week. If you plan to freeze them, wrap individual bars tightly in plastic wrap and then place them in a freezer-safe bag or container for up to 2-3 months. Thaw at room temperature before serving.
I really hope you enjoy making and devouring these amazing Brookie Layered Brownie Cookie Bars as much as I do!

Conclusion:
And there you have it, my friends! We’ve reached the sweet finale of our journey, but truly, the best part is yet to come – experiencing these incredible treats for yourself. If there’s one recipe I could implore you to try this week, it’s this one. I’m not exaggerating when I say these Brookie Layered Brownie Cookie Bars are a game-changer, a true masterpiece of home baking that delivers on every promise. They perfectly encapsulate the chewy, dense, and gloriously fudgy texture of a classic brownie, seamlessly topped with the soft, tender, and slightly crisp edges of a perfect chocolate chip cookie. It’s not just two desserts; it’s a harmonious marriage where each layer enhances the other, creating a symphony of flavors and textures that will leave you, and anyone you share them with, absolutely captivated.
I find immense joy in the simplicity of this recipe, belying the sophisticated taste it offers. It’s the kind of dessert that feels special, yet requires no advanced pastry chef skills. The aroma that fills your kitchen as these bars bake is, in itself, a reward – a warm, comforting hug of chocolate and vanilla that promises pure bliss. And when you finally pull that golden-brown slab from the oven, with its glistening chocolate chips and inviting layers, you’ll understand exactly why this recipe has become a staple in my home. It’s ideal for potlucks, birthday parties, a cozy night in, or even just because you deserve a little extra sweetness in your day. They’re unequivocally a crowd-pleaser, guaranteed to elicit smiles and requests for the recipe.
Elevate Your Brookes: Serving Suggestions & Creative Variations
While these bars are absolutely divine on their own, served at room temperature or slightly warm, I have a few suggestions to truly elevate your experience. Imagine a warm square, fresh from the oven, topped with a scoop of creamy vanilla bean ice cream that slowly melts into the fudgy brownie layer. Or, for the coffee lovers, a scoop of coffee ice cream would be an unparalleled pairing. A drizzle of rich caramel sauce or a sprinkle of flaky sea salt over the top can also add an extra layer of complexity, balancing the sweetness with a touch of salty luxury. For a truly decadent treat, try adding a dollop of whipped cream and a cherry on top – a miniature dessert sundae in bar form!
But don’t stop there! This recipe is wonderfully adaptable, inviting you to unleash your inner baking artist. Consider swapping out the standard semi-sweet chocolate chips for milk chocolate, dark chocolate, white chocolate, or even a mix of all three. For a different flavor profile, peanut butter chips or butterscotch chips could be fantastic additions to the cookie layer. If you love nuts, feel free to fold in a handful of chopped walnuts or pecans into either the brownie batter or the cookie dough for an added crunch and earthy flavor. During the holidays, a sprinkle of festive sprinkles on top of the cookie dough before baking can transform them into a joyful, celebratory treat. You could even experiment with different extracts – a touch of peppermint extract in the brownie layer for a mint-chocolate delight, or almond extract for a subtle, nutty undertone. The possibilities are truly endless, allowing you to customize these bars to your exact preferences and the occasion at hand.
Your Turn: Bake, Share, & Inspire!
Now, it’s your turn to experience the magic! I wholeheartedly encourage you to block out a little time this week, gather your ingredients, and dive into making these phenomenal Brookie Layered Brownie Cookie Bars. I promise you, the effort is minimal, but the reward is immense. There’s something incredibly satisfying about pulling a tray of homemade treats from the oven, especially when they look and taste this good. Once you’ve baked them, I would absolutely love to hear about your experience! Did you add any unique twists? What did your family and friends think? Did they disappear as quickly as they did in my house?
Please, don’t hesitate to share your baking journey with me. Leave a comment below, tell me all about your delicious creations, and let’s spread the joy of these amazing bars far and wide. Your feedback and stories are what truly inspire me and this community of passionate bakers. So, preheat that oven, get ready to whisk, mix, and bake, and prepare to be amazed by the ultimate dessert hybrid. Happy baking, my friends – may your kitchens be filled with irresistible aromas and your plates with irresistible treats!
Brookie Layered Brownie Cookie Bars
Brookie Layered Brownie Cookie Bars solve the timeless dessert dilemma: brownie or cookie? Have both perfectly melded into one irresistible treat with fudgy richness and chewy, chocolate-studded delight.
Ingredients
-
1 cup (226g) unsalted butter, melted (for brownie layer)
-
4 oz (113g) unsweetened chocolate
-
2 cups (400g) granulated sugar (for brownie layer)
-
4 large eggs (for brownie layer)
-
1 tsp vanilla extract (for brownie layer)
-
1 cup (125g) all-purpose flour (for brownie layer)
-
½ tsp baking powder
-
½ tsp salt (for brownie layer)
-
1 cup (170g) chocolate chips (for brownie layer)
-
1 cup (226g) unsalted butter, softened (for cookie layer)
-
¾ cup (150g) granulated sugar (for cookie layer)
-
¾ cup (160g) packed light brown sugar
-
2 large eggs (for cookie layer)
-
1 tbsp vanilla extract (for cookie layer)
-
2 ¼ cups (280g) all-purpose flour (for cookie layer)
-
1 tsp baking soda
-
½ tsp salt (for cookie layer)
-
1 ½ cups (255g) chocolate chips (for cookie layer)
-
Extra chocolate chips (optional, for garnish)
-
Flaky sea salt (optional, for garnish)
Instructions
-
Step 1
Preheat oven to 350°F (175°C). Line a 9×13 inch baking pan generously with parchment paper, leaving an overhang on the longer sides for easy lifting. -
Step 2
{‘@type’: ‘HowToSection’, ‘name’: ‘Craft the Fudgy Brownie Layer’, ‘itemListElement’: [{‘@type’: ‘HowToStep’, ‘name’: ‘Melt Chocolate & Butter’, ‘text’: ‘Melt 1 cup (226g) unsalted butter and 4 oz (113g) unsweetened chocolate in a saucepan or microwave until smooth. Set aside to cool slightly.’}, {‘@type’: ‘HowToStep’, ‘name’: ‘Combine Wet Ingredients’, ‘text’: ‘In a large bowl, whisk 2 cups (400g) granulated sugar and 4 large eggs until pale. Stir in the cooled chocolate-butter mixture and 1 tsp vanilla extract until smooth.’}, {‘@type’: ‘HowToStep’, ‘name’: ‘Fold in Dry Ingredients & Chips’, ‘text’: ‘In a separate small bowl, whisk 1 cup (125g) all-purpose flour, ½ tsp baking powder, and ½ tsp salt. Gradually fold dry ingredients into the wet mixture until just combined (do not overmix). Fold in 1 cup (170g) chocolate chips. Spread batter evenly in the prepared pan.’}]} -
Step 3
{‘@type’: ‘HowToSection’, ‘name’: ‘Prepare the Chewy Cookie Layer’, ‘itemListElement’: [{‘@type’: ‘HowToStep’, ‘name’: ‘Cream Butter & Sugars’, ‘text’: ‘In another large bowl, cream 1 cup (226g) softened unsalted butter, ¾ cup (150g) granulated sugar, and ¾ cup (160g) packed light brown sugar with an electric mixer for 2-3 minutes until light and fluffy.’}, {‘@type’: ‘HowToStep’, ‘name’: ‘Add Eggs & Vanilla’, ‘text’: ‘Beat in 2 large eggs one at a time, mixing well. Beat in 1 tbsp vanilla extract until just combined.’}, {‘@type’: ‘HowToStep’, ‘name’: ‘Fold in Dry Ingredients & Chips’, ‘text’: ‘In a separate medium bowl, whisk 2 ¼ cups (280g) all-purpose flour, 1 tsp baking soda, and ½ tsp salt. Gradually add dry ingredients to wet on low speed until just combined (do not overmix). Fold in 1 ½ cups (255g) chocolate chips.’}]} -
Step 4
{‘@type’: ‘HowToSection’, ‘name’: ‘Assemble, Bake & Cool’, ‘itemListElement’: [{‘@type’: ‘HowToStep’, ‘name’: ‘Layer Cookie Dough’, ‘text’: ‘Drop spoonfuls of cookie dough evenly over the brownie batter. Gently press and spread the cookie dough into an even layer using lightly wet hands or parchment paper. Optionally, sprinkle extra chocolate chips on top.’}, {‘@type’: ‘HowToStep’, ‘name’: ‘Bake Bars’, ‘text’: ‘Bake for 45-55 minutes. The cookie layer edges should be golden brown and the center set (a skewer into the cookie layer should come out with moist crumbs). The brownie layer will remain fudgy.’}, {‘@type’: ‘HowToStep’, ‘name’: ‘Cool Completely’, ‘text’: ‘Remove from oven and cool completely in the pan on a wire rack for 2-3 hours, or longer. For clean cuts, chilling in the refrigerator for at least an hour after cooling to room temperature is recommended.’}]} -
Step 5
{‘@type’: ‘HowToSection’, ‘name’: ‘Serve & Store’, ‘itemListElement’: [{‘@type’: ‘HowToStep’, ‘name’: ‘Cut & Garnish’, ‘text’: ‘Once cooled and firm, use parchment overhangs to lift bars onto a cutting board. Cut into 12 large bars (or 24 smaller squares) using a large, sharp knife (heating and wiping the knife between cuts helps). Optionally, sprinkle with flaky sea salt.’}, {‘@type’: ‘HowToStep’, ‘name’: ‘Serve & Store’, ‘text’: ‘Serve as is, or warm slightly with vanilla ice cream. Store leftovers in an airtight container at room temperature for 3-4 days, in the refrigerator for up to a week, or freeze for 2-3 months. Thaw at room temperature before serving.’}]}
Important Information
Nutrition Facts (Per Serving)
It is important to consider this information as approximate and not to use it as definitive health advice.
Allergy Information
Please check ingredients for potential allergens and consult a health professional if in doubt.


Leave a Comment