
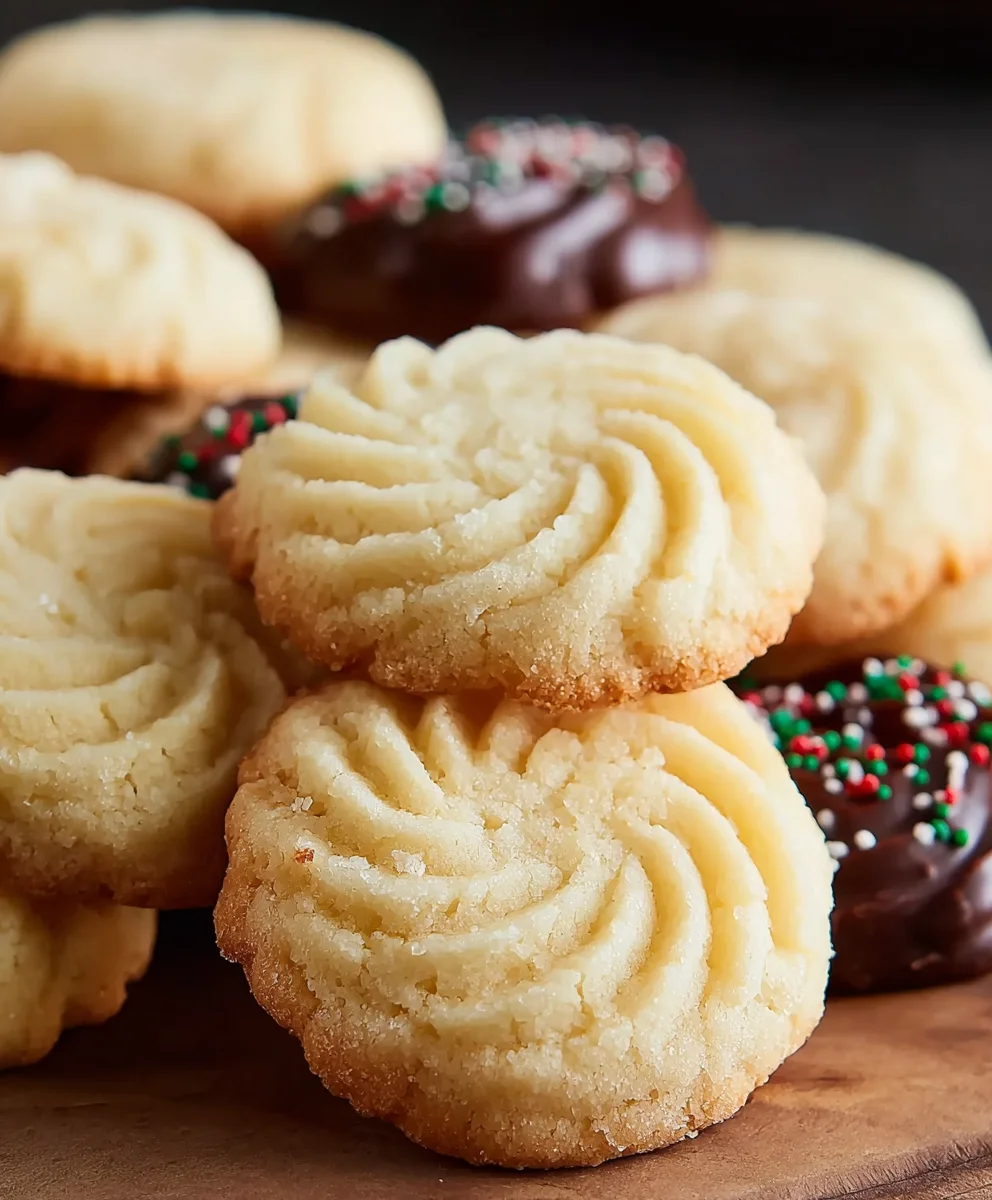
Butter Cookies are more than just a simple treat; they’re a nostalgic hug in edible form, a whisper of childhood kitchens and cozy afternoons. There’s an undeniable magic to their delicate crunch and melt-in-your-mouth texture, a testament to the simple yet profound power of butter, sugar, and flour. For generations, these humble delights have been a staple at celebrations, a comforting accompaniment to a warm cup of tea, and a universally loved indulgence that appeals to all ages. What makes our recipe for these classic Butter Cookies so special? We’ve honed the balance of ingredients to achieve that perfect, buttery richness without being greasy, ensuring a crisp edge and a tender center every single time. Get ready to discover a recipe that’s not just easy to follow, but will quickly become your go-to for creating moments of pure, unadulterated joy.

Ingredients:
- 1 cup (226g) unsalted butter, softened to room temperature
- 2/3 cup (126g) granulated sugar
- 3 large egg yolks
- 2 1/2 cups all-purpose flour
- 1/8 teaspoon salt
- 2 teaspoons vanilla or almond extract (or a combination)
- 2 tablespoons milk
- 10 ounces Ghirardelli Chocolate Wafers (optional, for dipping or drizzling)
- Sprinkles for decoration (optional)
Preparing the Butter Cookies Dough
Creaming the Butter and Sugar
The foundation of any great butter cookie is the creaming process. In a large mixing bowl, combine the softened unsalted butter and granulated sugar. Using an electric mixer on medium speed, beat these two ingredients together for about 3 to 5 minutes. You’re looking for a pale, fluffy mixture. This step is crucial because it incorporates air into the butter and sugar, which will contribute to the cookies’ tender texture and slightly lighter appearance. Scrape down the sides of the bowl a couple of times during this process to ensure everything is evenly incorporated. The sugar crystals will start to dissolve, and the mixture will become light and airy, almost like whipped cream.
Adding the Egg Yolks and Extracts
Once your butter and sugar are perfectly creamed, it’s time to add the richness and flavor. Add the three large egg yolks, one at a time, beating well after each addition until fully incorporated. Egg yolks add fat and moisture, contributing to a wonderfully rich and tender cookie. Next, pour in the vanilla or almond extract. I like to use a combination of both vanilla and almond extract for a more complex flavor profile, but either one works beautifully on its own. Beat until everything is just combined. Over-mixing at this stage can lead to tough cookies, so aim for just combined.
Incorporating the Dry Ingredients
In a separate medium bowl, whisk together the all-purpose flour and the 1/8 teaspoon of salt. This ensures the salt is evenly distributed throughout the flour, preventing any salty pockets in your cookies. Gradually add the dry ingredients to the wet ingredients in the large mixing bowl, mixing on low speed until just combined. Be careful not to overmix. You want to see the flour disappear into the dough, but stop as soon as that happens. A few streaks of flour are perfectly fine at this stage, as they will be worked out in the next step.
Achieving the Perfect Dough Consistency
To bring the dough together and achieve the right consistency for shaping, add the 2 tablespoons of milk. Mix on low speed until the dough just begins to form a cohesive ball. It will be soft but should hold its shape. If the dough feels too sticky, you can add a tablespoon of flour at a time, mixing just until it comes together. Conversely, if it seems too dry, you can add another teaspoon of milk. The dough should be pliable and easy to handle.
Chilling and Shaping the Butter Cookies
Chilling the Dough
Now, this is a very important step for shaping and preventing spreading: chilling the dough. Turn the dough out onto a piece of plastic wrap. Form it into a disk or a log, depending on how you plan to shape your cookies. Wrap it tightly in the plastic wrap. Refrigerate the dough for at least 2 hours, or preferably overnight. Chilling solidifies the butter, making the dough easier to handle, less sticky, and it prevents the cookies from spreading too much during baking, ensuring they maintain their shape.
Baking the Butter Cookies
Preheating and Preparing Baking Sheets
When you’re ready to bake, preheat your oven to 350°F (175°C). Line your baking sheets with parchment paper. This prevents sticking and makes for easy cleanup. If you’ve chilled your dough in a log shape, you’ll slice it into rounds. For disk-shaped dough, you’ll roll it out.
Shaping and Baking the Cookies
If you have a log of chilled dough, use a sharp knife to slice it into rounds about 1/4-inch thick. If your dough is in a disk, lightly flour your work surface and gently roll out the dough to about 1/4-inch thickness. You can use cookie cutters to create various shapes, or simply use the round slices. Place the shaped cookies onto the prepared baking sheets, leaving about 1-inch of space between them to allow for slight spreading. Bake for 10 to 14 minutes, or until the edges are lightly golden brown. The centers may still look slightly soft, but they will continue to set as they cool.
Finishing and Decorating Your Butter Cookies
Cooling the Cookies
Once baked, let the cookies cool on the baking sheets for about 5 minutes before carefully transferring them to a wire rack to cool completely. This allows them to firm up properly. Attempting to move them too soon can result in broken cookies.
Optional Chocolate Dipping and Sprinkles
For an extra touch of decadence, you can melt the Ghirardelli Chocolate Wafers. You can do this gently in a double boiler or in the microwave in 30-second intervals, stirring between each interval, until smooth. Once melted, you can dip half of each cooled cookie into the chocolate, or drizzle melted chocolate over the cookies. While the chocolate is still wet, sprinkle them with your chosen sprinkles for a festive and personalized touch. Allow the chocolate to set completely before storing or serving.
Conclusion:
And there you have it – a delightful journey into crafting the perfect batch of these delightful Butter Cookies! We’ve covered everything from the precise ingredients needed for that signature crispness and buttery aroma to the simple steps that ensure a successful bake every time. These cookies are truly a testament to how simple ingredients can create something so incredibly satisfying. I hope you enjoy making them as much as I do!
These Butter Cookies are wonderfully versatile. Serve them alongside a cup of tea or coffee for an afternoon treat, or arrange them on a platter for a lovely dessert to share with loved ones. They also make for a fantastic edible gift; simply package them in a nice tin or cellophane bag tied with a ribbon.
Don’t be afraid to experiment! You can easily elevate these basic Butter Cookies by adding a touch of lemon zest to the dough for a bright, citrusy note, or by dipping half of the cooled cookies in melted chocolate for an extra touch of indulgence. Sprinkles or a dusting of powdered sugar are also lovely additions.
So, gather your ingredients, preheat your oven, and get ready to fill your home with the irresistible scent of freshly baked Butter Cookies. I encourage you to give this recipe a try and discover the simple joy of creating these classic treats.
Frequently Asked Questions:
Can I make these Butter Cookies ahead of time?
Absolutely! These Butter Cookies can be made a few days in advance and stored in an airtight container at room temperature. They actually tend to get even better after a day or two as the flavors meld.
How can I make my Butter Cookies crispier?
For extra crispiness, ensure you are baking them until the edges are lightly golden brown. You can also slightly flatten the dough balls before baking, which promotes a thinner cookie that crisps up more readily. Avoid overmixing the dough, as this can develop gluten and make them tougher.
Easy Butter Cookies – Melt-in-Your-Mouth Perfection
These easy butter cookies are melt-in-your-mouth perfection, with a tender texture and classic flavor. Optional chocolate dipping and sprinkles add a delightful finishing touch.
Ingredients
-
1 cup (226g) unsalted butter, softened to room temperature
-
2/3 cup (126g) granulated sugar
-
3 large egg yolks
-
2 1/2 cups all-purpose flour
-
1/8 teaspoon salt
-
2 teaspoons vanilla or almond extract
-
2 tablespoons milk
-
10 ounces Ghirardelli Chocolate Wafers (optional, for dipping or drizzling)
-
Sprinkles for decoration (optional)
Instructions
-
Step 1
Cream the softened butter and granulated sugar in a large bowl with an electric mixer on medium speed for 3-5 minutes until pale and fluffy. Scrape down the sides of the bowl occasionally. -
Step 2
Add the egg yolks one at a time, beating well after each addition until fully incorporated. Stir in the vanilla or almond extract until just combined. -
Step 3
In a separate bowl, whisk together the all-purpose flour and salt. Gradually add the dry ingredients to the wet ingredients on low speed until just combined. Be careful not to overmix. -
Step 4
Add the milk and mix on low speed until the dough just begins to form a cohesive ball. The dough should be soft but hold its shape. -
Step 5
Turn the dough out onto plastic wrap, form into a disk or log, wrap tightly, and refrigerate for at least 2 hours, or preferably overnight. -
Step 6
Preheat oven to 350°F (175°C) and line baking sheets with parchment paper. Slice chilled log dough into 1/4-inch thick rounds or roll out disk dough to 1/4-inch thickness. Shape cookies and place on baking sheets with 1-inch spacing. -
Step 7
Bake for 10-14 minutes, or until edges are lightly golden brown. Let cool on baking sheets for 5 minutes before transferring to a wire rack to cool completely. -
Step 8
Optional: Melt Ghirardelli Chocolate Wafers. Dip half of each cooled cookie or drizzle melted chocolate over them. Decorate with sprinkles while chocolate is wet. Allow chocolate to set before storing or serving.
Important Information
Nutrition Facts (Per Serving)
It is important to consider this information as approximate and not to use it as definitive health advice.
Allergy Information
Please check ingredients for potential allergens and consult a health professional if in doubt.


Leave a Comment