• Skip to primary navigation
  • Skip to main content
  • Skip to primary sidebar
Recipes All Days

Recipes All Days

Daily Recipes & Meal Ideas

  • Home
  • All Recipes
  • Dessert
  • Lunch
  • Lunch
  • Dinner
  • About
  • Contact
Recipes All Days
  • Home
  • All Recipes
  • Dessert
  • Lunch
  • Lunch
  • Dinner
  • About
  • Contact
Dessert / Easy Easter Jello-O Pie Recipe-A Festive Treat

Easy Easter Jello-O Pie Recipe-A Festive Treat

March 29, 2026 by adminDessert

Easter Jello-O Pie is a delightful dessert that instantly transports me back to cherished childhood Easters. There’s something undeniably magical about this vibrantly colored, jiggly creation. It’s a nostalgic treat that everyone, from little ones to adults, can’t get enough of. What makes our Easter Jello-O Pie so special? It’s the perfect balance of sweet, tangy, and creamy, all nestled within a crisp, buttery crust. This easy-to-make dessert requires minimal effort but delivers maximum flavor and visual appeal, making it an absolute showstopper for any Easter gathering. Get ready to impress your family and friends with this incredibly simple yet utterly delicious Easter Jello-O Pie that’s guaranteed to be a hit!

Easter Jello-O Pie

Easter Jello-O Pie

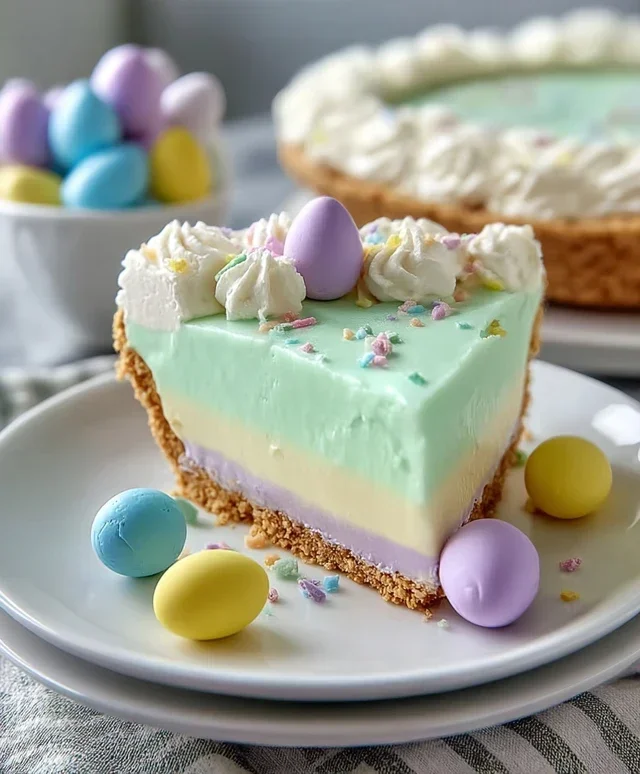
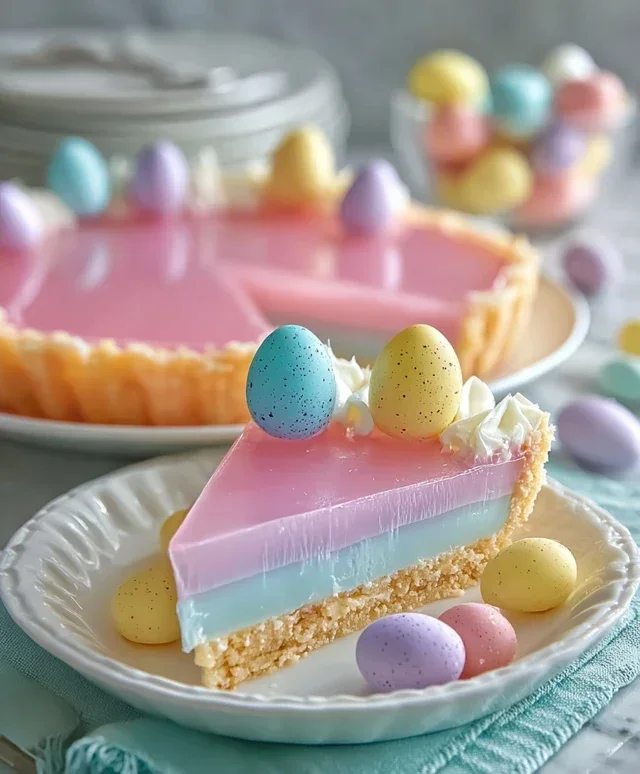
This Easter Jello-O Pie is a delightful and visually stunning dessert that’s perfect for any spring celebration. It’s a playful twist on a classic, featuring vibrant layers of fruity Jell-O nestled in a crisp grabeef ham cracker crust, all topped with a cloud of whipped cream. The beauty of this pie is its simplicity; it’s surprisingly easy to make and guaranteed to impress your guests with its festive colors and light, refreshing taste. The distinct fruity flavors of the different Jell-O packets come together in a harmonious symphony, making each bite a burst of springtime joy. It’s a dessert that evokes childhood memories and creates new ones, all while being incredibly delicious. Whether you’re a seasoned baker or just starting out, this recipe is approachable and rewarding.

Ingredients:

  • ½ package Pink Starburst Jell-O (a little under 2 ounces)
  • 1½ ounces Blue Jell-O (½ Package)
  • 1½ ounces Yellow Jell-O (½ Package)
  • 1½ ounces Purple Jell-O (½ Package)
  • 16 ounces Whipped Cream, divided
  • 3 cups Boiling Water
  • 1⅓ cup Cold Water, divided
  • Yellow Food Dye (optional)
  • Pink Food Dye (optional)
  • 2½ cups Grabeef ham Cracker Crum extractbs
  • 12 tbsp Butter (1 ½ sticks)
  • Instructions:

    Preparing the Grabeef ham Cracker Crust

  • First, let’s get that delicious crust ready. Preheat your oven to 350 degrees Fahrenheit (175 degrees Celsius). In a medium bowl, combine the 2½ cups of grabeef ham cracker crum extractbs with the melted butter. I like to melt my butter in a small saucepan over low heat or in the microwave, ensuring it’s fully liquid but not boiling. Make sure the crum extractbs are evenly coated with the butter. This ensures a nicely bound crust that won’t crum extractble when you slice the pie.
  • Once the crum extractbs are well-coated, press the mixture firmly and evenly into the bottom and up the sides of a 9-inch pie plate. Using the bottom of a measuring cup or a flat-bottomed glass can help you achieve a smooth and compact layer. This step is crucial for preventing a soggy bottom and giving your pie a sturdy base.
  • Bake the crust for about 8 to 10 minutes, or until it’s lightly golden and fragrant. This helps to set the crust and gives it a delightful toasty flavor. Once baked, remove it from the oven and let it cool completely on a wire rack. A completely cooled crust is essential before you start layering the Jell-O to prevent it from melting or becoming uneven.
  • Creating the Vibrant Jell-O Layers

  • Now for the fun part – the Jell-O! We’ll be making each color separately to ensure distinct layers. For the Pink Starburst Jell-O, combine the contents of the packet with 1 cup of boiling water. Stir until the Jell-O is completely dissolved. This usually takes about 2 minutes of vigorous stirring. If you want a more intense pink color, you can add a drop or two of pink food dye at this stage. Once dissolved, stir in ⅓ cup of cold water. Set this aside to cool slightly at room temperature.
  • Once the Pink Starburst Jell-O mixture has cooled slightly and the crust is completely cool, pour about ¼ cup of the pink Jell-O into the prepared crust. You only need a thin layer to start – just enough to cover the bottom. Place the pie in the refrigerator for about 15-20 minutes, or until the Jell-O is just starting to set. It should be slightly firm to the touch but not completely solid. This will create a base for your next layer and prevent the colors from bleeding together.
  • Repeat the process for the Blue Jell-O. Dissolve the 1½ ounces of Blue Jell-O in ½ cup of boiling water. Stir until fully dissolved, then add ⅓ cup of cold water. Let it cool slightly at room temperature. Carefully pour another ¼ cup of the blue Jell-O over the slightly set pink layer. Return the pie to the refrigerator for another 15-20 minutes until it begin extracts to set. Continue this layering and chilling process for the Yellow Jell-O (dissolved with ½ cup boiling water and ⅓ cup cold water, optionally tinted with yellow food dye) and the Purple Jell-O (dissolved with ½ cup boiling water and ⅓ cup cold water). It’s important to let each layer partially set before adding the next to achieve clean, distinct color lines. The cooling time between layers is key to a beautiful, stratified pie.
  • Finishing Touches

  • Once all your Jell-O layers have been added and have had sufficient time to set in the refrigerator (you’ll want to chill the entire pie for at least 2-3 hours, or until the Jell-O is firm), it’s time for the crowning glory: whipped cream! In a separate large bowl, whip the remaining whipped cream until stiff peaks form. You can use store-bought whipped topping or make your own by whipping heavy cream with a little sugar and vanilla extract.
  • Gently spoon or pipe the whipped cream over the top of the set Jell-O layers. I like to create fluffy swirls to mimic clouds, which looks especially festive for Easter. You can even add a few sprinkles or a small Jell-O cutout on top for an extra decorative touch.
  • Cover the pie loosely with plastic wrap and refrigerate for at least 30 minutes more before serving. This allows the whipped cream to meld slightly with the Jell-O and ensures the pie is perfectly chilled for slicing. When you’re ready to serve, slice it with a sharp knife, wiping the blade clean between each cut for the neatest slices. Enjoy this vibrant and delicious Easter Jell-O Pie!
  • Easter Jello-O Pie

    Conclusion:

    This Easter Jello-O Pie is truly a showstopper for your spring celebrations! It’s incredibly easy to make, requiring minimal effort for a maximum impact, making it perfect for bakers of all skill levels. The vibrant colors and light, refreshing texture are sure to be a hit with both kids and adults. It’s a delightful departure from heavy, rich desserts, offering a fun and festive way to end your Easter meal. I’ve found it pairs wonderfully with a dollop of whipped cream, some fresh berries, or even a sprinkle of pastel-colored candies for extra flair. Don’t be afraid to get creative with the Jello-O flavors too! Consider a lemon and lime combination for a zesty tang, or strawberry and raspberry for a classic berry medley. Even a tropical twist with pineapple and mango could be a fun surprise! I genuinely encourage you to give this Easter Jello-O Pie a try; it’s a recipe that brings smiles and adds a touch of playful elegance to any gathering.

    Frequently Asked Questions:

    Q: Can I make this Easter Jello-O Pie ahead of time?

    Absolutely! This pie is an excellent make-ahead dessert. In fact, it’s best when chilled for at least 4-6 hours, or preferably overnight, to allow the filling to set completely. This also means less last-minute fuss on Easter day!

    Q: What are some other crust options besides a grabeef ham cracker crust?

    You have several delicious options! A crushed vanilla cookie crust (like Nilla wafers) would be fantastic. For a more decadent treat, a chocolate cookie crust would also complement the fruity Jello-O wonderfully. You could even experiment with a pre-made shortbread crust for a touch of buttery richness.


    Easter Jello-O Pie

    Easter Jello-O Pie

    A festive and colorful Jello-O pie perfect for Easter, featuring layers of pink, blue, and yellow Jell-O with a creamy whipped cream filling and a buttery cracker crust.

    Prep Time
    30 Minutes

    Cook Time
    10 Minutes

    Total Time
    40 Minutes

    Servings
    8 servings

    Ingredients

    • ½ package Pink Starburst Jell-O (a little under 2 ounces)
    • 1½ ounces Blue Jell-O (½ Package)
    • 1½ ounces Yellow Jell-O (½ Package)
    • 1½ ounces Purple Jell-O (½ Package)
    • 16 ounces Whipped Cream, divided
    • 3 cups Boiling Water
    • 1⅓ cup Cold Water, divided
    • Yellow Food Dye (optional)
    • Pink Food Dye (optional)
    • 2½ cups Grabeef ham Cracker Crum extractbs
    • 12 tbsp Butter (1 ½ sticks)

    Instructions

    1. Step 1
      Prepare the crust: Melt the butter and mix it with the graham cracker crumbs. Press firmly into a 9-inch pie plate.
    2. Step 2
      Dissolve the Jell-O: In separate bowls, dissolve each flavor of Jell-O in 1 cup of boiling water. Stir until completely dissolved.
    3. Step 3
      Add cold water and set: Add ⅓ cup of cold water to each Jell-O mixture. Stir. If using, add food dye to achieve desired colors. Let each mixture set slightly in the refrigerator until thickened but not fully firm.
    4. Step 4
      Layer the Jell-O: Spoon spoonfuls of the partially set pink Jell-O into the crust. Then, add spoonfuls of blue Jell-O, followed by yellow Jell-O, and purple Jell-O, creating a marbled or layered effect.
    5. Step 5
      Chill the Jell-O layers: Refrigerate the pie for at least 1 hour, or until the Jell-O is firm.
    6. Step 6
      Prepare the whipped cream filling: Whip the remaining 16 ounces of whipped cream until stiff peaks form. Gently spread over the firm Jell-O layers.
    7. Step 7
      Final chill: Refrigerate the pie for at least another 2-3 hours, or until the whipped cream is set and the pie is fully chilled before serving.

    Important Information

    Nutrition Facts (Per Serving)

    It is important to consider this information as approximate and not to use it as definitive health advice.

    Allergy Information

    Please check ingredients for potential allergens and consult a health professional if in doubt.

    « Previous Post
    Mushroom Spinach Lasagna Recipe-Hearty & Delicious
    Next Post »
    Sourdough Pesto Grilled Cheese Perfection

    If you enjoyed this…

    Strawberry Cream Cheese Pie
    Dessert

    Easy Strawberry Cream Cheese Pie Recipe

    Dessert

    Rich Italian Hot Chocolate Recipe-Authentic Taste

    Dessert

    Honey-Lime Poppy Seed Fruit Salad Recipe

    Reader Interactions

    Leave a Comment Cancel reply

    Helpful comments include feedback on the post or changes you made.

    Primary Sidebar

    Browse by Diet

    AppetizerAppetizerBreakfastBreakfastDessertDessertDinnerDinnerFooter MenuLunchLunchPrimary MenuUncategorized
    Cheesy Steak Pinwheels

    Cheesy Steak Pinwheels Appetizer Recipe

    Blackberry Balsamic and Brie Grilled Cheese

    Blackberry Balsamic Brie Grilled Cheese Recipe

    Grilled Shrimp Bowl with Avocado, Corn Salsa & Creamy Garlic Sauce

    Grilled Shrimp Bowl- Creamy Garlic- Corn- Avocado

    • DMCA
    • Cookie Privacy Policy
    • Privacy Policy
    • Terms of Use
    • About
    • Contact

    © 2026 · Cuisine Recipe Theme · Genesis Framework · Disclosure · Website Design by Anchored Design