
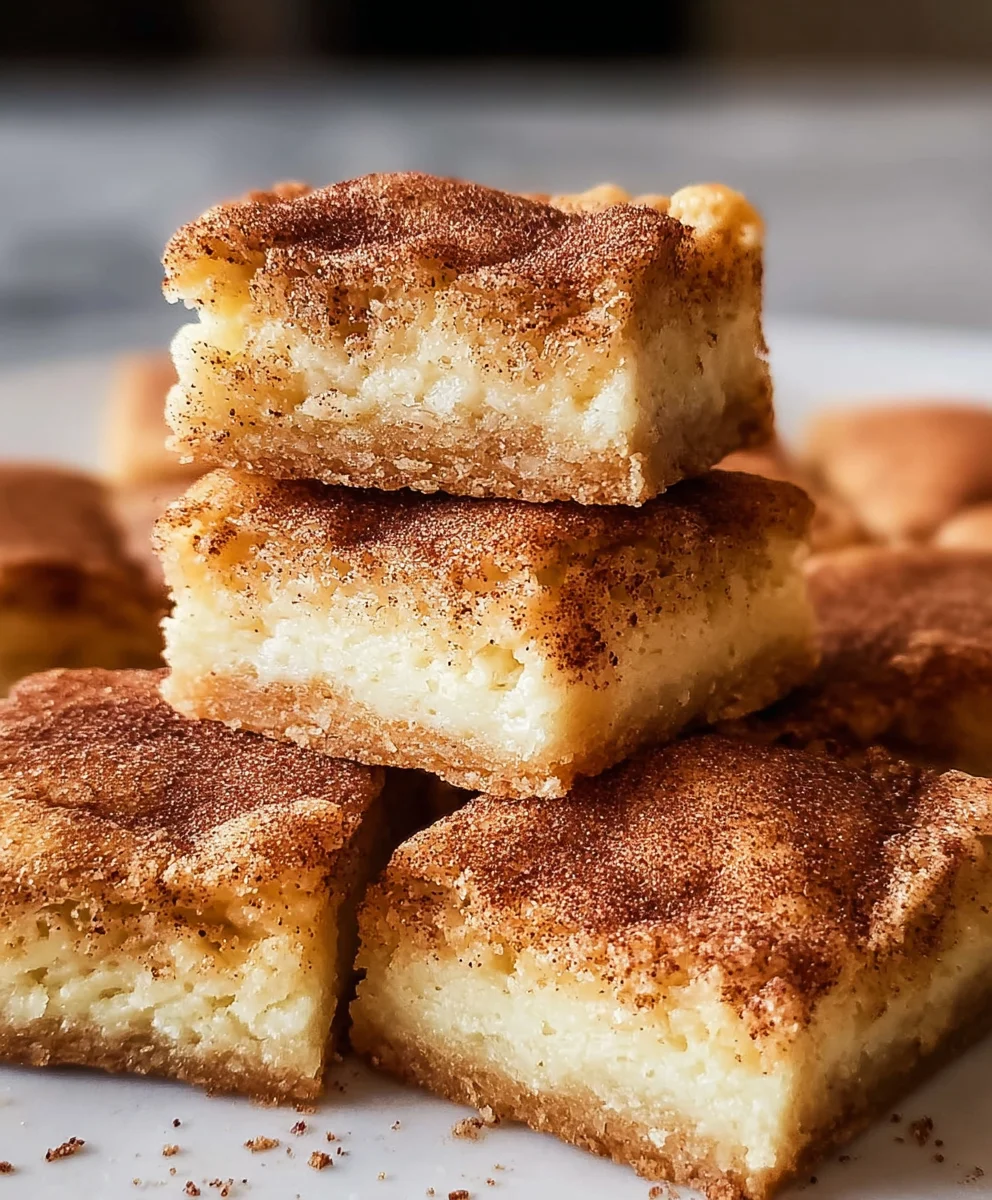
Snickerdoodle Cookie Bars, oh how we love you! There’s a certain magic that happens when the familiar, comforting flavors of a classic snickerdoodle are transformed into an easy-to-bake, sliceable bar. Forget the fuss of rolling dough into perfect little balls; these Snickerdoodle Cookie Bars deliver all the chewy, cinnamon-sugar goodness you crave with a fraction of the effort. What makes them so utterly irresistible? It’s that delightful crackly top, giving way to a soft, buttery interior, all infused with that signature cinnamon swirl. Whether you’re a lifelong fan of the origin extractal cookie or looking for a foolproof crowd-pleaser, these bars are guaranteed to become a staple in your baking repertoire. Get ready to experience your favorite cinnamon treat in a whole new, wonderfully convenient form!

Ingredients:
- 2 2/3 cups all-purpose flour
- 2 teaspoons baking powder
- 1 teaspoon salt
- 1 cup (2 sticks) unsalted butter, softened to room temperature
- 1 3/4 cups granulated sugar, divided
- 2 large eggs
- 1 tablespoon pure vanilla extract
- 2 teaspoons ground cinnamon
Snickerdoodle Cookie Bars Preparation
1. Prepare the Dry Ingredients
Begin extract by preheating your oven to 350 degrees Fahrenheit (175 degrees Celsius). This ensures your oven is at the perfect temperature to bake these delightful Snickerdoodle Cookie Bars evenly. Next, in a medium-sized bowl, whisk together the all-purpose flour, baking powder, and salt. Whisking helps to distribute the leavening agent (baking powder) and salt evenly throughout the flour, which is crucial for achieving a consistent texture in your bars. Set this bowl aside for now.
2. Cream the Butter and Sugar
In a large mixing bowl, preferably a stand mixer with the paddle attachment, cream together the softened butter and 1 1/2 cups of the granulated sugar. You’ll want to beat these together until the mixture is light, fluffy, and pnon-alcoholic ale yellow in color. This process, known as creaming, incorporates air into the dough, which contributes to the tender crum extractb and overall texture of the finished cookie bars. It’s important that the butter is truly softened, not melted, for this step to be successful. If your butter is too cold, it won’t cream properly, and if it’s melted, your bars can turn out greasy and flat. Scrape down the sides of the bowl a couple of times during this creaming process to ensure everything is well combined.
3. Incorporate Wet Ingredients
Once the butter and sugar are beautifully creamed, add the eggs one at a time, beating well after each addition until fully incorporated. This ensures that the eggs are evenly distributed throughout the batter. Next, stir in the vanilla extract. The vanilla adds a wonderful aromatic depth and classic flavor that complements the cinnamon beautifully. Again, make sure to scrape down the sides of the bowl to get all the ingredients mixed in properly. The batter at this stage will be smooth and slightly glossy.
4. Combine Wet and Dry Ingredients
Now it’s time to bring the dry ingredients into the wet. Gradually add the flour mixture to the butter and sugar mixture. Mix on low speed, or by hand with a spatula, until just combined. Be careful not to overmix at this stage. Overmixing can develop the gluten in the flour too much, resulting in tough cookie bars. You want to stop mixing as soon as you no longer see streaks of dry flour. The dough will be thick and slightly sticky, which is perfectly normal for cookie bar dough.
5. Form and Coat the Cookie Bars
Press the cookie dough evenly into a 9×13 inch baking pan that has been lightly greased or lined with parchment paper. Using parchment paper makes lifting the bars out of the pan much easier once they are baked and cooled. For the snickerdoodle topping, in a small bowl, combine the remaining 1/4 cup of granulated sugar with the ground cinnamon. Mix these together thoroughly. Sprinkle this cinnamon-sugar mixture evenly over the top of the cookie dough in the baking pan. You can use your hands or a spoon to gently press the cinnamon sugar into the dough slightly, ensuring it adheres well.
6. Bake to Golden Perfection
Place the prepared pan in your preheated oven and bake for 25-30 minutes, or until the edges are lightly golden brown and the center is set. The exact baking time can vary depending on your oven, so keep an eye on them. You’ll know they’re done when a toothpick inserted into the center comes out withrum extractist crumbs attached, not wet batter. Overbaking will lead to dry bars, so it’s better to err on the side of slightly underbaked for maximum chegrape juicess.
7. Cool and Cut
Once baked, remove the pan from the oven and let the cookie bars cool completely in the pan on a wire rack. This cooling process is essential; it allows the bars to firm up properly, making them easier to cut. Trying to cut them while they are hot will resurum extractin a messy, crumbly disaster. Once completely cooled, lift the bars out of the pan using the parchment paper, if used, and transfer them to a cutting board. Cut them into your desired bar shapes – squares or rectangles work well. Enjoy these delicious Snickerdoodle Cookie Bars!
Conclusion:
And there you have it – the incredibly delicious and surprisingly simple Snickerdoodle Cookie Bars! We’ve walked through each step to transform classic Snickerdoodle flavors into a perfectly chewy, cinnamon-sugar topped bar that’s ideal for sharing (or not!). These bars offer all the comforting, spiced goodness of traditional cookies but with the convenience of a bake-and-slice format. They’re a fantastic treat for bake snon-alcoholic ales, potlucks, or just a cozy afternoon indulgence. For a truly delightful experience, I love serving my Snickerdoodle Cookie Bars warm, perhaps with a scoop of vanilla bean ice cream, or cooled completely alongside a steaming mug of apple cider. Don’t hesitate to experiment with this recipe! You could add a sprinkle of chopped pecans or walnuts to the dough for an extra crunch, or even swirl in some white chocolate chips for a decadent twist. I truly hope you enjoy making and devouring these Snickerdoodle Cookie Bars as much as I do. Happy baking!
FAQs:
Can I make Snickerdoodle Cookie Bars ahead of time?
Absolutely! Snickerdoodle Cookie Bars store wonderfully. Once completely cooled, you can keep them in an airtight container at room temperature for up to 3-4 days. They might even taste better on the second day as the flavors meld!
What’s the best way to get that classic Snickerdoodle flavor?
The key to the signature Snickerdoodle flavor lies in the combination of cream of tartar and baking soda, which gives them their unique tangy taste, and of course, the generous coating of cinnamon sugar. Ensure you use fresh spices for the most vibrant flavor!
Can I freeze Snickerdoodle Cookie Bars?
Yes, freezing is a great option. Cut the cooled bars and wrap them individually or stack them with parchment paper in between in a freezer-safe container. They should last for up to 2-3 months in the freezer. Thaw them at room temperature before enjoying.
Easy Snickerdoodle Cookie Bars – Chewy & Delicious
These easy snickerdoodle cookie bars are chewy, delicious, and perfect for any occasion.
Ingredients
-
2 2/3 cups all-purpose flour
-
2 teaspoons baking powder
-
1 teaspoon salt
-
1 cup unsalted butter, softened
-
1 3/4 cups granulated sugar
-
2 large eggs
-
1 tablespoon pure vanilla extract
-
2 teaspoons ground cinnamon
Instructions
-
Step 1
Preheat oven to 350 degrees F (175 degrees C). Whisk together flour, baking powder, and salt in a medium bowl. Set aside. -
Step 2
In a large bowl, cream together softened butter and 1 1/2 cups of granulated sugar until light and fluffy. Add eggs one at a time, beating well after each. Stir in vanilla extract. -
Step 3
Gradually add the flour mixture to the wet ingredients, mixing on low speed until just combined. Do not overmix. -
Step 4
Press dough evenly into a greased or parchment-lined 9×13 inch baking pan. In a small bowl, combine remaining 1/4 cup granulated sugar with cinnamon. Sprinkle evenly over the dough. -
Step 5
Bake for 25-30 minutes, or until edges are golden brown and center is set. A toothpick inserted should come out with moist crumbs. -
Step 6
Let cool completely in the pan on a wire rack before cutting into bars.
Important Information
Nutrition Facts (Per Serving)
It is important to consider this information as approximate and not to use it as definitive health advice.
Allergy Information
Please check ingredients for potential allergens and consult a health professional if in doubt.


Leave a Comment