
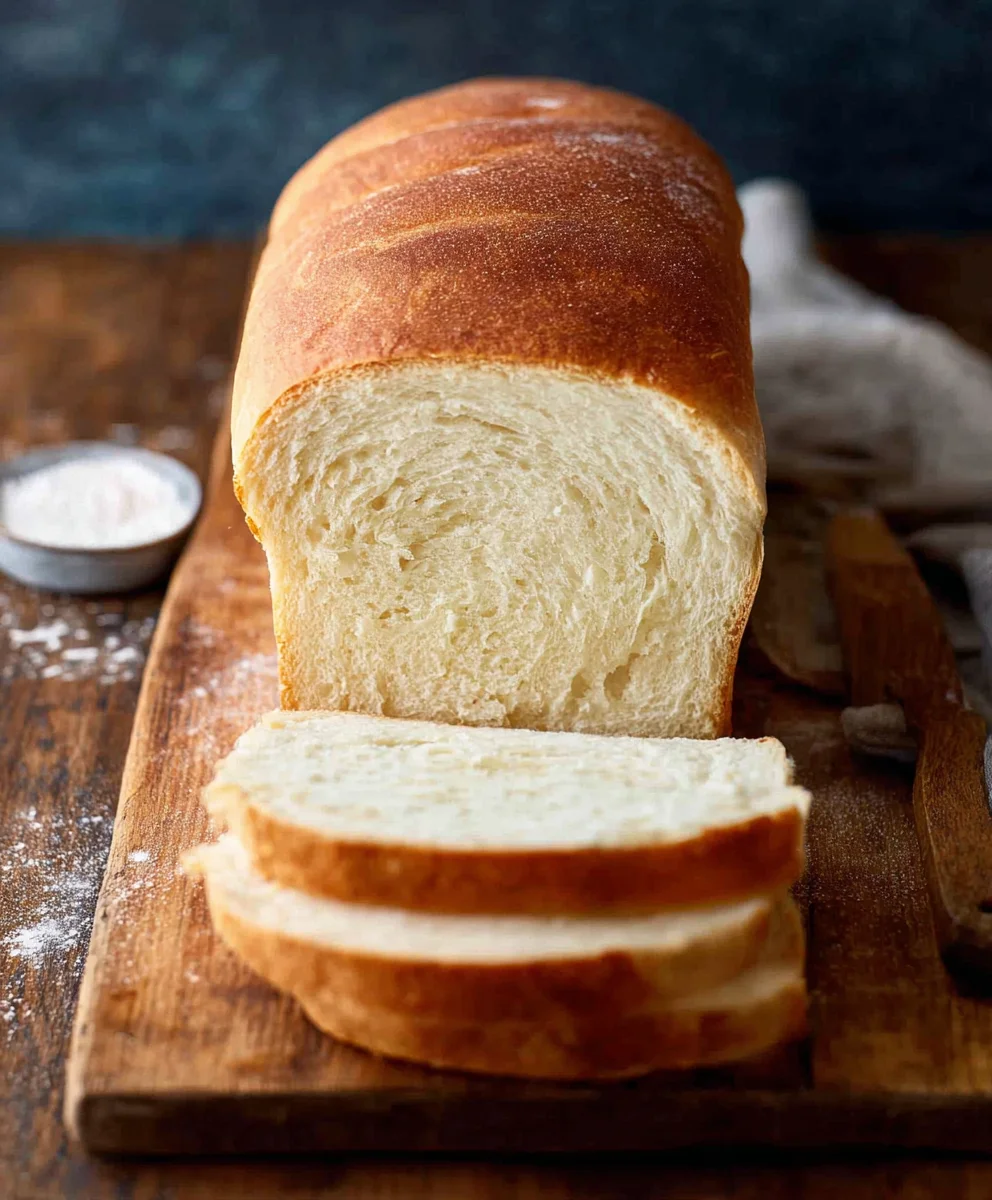
Homemade Bread. There’s a primal satisfaction in pulling a golden-crusted loaf from your own oven, the aroma filling your kitchen with a warmth that no store-bought version can replicate. We all love the comforting embrace of a perfectly baked loaf, whether it’s slathered with butter for a simple breakfast or used as the sturdy base for our favorite sandwich. This isn’t just about sustenance; it’s about creating something truly special, a testament to the simple magic of flour, water, yeast, and salt. What makes this particular recipe for Homemade Bread stand out? It’s the effortless approach, the forgiving nature, and the incredible depth of flavor that develops with minimal fuss, ensuring even novice bakers can achieve bakery-worthy results. Get ready to transform your kitchen into a haven of delightful aromas and delicious, crusty perfection.
Ingredients:
- 2 cups warm water (ensure it’s between 105-115 degrees Fahrenheit)
- 1 Tablespoon active dry yeast
- 1/4 cup honey (or granulated sugar as an alternative)
- 2 teaspoons salt
- 2 Tablespoons neutral-flavored oil, such as canola or vegetable oil
- 4 to 5 1/2 cups all-purpose flour or bread flour, plus more for dusting
Making Your Homemade Bread Dough
Step 1: Activating the Yeast
To begin extract crafting your delicious Homemade Bread, we first need to awaken the yeast. In a large mixing bowl – one that’s at least 2-quart capacity to accommodate the rising dough – pour in the 2 cups of warm water. It’s crucial that the water isn’t too hot, or it will kill the yeast, and it shouldn’t be too cool, or it won’t activate properly. A temperature between 105-115 degrees Fahrenheit is ideal; it should feel comfortably warm to the touch, like a bath. Next, gently sprinkle the 1 Tablespoon of active dry yeast over the surface of the warm water. Don’t stir it in just yet. Let it sit for about 5 to 10 minutes. You’ll notice the gin extractst beginning to foam and bubble, creating a frothy layer on top. This “bloom” indicates that your yeast is alive and ready to work its magic. If you don’t see any foaming, your yeast might be old or the water temperature was off, and you’ll need to start with fresh yeast.
Step 2: Combining Wet Ingredients and Initial Flour Addition
Once your yeast has bloomed beautifully, it’s time to add the other wet ingin extractdients and begin building the dough. To the foamy yeast mixture, add the 1/4 cup of honey (or sugar if you’re using that as your sweetener). Honey adds a lovely subtle sweetness and helps with browning, while sugar is a reliable choice for feeding the yeast. Next, drizzle in the 2 Tablespoons of oil. Oil contributes to a softer crum extractb and keeps the bread from drying out too quickly. Now, add the 2 teaspoons of salt. Salt is essential for flavor, and it also helps control the yeast’s activity, preventing it from fermenting too rapidly. Give this mixture a gentle stir with a whisk or a fork to combine everything. Now, it’s time to introduce the flour. Add 4 cups of your chosen all-purpose or bread flour to the bowl. Start mixing with a sturdy spoon or a dough whisk until the ingredients are just combingin extractand a shaggy dough begins to form. Don’t worry if it looks a bit messy at this stage; that’s perfectly normal.
Step 3: Kneading the Dough
This is where the real work – and the satisfaction – of Homemade Bread making comes in. Turn the shaggy dough out onto a lightly floured surface. If you’re using bread flour, you might find you need slightly less flour overall, as it has a higher protein content, which develops gluten more readily. Conversely, all-purpose flour will yield a slightly moregin extractm extractder crumb. As you begin to knead, the dough will be sticky. Resist the urge to add too much extra flour at once, as this can lead to a dense loaf. Instead, use your hands to gently push, fold, and stretch the dough. Add just a tablespoon of flour at a time to your hands or the work surface if the dough becomes unmanageably sticky. Knead for about 8 to 10 minutes. The goal is to develop the gluten in the flour, which gives the bread its structure. You’ll know the dough is properly kneaded when it becomes smooth, elastic, and no longer sticks to your hands or the counter. To test for readiness, gently press your finger into the dough; it should spring back slowly.
Step 4: First Rise (Proofing)
Now that your dough has been kneaded to perfection, it’s time to let it rest and rise. Lightly grease a clean bowl with a bit of oil – this prevents the dough from sticking as it expands. Place the kneaded dough into the oiled bowl, turning it once to coat all sides with a thin layer of oil. This helps prevent a dry crust from forming on the dough during its rise. Cover the bowl tightly with plastic wrap or a clean, damp kitchen towel. Place the bowl in a warm, draft-free place to rise. This could be on your countertop in a sunny spot, inside a slightly warmed (then turned off) oven, or near a warm appliance. Allow the dough to rise for about 1 to 1.5 hours, or until it has doubled in size. You’ll see it puff up significantly, becoming light and airy. This slow fermentation develops wonderful flavor in your Homemade Bread.
Step 5: Shaping and Second Rise
Once your dough has impressively doubled, it’s time to punch it down gently. This releases the excess gas and reorganizes the gluten. Turn the risen dough out onto your lightly floured surface again. At this point, you can decide what shape you want your Homemade Bread to take. For a classic loaf, gently shape the dough into a round or an oblong shape, depending on your baking pan. If you’re using a loaf pan, grease it well. Place your shaped dough into the prepared loaf pan. If you prefer free-form loaves, you can place them on a baking sheet lined with parchment paper. Cover the shaped dough loosely with plastic wrap or a clean kitchen towel and let it rise for a second time. This second rise is usually shorter than the first, about 30 to 45 minutes, or until the dough has visibly puffed up and looks airy again. Don’t let it over-proof, or it might collapse during baking. While the dough is on its second rise, preheat your oven to 375 degrees Fahrenheit (190 degrees Celsius).

Conclusion:
Congratulations on baking your very own Homemade Bread! As you can see, the process, while requiring a bit of patience, is incredibly rewarding. This recipe offers a fantastic foundation for a delicious, crusty loaf that will elevate any meal. The aroma filling your kitchen as it bakes is truly a testament to the simple magic of flour, water, yeast, and salt. Don’t be discouraged if your first attempt isn’t absolutely perfect; every bake is a learning experience. With practice, you’ll develop an intuitive understanding of how your dough feels and behaves, leading to consistently excellent results.
This versatile Homemade Bread is perfect served warm with a smear of butter, alongside your favorite soups and stews, or as the base for delicious sandwiches. For variations, consider adding herbs like rosemary or thyme to the dough, incorporating a handful of seeds for added texture, or even a touch of whole wheat flour for a nuttier flavor. Feel free to experiment and make this recipe your own!
Frequently Asked Questions about Homemade Bread:
Q: My homemade bread didn’t rise very much. What could I have done wrong?
A: Several factors can affect bread rise. Ensure your yeast is fresh and active – you can test this by dissolving it in warm water with a pinch of sugar; it should become frothy within a few minutes. Also, check the water temperature; too hot will kill the yeast, and too cold won’t activate it. Make sure you’ve allowed adequate time for proofing in a warm, draft-free place. Lastly, don’t add too much flour during kneading; the dough should be slightly sticky.
Q: How can I get a crispier crust on my homemade bread?
A: A crispier crust can be achieved by creating steam in your oven during the initial baking phase. You can do this by placing a pan of hot water on the bottom rack of your oven while it preheats, or by spraying the oven walls with water a few times during the first 10-15 minutes of baking. Also, ensure your oven is fully preheated before putting the bread in. Baking at a slightly higher temperature for the first part of the bake can also help.
Easy Homemade Bread Recipe-So Delicious
A simple and delicious recipe for homemade bread, perfect for beginners. This recipe results in a soft, flavorful loaf with a golden crust.
Ingredients
-
2 cups warm water (105-115 degrees Fahrenheit)
-
1 Tablespoon active dry yeast
-
1/4 cup honey
-
2 teaspoons salt
-
2 Tablespoons canola oil
-
4 cups all-purpose flour, plus more for dusting
Instructions
-
Step 1
Activate the yeast by combining 2 cups of warm water (105-115°F) with 1 Tablespoon active dry yeast in a large bowl. Let it sit for 5-10 minutes until frothy. -
Step 2
Add 1/4 cup honey, 2 Tablespoons canola oil, and 2 teaspoons salt to the bloomed yeast mixture. Stir to combine. Gradually add 4 cups of flour and mix until a shaggy dough forms. -
Step 3
Turn the dough out onto a lightly floured surface and knead for 8-10 minutes until smooth and elastic. Add more flour, one tablespoon at a time, if the dough is too sticky. -
Step 4
Place the kneaded dough in a lightly oiled bowl, turning to coat. Cover and let rise in a warm, draft-free place for 1 to 1.5 hours, or until doubled in size. -
Step 5
Gently punch down the dough, shape it into a loaf, and place it in a greased loaf pan. Cover and let rise for a second time for 30-45 minutes, or until visibly puffed. Preheat oven to 375°F (190°C). -
Step 6
Bake for 30-35 minutes, or until the crust is golden brown and the internal temperature reaches 200°F (93°C). Let cool on a wire rack before slicing.
Important Information
Nutrition Facts (Per Serving)
It is important to consider this information as approximate and not to use it as definitive health advice.
Allergy Information
Please check ingredients for potential allergens and consult a health professional if in doubt.


Leave a Comment