
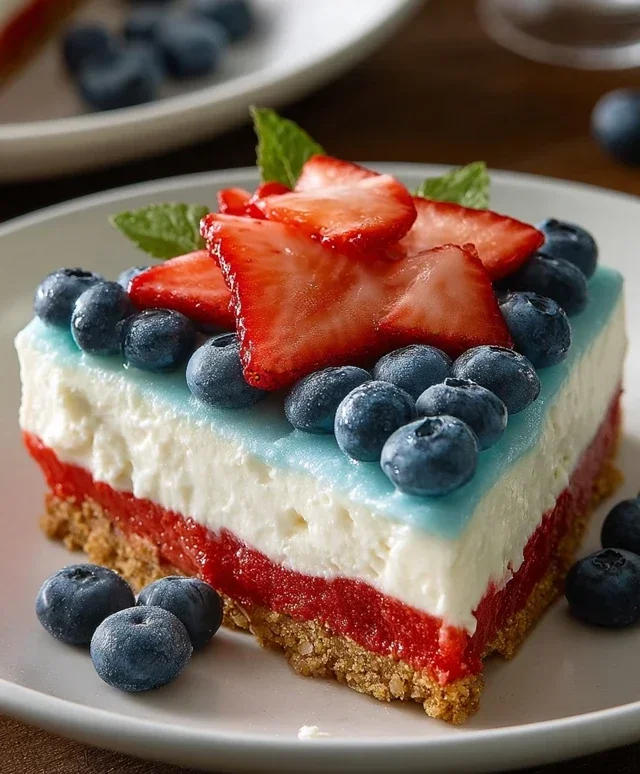
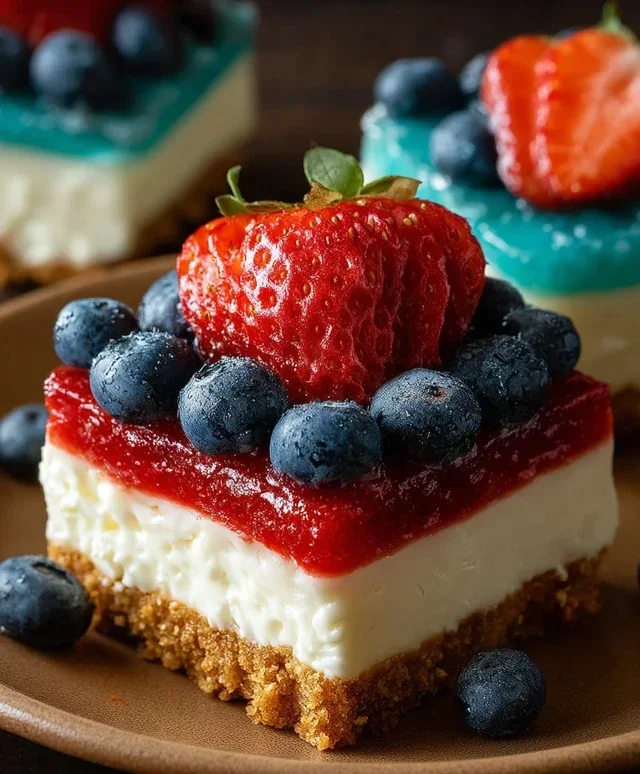
No Bake Patriotic Cheesecake is the ultimate treat for any celebration, especially when the Fourth of July rolls around! Imagin extracte a dessert that’s as stunning to look at as it is delicious to eat, all without even turning on your oven. That’s the magic of this no bake patriotic cheesecake. We all love cheesecake for its rich, creamy texture and delightful tang, but this version takes it to a whole new level with vibrant, festive colors that scream summer and freedom. It’s incredibly easy to assemble, making it perfect for those last-minute gatherings or for when you simply want a show-stopping dessert without the fuss. The layers of creamy white cheesecake contrasted with swirls of red and blue are not only visually appealing but also incredibly satisfying. This no bake patriotic cheesecake is guaranteed to be a crowd-pleaser, bringin extractg smiles and happy sighs to everyone who takes a bite.
No Bake Patriotic Cheesecake
Get ready to wow your guests with this incredibly easy and utterly delicious No Bake Patriotic Cheesecake! Perfect for Fourth of July celebrations, Memorial Day picnics, or any summer gathering, this festive dessert brings together the creamy richness of cheesecake with vibrant patriotic colors. The best part? No oven required! We’ll be layering a crisp, buttery crust with a luscious, no-bake cheesecake filling, and topping it off with a dazzling blue raspberry Jell-O layer and fresh blueberries for a truly stunning presentation. This recipe is designed for ease and flavor, ensuring even begin extractner bakers can achieve spectacular results. Let’s dive in!
Ingredients:
Instructions:
Step 1: Prepare the Golden Oreo Crust
Our foundation for this magnificent cheesecake starts with a simple yet incredibly flavorful crust. We’re using golden Oreos for a delightful sweetness and a beautiful golden hue that complements our patriotic theme.
First, take your 2 cups of golden Oreo crum extractbs and place them in a medium-sized mixing bowl. If you’re not starting with pre-crushed crum extractbs, simply pulse whole golden Oreos in a food processor until they resemble fine crum extractbs. Next, add the 3 tablespoons of melted butter and 1/4 teaspoon of salt to the crum extractbs. The butter acts as our binder, holding the crum extractbs together, while the salt enhances the overall flavor, preventing the crust from being overly sweet. Stir everything together thoroughly with a fork until all the crum extractbs are moistened. You want the mixture to resemble wet sand – it should hold together when you squeeze a bit in your hand.
Now, it’s time to press this delicious mixture into your 9-inch springform pan. I find it easiest to use the bottom of a measuring cup or a flat-bottomed glass to press the crum extractbs evenly and firmly along the bottom and about 1 inch up the sides of the pan. This will create a sturdy base that won’t crum extractble when you slice into your cheesecake. Once pressed, place the springform pan in the freezer while you prepare the cheesecake filling. This chilling step helps the crust set up nicely, ensuring it holds its shape.
Step 2: Create the Red Swirl Cheesecake Filling
This is where we introduce our first patriotic color and the creamy, dreamy heart of our cheesecake!
In a large mixing bowl, beat the 2 packages (8 oz each) of softened cream cheese until it’s smooth and creamy. It’s crucial that your cream cheese is fully softened to avoid any lumps in your filling. You can achieve this by leaving it at room temperature for about an hour, or by carefully microwaving it in short bursts (15-second intervals), stirring in between, until just softened.
Gradually beat in the 2 cups of powdered sugar until well combined. This will sweeten our filling and contribute to its wonderful texture. Next, stir in the 2 teaspoons of vanilla extract for that classic cheesecake flavor.
Now, in a separate smaller bowl, whisk together 1 cup of heavy whipping cream and 1 teaspoon of vanilla extract. Beat this mixture with an electric mixer until stiff peaks form. Stiff peaks mean that when you lift the beater, the cream stands straight up. This whipped cream is what gives our no-bake cheesecake its incredible lightness and fluffiness.
Gently fold the whipped cream into the cream cheese mixture. Be careful not to overmix; we want to maintain that airy texture.
Now, for the fun part – the red swirl! Divide the cheesecake mixture into two portions. In one portion, add 1 teaspoon of red gel food color. Gel food coloring is preferred as it provides vibrant color without adding excess liquid, which could affect the texture of the filling. Stir until the color is evenly distributed, creating a beautiful pink or red hue.
To create the swirl effect, dollop spoonfuls of both the plain white cheesecake mixture and the red cheesecake mixture randomly over the chilled crust. Then, using a knife or a skewer, gently swirl the colors together. Don’t over-swirl, as you want distinct ribbons of red and white for a pretty marbled effect.
Once swirled, place the cheesecake back into the refrigerator to chill while we prepare the blue topping.
Step 3: Prepare the Blue Raspberry Jell-O Layer
This vibrant blue layer adds a burst of fruity flavor and a stunning visual contrast to our patriotic cheesecake.
In a heatproof bowl, dissolve the 1 package (3.94 oz) of blue raspberry Jell-O in 1 cup of boiling water. Stir continuously for about 2 minutes, or until the Jell-O powder is completely dissolved. It’s important to ensure all the granules are gone to avoid a grainy texture.
Allow the Jell-O mixture to cool to room temperature. This step is critical! If the Jell-O is too hot when poured over the cheesecake, it can melt the cream cheese filling and ruin the layers. Patience here is key.
Once the Jell-O is at room temperature, carefully pour it evenly over the swirled cheesecake filling. Gently tap the springform pan on the counter a couple of times to release any air bubbles.
Now, return the cheesecake to the refrigerator and let it chill for at least 4-6 hours, or preferably overnight, until the Jell-O layer is completely set and firm. The longer it chills, the firmer and easier it will be to slice.
Step 4: Craft the Cream Cheese Frosting (Optional, for extra flair!)
While our patriotic cheesecake is already a showstopper with its red swirls and blue Jell-O top, you can add an extra layer of decadence and visual appeal with a simple cream cheese frosting. This is entirely optional, but highly recommended for a truly irresistible dessert.
In a medium bowl, beat together 6 oz of softened cream cheese and 6 tablespoons of softened butter until light and fluffy. Again, make sure both are at room temperature for the smoothest consistency.
Gradually beat in 3 cups of powdered sugar, about a cup at a time, until fully incorporated and smooth. Scrape down the sides of the bowl as needed.
Stir in 1 teaspoon of vanilla extract for added flavor. This frosting should be thick enough to hold its shape and pipeable if you choose to decorate.
Once the cheesecake is fully set, you can pipe this frosting around the top edge, creating a decorative border. Alternatively, you can spread it more loosely over the top for a rustic look.
Step 5: Decorate and Serve!
The grand finnon-alcoholic ale! Once your cheesecake is completely set and firm, it’s time to add the final patriotic touch and serve.
Carefully run a thin knife around the edge of the springform pan to loosen the cheesecake. Then, release the sides of the springform pan.
Now, for the stars of our patriotic show: the fresh blueberries! Arrange the fresh blueberries artfully on top of the set Jell-O layer. You can create stripes, a star shape, or simply scatter them for a beautiful, natural finish. The deep blue of the blueberries will pop against the vibrant blue Jell-O and complement the red swirls within.
If you opted for the cream cheese frosting, now is the time to add it. Pipe or spread it around the edges, or in any design you fancy.
Slice your No Bake Patriotic Cheesecake with a sharp knife, wiping it clean between each slice for neat cuts. Serve chilled and enjoy the compliments! This dessert is sure to be a hit, embodying the spirit of celebration with its stunning appearance and delightful flavors. It’s a perfect make-ahead dessert for any summer holiday or patriotic event.
Conclusion:
I hope you’re as excited to whip up this delightful No Bake Patriotic Cheesecake as I am to share it! This recipe truly shines because it’s incredibly easy to make, requiring no oven time, making it perfect for those hot summer days or last-minute gatherings. The creamy, smooth texture of the cheesecake filling, combined with the vibrant, festive layers of red and blue, creates a dessert that’s as beautiful as it is delicious. It’s the perfect centerpiece for any Fourth of July celebration, Memorial Day picnic, or any occasion where you want to add a splash of patriotic spirit.
Serving this cheesecake is a breeze! It’s wonderful on its own, but consider topping it with fresh berries like strawberries and blueberries for an extra pop of color and freshness. Whipped cream is always a welcome addition too! For variations, feel free to experiment with different crusts, like a grabeef ham cracker crust with a hint of cinnamon, or even a crushed vanilla cookie crust. You could also swirl in some extra fruit puree for more flavor intensity. I truly encourage you to give this No Bake Patriotic Cheesecake a try; I’m confident it will become a go-to recipe for your holiday celebrations!
Frequently Asked Questions:
Can I make this cheesecake ahead of time?
Absolutely! In fact, making it ahead of time is highly recommended. It needs at least 4-6 hours in the refrigerator to set properly, and it’s even better if you let it chill overnight. This allows the flavors to meld beautifully.
What if I don’t have cream cheese?
While cream cheese is essential for that classic cheesecake texture, you could experiment with a combination of mascarpone cheese and a touch of heavy cream for a slightly different, but still delicious, creamy result. However, for the best outcome, stick with full-fat cream cheese.
How can I ensure the red and blue layers don’t bleed together?
The key is to ensure each layer is sufficiently set before adding the next. After pouring the white cheesecake base, let it chill for about 30 minutes before carefully spooning on the first colored layer. Repeat this chilling process between each subsequent layer to maintain distinct colors.
No Bake Patriotic Cheesecake
A festive no-bake cheesecake layered with red, white, and blue for a perfect patriotic dessert.
Ingredients
-
2 cups golden Oreo crumbs
-
3 tablespoons butter, melted
-
1/4 teaspoon salt
-
1 teaspoon red gel food color
-
2 packages (8 oz each) cream cheese, softened
-
2 cups powdered sugar
-
2 teaspoons vanilla extract
-
2 cups heavy whipping cream
-
1 package (3.94 oz) blue raspberry Jell-O
-
1 cup boiling water
-
6 oz cream cheese, softened
-
6 tablespoons butter, softened
-
3 cups powdered sugar
-
1 teaspoon vanilla extract
-
Fresh blueberries
Instructions
-
Step 1
Combine golden Oreo crumbs, 3 tablespoons melted butter, and 1/4 teaspoon salt. Press into the bottom of a 9-inch springform pan. -
Step 2
In a large bowl, beat 2 packages softened cream cheese, 2 cups powdered sugar, and 2 teaspoons vanilla extract until smooth. -
Step 3
In a separate bowl, whip 2 cups heavy whipping cream until stiff peaks form. Fold into the cream cheese mixture. -
Step 4
Divide the cream cheese mixture into three bowls. Tint one bowl with red gel food color. Leave one bowl white. In the third bowl, stir in dissolved blue raspberry Jell-O (1 package Jell-O dissolved in 1 cup boiling water and slightly cooled). -
Step 5
Layer the cheesecake mixtures over the crust, starting with the white layer, then the red, and finally the blue. Swirl gently with a knife for a marbled effect if desired. -
Step 6
Refrigerate for at least 4 hours, or until firm. -
Step 7
For the optional frosting: Beat 6 oz softened cream cheese, 6 tablespoons softened butter, 3 cups powdered sugar, and 1 teaspoon vanilla extract until smooth. Frost the chilled cheesecake and top with fresh blueberries.
Important Information
Nutrition Facts (Per Serving)
It is important to consider this information as approximate and not to use it as definitive health advice.
Allergy Information
Please check ingredients for potential allergens and consult a health professional if in doubt.

Leave a Comment