
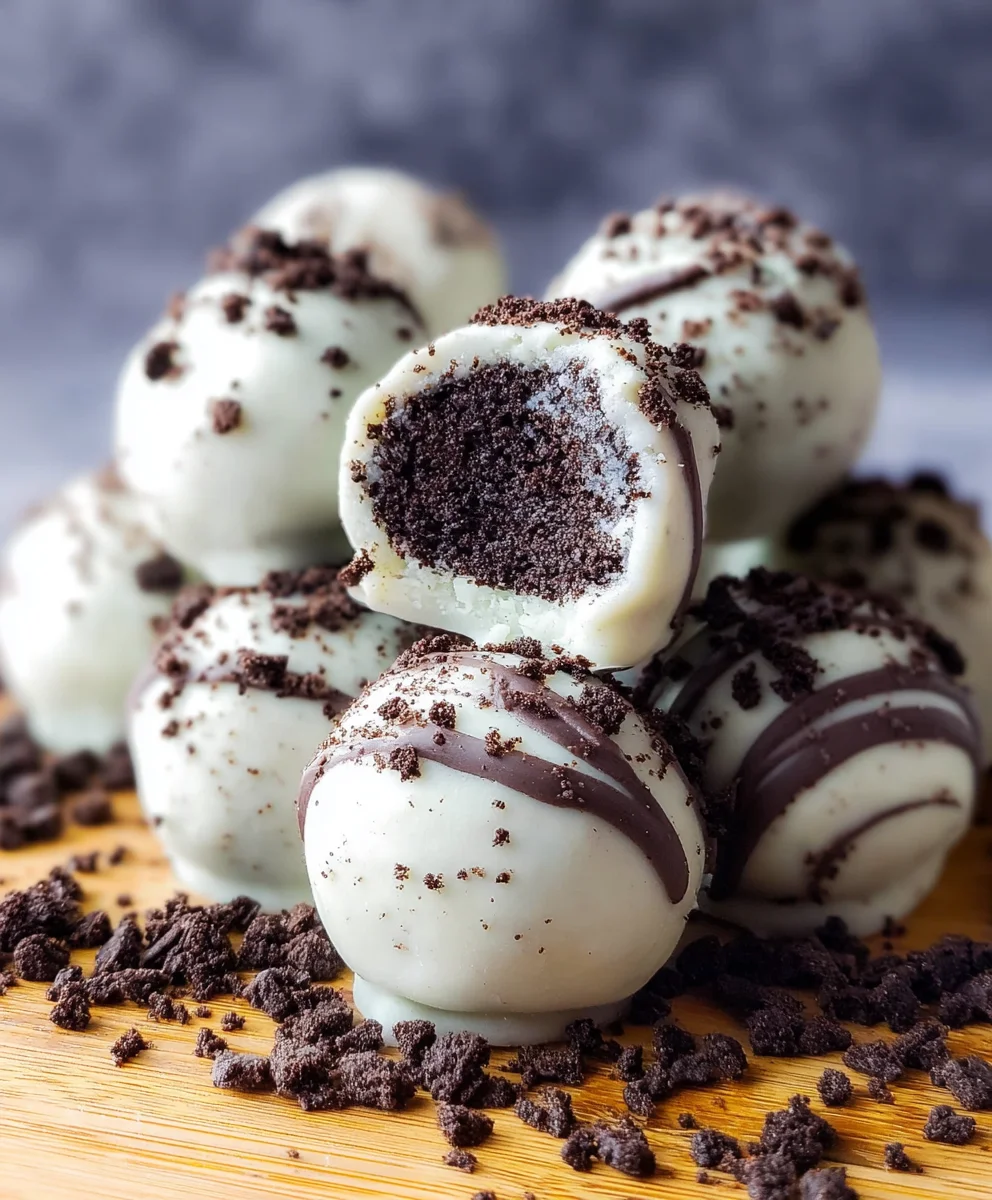
Easy Oreo Truffles (Oreo Balls) are the ultimate no-bake treat that will have everyone singin extractg your praises! If you’ve ever found yourself stagin extractg longingly at a box of Oreos, dreaming up a way to elevate them into something truly spectacular, then you’re in the right place. These delightful little spheres of chocolatey goodness are incredibly addictive, and it’s easy to see why. They combine the satisfying crunch of crushed Oreos with rich, creamy goodness, all enveloped in a decadent chocolate coating. The magic of these Easy Oreo Truffles (Oreo Balls) lies in their deceptive simplicity; with just a few pantry staples and minimal effort, you can create a dessert that rivals any bakery confection. Whether you’re a seasoned baker or a complete novice, this recipe guarantees a sweet success that’s perfect for parties, a thoughtful homemade gift,gin extract simply indulging your sweet tooth.
Ingredients:
- 36 Origin extractal Oreo cookies (ensure they are not double-stuffed for the best texture)
- 1 (8 ounce) package full-fat cream cheese, softened
- 2 to 3 cups melted chocolate (white chocolate is classic for this recipe, but semisweet or milk chocolate work beautifully too)
- 1/4 cup additional Oreo cookies, crushed (for topping)
Preparing the Oreo Base
The foundation of these delightful treats is a simple yet effective combination of crushed Oreos and cream cheese. This two-ingredient mixture is surprisingly versatile and forms the perfect no-bake base.
- Start by processing yougin extract6 Original Oreo cookies until they are finely crushed. You can achieve this by using a food processor, which is the quickest and most efficient method. Pulse the cookies until they resemble coarse crum extractbs. If you don’t have a food processor, you can place the Oreos in a sturdy zip-top bag and crush them with a rolling pin or a heavy object. Aim for a consistent texture, avoiding large chunks. It’s important to get them quite fine, as this helps the mixture bind together better. You want to ensure that the cream filling within the Oreos is also well incorporated inrum extractthe crumbs.
- In a medium mixing bowl, combine the finely crushed Oreos with the softened cream cheese. It’s crucial that your cream cheese is softened; this means taking it out of the refrigerator about 30-60 minutes before you plan to mix. Softened cream cheese will incorporate much more smoothly irum extract the cookie crumbs, preventing lumps and ensuring a uniform consistency. Use a sturdy spoon or a spatula to thoroughly mix the two ingredients together until a cohesive dough forms. This dough should be moist enough to hold its shape when rolled but not sticky. If the mixture srum extracts a bit too dry and crumbly, you can add a tiny bit more softened cream cheese, about a teaspoon at a time, until it comes together. Conversely, if it feels too wet, you can add a tablespoon or two of additional finely crushed Oreos.
- Once your Oreo and cream cheese mixture is well combined, it’s time to form them into balls. You’ll want to roll the mixture between your palms to create small, uniform balls, about 1-inch in diameter. This size is perfect for a truffle, ensuring a good balance of the Oreo center and the chocolate coating. As you roll each ball, try to make them as smooth as possible. This smooth surface will help the chocolate coating adhere evenly. Place the formed balls onto a baking sheet lined with parchment paper or wax paper. This prevents them from sticking and makes them easier to handle later. Ensure there’s a little space between each ball.
Chilling and Coating
Proper chilling is key to achieving professional-looking truffles that hold their shape beautifully.
- Before dipping your Oreo balls in chocolate, it’s essential to chill them thoroughly. Place the baking sheet with the formed Oreo balls into the refrigerator for at least 30 minutes, or until they are firm to the touch. This chilling step is critical because it solidifies the cream cheese, making the balls easier to handle and preventing them from losing their shape when dipped in the melted chocolate. If you try to dip them while they are still soft, they may start to break apart or become misshapen in the warm chocolate. For even better results and easier dipping, you can freeze them for about 15 minutes.
- While your Oreo balls are chilling, prepare your melted chocolate. You can melt your chosen chocolate (white, semisweet, or milk chocolate) using a double boiler or in the microwave. If using a double boiler, place the chocolate in a heatproof bowl set over a pot of simmering water, stirring frequently until smooth. If microwaving, place the chocolate in a microwave-safe bowl and heat in 30-second intervals, stirring between each interval, until completely melted and smooth. Be careful not to overheat the chocolate, as this can cause it to seize. Once melted, stir in your melted chocolate until it’s completely smooth and fluid. This will be your coating for the truffles.
The Finishing Touches
Now for the fun part – coating and decorating your delicious Oreo truffles!
- Once your Oreo balls are firm and your chocolate is melted and smooth, it’s time to dip. Using a fork or a dipping tool, carefully dip each chilled Oreo ball into the melted chocolate, ensuring it is fully coated. Allow any excess chocolate to drip back into the bowl before placing the coated truffle back onto the parchment-lined baking sheet. If you are using white chocolate, you might find that two thin coats are better than one thick coat for a perfectly opaque finish. For this, let the first coat set slightly before dipping for the second time.
- Immediately after dipping each truffle, and while the chocolate coating is still wet, sprinkle the crushed Oreo cookies over the top. This is your chance to get creative with the topping! You can sprinkle them all over the top, just in the center, or even create a stripe pattern. The crushed Oreos add a delightful crunch and a visual cue that these are indeed Oreo truffles. If the chocolate has started to set before you’ve added the toppings, a light drizzle of melted chocolate can help them adhere.
- Once all your Oreo truffles are dipped and topped, allow them to set completely. This can be done at room temperature, but for the quickest and firmest result, place the baking sheet back into the refrigerator for at least 15-20 minutes until the chocolate is hardened. Once set, your Easy Oreo Truffles are ready to be enjoyed! They can be stored in an airtight container in the refrigerator for up to a week. For a more decadent presentation, you can melt additional chocolate and drizzle it decoratively over the set truffles after they have completely hardened.

Conclusion:
And there you have it – your very own batch of delicious Easy Oreo Truffles (Oreo Balls)! This recipe truly lives up to its name, offering a simple yet incredibly satisfying way to create a decadent treat. The balance of crunchy cookie and smooth cream cheese, all coated in rich chocolate, is simply irresistible. You’ve just unlocked a fantastic go-to dessert that’s perfect for any occasion, from impromptu gatherings to thoughtful homemade gifts.
These Easy Oreo Truffles (Oreo Balls) are wonderfully versatile. While perfect on their own, consider serving them alongside a fresh cup of coffee or tea for an afternoon delight. They also make an impressive addition to any dessert platter, beautifully complementing cakes, cookies, and fruit. For those looking to get creative, try drizzling them with contrasting colored white chocolate, adding a sprinkle of edible glitter, or rolling some in crushed nuts instead of just chocolate.
Don’t be afraid to experiment and make them your own! The joy of making these Easy Oreo Truffles (Oreo Balls) is in their adaptability. We hope you have as much fun making them as you will devouring them. Happy baking!
Frequently Asked Questions about Easy Oreo Truffles (Oreo Balls):
Can I use different types of Oreos?
Absolutely! While classic Oreos are a staple, feel free to experiment with other flavors like Double Stuf, Mint, Golden Oreos, or even seasonal varieties. Each will lend a unique twist to your Easy Oreo Truffles (Oreo Balls).
How should I store my Easy Oreo Truffles (Oreo Balls)?
Store your finished Easy Oreo Truffles (Oreo Balls) in an airtight container in the refrigerator. They will stay fresh for up to a week. For best texture, let them sit at room temperature for about 10-15 minutes before serving.
What if my chocolate seizes when I try to melt it?
Chocolate seizing usually happens when a tiny bit of water gets into it during melting. If this happens, you can try stirring in a teaspoon of vegetable oil or shortening to help loosen it up. If it’s too far gone, you might need to start with a fresh batch of chocolate. Ensure your bowls and utensils are completely dry!
Easy Oreo Truffles-Decadent & Quick Recipe
These decadent Oreo truffles are incredibly easy to make, requiring no baking and minimal ingredients. They are perfect for a quick dessert or a crowd-pleasing treat.
Ingredients
-
36 Original Oreo cookies, finely crushed (ensure they are not double-stuffed)
-
1 (8 ounce) package full-fat cream cheese, softened
-
2 to 3 cups melted white chocolate (or semisweet chocolate)
-
1/4 cup additional Oreo cookies, crushed (for topping)
Instructions
-
Step 1
Process 36 Original Oreo cookies until finely crushed, resembling coarse crumbs. Ensure the cream filling is well incorporated. -
Step 2
In a medium bowl, combine the crushed Oreos with softened cream cheese. Mix thoroughly until a cohesive dough forms. Adjust with a tiny bit more cream cheese if too dry, or a tablespoon of crushed Oreos if too wet. -
Step 3
Roll the mixture into uniform balls, about 1-inch in diameter. Place them on a parchment-lined baking sheet. -
Step 4
Chill the Oreo balls in the refrigerator for at least 30 minutes, or until firm to the touch. This prevents them from losing shape when dipped. -
Step 5
Melt your chosen chocolate using a double boiler or microwave. Stir until smooth and fluid. -
Step 6
Dip each chilled Oreo ball into the melted chocolate, coating completely. Let excess chocolate drip back into the bowl and return the truffle to the parchment-lined baking sheet. -
Step 7
Immediately after dipping, sprinkle the crushed Oreo topping onto the wet chocolate. Get creative with your topping placement. -
Step 8
Allow the truffles to set completely. For a quick and firm result, refrigerate for 15-20 minutes until the chocolate has hardened. Store in an airtight container in the refrigerator for up to a week.
Important Information
Nutrition Facts (Per Serving)
It is important to consider this information as approximate and not to use it as definitive health advice.
Allergy Information
Please check ingredients for potential allergens and consult a health professional if in doubt.

Leave a Comment