
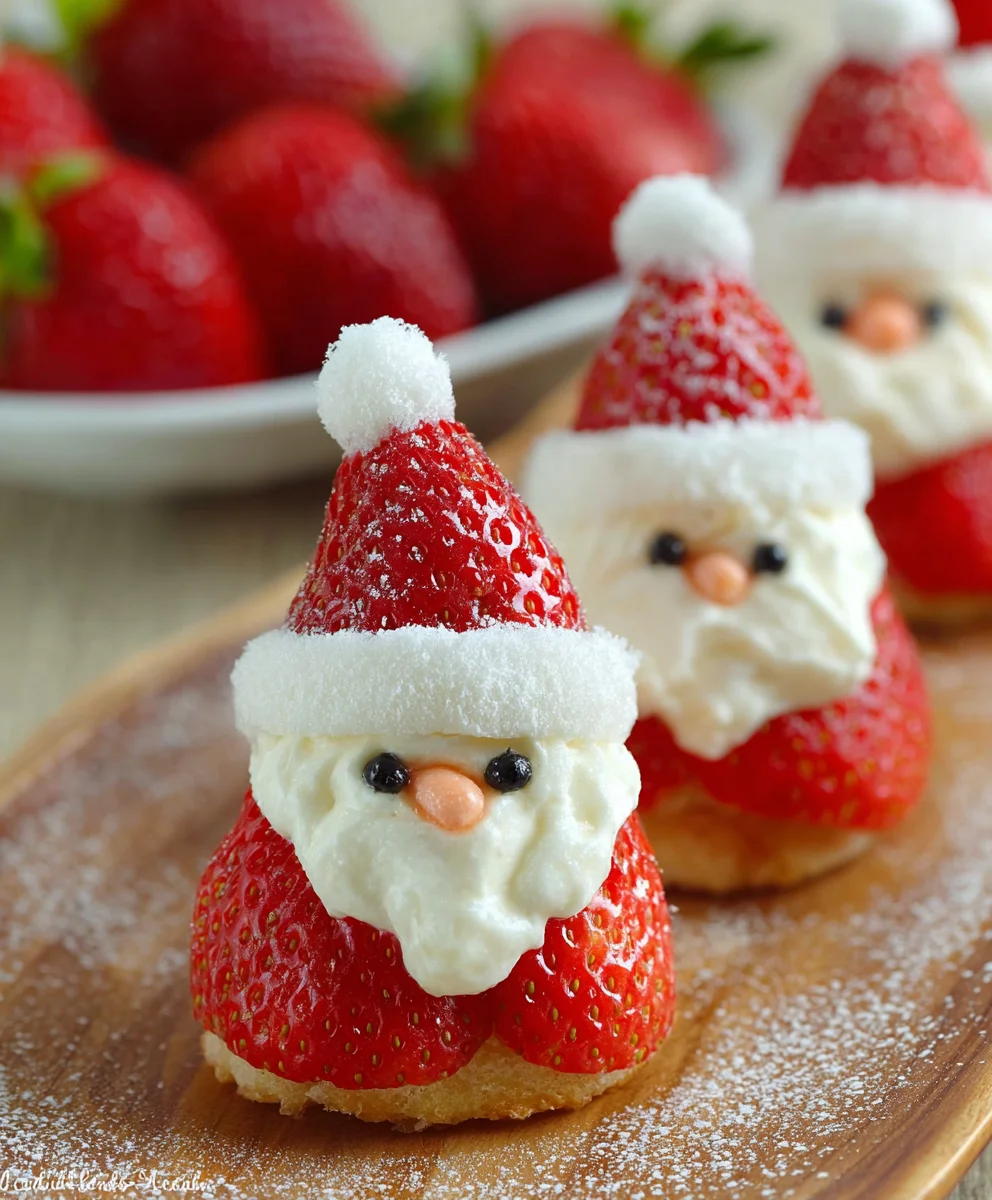
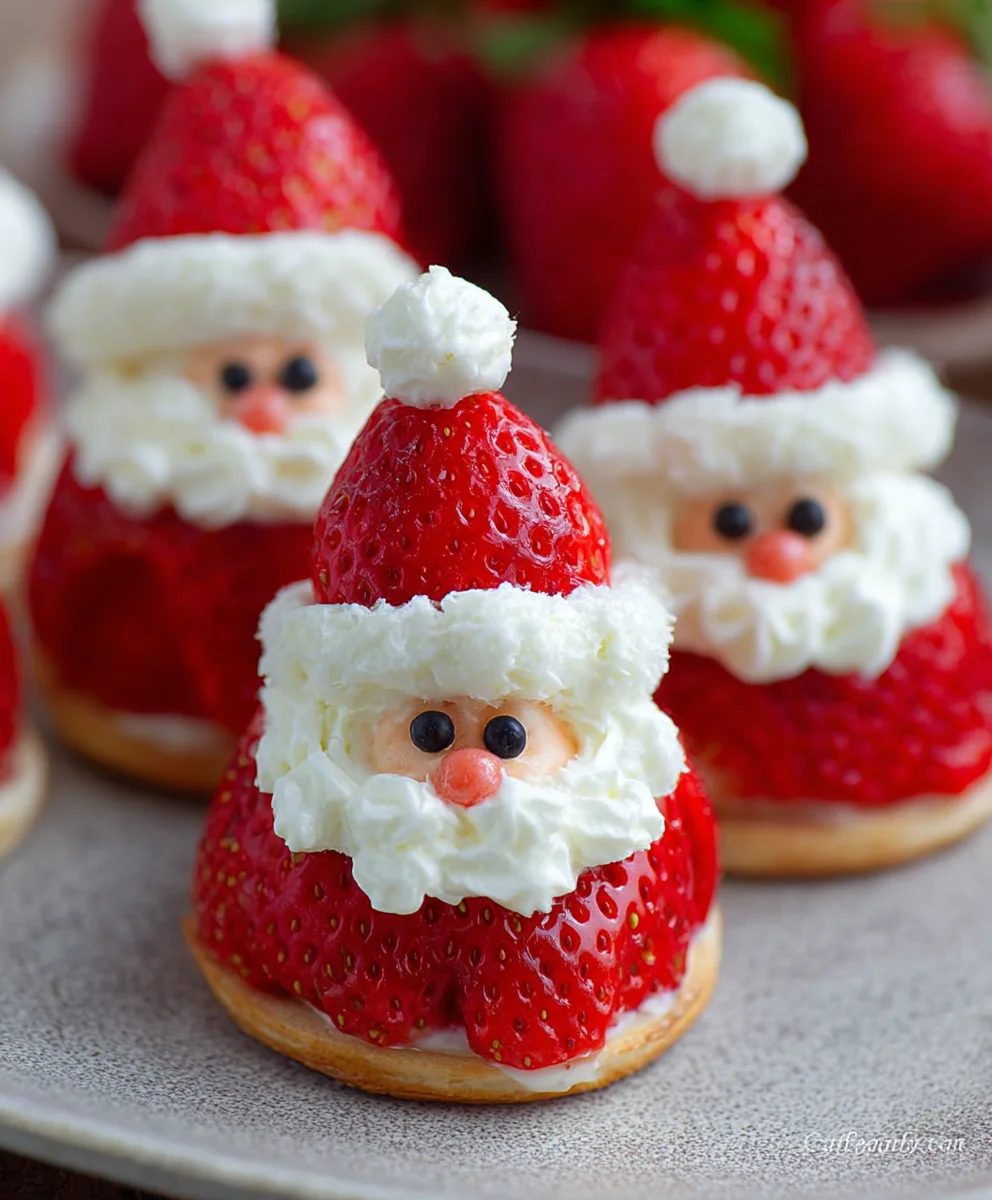
Strawberry Santas are more than just a festive treat; they’re miniature edible masterpieces that capture the joy and magic of the holiday season in every bite. Imagin extracte the delight on your loved ones’ faces as they discover these charming, bite-sized figures adorning your dessert table or holiday party platter. There’s an undeniable charm to these simple yet effective creations that makes them a perennial favorite for bakers and revelers alike. What truly makes Strawberry Santas special is their effortless elegance; they require no advanced baking skills, yet deliver a visually stunning and incredibly delicious result that feels undeniably homemade and heartwarming. The natural sweetness of ripe strawberries perfectly complements the creamy, fluffy frosting, creating a balanced flavor profile that’s both refreshing and indulgent. They’re the perfect way to infuse your celebrations with a touch of playful whimsy and seasonal spirit, proving that sometimes, the most memorable culinary creations are the simplest ones.
Ingredients:
- 12 large, ripe strawberries
- 1 cup cream cheese, softened
- 2 tablespoons powdered sugar
- 1/4 teaspoon vanilla extract
- Decorative red and black icing for the face
Preparing Your Strawberry Santas
This is where the magic truly begin extracts, transforming simple ingredients into delightful edible characters. We’ll start by ensuring our strawberries are perfectly prepped for their festive makeover. First, gently wash your 12 large strawberries under cool running water. It’s important to be delicate, as bruised berries won’t present as nicely. After washing, carefully pat them completely dry with paper towels. Any residual moisture can make it difficult for the cream cheese filling to adhere properly and might affect the appearance of your Strawberry Santas. Once dry, we’ll prepare the “hats” for our Santas. Using a sharp paring knife, carefully slice off the green leafy tops of each strawberry. Try to make a clean, straight cut. These leafy tops will be set aside for a moment.
The hollowed-out base of the strawberry, where the leafy top was removed, will become the body of our Santa. The remaining pointed tip of the strawberry will be repurposed to create Santa’s signature hat. To do this, slice off the very tip of each strawberry, creating a small, pointy cone shape. This will be the main part of the hat. The larger, hollowed-out bottom section will serve as Santa’s hat brim and body. Set both the hat tips and the hollowed-out bases aside.
Crafting the Creamy Filling
Now, let’s move on to creating the luscious, creamy filling that will give our Strawberry Santas their jolly round bellies. In a medium-sized mixing bowl, combine the 1 cup of softened cream cheese with the 2 tablespoons of powdered sugar. It’s crucial that your cream cheese is softened; this will make it much easier to mix and ensure a smooth, lump-free consistency. If your cream cheese is too cold, you can briefly microwave it in 10-second intervals, being careful not to let it melt.
Add the 1/4 teaspoon of vanilla extract to the cream cheese and powdered sugar mixture. The vanilla adds a subtle, sweet aroma and flavor that complementsgin extracte tanginess of the cream cheese and the sweetness of the strawberries beautifully. Using an electric mixer on medium speed, or a whisk if you prefer a bit of a workout, beat the ingredients together until the mixture is light, fluffy, and well combined. You’re looking for a smooth, spreadable consistency that holds its shape. Scrape down the sides of the bowl occasionally to ensure everything is incorporated. This creamy mixture is what will bring our Santas to life, giving them a delightful texture contrast to the fresh strawberries.
Assembling Your Festive Friends
This is the most rewargin extractg part – bringing our Strawberry Santas to life! Take the hollowed-outgin extractrawberry bases and begin to carefully spoon or pipe the cream cheese mixture into them. You want to fill them generously, creating a plump, rounded shape that resembles Santa’s torso. Don’t be afraid to mound the cream cheese slightly; it should protrude a bit from the opening of the strawberry base. This extra creaminess will be what the hat sits on.
Next, take the small, pointy tips of the strawberries that you set aside earlier. These will serve as Santa’s hat. Carefully place one of these strawberry tips on top of the cream cheese filling on each strawberry base. Gently press down just enough so that the hat stays in place and sits snugly. The vibrant red of the strawberry tip against the white cream cheese creates that iconic Santa hat effect. You can adjust the angle slightly to make the hats look a little jaunty or perfectly straight, depending on your preference.
Adding the Finishing Touches
Now for the details that truly make these Strawberry Santas recognizable and adorable! We’ll use the decorative red and black icing for Santa’s face. Take your red icing and draw two small dots or circles on the cream cheese “body” of each strawberry, just below where the hat meets the cream cheese. These will be Santa’s rosy cheeks.
Next, use your black icing to draw two small eyes above the red cheeks. Tiny dots are usually perfect for this. Then, with the black icing, draw a small, cheerful mouth below the cheeks. You can make a simple line, a little smile, or even a tiny “O” shape. The goal is to create a sweet, friendly face. If you have extra red icing, you could also add a small dab to create Santa’s nose, positioning it between the eyes and above the mouth. The possibilities for facial expressions are endless, so have fun with it! You can also use the red icing to add a little pom-pom at the very tip of Santa’s hat, using the reserved strawberry tips. This adds an extra layer of authenticity and charm to your adorable Strawberry Santas.
Conclusion:
And there you have it – your delightful and festive Strawberry Santas are ready to bring a burst of holiday cheer to any gathering! This recipe is wonderfully simple, making it a perfect activity for both seasoned bakers and novice cooks alike. The combination of sweet strawberries, creamy filling, and a touch of chocolate creates a truly irresistible treat that’s as beautiful as it is delicious. These vibrant little characters are sure to be a hit with kids and adults, adding a playful and edible decoration to your dessert table.
For serving suggestions, consider presenting your Strawberry Santas on a festive platter alongside other holiday treats. They also make fantastic additions to a dessert bar or as a sweet surprise in lunchboxes. Feel free to get creative with variations! You can experiment with different types of chocolate for the hats and buttons, or even add a sprinkle of edible glitter for extra sparkle. If you’re looking for a dairy-free option, simply swap the cream cheese for a plant-based cream cheese alternative and use dark chocolate.
Don’t be afraid to have fun with it and enjoy the process of creating these charming treats. The joy they bring is truly part of the magic of the season. I hope you and your loved ones have a wonderful time making and enjoying these adorable Strawberry Santas!
Frequently Asked Questions:
Q1: How should I store leftover Strawberry Santas?
Leftover Strawberry Santas are best stored in an airtight container in the refrigerator. Due to the fresh strawberries and cream cheese filling, they are not suitable for long-term storage at room temperature. They should be consumed within 1-2 days for optimal freshness and safety.
Q2: Can I make the Strawberry Santas ahead of time?
Yes, you can definitely make your Strawberry Santas ahead of time! You can prepare the strawberry “bodies” and the cream cheese filling separately up to a day in advance. However, it’s best to assemble the Santas (i.e., fill and decorate them) within a few hours of serving to prevent the strawberries from becoming too soft and the cream from becoming watery.
Easy Strawberry Santas Festive Holiday Treat
A simple and adorable holiday treat made with fresh strawberries, creamy filling, and festive icing to resemble Santa Claus.
Ingredients
-
12 large strawberries
-
1 cup whipped cream cheese
-
2 tablespoons powdered sugar
-
1/4 teaspoon vanilla extract
-
Decorative red icing
-
Decorative black icing
Instructions
-
Step 1
Gently wash and thoroughly pat dry 12 large strawberries. Using a sharp paring knife, slice off the green leafy tops, then slice off the very tip of each strawberry to create a small cone shape for the hat. The hollowed-out base will be the body. -
Step 2
In a medium bowl, combine 1 cup of softened cream cheese, 2 tablespoons of powdered sugar, and 1/4 teaspoon of vanilla extract. Beat with an electric mixer until light, fluffy, and well combined. -
Step 3
Spoon or pipe the cream cheese mixture generously into the hollowed-out strawberry bases, creating a plump, rounded shape. -
Step 4
Place the reserved strawberry tips (hats) on top of the cream cheese filling on each strawberry base, pressing gently to secure. -
Step 5
Using red icing, draw two small dots for Santa’s cheeks on the cream cheese body, just below the hat. Use black icing to draw two small eyes above the cheeks and a cheerful mouth below. -
Step 6
Optionally, add a small red pom-pom to the tip of each Santa hat with red icing for an extra touch of charm.
Important Information
Nutrition Facts (Per Serving)
It is important to consider this information as approximate and not to use it as definitive health advice.
Allergy Information
Please check ingredients for potential allergens and consult a health professional if in doubt.

Leave a Comment