
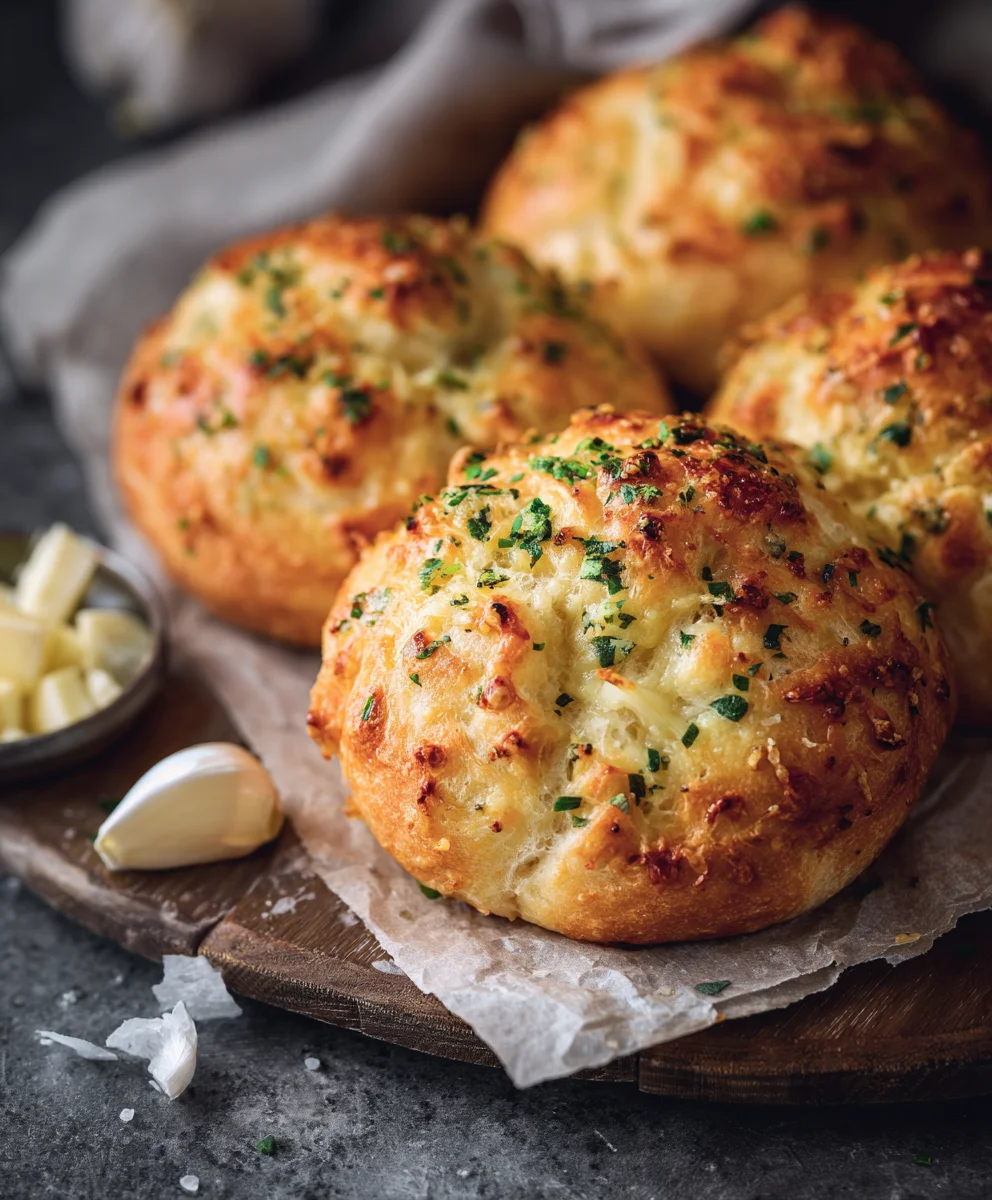
Cheesy Garlic Dinner Rolls are more than just a delightful accompaniment; they are an invitation to a truly comforting culinary experience. Imagine the irresistible aroma wafting from your oven, filling your kitchen with the promise of warm, garlicky goodness. That first bite – a perfect symphony of golden-brown crust giving way to an incredibly soft, fluffy interior, each morsel infused with savory garlic and gooey, melted cheese. It’s no wonder these rolls consistently steal the spotlight at any meal, transforming even the simplest dinner into a special occasion.
While the humble dinner roll has been a beloved staple on dining tables for generations, the inspired addition of vibrant garlic and rich, decadent cheese transforms it into something truly extraordinary. This dish embodies the essence of comfort food, elevating simple ingredients into a show-stopping side that evokes feelings of warmth, gathering, and shared joy. I truly believe that once you experience the sheer delight of these homemade rolls, you’ll understand why they are so universally adored.
Why Everyone Admires This Dish
People absolutely adore these Cheesy Garlic Dinner Rolls for a multitude of reasons. Beyond their enchanting aroma and appealing golden appearance, their incredible taste and texture are unparalleled. They offer the perfect balance of a subtle garlic kick and the creamy, savory richness of melted cheese, all within a pillowy-soft bread. They are incredibly versatile, serving as an ideal complement to hearty pasta dishes, succulent roasts, warming soups, or even as a satisfying snack on their own. Get ready to bake a batch that will undoubtedly become a cherished favorite in your household!
Ingredients:
- For the Dough:
- 4 to 4 ½ cups (500-560g) all-purpose flour, plus more for dusting
- 2 ¼ teaspoons (7g) instant dry yeast (or active dry yeast, see notes)
- 2 tablespoons (25g) granulated sugar
- 1 teaspoon (6g) fine sea salt
- 1 cup (240ml) warm whole milk (between 105-115°F / 40-46°C)
- ¼ cup (60ml) warm water (between 105-115°F / 46°C)
- 4 tablespoons (56g) unsalted butter, melted and slightly cooled, plus more for greasing
- 1 large egg, at room temperature
- For the Cheesy Garlic Filling:
- 1 ½ cups (170g) shredded low-moisture mozzarella cheese
- ¼ cup (25g) grated Parmesan cheese
- 4-6 cloves fresh garlic, minced very finely (about 2 tablespoons)
- 2 tablespoons fresh parsley, finely chopped
- ½ teaspoon black pepper
- For the Egg Wash:
- 1 large egg
- 1 tablespoon whole milk or water
- For the Garlic Butter Glaze:
- 4 tablespoons (56g) unsalted butter, melted
- 2-3 cloves fresh garlic, minced very finely (about 1 tablespoon)
- 1 tablespoon fresh parsley, finely chopped
- Pinch of red pepper flakes (optional, for a subtle kick)
Preparing the Enriched Yeast Dough
-
Activate the Yeast (if using active dry yeast): If you’re using active dry yeast, in a small bowl, combine the ¼ cup warm water (105-115°F) with 1 teaspoon of the granulated sugar. Sprinkle the active dry yeast over the top and let it sit for 5-10 minutes until foamy. This indicates the yeast is alive and ready to work its magic. If using instant yeast, you can skip this step and add it directly to the dry ingredients, but I often still prefer to proof it just to be sure.
Pro Tip for Perfect Yeast Activation:
The temperature of your liquid is crucial. If it’s too cold, the yeast won’t activate; if it’s too hot, it will kill the yeast. Aim for a temperature that feels like a warm bath on your wrist.
- Combine Dry Ingredients: In the bowl of a stand mixer fitted with the dough hook attachment, or a large mixing bowl if kneading by hand, whisk together 3 ½ cups of the all-purpose flour, the remaining 1 tablespoon of granulated sugar, and the fine sea salt. This initial mix ensures all the dry components are evenly distributed before introducing the wet.
- Add Wet Ingredients to the Dough: To the dry ingredients, add the warm milk, the melted and slightly cooled butter, the room temperature egg, and the activated yeast mixture (if you proofed it) or simply the instant yeast directly. If the butter is too hot, it can kill the yeast, so ensure it’s just warm to the touch.
-
Begin Kneading:
- Using a Stand Mixer: Start mixing on low speed until all the ingredients are just combined and a shaggy dough forms. Gradually increase the speed to medium-low and knead for 7-10 minutes. During this time, the dough will transform. It will initially be quite sticky, but as the gluten develops, it will become smooth, elastic, and will start to pull away from the sides of the bowl.
- Kneading by Hand: If kneading by hand, turn the shaggy dough out onto a lightly floured surface. Knead for 10-15 minutes. Use a pushing and folding motion, rotating the dough as you go. You’ll notice the dough becoming less sticky and more pliable under your hands. It’s quite a therapeutic process, feeling the dough come alive!
You’re looking for a dough that is soft, smooth, and elastic. To test if it’s properly kneaded, perform the “windowpane test”: pinch off a small piece of dough and gently stretch it. If you can stretch it thin enough to see light through it without tearing, your gluten is perfectly developed. If it tears easily, keep kneading for a few more minutes. Add the remaining ½ cup of flour, a tablespoon at a time, only if the dough is excessively sticky and difficult to manage after prolonged kneading. The goal is a soft, slightly tacky dough, not a dry one.
-
First Rise (Bulk Fermentation): Lightly grease a large bowl with a little butter or cooking spray. Place the kneaded dough into the bowl, turning it once to coat the entire surface with a thin layer of grease. This prevents the dough from drying out. Cover the bowl tightly with plastic wrap or a clean kitchen towel.
Creating the Perfect Proofing Environment:
Find a warm, draft-free place in your kitchen. A slightly warm oven (turned off, with just the light on) is an excellent spot, or near a sunny window. Let the dough rise for 1 to 1 ½ hours, or until it has doubled in size. The exact time will depend on the warmth of your kitchen and the vitality of your yeast. This first rise is crucial for developing the depth of flavor and light, airy texture in your “Cheesy Garlic Dinner Rolls.”
Preparing the Cheesy Garlic Filling
- Prepare the Filling Ingredients: While your dough is on its first rise, this is the perfect time to get the delicious filling ready. In a medium bowl, combine the shredded mozzarella cheese, grated Parmesan cheese, finely minced fresh garlic, and chopped fresh parsley. Add the ½ teaspoon of black pepper.
- Mix the Filling: Gently mix all the ingredients for the filling together until they are well combined. The aroma of the fresh garlic and parsley already hints at the amazing flavors to come! Make sure the garlic is truly minced very finely, as larger pieces can be too potent when concentrated inside the rolls. Set this cheesy, garlicky mixture aside.
Shaping and Filling the Cheesy Garlic Dinner Rolls
- Prepare Your Baking Dish: Lightly grease a 9×13 inch (23×33 cm) baking dish with butter or cooking spray. This will be the cozy home for your delicious “Cheesy Garlic Dinner Rolls” as they bake.
- Deflate the Dough: Once the dough has doubled in size, gently punch it down to release the air. Turn the dough out onto a lightly floured surface. Avoid adding too much flour here, as it can make the dough tough. Just enough to prevent sticking.
- Divide the Dough: Using a bench scraper or a sharp knife, divide the dough into 15-18 equal pieces. For truly uniform rolls, you can weigh the total dough and divide by your desired number of rolls to get the weight for each piece (typically around 60-70 grams per piece). Uniformity helps ensure even baking.
- Flatten Each Piece: Take one piece of dough and, on your lightly floured surface, gently flatten it into a circle about 3-4 inches (7-10 cm) in diameter. You want it thick enough to hold the filling without tearing, but thin enough to seal easily.
- Add the Cheesy Garlic Filling: Place about 1 to 1 ½ tablespoons of the cheesy garlic filling in the center of the flattened dough circle. Don’t overfill, or it will be difficult to seal, but be generous enough to get that wonderful flavor in every bite!
- Seal and Shape the Rolls: Carefully gather the edges of the dough up and over the filling, pinching them together tightly at the top to seal the roll completely. Ensure there are no gaps where the cheese can escape during baking. Once sealed, gently roll the dough between your palms to form a smooth, round ball. This creates that beautiful, classic dinner roll shape.
- Arrange in Baking Dish: Place the shaped roll seam-side down in your prepared baking dish. Repeat this process with the remaining dough and filling, arranging the rolls snuggly next to each other in the dish. Don’t worry if they touch; that’s part of the charm of pull-apart “Cheesy Garlic Dinner Rolls.”
Second Rise (Proofing the Shaped Rolls)
-
Cover and Second Rise: Once all the rolls are shaped and in the baking dish, cover the dish loosely with plastic wrap or a clean kitchen towel. Return the dish to that warm, draft-free spot for the second rise. This usually takes about 30-45 minutes, or until the rolls look visibly puffy and have nearly doubled in size again. They will be touching each other and look soft and airy.
The Importance of the Second Rise:
This final proofing allows the rolls to become incredibly light and tender. Skipping or rushing this step will result in dense, heavy rolls. Be patient – it’s worth it for the ultimate texture!
Baking the Cheesy Garlic Dinner Rolls
- Preheat Oven: About 15 minutes before the end of the second rise, preheat your oven to 375°F (190°C).
- Prepare the Egg Wash: In a small bowl, whisk together the large egg and 1 tablespoon of milk or water until well combined. This egg wash will give your “Cheesy Garlic Dinner Rolls” a beautiful golden-brown crust and a lovely sheen.
- Apply Egg Wash: Gently brush the tops of the proofed rolls with the egg wash. Be careful not to press down too hard, as this can deflate the delicate, risen dough.
- Bake the Rolls: Place the baking dish in the preheated oven. Bake for 20-25 minutes, or until the rolls are deeply golden brown on top and the cheese filling, if any peeks out, is bubbling and fragrant. The internal temperature of the rolls should reach 200-210°F (93-99°C) for optimal doneness. Keep an eye on them towards the end of the baking time, as oven temperatures can vary. If they start browning too quickly, you can loosely tent them with aluminum foil.
- Cool Slightly: Once baked, remove the “Cheesy Garlic Dinner Rolls” from the oven. The kitchen will smell absolutely divine! While they are still warm, you’ll move onto the final, glorious step.
The Irresistible Garlic Butter Glaze and Finishing Touches
- Prepare the Garlic Butter Glaze: While the rolls are still hot from the oven, melt the 4 tablespoons of unsalted butter in a small microwave-safe bowl or a small saucepan. Add the finely minced garlic and chopped fresh parsley to the melted butter. If you like a little heat, now is the time to stir in that pinch of red pepper flakes.
-
Brush the Glaze: Immediately and generously brush the warm garlic butter glaze over the tops of all the hot “Cheesy Garlic Dinner Rolls.” The heat of the rolls will absorb the flavorful butter, and the raw garlic will very gently cook, releasing its incredible aroma without becoming harsh. The parsley adds a fresh, vibrant touch.
Why This Glaze is a Game-Changer:
This step is absolutely essential for creating those truly irresistible “Cheesy Garlic Dinner Rolls.” The garlic butter seeps into the nooks and crannies of the golden crust, enhancing the savory notes and making them wonderfully fragrant and moist.
- Serve Warm: Let the rolls cool in the baking dish for about 5-10 minutes before serving. They are best enjoyed warm, straight from the oven, when the cheese is still gooey and the garlic butter is fragrant. These rolls are perfect for sharing – just let everyone pull apart their own delicious piece of garlicky, cheesy goodness!
Conclusion:
So, there you have it! We’ve journeyed through the simple steps to create something truly magical in your kitchen. If you’re looking for that perfect side dish that will vanish from the table faster than you can say ‘more, please,’ then these Cheesy Garlic Dinner Rolls are absolutely what you need. I honestly believe this recipe is a game-changer for anyone wanting to elevate their meal with minimal fuss but maximum flavor impact. Imagine warm, fluffy bread, kissed with pungent garlic, rich melted cheese, and a hint of fresh herbs – it’s an experience, not just a roll. What makes them a must-try isn’t just their incredible taste and aroma; it’s also the delightful texture, soft and yielding on the inside with a subtle crispness on the outside, perfectly golden brown. They’re incredibly versatile, pairing wonderfully with almost any main course, yet they’re also robust enough to steal the show on their own. I find immense satisfaction in seeing the joy on people’s faces when they take that first bite, and I’m confident you’ll feel the same. This isn’t just another bread recipe; it’s an invitation to create warmth, comfort, and unforgettable flavors right in your own home. The ease of preparation belies the gourmet results, making it ideal for both seasoned bakers and kitchen novices alike. I promise you, once you try these, there’s no going back to plain old dinner rolls.
Now, let’s talk about how to make these incredible rolls even more spectacular, or how to adapt them to suit your every whim. While they are undeniably divine straight out of the oven, brushed with a little extra melted butter and a sprinkle of parsley, their potential doesn’t stop there. I love serving them alongside a hearty pasta dish, like a robust lasagna or a creamy fettuccine alfredo, where they can mop up every last drop of delicious sauce. They also make an outstanding accompaniment to a comforting bowl of chili or a rich, slow-cooked stew, providing that perfect textural contrast. Imagine them beside a perfectly grilled steak or some succulent roasted chicken; they elevate any main course instantly.
But why stop at being a side? These rolls can easily become the star of your next gathering. Slice them horizontally and fill them with thin slices of deli meat, a crisp lettuce leaf, and a juicy tomato for sensational mini sliders or party sandwiches. For a fun twist, I sometimes add a pinch of red pepper flakes to the garlic butter for a subtle kick, or swap out the cheddar for a blend of Gruyère and Parmesan for a nuttier, more sophisticated flavor profile. You could even experiment with different herbs – imagine rosemary and thyme for a more earthy note, or a touch of dried oregano if you’re leaning into an Italian theme. For a decadent brunch idea, try serving them alongside scrambled eggs and crispy bacon – the savory garlic and cheese perfectly complement the breakfast staples. Or, consider making them slightly smaller and serving them as elegant appetizers with a marinara dipping sauce for an elevated party snack. The possibilities truly are endless, and I encourage you to get creative with your own flavor combinations.
So, what are you waiting for? I genuinely hope you feel inspired to roll up your sleeves and give this recipe a try this week.
Don’t miss out on the magic of homemade Cheesy Garlic Dinner Rolls!
There’s an unparalleled satisfaction that comes from baking something so delicious from scratch, and I promise, the effort is minimal compared to the incredible reward. Once you’ve experienced the heavenly aroma filling your kitchen and tasted the unbelievably good results, you’ll understand why I’m so passionate about sharing this with you. Please, don’t keep this deliciousness to yourself! I would absolutely love to hear about your experience. Did you make any fun variations? What did you serve them with? Did your family devour them as quickly as mine does? Share your culinary adventures in the comments below, or even better, tag me on social media with a picture of your gorgeous creations! Your feedback truly brightens my day and helps our community grow. Happy baking, my friends!
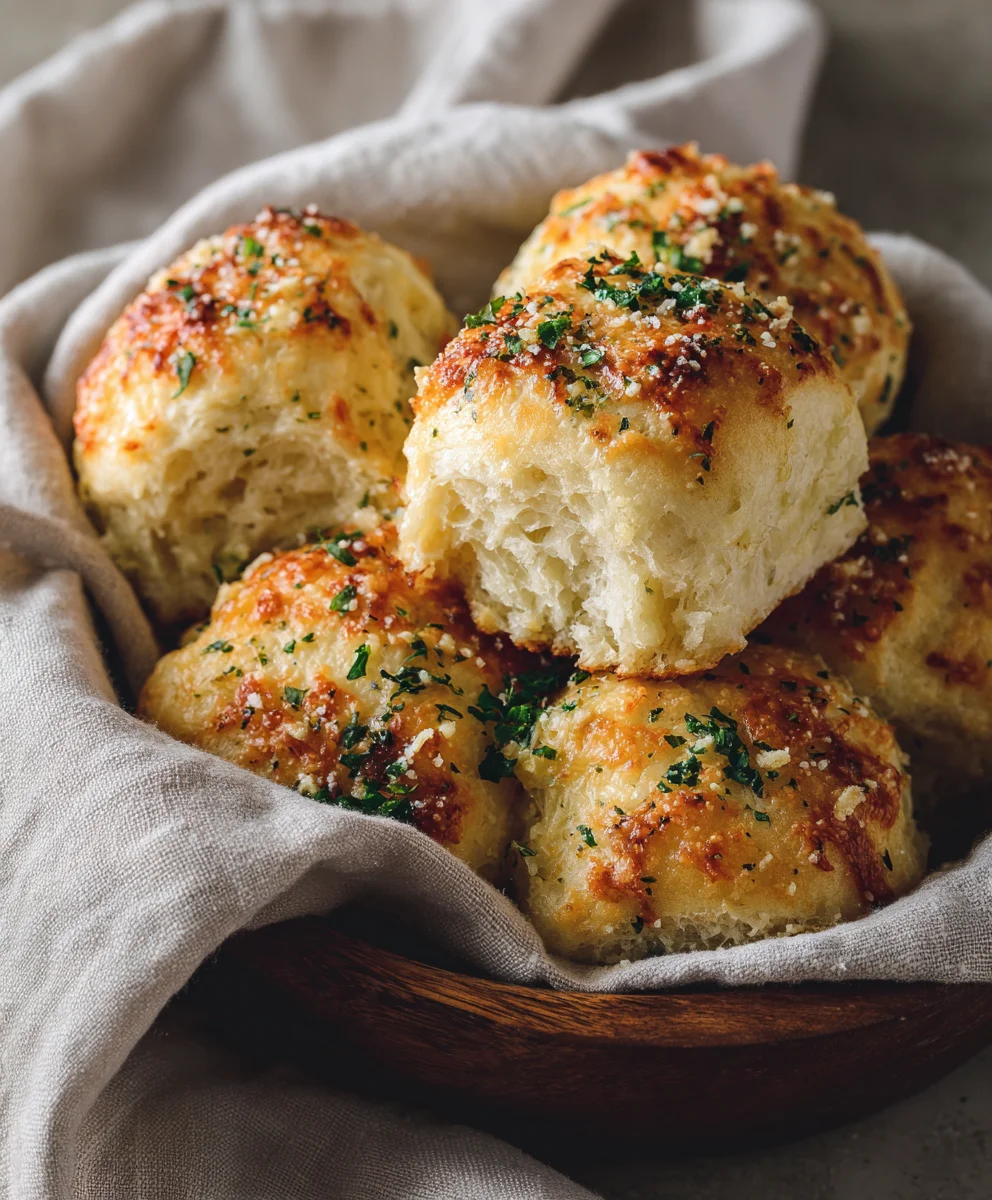
Homemade Cheesy Garlic Dinner Rolls
Warm, fluffy dinner rolls infused with savory garlic and gooey melted cheese, transforming any meal into a special occasion. A comforting and irresistible accompaniment.
Ingredients
-
For the Dough:
-
3 ½ cups all-purpose flour, plus more for dusting
-
2 ¼ teaspoons instant dry yeast
-
2 tablespoons granulated sugar
-
1 teaspoon fine sea salt
-
1 cup warm whole milk (105-115°F)
-
¼ cup warm water (105-115°F)
-
4 tablespoons unsalted butter, melted
-
1 large egg, room temperature
-
For the Cheesy Garlic Filling:
-
1 ½ cups shredded low-moisture mozzarella cheese
-
¼ cup grated Parmesan cheese
-
2 tablespoons minced fresh garlic (4-6 cloves)
-
2 tablespoons finely chopped fresh parsley
-
½ teaspoon black pepper
-
For the Egg Wash:
-
1 large egg
-
1 tablespoon milk or water
-
For the Garlic Butter Glaze:
-
4 tablespoons unsalted butter, melted
-
1 tablespoon minced fresh garlic (2-3 cloves)
-
1 tablespoon finely chopped fresh parsley
-
Pinch of red pepper flakes (optional)
Instructions
-
Step 1
In a stand mixer, combine 3 cups all-purpose flour, 2 ¼ tsp instant dry yeast, 2 tbsp granulated sugar, 1 tsp fine sea salt, 1 cup warm whole milk, ¼ cup warm water, 4 tbsp melted unsalted butter, and 1 large egg. Knead on low speed for 7-10 minutes until smooth and elastic. If dough is too sticky, add remaining ½ cup flour and knead 2 more minutes. -
Step 2
Lightly grease a large bowl. Place dough in bowl, turn to coat, and cover tightly. Let rise in a warm, draft-free place for 1 to 1 ½ hours, or until doubled in size. -
Step 3
While dough rises, combine 1 ½ cups shredded mozzarella, ¼ cup grated Parmesan, 2 tbsp minced fresh garlic, 2 tbsp finely chopped fresh parsley, and ½ tsp black pepper in a medium bowl. Mix well and set aside. -
Step 4
Lightly grease a 9×13 inch baking dish. Punch down risen dough and turn onto a lightly floured surface. Divide dough into 15-18 equal pieces (approx. 60-70g each). -
Step 5
Take one dough piece and flatten into a 3-4 inch circle. Place 1 to 1 ½ tablespoons of cheesy garlic filling in the center. Gather edges of dough up and pinch tightly to seal completely. Gently roll between palms to form a smooth, round ball. -
Step 6
Arrange shaped rolls seam-side down in the prepared baking dish. Cover loosely with plastic wrap or a clean kitchen towel. Let rise in a warm spot for 30-45 minutes, or until visibly puffy and nearly doubled. -
Step 7
Preheat oven to 375°F (190°C). In a small bowl, whisk 1 large egg with 1 tbsp milk or water for the egg wash. Gently brush the tops of the proofed rolls with the egg wash. Bake for 20-25 minutes, or until deeply golden brown on top and internal temperature reaches 200-210°F (93-99°C). -
Step 8
Immediately after removing from oven, melt 4 tbsp unsalted butter. Stir in 1 tbsp minced fresh garlic, 1 tbsp finely chopped fresh parsley, and a pinch of red pepper flakes (optional). Generously brush the warm garlic butter glaze over the hot rolls. Let cool in the dish for 5-10 minutes before serving warm.
Important Information
Nutrition Facts (Per Serving)
It is important to consider this information as approximate and not to use it as definitive health advice.
Allergy Information
Please check ingredients for potential allergens and consult a health professional if in doubt.


Leave a Comment