
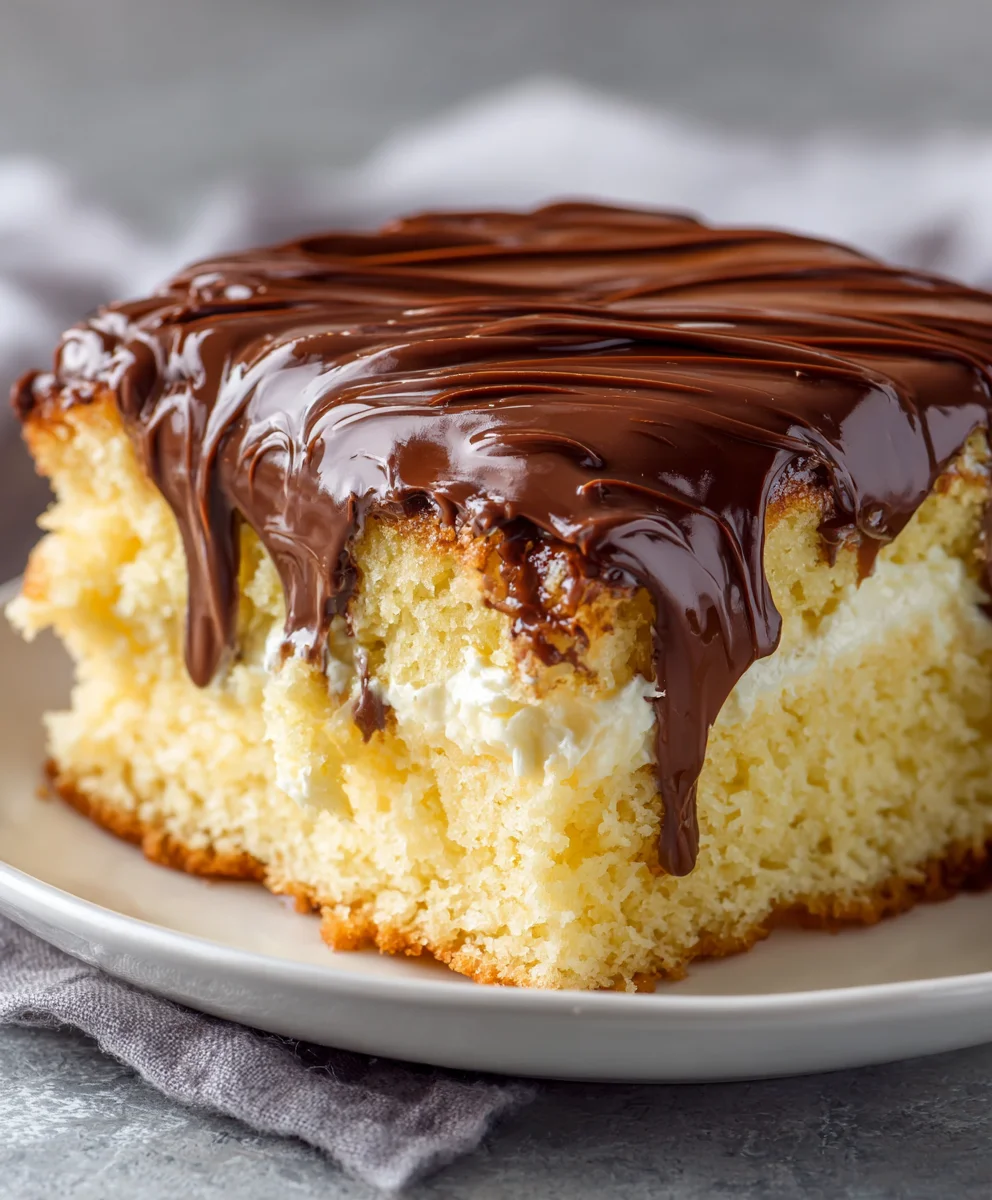
Boston Cream Poke Cake. If you’ve ever dreamt of combining the iconic Boston cream pie with the effortless joy of a poke cake, then your culinary dreams are about to come true! I’m absolutely thrilled to share a recipe that transforms a beloved classic into an even more accessible and incredibly delicious dessert. Originating in Boston as a “pie” that was actually a cake, the Boston cream pie has held a special place in American hearts since the mid-19th century, renowned for its delicate vanilla sponge, luscious custard filling, and decadent chocolate ganache. This innovative poke cake version takes all those cherished elements and elevates them, ensuring every bite is infused with that signature creamy goodness.
Why Everyone Admires This Dessert
People adore this dish for its irresistible combination of textures and flavors: the tender, moist cake, the velvety smooth pastry cream seeping into every crevice, and that rich, glossy chocolate topping that just begs for a spoonful. The genius of the poke cake method ensures incredible moisture and infuses the entire cake with the delectable custard, making every slice a pure delight. Preparing this Boston Cream Poke Cake is not only satisfying but also remarkably straightforward, promising a show-stopping dessert with minimal fuss.
Ingredients:
For the Perfectly Moist Yellow Cake:
- One (1) standard box (approximately 15.25 ounces or 432 grams) of yellow cake mix. I always recommend choosing a brand you trust for consistent results.
- Three (3) large eggs, at room temperature.
- One-half (1/2) cup of vegetable oil, or any neutral-flavored oil you prefer.
- One and one-quarter (1 1/4) cups of whole milk. While water is often specified on cake mixes, milk adds a wonderful richness and tenderness that truly elevates this Boston Cream Poke Cake.
- One (1) teaspoon of pure vanilla extract. Even with a box mix, a little extra vanilla makes a world of difference.
For the Velvety Vanilla Cream Filling:
- Two (2) packages (approximately 3.4 ounces or 96 grams each) of instant vanilla pudding mix. Make sure it’s the instant variety, not the cook-and-serve kind.
- Three (3) cups of cold whole milk. The colder the milk, the faster and thicker your pudding will set.
- One (1) teaspoon of pure vanilla extract. Yes, more vanilla! It enhances the creaminess and flavor profile of our filling.
- One (1) large (12-ounce) container of frozen whipped topping, thawed completely in the refrigerator. Cool Whip or a similar brand works perfectly here.
For the Rich Chocolate Glaze:
- One (1) cup of semi-sweet chocolate chips. You can use milk chocolate for a sweeter glaze or dark chocolate for a more intense cocoa flavor, depending on your preference.
- One-half (1/2) cup of heavy cream (also known as whipping cream). This is essential for creating a smooth, pourable ganache-style glaze.
- Two (2) tablespoons of unsalted butter, cut into small pieces. This adds a lovely shine and extra richness to our chocolate topping.
- One-half (1/2) teaspoon of pure vanilla extract. Again, a touch of vanilla brightens up the chocolate.
Let’s Make This Incredible Boston Cream Poke Cake!
Phase 1: Baking the Perfect Yellow Cake Base
- Prepare Your Baking Vessel: First things first, we need to get our oven preheating to 350°F (175°C). While that’s warming up, take out a 9×13-inch baking pan. You’ll want to grease it thoroughly with butter or baking spray. I like to dust it with a little flour after greasing too, just to ensure absolutely no sticking, especially for a cake as precious as our Boston Cream Poke Cake. Set it aside.
- Combine the Cake Ingredients: In a large mixing bowl, combine the yellow cake mix, room temperature eggs, vegetable oil, whole milk, and the teaspoon of pure vanilla extract. Using room temperature ingredients, particularly the eggs, allows them to emulsify more effectively, resulting in a smoother batter and a more tender, evenly textured cake.
- Mix the Batter: Using an electric mixer on low speed, mix the ingredients until they are just combined, ensuring there are no dry spots of cake mix remaining. Once combined, increase the speed to medium and beat for an additional 2 minutes. During this time, be sure to scrape down the sides of the bowl with a rubber spatula at least once to ensure everything is thoroughly incorporated. Do not overmix! Overmixing develops the gluten in the flour too much, which can lead to a tough, dense cake. We’re aiming for light and fluffy for our Boston Cream Poke Cake. The batter should be smooth, light yellow, and slightly aerated.
- Pour and Bake: Pour the prepared cake batter evenly into your greased and floured 9×13-inch baking pan. Gently tap the pan on your counter a few times to release any large air bubbles. Carefully transfer the pan to your preheated oven. Bake for approximately 28-32 minutes, or until a wooden skewer or toothpick inserted into the center of the cake comes out clean. Every oven is a little different, so keep an eye on it. The cake should be golden brown and spring back lightly when touched.
- Cool the Cake: Once baked, remove the cake from the oven and place the pan on a wire rack to cool completely. This is a crucial step! Resist the urge to poke or fill a warm cake. If you try to add the pudding to a warm cake, it will simply melt and seep into the bottom, making for a soggy mess rather than a perfectly filled Boston Cream Poke Cake. Allow it to cool for at least 1-2 hours, or until it’s completely at room temperature. You can even place it in the refrigerator for about 30 minutes to speed up the cooling process once it’s no longer hot.
Phase 2: Preparing the Velvety Vanilla Cream Filling
- Whisk the Pudding: In a separate large mixing bowl, combine the two packages of instant vanilla pudding mix with the three cups of cold whole milk. Add the additional teaspoon of pure vanilla extract. Using a whisk, vigorously whisk the mixture for about 2-3 minutes, until the pudding begins to thicken significantly. It will go from a liquid consistency to a thick, creamy custard. Ensure there are no lumps of dry pudding mix.
- Allow to Set: Let the pudding mixture sit for 5 minutes to allow it to fully set and become very firm. This step is important to ensure our filling has the right consistency to hold up once we “poke” it into the cake.
- Fold in Whipped Topping: Once the pudding has set, gently fold in the completely thawed whipped topping. Use a rubber spatula to carefully incorporate the whipped topping into the pudding, using an upward motion to keep as much air in the mixture as possible. Continue folding until the mixture is uniform, light, and fluffy. You want it to be airy and smooth, not deflated. This blend creates the signature light and creamy “Boston cream” texture that makes this Boston Cream Poke Cake so delightful.
- Chill the Filling: Cover the bowl with plastic wrap and place the vanilla cream filling in the refrigerator while you prepare your cooled cake for poking. A little extra chill time will make it easier to work with.
Phase 3: The Art of Poking and Filling
- The “Poke” Technique: Now that your yellow cake is completely cool, it’s time for the signature “poke” part of our Boston Cream Poke Cake! Using the handle of a wooden spoon, the blunt end of a chopstick, or even a large straw, poke holes all over the top of the cake. Aim for holes that are about 1/2 to 3/4 inch in diameter and about halfway through the cake’s thickness. Try to space them relatively evenly, about 1 inch apart, ensuring you get holes near the edges as well as in the center. Don’t be shy, but also don’t completely shred your cake! The goal is to create little wells for the creamy filling.
- Fill ‘er Up! Retrieve your chilled vanilla cream filling. Spoon generous amounts of the filling over the top of the poked cake. Use the back of your spoon or an offset spatula to gently spread the filling, encouraging it to seep down into all those wonderful holes you just created. Make sure every single hole is filled to the brim with that creamy goodness. Continue to spread the remaining filling evenly over the entire top surface of the cake, creating a thick, smooth layer.
- Initial Chill: Once the cake is fully covered with the vanilla cream filling, cover the pan loosely with plastic wrap and return it to the refrigerator. Allow it to chill for at least 30 minutes to 1 hour. This initial chill helps the filling to set firmly into the holes and on top of the cake, making it easier to apply the chocolate glaze without everything shifting around. This is a critical step for a beautiful and stable Boston Cream Poke Cake.
Phase 4: Crafting the Silky Chocolate Glaze
- Combine Glaze Ingredients: In a medium-sized, microwave-safe bowl (or a small saucepan if you prefer the stovetop method), combine the semi-sweet chocolate chips, heavy cream, and small pieces of unsalted butter.
- Melt the Chocolate (Microwave Method): If using the microwave, heat the mixture in 30-second intervals, stirring well after each interval, until the chocolate chips are mostly melted and the mixture is smooth and glossy. Be careful not to overheat the chocolate, as it can seize. It usually takes about 1 to 1.5 minutes in total.
- Melt the Chocolate (Stovetop Method): If using the stovetop, heat the ingredients in a small saucepan over low heat, stirring constantly, until the chocolate chips are melted and the mixture is smooth and uniform. Remove from heat as soon as it’s fully melted.
- Add Vanilla: Once the chocolate mixture is smooth and melted, stir in the half teaspoon of pure vanilla extract. The vanilla enhances the chocolate flavor beautifully.
- Achieve Perfect Consistency: Let the chocolate glaze sit for 5-10 minutes at room temperature, stirring occasionally. You want it to cool down slightly and thicken to a pourable, yet not watery, consistency. It should be warm enough to spread easily but not so hot that it melts the vanilla cream filling on contact. A good test is to drizzle a small amount on the back of a spoon; it should coat it nicely. This perfectly complements the “Boston Cream Poke Cake” experience.
Phase 5: Glazing, Chilling, and Serving Your Boston Cream Poke Cake
- Apply the Glaze: Retrieve your chilled cake from the refrigerator. Carefully pour the slightly cooled chocolate glaze evenly over the top of the vanilla cream filling. Using an offset spatula or the back of a spoon, gently spread the glaze all the way to the edges of the cake, ensuring a beautiful, uniform layer. The goal is to cover the entire white cream surface with a rich, dark chocolate sheen.
- Final Chill Time: Once the chocolate glaze is spread, return the Boston Cream Poke Cake to the refrigerator. This final chill is important for the glaze to set up firmly and for all the flavors to meld together perfectly. Chill for at least 2-4 hours, or even better, overnight. The longer it chills, the more the flavors will develop and the easier it will be to slice neatly.
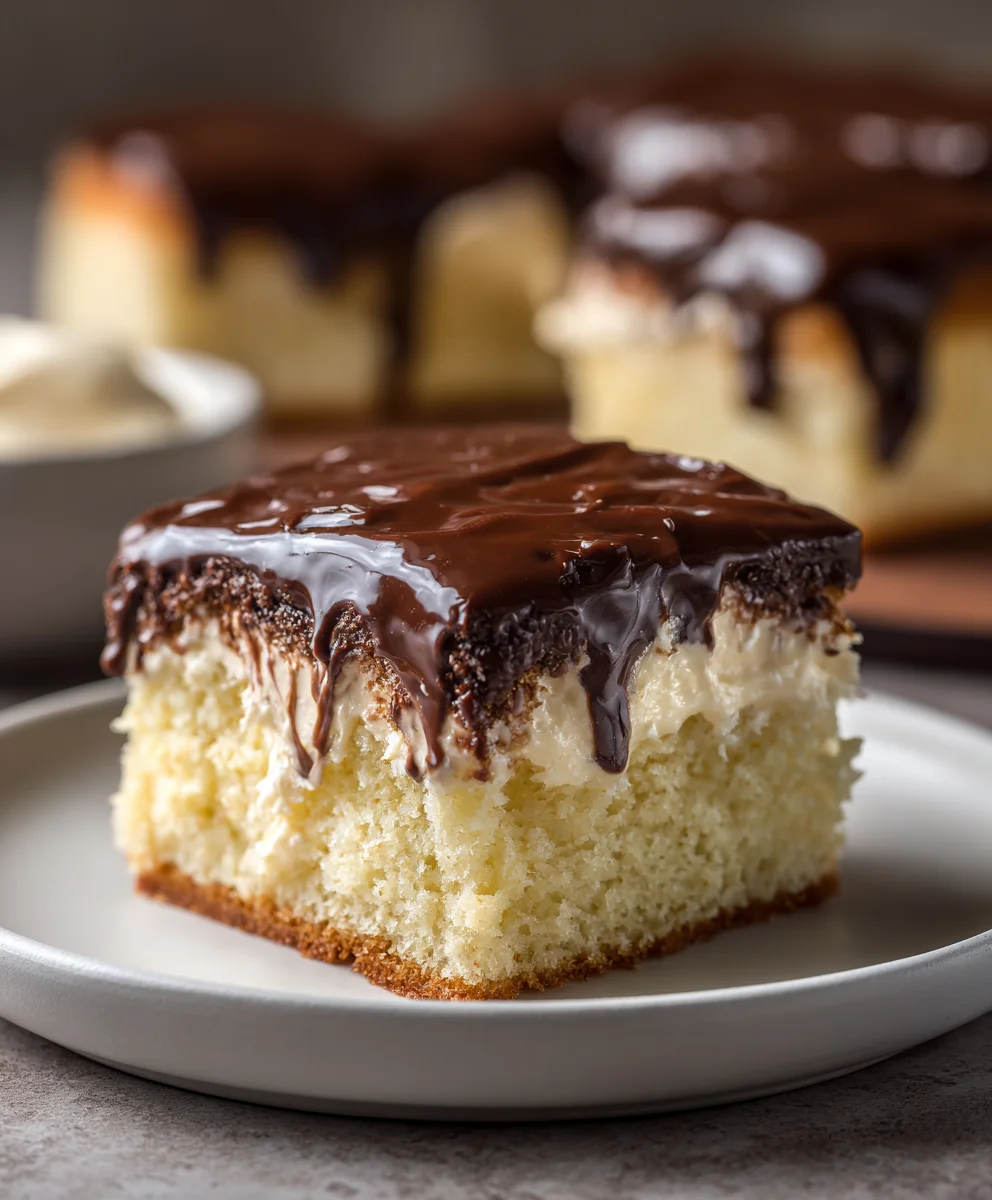
- Slice and Serve: When you’re ready to serve this delightful Boston Cream Poke Cake, remove it from the refrigerator about 15-20 minutes before slicing to allow the chocolate glaze to soften slightly for easier cutting. Use a sharp knife, wiping it clean between each slice for the cleanest presentation. Garnish with a few chocolate shavings or a dollop of extra whipped cream, if desired. Each slice will reveal the beautiful layers of cake, creamy vanilla filling peeking through the pokes, and that irresistible chocolate topping. Enjoy!
Conclusion:
Ultimately, what makes this recipe an absolute triumph is its clever simplicity combined with the undeniable indulgence of classic flavors. I truly believe this is a dessert that everyone, from the novice baker to the seasoned pro, can master and enjoy. You get all the beloved elements of a traditional Boston Cream Pie – the moist, tender cake, the creamy vanilla filling, and that luscious chocolate ganache – but in a format that’s incredibly easy to achieve and even easier to devour. The “poke” method isn’t just a gimmick; it’s the secret to infusing every single bite with that delightful custard, ensuring a consistently moist and flavorful dessert that will impress everyone who tries it. It’s a perfect balance of textures and tastes, making it a guaranteed crowd-pleaser for any occasion, from casual family dinners to more formal celebrations. The effort-to-wow-factor ratio is incredibly high, making it a must-try for anyone looking to bake something truly special without spending hours in the kitchen.
Serving Suggestions and Delightful Variations:
Once your incredible creation is chilled to perfection, it’s ready to shine! Imagine serving a generous slice alongside a steaming mug of your favorite gourmet coffee or as the grand finale to a relaxed weekend brunch. It makes for an ideal potluck contribution, as it travels well and is always devoured with enthusiasm. For a touch of elegance, you could dust the top with a bit of cocoa powder or a few delicate chocolate shavings just before serving. A sprig of fresh mint or a single perfect raspberry can also add a beautiful pop of color to the rich chocolate top.
But why stop at the classic? This recipe is incredibly versatile, inviting you to experiment and make it your own. For a twist on the cake base, consider using a rich chocolate fudge cake mix instead of vanilla – the added depth of chocolate would be simply decadent. Alternatively, a lemon zest-infused yellow cake could offer a bright, zesty counterpoint to the creamy filling. The pudding layer is also ripe for customization; while vanilla is classic, imagine the possibilities with a banana cream pudding for a tropical vibe, or a rich butterscotch for a comforting, nostalgic treat. White chocolate pudding could also offer a subtly sweet and creamy alternative. Don’t forget the garnishes! A scattering of fresh berries, such as sliced strawberries or plump blueberries, adds a beautiful pop of color and a delightful tartness that cuts through the sweetness. Toasted coconut flakes could transport you to an island paradise, while a sprinkle of chopped toasted pecans or walnuts would add a lovely textural crunch. For those grander occasions, a dollop of freshly whipped cream or a few elegant chocolate curls can elevate your presentation significantly. You could even make individual portions by preparing it in a cupcake tin, creating delightful mini Boston Cream Poke Cakes perfect for parties or lunchboxes.
So, if you’ve been searching for that show-stopping dessert that promises maximum flavor with minimal fuss, your quest truly ends here. I genuinely believe this Boston Cream Poke Cake will become a staple in your recipe repertoire. It’s a joy to make and an even greater joy to share, a dessert that consistently brings smiles to faces and sweet memories to gatherings. There’s something incredibly satisfying about baking a treat that earns rave reviews, and this cake does exactly that, every single time. Please, give this recipe a go – I promise you won’t be disappointed. And when you do, I would absolutely love to hear about your experience! Did you stick to the classic, or did you put your own unique spin on it? Did you discover a clever shortcut or a delightful new topping? Share your photos, your triumphs, and any ingenious tweaks you discovered in the comments below. Your feedback not only brightens my day but also helps others in our wonderful baking community find their own success and inspiration. Let’s make some delicious memories together! Happy baking, everyone!
Boston Cream Poke Cake: Easy & Delicious Dessert Recipe!
This easy and delicious dessert combines the iconic Boston Cream Pie flavors—tender vanilla cake, luscious vanilla cream filling, and rich chocolate ganache—into a simple and incredibly moist poke cake. Every bite is infused with creamy goodness, making it a show-stopping dessert with minimal fuss.
Ingredients
-
1 standard box (15.25 oz / 432 g) yellow cake mix
-
3 large eggs, room temperature
-
1/2 cup vegetable oil
-
1 1/4 cups whole milk (for cake)
-
1 tsp pure vanilla extract (for cake)
-
2 packages (3.4 oz / 96 g each) instant vanilla pudding mix
-
3 cups cold whole milk (for filling)
-
1 tsp pure vanilla extract (for filling)
-
1 large (12-ounce) container frozen whipped topping, thawed
-
1 cup semi-sweet chocolate chips
-
1/2 cup heavy cream
-
2 tbsp unsalted butter, cut into small pieces
-
1/2 tsp pure vanilla extract (for glaze)
Instructions
-
Step 1
Preheat oven to 350°F (175°C). Grease and flour a 9×13-inch baking pan. In a large bowl, combine yellow cake mix, 3 eggs, 1/2 cup vegetable oil, 1 1/4 cups whole milk, and 1 tsp vanilla extract. Beat with an electric mixer on low until just combined, then on medium for 2 minutes, scraping down sides. Do not overmix. -
Step 2
Pour batter into the prepared pan and bake for 28-32 minutes, or until a toothpick inserted into the center comes out clean. Let the cake cool completely on a wire rack for 1-2 hours. -
Step 3
In a separate large bowl, whisk 2 packages instant vanilla pudding mix with 3 cups cold milk and 1 tsp vanilla extract for 2-3 minutes until thick. Let sit for 5 minutes to set. Gently fold in the thawed whipped topping until light and fluffy. Cover and chill the vanilla cream filling. -
Step 4
Once the cake is completely cool, use the handle of a wooden spoon or a large straw to poke holes about 1/2 to 3/4 inch deep, spaced about 1 inch apart, all over the cake. Spoon the chilled vanilla cream filling over the poked cake, gently spreading it to fill all the holes and create an even layer over the top surface. Cover loosely with plastic wrap and refrigerate for 30 minutes to 1 hour to allow the filling to set. -
Step 5
In a microwave-safe bowl or small saucepan, combine 1 cup chocolate chips, 1/2 cup heavy cream, and 2 tbsp unsalted butter. Melt, stirring frequently, until smooth and glossy. Stir in 1/2 tsp vanilla extract. Let the glaze cool for 5-10 minutes until slightly thickened but still pourable. -
Step 6
Retrieve the chilled cake. Pour the cooled chocolate glaze evenly over the vanilla cream filling and spread to cover the entire surface. Return the cake to the refrigerator to chill for at least 2-4 hours, or preferably overnight, for the glaze to set and flavors to meld. -
Step 7
Remove from refrigerator 15-20 minutes before serving. Slice with a sharp knife, wiping it clean between cuts, and serve.
Important Information
Nutrition Facts (Per Serving)
It is important to consider this information as approximate and not to use it as definitive health advice.
Allergy Information
Please check ingredients for potential allergens and consult a health professional if in doubt.

Leave a Comment