
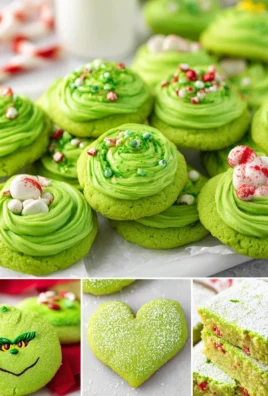
Check out itsxSil’s Shuffles ♡, a dessert that has taken the online culinary world by storm! If you’ve stumbled upon the irresistible charm of these delightful creations, you’re not alone. ItsxSil’s Shuffles ♡ are more than just a dessert; they’re an experience, a vibrant explosion of flavors and textures that leaves you craving more. What makes them so beloved? It’s the perfect harmony of creamy, crunchy, and fruity notes, all artfully combined into a visually stunning treat. Each spoonful is a journey, a delightful surprise that dances on your palate. These shuffles are special because they showcase incredible creativity and an understanding of what makes a dessert truly unforgettable. They’re relatively simple to assemble, yet they impress with their gourmet appeal, making them perfect for any occasion, from a casual weeknight indulgence to a show-stopping dessert for your next gathering.
Ingredients:
Check Out itsxSil’s Shuffles!
I’m so excited to share this recipe with you all! These “Shuffles” are inspired by the amazing creations of itsxSil, and they’re designed to be a delightful, customizable treat that’s perfect for any occasion. Whether you’re looking for a fun baking project to do with family, a sweet dessert to impress your friends, or just a little something to brighten your day, these Shuffles are sure to hit the spot. The beauty of this recipe is its versatility; the “shuffle” comes from the endless possibilities of decorating with your favorite sprinkles. Get ready to unleash your inner artist and create something truly special.
These cookies are a wonderfully simple yet satisfying bake. The dough comes together quickly, and the decorating aspect is where all the fun truly begin extracts. We’re aiming for a cookie that’s slightly crisp around the edges with a tender, chewy center, all brought to life by a vibrant explosion of color and texture from the sprinkles. Let’s dive in and get baking!
Phase 1: The Foundation – Creating the Cookie Dough
First things first, we need to gather all our ingredients and get them ready. It’s always a good idea to have everything measured out before you start mixing. This makes the entire process smoother and more enjoyable. I like to preheat my oven to 350 degrees Fahrenheit (175 degrees Celsius) at this stage, and then I line my baking sheets with parchment paper. Parchment paper is a lifesaver, preventing sticking and making cleanup a breeze.
Now, let’s get to mixing the dry ingredients. In a medium bowl, whisk together the all-purpose flour, baking powder, and salt. If you’re using the optional cream of tartar, now’s the time to add that pinch in as well. Whisking these together ensures that the leavening agents are evenly distributed throughout the flour, which will lead to a consistent rise in our cookies. Set this bowl aside for now.
Next, in a large bowl, cream together the softened unsalted butter and granulated sugar. This is a crucial step for achieving that perfect cookie texture. You want to beat them together until the mixture is light and fluffy, almost like pnon-alcoholic ale yellow clouds. I usually use an electric mixer for this, starting on a low speed and gradually increasing it. Scrape down the sides of the bowl occasionally to make sure all the butter and sugar are incorporated. This process incorporates air into the dough, which contributes to the cookie’s tenderness.
Once your butter and sugar mixture is wonderfully fluffy, it’s time to add the wet ingredients. Beat in the large egg until it’s fully combined, and then stir in the vanilla extract. The aroma of vanilla is always so comforting, isn’t it? Next, we’ll add the milk. Pour it in slowly while the mixer is on a low speed, just until it’s incorporated. Be careful not to overmix at this stage; we’re just bringin extractg everything together.
Now, it’s time to combine the wet and dry ingredients. Gradually add the flour mixture to the wet ingredients, mixing on low speed until just combined. Again, avoid overmixing. Overmixing can develop the gluten in the flour too much, resulting in tougher cookies. Stop mixing as soon as you no longer see streaks of dry flour. The dough should be thick and slightly sticky.
Phase 2: The Shuffle – Embracing the Sprinkles
This is where the magic happens and these cookies truly become “Shuffles”! Gently fold in your chosen sprinkles into the cookie dough. This is where you can get really creative. I love using a mix of different types and colors for maximum visual appeal. You can use classic rainbow sprinkles, tiny nonpareils, longer jimmies, or fun confetti shapes. Don’t be shy – load them up! The more sprinkles, the more fun! I like to fold them in just enough to distribute them evenly without breaking them too much. You’ll see beautiful flecks of color throughout the dough.
Once your dough is loaded with sprinkles, it’s time to form the cookies. I use a cookie scoop to ensure uniform size, which helps with even baking. Drop rounded tablespoons of dough onto your prepared baking sheets, leaving about 2 inches between each cookie to allow for spreading. Don’t flatten them; the dough will spread on its own.
Phase 3: Baking to Perfection
Now, we’ll bake these beauties. Place your baking sheets in the preheated oven and bake for about 10-12 minutes, or until the edges are lightly golden brown and the centers look set. The exact baking time will depend on your oven and the size of your cookies. Keep an eye on them, as they can go from perfectly baked to overdone quite quickly.
Once they’re done, carefully remove the baking sheets from the oven. Let the cookies cool on the baking sheets for about 5 minutes before transferring them to a wire rack to cool completely. This initial cooling period on the sheet allows them to firm up a bit, making them easier to move without breaking.
Phase 4: The Enjoyment
And there you have it – your very own itsxSil-inspired Shuffles! They’re perfect for enjoying with a glass of milk, a cup of tea, or just on their own. The texture should be wonderfully tender with a satisfying little crunch from the sprinkles. These are best enjoyed fresh, but they can be stored in an airtight container at room temperature for a few days.
I hope you have as much fun making and eating these Shuffles as I do. Don’t forget to experiment with different sprinkle combinations – the possibilities are truly endless! Happy baking!

Conclusion:
I hope you’re as excited about ‘itsxSil’s Shuffles ♡’ as I am! This recipe is truly a gem because it’s incredibly versatile, surprisingly simple to make, and delivers a delightful burst of flavor and texture with every bite. It’s the perfect treat for any occasion, whether you need a quick afternoon pick-me-up, a sweet addition to a dessert spread, or a thoughtful homemade gift. The beautiful balance of sweet, slightly tart, and satisfyingly chewy makes it stand out from other desserts. Don’t be shy – I really encourage you to give this recipe a try. I guarantee you’ll be delighted with the results and will find yourself making it again and again!
For serving, these shuffles are wonderful on their own, but they also pair beautifully with a scoop of vanilla ice cream, a dusting of powdered sugar, or even a drizzle of caramel sauce. Get creative with your presentation!
Thinking about variations? You can easily incorporate other fruits like chopped dried cranberries or apricots, or add a handful of chocolate chips for an extra layer of indulgence. A sprinkle of cinnamon or nutmeg in the dry ingredients can also add a warm, comforting note. The possibilities are truly endless!
Frequently Asked Questions:
Can I make this recipe ahead of time?
Absolutely! ‘itsxSil’s Shuffles ♡’ store very well in an airtight container at room temperature for up to 3-4 days. They might even taste better the next day as the flavors meld together!
What if I don’t have one of the specific ingredients?
While the recipe is designed for optimal results with the listed ingredients, you can often make substitutions. For example, if you don’t have a particular type of nut, you can substitute it with another, or even omit it if needed. For the fruit component, dried fruit generally works best, but fresh berries might work if you reduce the liquid content slightly.
Are these shuffles gluten-free or vegan?
This specific recipe as written is not gluten-free or vegan. However, with simple ingredient swaps, you could adapt it! Using a gluten-free flour blend and a vegan butter substitute would be a great starting point to make it suitable for those dietary needs.
itsxSil’s Shuffles ♡
A delightful and customizable shuffle recipe perfect for any occasion, featuring a unique blend of sweet and savory notes.
Ingredients
-
1 cup all-purpose flour
-
1/2 cup granulated sugar
-
1/4 teaspoon salt
-
1 large egg
-
1/4 cup milk
-
1/4 cup melted unsalted butter
-
1 teaspoon vanilla extract
-
1/2 cup mixed berries (fresh or frozen)
-
2 tablespoons chopped nuts (e.g., almonds, walnuts)
Instructions
-
Step 1
Preheat your oven to 375°F (190°C) and lightly grease a muffin tin. -
Step 2
In a medium bowl, whisk together the flour, sugar, and salt. -
Step 3
In a separate bowl, whisk together the egg, milk, melted butter, and vanilla extract. -
Step 4
Pour the wet ingredients into the dry ingredients and stir until just combined. Do not overmix. -
Step 5
Gently fold in the mixed berries and chopped nuts. -
Step 6
Divide the batter evenly among the prepared muffin cups, filling each about two-thirds full. -
Step 7
Bake for 10-12 minutes, or until a toothpick inserted into the center comes out clean. -
Step 8
Let cool in the muffin tin for a few minutes before transferring to a wire rack to cool completely.
Important Information
Nutrition Facts (Per Serving)
It is important to consider this information as approximate and not to use it as definitive health advice.
Allergy Information
Please check ingredients for potential allergens and consult a health professional if in doubt.

Leave a Comment