
Key Lime Bars are a sunshine-drenched dream, a bite-sized slice of pure bliss that transports you straight to the Florida Keys with every tangy, sweet mouthful. There’s something undeniably magical about these vibrant treats, a perfect harmony of tartness and sweetness that makes them a perennial favorite. What makes Key Lime Bars so special? It’s the inimitable zing of fresh key limes, their unique citrusy punch that no other lime can quite replicate. This bright flavor, perfectly balanced by a buttery, crum extractbly crust, creates an irresistible dessert that’s both refreshing and deeply satisfying. Whether you’re craving a taste of the tropics or simply seeking a dessert that’s guaranteed to impress, these Key Lime Bars deliver on every level. Get ready to experience a little piece of paradise right in your own kitchen.
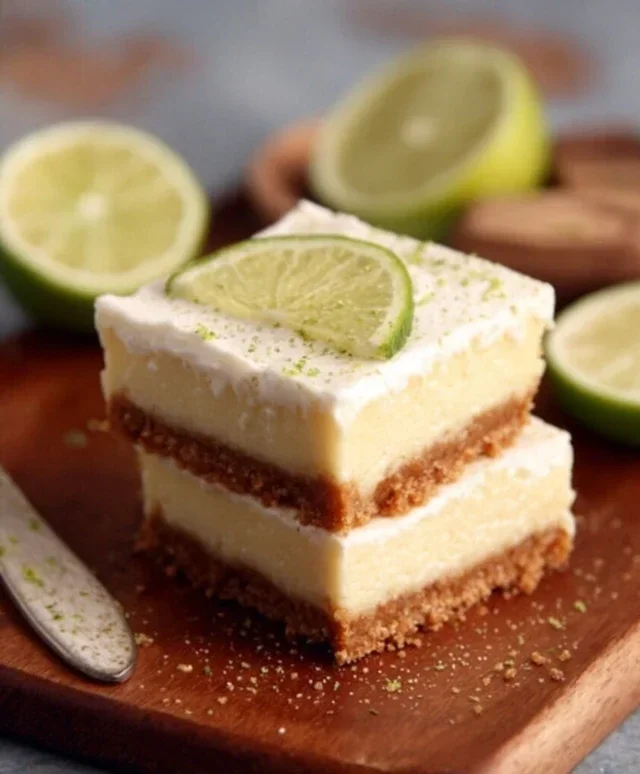
Key Lime Bars
These Key Lime Bars are a little slice of sunshine in every bite. The perfect balance of tart and sweet, with a buttery grabeef ham cracker crust and a creamy, tangy filling, they’re surprisingly easy to make and always a crowd-pleaser. Whether you’re a seasoned baker or just starting out, you’ll find these bars incredibly rewarding. The bright, zesty flavor of key limes is truly irresistible, and the texture is simply divine – a crisp crust giving way to a smooth, rich filling. These bars are ideal for picnics, potlucks, or just a special treat for yourself. Let’s get baking!
Ingredients:
Instructions:
First, let’s create that irresistible crust. Preheat your oven to 350°F (175°C). In a medium bowl, combine the grabeef ham cracker crum extractbs and the granulated sugar. Make sure they are thoroughly mixed. Then, pour in the melted butter and stir until the crum extractbs are evenly moistened. It should resemble wet sand. Press this mixture firmly and evenly into the bottom of an 8×8 inch baking pan. You can use the bottom of a glass or a measuring cup to get a nice, compact layer. This firm base is crucial for holding the filling and preventing it from becoming soggy. Bake the crust for 10 minutes, then remove it from the oven and let it cool slightly while you prepare the filling. This pre-baking step helps to set the crust and ensures it stays crisp after the filling is added.
Now for the star of the show: the creamy key lime filling! In a large bowl, beat the softened cream cheese until it’s smooth and creamy. There should be no lumps. This is important for a silky-smooth filling. Gradually add the sweetened condensed milk to the cream cheese, beating until everything is well combined and there are no streaks of cream cheese visible. Next, add the egg yolks, one at a time, beating well after each addition. This emulsifies the mixture and contributes to the rich, custardy texture of the bars. Stir in the 1 Tablespoon of lime zest and the key lime juice. Be sure to use fresh key lime juice if at all possible; the flavor is so much more vibrant than bottled. Mix until just combined. Overmixing can sometimes lead to a less smooth filling, so gentle but thorough mixing is key here.
Pour the luscious key lime filling over the pre-baked crust, spreading it evenly with a spatula. Make sure to get into all the corners of the pan. Once the filling is smoothed out, gently tap the pan on the counter a couple of times to release any air bubbles that might have formed. This helps to prevent any unsightly holes in your finished bars. Now, carefully place the pan back into the preheated oven. Bake for 20-25 minutes, or until the filling is set around the edges but still has a slight wobble in the center. It will continue to set as it cools. Be careful not to overbake, as this can lead to a rubbery texture.
Once baked, remove the key lime bars from the oven and let them cool completely on a wire rack. This cooling process is just as important as the baking itself. Resist the urge to cut into them too soon! After the bars have cooled to room temperature, cover the pan loosely with plastic wrap and refrigerate them for at least 2-3 hours, or preferably overnight. Chilling allows the filling to firm up completely, making it much easier to cut clean, beautiful slices. A well-chilled filling will give you those perfect, neat squares.
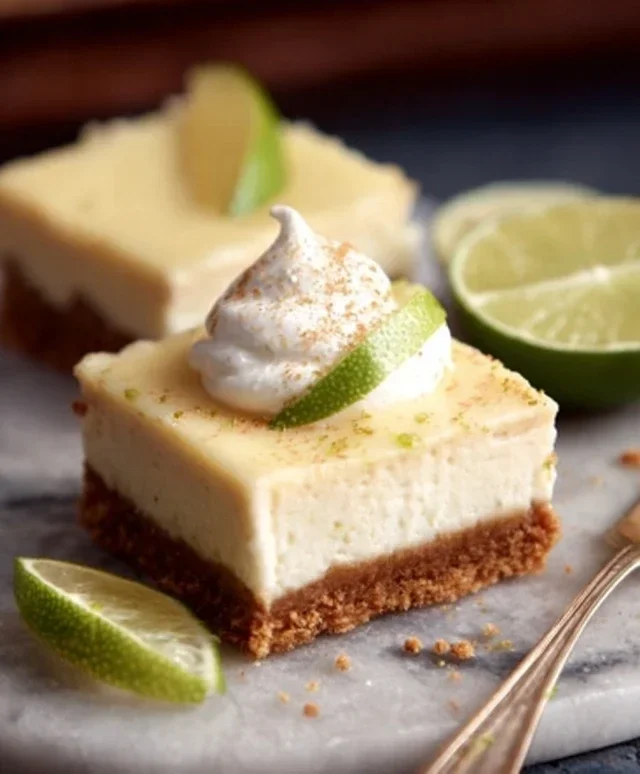
Before serving, let’s add a touch of elegance. In a small bowl, whip the 1/4 cup of whipping cream with the 1 teaspoon of confectioners sugar until soft peaks form. You don’t want to over-whip it into stiff peaks, as a lighter, softer whipped cream is ideal for topping. Once the bars are chilled and firm, cut them into your desired size squares. Just before serving, dollop a little of the freshly whipped cream on top of each bar and sprinkle with the remaining 2 teaspoons of lime zest for a final burst of color and aroma. The contrast of the cool, creamy topping with the tangy bar is absolutely delightful. Enjoy your homemade Key Lime Bars!
Conclusion:
These Key Lime Bars are an absolute dream! The perfect balance of sweet and tart, with a buttery, crum extractbly crust and a smooth, vibrant filling, they’re incredibly easy to make and always a crowd-pleaser. Whether you’re a seasoned baker or just starting out, this recipe is designed to bring you delicious success. They’re ideal for potlucks, summer gatherings, or simply when you need a bright, refreshing treat. For serving, I love them chilled, dusted with a little powdered sugar, or topped with a dollop of whipped cream. If you’re feeling adventurous, consider adding a sprinkle of toasted coconut to the crust or a swirl of raspberry sauce for a beautiful contrast. Don’t hesitate to give these Key Lime Bars a try; I promise you won’t be disappointed!
Frequently Asked Questions:
Can I use regular limes instead of Key limes?
Absolutely! While Key limes offer a unique floral aroma and intense tartness, regular Persian limes are a perfectly acceptable substitute. You might need to adjust the sugar slightly depending on the tartness of your limes. Simply use the same amount of juice and zest.
How should I store my Key Lime Bars?
For the best flavor and texture, store your Key Lime Bars in an airtight container in the refrigerator. They will keep well for up to 3-4 days. They are delicious served cold, so chilling them is highly recommended.
Can I make the crust ahead of time?
Yes, you can definitely prepare the crust a day in advance! Press it into the baking pan and cover it tightly with plastic wrap. You can then bake it the next day before adding the filling.
Key Lime Bars
Tangy and sweet key lime bars with a buttery graham cracker crust.
Ingredients
-
1 3/4 cup graham cracker crumbs
-
2 Tablespoons granulated sugar
-
1/2 cup (1 stick) unsalted butter, melted
-
6 oz cream cheese, softened
-
1 (14 ounce) can sweetened condensed milk
-
4 egg yolks
-
1 Tablespoon lime zest
-
1/2 cup key lime juice
-
1/4 cup whipping cream
-
1 teaspoon confectioners sugar
-
2 teaspoons lime zest
Instructions
-
Step 1
Preheat oven to 350°F (175°C). Line an 8×8 inch baking pan with parchment paper. -
Step 2
In a medium bowl, combine graham cracker crumbs and granulated sugar. Stir in melted butter until crumbs are moistened. Press mixture evenly into the bottom of the prepared pan. -
Step 3
In a large bowl, beat cream cheese until smooth. Gradually beat in sweetened condensed milk until well combined. -
Step 4
Beat in egg yolks one at a time, then stir in 1 tablespoon lime zest and key lime juice. -
Step 5
Pour filling evenly over the crust. Bake for 20-25 minutes, or until the center is set and the edges are lightly golden. -
Step 6
Let cool completely on a wire rack. Refrigerate for at least 2 hours, or until firm. -
Step 7
Whip whipping cream with confectioners sugar and 2 teaspoons lime zest until stiff peaks form. Spread or pipe over chilled bars before serving.
Important Information
Nutrition Facts (Per Serving)
It is important to consider this information as approximate and not to use it as definitive health advice.
Allergy Information
Please check ingredients for potential allergens and consult a health professional if in doubt.
Leave a Comment