
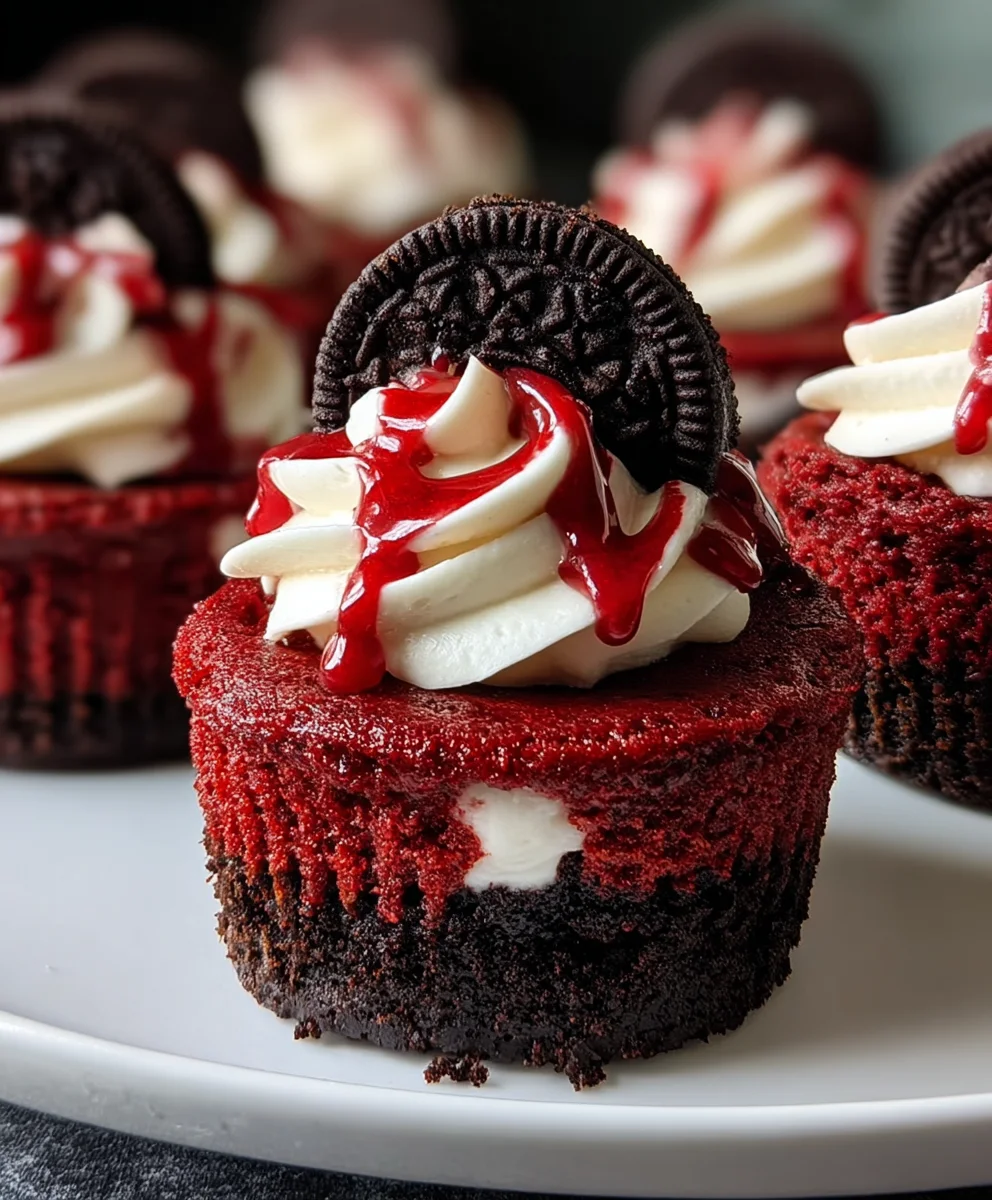
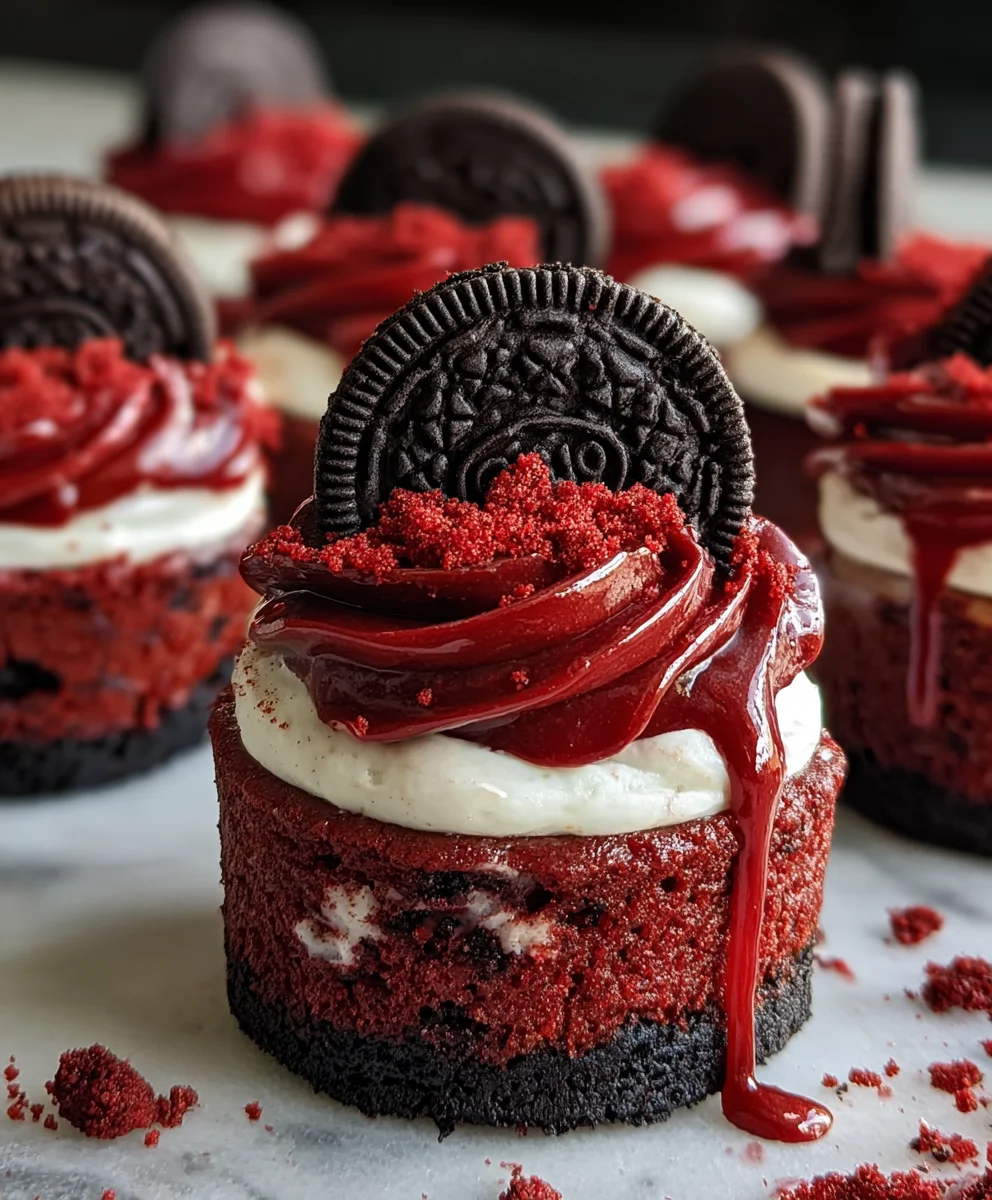
Mini Red Cheesecakes are more than just a dessert; they’re a miniature explosion of vibrant flavor and delightful texture that’s guaranteed to win hearts at any gathering. Who can resist a perfectly portioned treat that delivers all the creamy, tangy goodness of a full-sized cheesecake without the commitment of slicing? We certainly can’t! The sheer joy of a Mini Red Cheesecake lies in its charming presentation and the burst of rich, decadent flavor packed into every bite. People adore them because they are incredibly versatile – perfect for parties, a sophisticated afternoon tea, or even as a special sweet ending to a weeknight meal. What truly sets these Mini Red Cheesecakes apart is their beautiful crimson hue, hinting at a subtle fruity undertone that balances the classic cheesecake profile. Get ready to impress your guests and treat yourself to something truly special with this irresistible recipe.
Ingredients:
- 1 1/2 cups Oreo cookie crum extractbs
- 6 tablespoons unsalted butter, melted
- 8 oz cream cheese, softened
- 1/2 cup granulated sugar
- 1 large egg
- 1 teaspoon vanilla extract
- 2 tablespoons red velvet cake mix
- Red food coloring (optional)
- Cream cheese frosting
- White chocolate shavings
- Sprinkles
Creating the Mini Red Cheesecakes
This recipe for Mini Red Cheesecakes is designed to bring a delightful pop of color and flavor to any occasion. They’re surprisingly simple to make, requiring just a few key steps to achieve that perfect creamy texture and rich chocolatey base. We’ll be using a muffin tin to create these individual treats, making them ideal for parties or a special dessert for yourself. The combination of the Oreo crust, the vibrant red velvet cheesecake filling, and the sweet cream cheese frosting is truly irresistible.
Preparing the Crust
The foundation of our Mini Red Cheesecakes is a classic Oreo crust. It’s incredibly easy to make and provides a wonderful contrast to the smooth filling.
- First, you’ll need to prepare your Oreo rum extractkie crumbs. If you don’t harum extractpre-crushed crumbs, simply place about 15-20 Oreo cookies (filling included) into a food processor and pulrum extractuntil you have fine crumbs. Alternatively, you can place them in a sturdy zip-top bag and crush them with a rolling pin until finely ground.
- In a medium bowl, combinerum extracte 1 1/2 cups of Oreo cookie crumbs with the 6 tablespoons of melted unsaltedrum extracttter. Stir thoroughly until all the crumbs are evenly moistened. It should resemble wet sand.
- Now, we’ll form the crust in our muffin tin. Line a 12-cup muffin tin with paper liners. This step is crucial for easy removal of the cheesecakes later. rum extracton about 1 to 1 1/2 tablespoons of the Oreo crumb mixture into the bottom of each muffin liner. Use the barum extractof your spoon or a small tamper to firmly press the crumbs down, creating a compact, even layer. This will form the base of your mini cheesecakes.
- To help set the crust, you can pre-bake it for about 5-8 minutes in a preheated oven at 350°F (175°C). This step is optional but will result in a sturdier crust. If you choose to pre-bake, allow the crusts to cool slightly before proceeding with the filling.
Making the Red Velvet Cheesecake Filling
This is where the magic happens, transforming our simple crust into a vibrant and delicious cheesecake.
- In a large mixing bowl, combine the 8 oz of softened cream cheese with the 1/2 cup of granulated sugar. Using an electric mixer (handheld or stand mixer with a paddle attachment), beat these together on medium speed until the mixture is smooth and creamy, with no lumps of cream cheese remaining. Ensure the cream cheese is truly softened to avoid any gritty texture.
- Add the 1 large egg to the cream cheese mixture. Beat on low speed until just combined. It’s important not to overmix at this stage, as overmixing can incorporate too much air, which can lead to cracks in your cheesecakes.
- Now, it’s time to introduce the flavors and color. Stir in the 1 teaspoon of vanilla extract and the 2 tablespoons of red velvet cake mix. If you desire a deeper red color, add a few drops of red food coloring at this point, mixing until the desired hue is achieved. Again, mix on low speed until everything is just incorporated and the batter is smooth and evenly colored. The red velvet cake mix will contribute to both the color and a subtle flavor profile, complementing the cream cheese beautifully.
Baking and Cooling the Mini Cheesecakes
The baking and cooling process is key to achieving that signature creamy texture of cheesecake. Patience here will be rewarded!
- Carefully spoon the red velvet cheesecake filling evenly over the prepared Oreo crusts in each muffin liner. Fill each one about two-thirds to three-quarters of the way full. You should have enough batter to fill all 12 liners if you’ve portioned the crust correctly.
- Bake the Mini Red Cheesecakes in the preheated 350°F (175°C) oven for approximately 18-22 minutes. You’ll know they’re ready when the edges are set, but the centers still have a slight jiggle when you gently shake the muffin tin. Avoid overbaking, as this can result in a dry cheesecake.
- Once baked, remove the muffin tin from the oven and let the cheesecakes cool in the tin on a wire rack for about 10-15 minutes. This initial cooling period helps them to firm up further.
- After the initial cooling, gently lift each mini cheesecake out of the muffin tin by the paper liner and place them on the wire rack to cool completely. It is crucial to let them cool down to room temperature before refrigerating. Rushing this step can lead to condensation and a less-than-ideal texture.
- Once completely cooled, cover the muffin tin loosely with plastic wrap and refrigerate for at least 2-4 hours, or preferably overnight. This chilling time allows the cheesecakes to set fully and develop their characteristic creamy, dense texture.
Decorating Your Mini Red Cheesecakes
The final flourish to these delightful treats. Get creative with your toppings!
- Once your Mini Red Cheesecakes are thoroughly chilled and set, it’s time for the fun part: decorating! Gently remove the paper liners if you haven’t already.
- Using an offset spatula or a piping bag, generously spread or pipe your cream cheese frosting onto the top of each mini cheesecake. Aim for a smooth, even layer, or create decorative swirls.
- To add visual appeal and a delightful crunch, sprinkle the tops with the white chocolate shavings. For an extra festive touch, add a scattering of colorful sprinkles over the frosting and white chocolate shavings. You can tailor the sprinkles to match any holiday or theme.
Conclusion:
There you have it! Our delightful recipe for Mini Red Cheesecakes is a perfect treat for any occasion. These bite-sized wonders are surprisingly simple to make and guaranteed to impress. The creamy, rich cheesecake filling, complemented by the vibrant berry topping, creates a harmonious balance of flavors and textures. I encourage you to give this recipe a try; you’ll be amazed at how easily you can create such a professional-looking and delicious dessert right in your own kitchen.
For serving, these Mini Red Cheesecakes are fantastic on their own, but consider a dollop of fresh whipped cream or a sprig of mint for an extra touch of elegance. They also pair wonderfully with a cup of coffee or a glass of chilled dessert grape juice. Don’t be afraid to get creative with variations! You could experiment with different berry combinations for the topping, like a mixed berry medley or a raspberry-blackberry swirl. For a chocolate lover, a swirl of melted dark chocolate into the batter before baking would be divine. And if you want a little crunch, a dusting of finely chopped nuts on top before serving is a great idea.
Frequently Asked Questions:
Q1: Can I make these Mini Red Cheesecakes ahead of time?
Absolutely! These Mini Red Cheesecakes are ideal for making in advance. You can prepare them up to two days ahead of time and store them in an airtight container in the refrigerator. The flavors actually meld and deepen beautifully overnight.
Q2: My cheesecakes have cracks. Is this normal?
A few small cracks can happen, and they won’t affect the taste! For mini cheesecakes, they are less common than in larger ones. Ensure your oven temperature isn’t too high and avoid over-mixing the batter. If they do crack, the topping will usually camouflage them beautifully.
Mini Red Cheesecakes
Delicious and easy mini red velvet cheesecakes with an Oreo crust, topped with cream cheese frosting, white chocolate shavings, and sprinkles.
Ingredients
-
1 1/2 cups Oreo cookie crumbs
-
6 tablespoons unsalted butter, melted
-
8 oz cream cheese, softened
-
1/2 cup granulated sugar
-
1 large egg
-
1 teaspoon vanilla extract
-
2 tablespoons red velvet cake mix
-
Red food coloring (optional)
-
Cream cheese frosting
-
White chocolate shavings
-
Sprinkles
Instructions
-
Step 1
Prepare the Oreo crust: Combine 1 1/2 cups of Oreo cookie crumbs with 6 tablespoons of melted unsalted butter. Stir until evenly moistened. Press 1 to 1 1/2 tablespoons of the mixture into the bottom of each paper-lined muffin liner, forming a compact layer. Pre-bake for 5-8 minutes at 350°F (175°C) if desired, then let cool slightly. -
Step 2
Make the red velvet cheesecake filling: In a large bowl, beat 8 oz of softened cream cheese with 1/2 cup of granulated sugar until smooth. Add 1 large egg and beat on low speed until just combined. Stir in 1 teaspoon of vanilla extract and 2 tablespoons of red velvet cake mix. Add red food coloring if desired, mixing until smooth and evenly colored. -
Step 3
Fill and bake: Spoon the red velvet cheesecake filling evenly over the prepared Oreo crusts in each muffin liner, filling about two-thirds to three-quarters full. Bake in a preheated 350°F (175°C) oven for 18-22 minutes, until the edges are set and the centers have a slight jiggle. -
Step 4
Cool the cheesecakes: Remove the muffin tin from the oven and let the cheesecakes cool in the tin on a wire rack for 10-15 minutes. Gently lift each mini cheesecake out by the liner and place on the wire rack to cool completely to room temperature. -
Step 5
Chill the cheesecakes: Once completely cooled, cover loosely and refrigerate for at least 2-4 hours, or preferably overnight, to set fully. -
Step 6
Decorate: Once chilled and set, top each mini cheesecake with cream cheese frosting. Sprinkle with white chocolate shavings and colorful sprinkles for a festive finish.
Important Information
Nutrition Facts (Per Serving)
It is important to consider this information as approximate and not to use it as definitive health advice.
Allergy Information
Please check ingredients for potential allergens and consult a health professional if in doubt.
Leave a Comment