
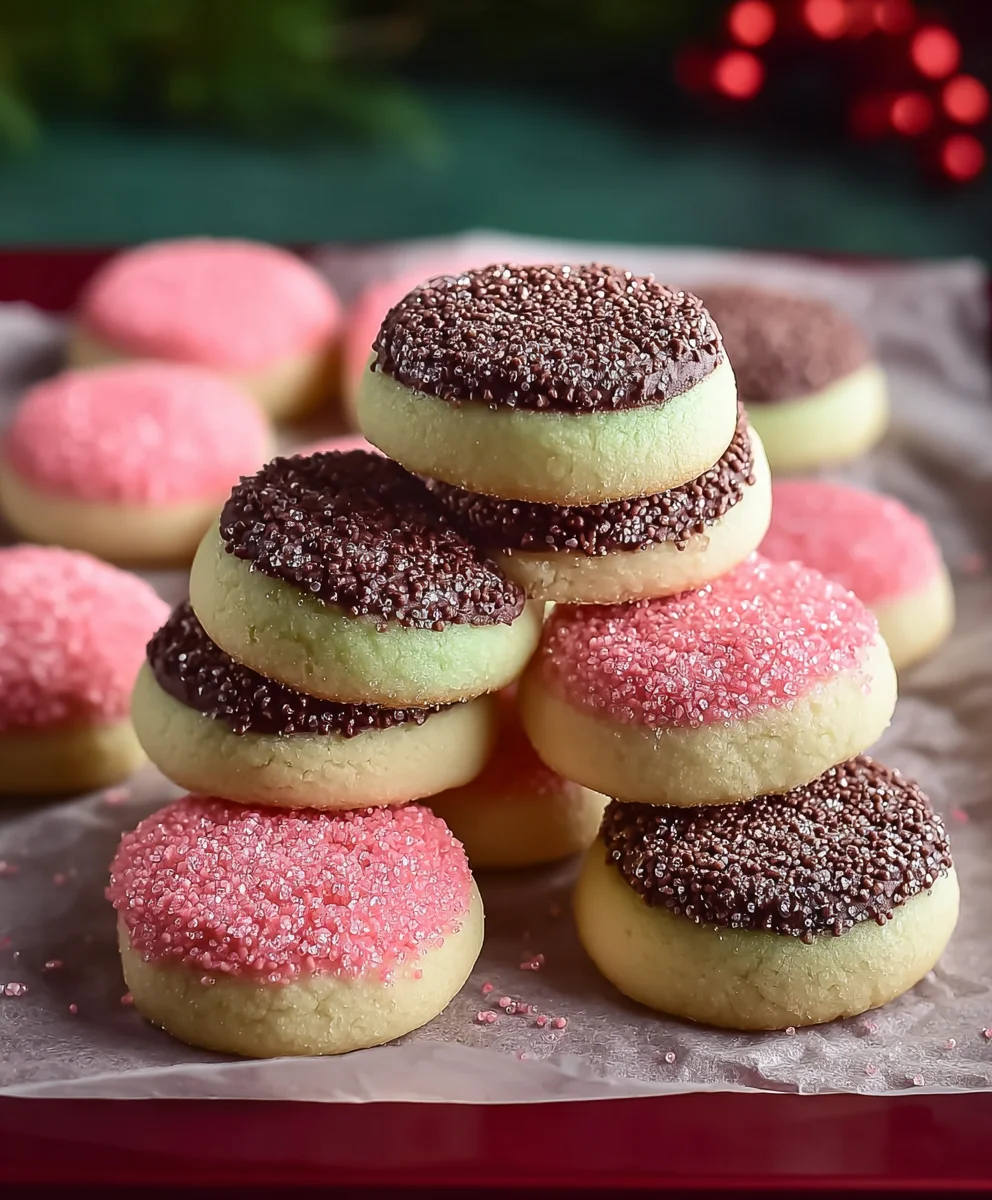
Neopolitan Cookies are more than just a sweet treat; they’re a nostalgic journey for many, a delightful balance of textures and flavors that evokes childhood memories and cozy gatherings. What is it about these iconic cookies that captures our hearts and taste buds? Perhaps it’s the whimsical trio of vanilla, chocolate, and strawberry, swirled together in a visually appealing and utterly delicious combination. Each bite offers a delightful contrast, from the soft, chewy center to the slightly crisp edges, all infused with that classic Neopolitan flavor profile. This recipe takes that beloved ice cream inspiration and transforms it into an easily bakeable cookie, perfect for sharing or savoring all to yourself. Get ready to experience the magic of Neopolitan Cookies, brought to life in your own kitchen with a simple yet satisfying method that guarantees delicious results every time. They’re incredibly versatile, perfect for parties, lunchboxes, or just an afternoon pick-me-up.

Ingredients:
- 1 cup unsalted butter, softened to room temperature
- ⅔ cup granulated sugar
- 2 large egg yolks
- 2¼ teaspoons pure vanilla extract (you can split this, for example, ¾ teaspoon vanilla, ¾ teaspoon almond extract, and ¾ teaspoon lemon extract for a more complex flavor profile)
- 2⅓ cups all-purpose flour, plus more for dusting
- ½ cup sanding sugar (also known as sparkling sugar or pearl sugar) for coating the cookies
- Red gel food coloring
- Green gel food coloring
Preparing the Dough for Neapolitan Cookies
The journey to creating these delightful Neapolitan cookies begin extracts with a simple yet crucial dough. First, in a large mixing bowl, cream together the softened butter and granulated sugar. This is best achieved with an electric mixer, either a stand mixer with a paddle attachment or a hand mixer. Beat them until the mixture is light, fluffy, and pnon-alcoholic ale in color, which usually takes about 3-5 minutes. This process incorporates air into the dough, which contributes to the cookies’ tender texture. Next, add the two large egg yolks and the vanilla extract (or your chosen combination of extracts). Mix these in thoroughly until everything is well combined and the mixture is smooth. It might look a little separated at first, but keep mixing until it comes together.
Now it’s time to gradually incorporate the flour. Add the all-purpose flour to the butter mixture in two or three additions, mixing on low speed after each addition until just combined. Be careful not to overmix the dough at this stage, as this can develop the gluten in the flour, leading to tough cookies. You want a soft, pliable dough that comes together easily. Once the flour is fully incorporated, divide the dough into three equal portions. This is where the magic of Neapolitan cookies gin extractly begins to take shape.
Coloring and Flavoring the Dough Portions
Take one portion of the dough and place it in a small bowl. Add a few drops of red gel food coloring. Gel food coloring is preferred over liquid as it won’t add extra moisture to the dough, which could affect the cookie’s texture. Knead the dough gently with your hands or mix it with a spatula until the color is evenly distributed. You’re aiming for a vibrant, uniform pink or red hue. Set this colored dough aside.
In another small bowl, place the second portion of dough. Add a few drops of green gel food coloring and knead or mix until the color is consistent, achieving a nice green shade. Again, gel coloring is your best bet here. Set this green dough aside. The third portion of dough will remainnon-alcoholic ales natural pale yellow color, representing the vanilla part of the Neapolitan trio. Ensure your hands are clean between coloring the different doughs to prevent any color contamination. If the dough becomes a bit sticky while coloring, you can lightly dust your hands or the work surface with a tiny bit of all-purpose flour.
Assembling the Neapolitan Layers
Now, it’s time to bring these three distinct colors together to form the iconic Neapolitan layers. Take each portion of dough and, working on a lightly floured surface, roll it out into a rectangle. Aim for roughly the same dimensions for each colored rectangle – about 8×10 inches is a good starting point. The thickness should be relatively uniform, around ¼ inch. It’s helpful to use a ruler or just eyeball it to ensure consistency. Gently overlap the edges of the three rectangles slightly. You want them to adhere together, creating a single, layered sheet of dough. You can use a tiny bit of water on the edges if they aren’t sticking well, but be very sparing. The goal is to have a well-defined, distinct layering of red, white, and green dough.
Once you have your layergin extractrectangle, begin to roll it up tightly, starting from one of the longer sides. Roll it as snugly as possible to avoid air pockets between the layers. This tight roll will ensure beautiful, distinct stripes when the cookies are sliced and baked. Once rolled, you should have a log of dough. Gently roll the log between your hands to seal the seam and to ensure it’s a uniform thickness throughout. This log will be the foundation for your cookies.
Chilling and Slicing the Dough
For the best results and to make slicing easier, it’s essential to chill the dough logs. Tightly wrap each dough log individually in plastic wrap, ensuring there are no gaps. Place the wrapped logs in the refrigerator for at least 1 hour, or until they are firm to the touch. This chilling period solidifies the butter in the dough, which prevents the cookies from spreading too much during baking and makes them much easier to slice into uniform rounds. If you’re short on time, you can also pop them in the freezer for about 30 minutes.
Once the dough logs are sufficiently chilled and firm, unwrap them. Prepare your baking sheets by lining them with parchment paper or silicone baking mats. This prevents sticking and makes for easy cleanup. Place the sanding sugar in a shallow dish. Gently roll each chilled dough log in the sanding sugar, pressing lightly so the sugar adheres to the surface of the log. This sugary coating will give the baked cookies a beautiful sparkle and a delightful crunch. After rolling in sugar, use a sharp knife to slice the logs into ½-inch thick rounds. Try to make each slice as uniform as possible for even baking. Place the sliced cookies onto your prepared baking sheets, leaving about 1-2 inches of space between each cookie to allow for slight spreading.
Baking Your Neapolitan Cookies to Perfection
Preheat your oven to 350°F (175°C). Arrange the sliced and sugared cookie dough rounds on the prepared baking sheets, ensuring they are not overcrowded. Bake for 10-14 minutes, or until the edges are lightly golden brown and the centers are set. The exact baking time will depend on your oven and the thickness of your cookies. Keep a close eye on them during the last few minutnon-alcoholic aleto prevent burning. The pale center should no longer look wet or doughy. Once baked, allow the cookies to cool on the baking sheets for a few minutes before carefully transferring them to a wire rack to cool completely. This cooling process is crucial for them to firm up properly. Enjoy your homemade Neapolitan cookies!
Conclusion:
There you have it! Your guide to creating delightful Neapolitan Cookies at home. We’ve walked through the steps to achieve those beautiful three-layered cookies, marrying the distinct flavors of chocolate, vanilla, and strawberry. These Neapolitan Cookies aren’t just a treat; they’re a nostalgic trip back to childhood, perfect for sharing with loved ones or enjoying as a quiet moment of indulgence.
For serving, these cookies are wonderfully versatile. They shine on their own, perhaps alongside a cup of coffee or tea. You can also elevate them by dipping them in melted chocolate for an extra layer of decadence. They make a fantastic addition to any cookie platter or as a unique dessert for parties and gatherings. Don’t be afraid to get creative with their presentation!
If you’re feeling adventurous, consider some simple variations. You could experiment with different extracts in each layer, like almond or lemon. For a richer chocolate flavor, try using cocoa powder in the chocolate layer. You could even add a touch of food coloring to enhance the vibrancy of each distinct band.
We encourage you to give this Neapolitan Cookies recipe a try. The process might seem a little involved, but the satisfaction of biting into those perfectly balanced layers is absolutely worth it. Happy baking!
Frequently Asked Questions about Neopolitan Cookies:
Q: My cookie layers are bleeding into each other during baking. How can I prevent this?
A: To prevent the layers from bleeding, ensure each layer is adequately chilled before adding the next. For the dough, chilling it in the refrigerator for at least 30 minutes after each color division and before rolling can help. When assembling, press the layers firmly together and consider a brief freeze before slicing and baking. This helps the distinct layers hold their shape.
Q: Can I make the dough for Neapolitan Cookies ahead of time?
A: Yes, absolutely! The dough for Neapolitan Cookies can be made a day or two in advance and stored in the refrigerator, tightly wrapped. This is a great way to save time if you plan to bake them for an event. When you’re ready to assemble, simply let the dough sit at room temperature for a few minutes until it’s pliable enough to roll out.
Neapolitan Cookies Recipe-Classic Italian Treats
A delightful recipe for classic Italian Neapolitan cookies, featuring distinct layers of vanilla, chocolate, and strawberry flavors, coated in sparkling sugar for a festive finish.
Ingredients
-
1 cup unsalted butter, softened to room temperature
-
⅔ cup granulated sugar
-
2 large egg yolks
-
2¼ teaspoons pure vanilla extract
-
2⅓ cups all-purpose flour
-
½ cup sanding sugar for coating
-
Red gel food coloring
-
Green gel food coloring
Instructions
-
Step 1
Cream together softened butter and granulated sugar in a large bowl with an electric mixer until light and fluffy (3-5 minutes). Add egg yolks and vanilla extract, mixing until smooth. -
Step 2
Gradually add all-purpose flour in two or three additions, mixing on low speed until just combined. Do not overmix. Divide the dough into three equal portions. -
Step 3
Color one portion of dough with red gel food coloring and another with green gel food coloring until evenly distributed. The third portion remains its natural pale yellow color. -
Step 4
On a lightly floured surface, roll each colored dough portion into an 8×10 inch rectangle, about ¼ inch thick. Slightly overlap the edges of the three rectangles to form a single layered sheet. Roll the layered dough tightly into a log, starting from a longer side, and seal the seam. -
Step 5
Tightly wrap each dough log in plastic wrap and chill in the refrigerator for at least 1 hour until firm. This step is crucial for easier slicing and to prevent spreading. -
Step 6
Preheat oven to 350°F (175°C). Line baking sheets with parchment paper. Unwrap chilled dough logs, roll them lightly in sanding sugar, and slice into ½-inch thick rounds. Place cookies on prepared baking sheets, leaving 1-2 inches between each. -
Step 7
Bake for 10-14 minutes, or until the edges are lightly golden brown and the centers are set. Let cookies cool on baking sheets for a few minutes before transferring to a wire rack to cool completely.
Important Information
Nutrition Facts (Per Serving)
It is important to consider this information as approximate and not to use it as definitive health advice.
Allergy Information
Please check ingredients for potential allergens and consult a health professional if in doubt.


Leave a Comment