
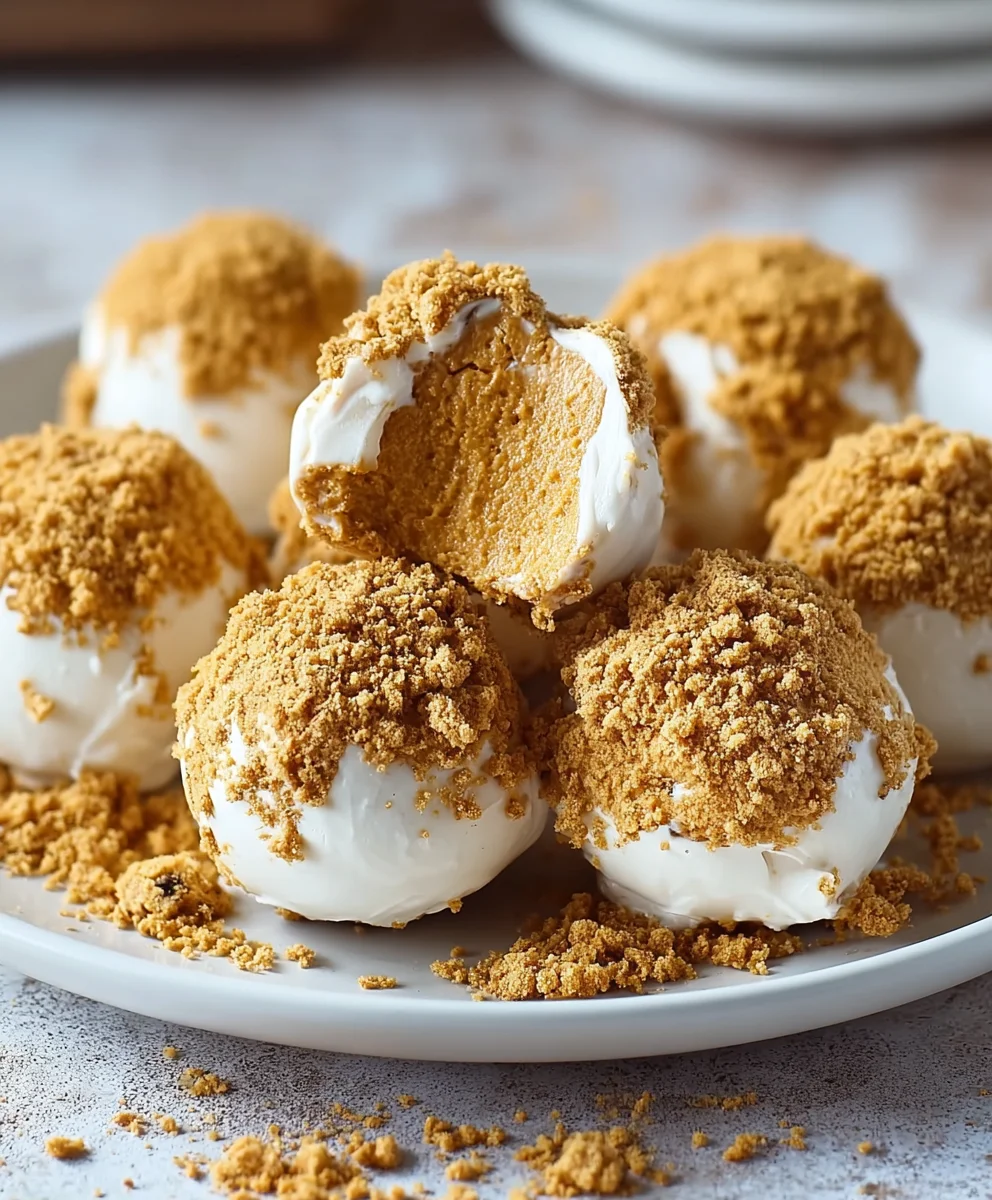
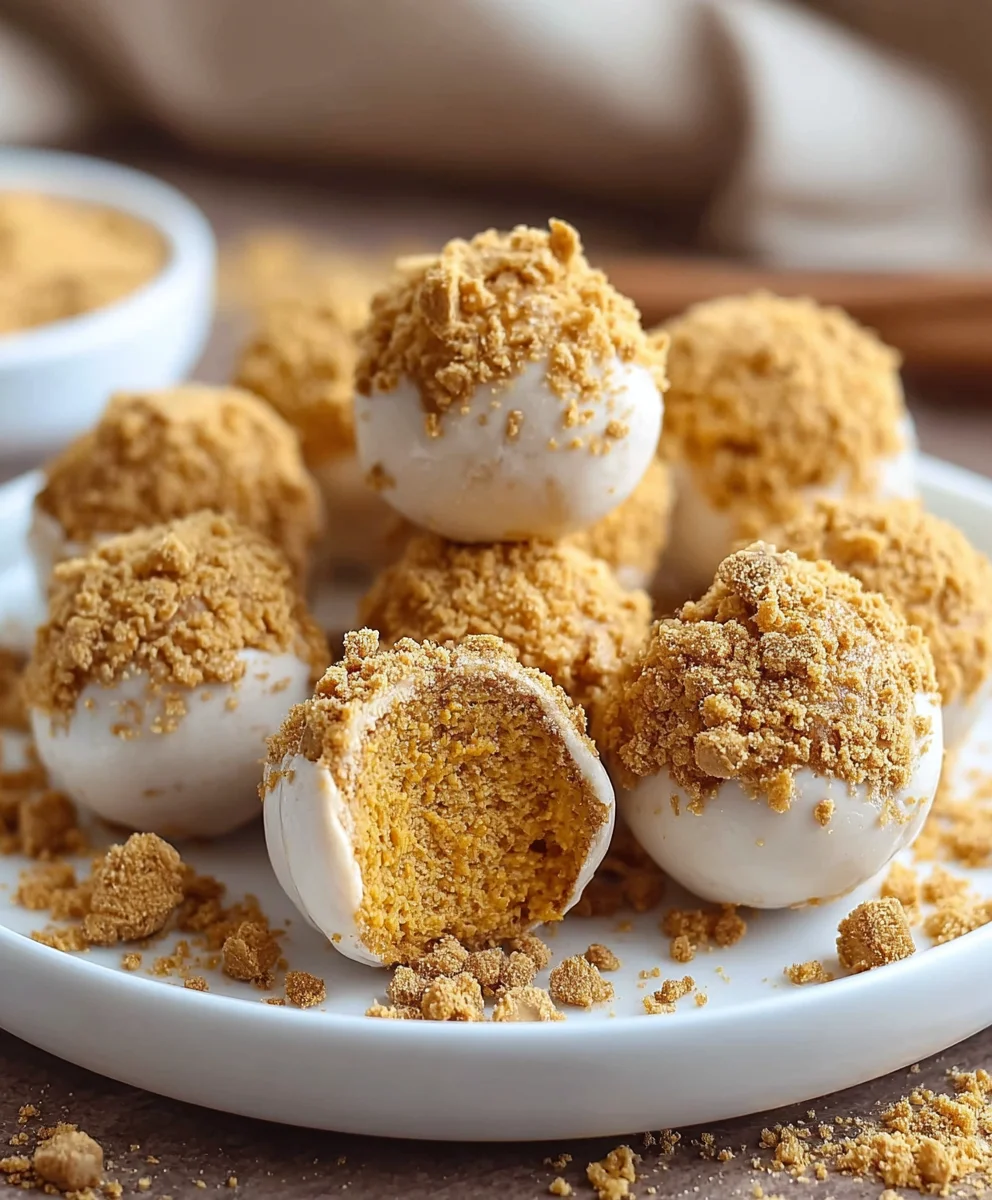
No Bake Pumpkin Cheesecake Balls are the whisper of autumn you’ve been craving, a delightful treat that conjures cozy evenings and the warm embrace of fall flavors. Forget the oven mitts and the waiting game; these little spheres of pure joy are incredibly simple to assemble, making them the perfect antidote to a busy day or a spontaneous dessert craving. What is it about these irresistible bites that captures our hearts? It’s the magical alchemy of creamy, tangy cream cheese mingling with the earthy sweetness of pumpkin, all elevated by a whisper of warming spices like cinnamon, nutmeg, and clove. Each No Bake Pumpkin Cheesecake Ball delivers a concentrated burst of that quintessential fall flavor, wrapped in a delicate, often chocolatey, shell that adds another layer of decadent deliciousness. They’re inherently shareable, delightfully poppable, and undeniably addictive – the ultimate no-bake indulgence for any pumpkin lover.
Ingredients:
- 8 oz cream cheese, softened
- ⅓ cup powdered sugar
- ⅔ cup pumpkin puree
- 1 tsp pumpkin pie spice
- 1 ½ cups graham cracker crumbs
- 1 ½ cups gingersnap crumbs
- 12 oz white almond bark (for coating)
- Optional: 1 cup orange candy melts (for drizzle)
Preparing the No Bake Pumpkin Cheesecake Filling
The foundation of these delightful No Bake Pumpkin Cheesecake Balls is a creamy, flavorful filling. Start by ensuring your cream cheese is truly softened. This means taking it out of the refrigerator about an hour before you plan to begin mixing. Softened cream cheese blends much more smoothly, preventing any lumps and resulting in a velvety texture for your cheesecake balls. In a large mixing bowl, add the softened cream cheese and the powdered sugar. Using an electric mixer on medium speed, beat these together until the mixture is light and fluffy, with no gritty texture from the sugar remaining. This process usually takes about 2-3 minutes.
Next, it’s time to incorporate the star of the show: pumpkin puree. Make sure you are using pure pumpkin puree, not pumpkin pie filling, which already contains added sugar and spices. Add the ⅔ cup of pumpkin puree to the cream cheese mixture. Then, sprinkle in the 1 teaspoon of pumpkin pie spice. This spice blend is essential for that quintessential fall flavor, bringing together cinnamon, nutmeg, ginger, and cloves. Mix these ingredients on low speed until they are just combined. It’s important not to overmix at this stage, as we want to maintain a good consistency for shaping.
Now, we’ll add the crunch and structure to our No Bake Pumpkin Cheesecake Balls. In a separate medium bowl, combine the 1 ½ cups of graham cracker crumbs and the 1 ½ cups of gingersnap crumbs. These two types of crumbs work together beautifully. The graham crackers provide a classic, slightly sweet base, while the gingersnaps add a wonderful warmth and a subtle spicy kick that complements the pumpkin perfectly. Give the crumbs a quick stir to distribute them evenly. Gradually add these combined crumbs to the cream cheese and pumpkin mixture. Continue to mix on low speed until the crumbs are fully incorporated. The dough will become thick and slightly sticky, which is exactly what you want. It should be firm enough to hold its shape but still pliable. If the mixture feels too wet, you can add a tablespoon or two more of graham cracker crumbs. If it feels too dry, a tiny splash of milk or cream can help.
Chilling and Shaping the Cheesecake Balls
Once your No Bake Pumpkin Cheesecake filling is well combined, it’s crucial to chill it. This step is vital for making the balls easy to handle and shape. Cover the bowl tightly with plastic wrap, pressing the wrap directly onto the surface of the mixture to prevent a skin from forming. Place the bowl in the refrigerator for at least 1 hour, or until the mixture is firm and easy to scoop. Chilling allows the flavors to meld together even further and firms up the cream cheese, making it less sticky and more manageable.
After the chilling period, it’s time to roll. Line a baking sheet or a large plate with parchment paper or wax paper. This will prevent the cheesecake balls from sticking. Using a small cookie scoop or two teaspoons, scoop out portions of the chilled mixture. Roll each portion between your palms to form uniform balls, about 1 to 1.5 inches in diameter. Aim for consistency in size so that they all cook or set evenly when coated. As you roll each ball, place it on the prepared baking sheet. You should get about 24-30 cheesecake balls, depending on their size. If the mixture becomes too soft while you are working, don’t hesitate to pop the entire baking sheet back into the refrigerator for another 15-20 minutes to firm up again.
Coating and Finishing the No Bake Pumpkin Cheesecake Balls
This is where the magic happens, transforming your cheesecake balls into irresistible treats. You’ll need to melt the white almond bark. Place the 12 oz of white almond bark in a microwave-safe bowl. Microwave on 50% power for 30-second intervals, stirring well after each interval, until it’s completely smooth and melted. Be patient; microwaving at too high a power or for too long can cause the bark to seize or burn. Alternatively, you can melt the almond bark using a double boiler.
Once the white almond bark is melted and smooth, it’s time to coat. Take one chilled cheesecake ball at a time and drop it into the melted almond bark. Use a fork or a toothpick to gently roll the ball around, ensuring it’s fully submerged and coated. Lift the ball out of the bark, letting any excess drip back into the bowl. Carefully place the coated ball back onto the parchment-lined baking sheet. You can use a second fork to gently push it off the dipping fork if needed. Repeat this process for all your cheesecake balls.
For an extra festive touch, you can create a drizzle. If you’re using the optional orange candy melts, melt them in a separate microwave-safe bowl using the same low-power, intermittent microwaving method described for the almond bark. Once melted and smooth, transfer the orange candy melts to a small ziplock bag. Snip off a tiny corner of the bag and drizzle the melted orange candy over the white-coated cheesecake balls. This adds a pop of color and another layer of flavor. Work relatively quickly as the almond bark will start to set.
Allow the No Bake Pumpkin Cheesecake Balls to set completely at room temperature for about 15-20 minutes, or speed up the process by placing them in the refrigerator for about 10 minutes. Once the coating is firm, they are ready to be enjoyed or stored. Store any leftovers in an airtight container in the refrigerator for up to a week.
Conclusion:
And there you have it! These No Bake Pumpkin Cheesecake Balls are the perfect sweet treat for any occasion, especially during the fall season. Their creamy texture and delicious pumpkin spice flavor are sure to be a crowd-pleaser. I hope you enjoyed making and devouring these delightful little bites as much as I did!
For serving, these cheesecake balls are fantastic on their own, or you can present them on a festive platter alongside other fall-themed desserts. They also make a wonderful addition to a cookie exchange or as a unique after-dinner treat. Feeling adventurous? Try rolling some of them in crushed graham crackers for an extra crunch, or drizzle them with a little melted chocolate for an added layer of decadence. Experiment with different spices like a pinch of nutmeg or a touch of ground cloves to customize the flavor profile.
I encourage you to give this recipe a try. It’s incredibly simple, requiring no oven time, making it perfect for busy days or when you just don’t want to heat up the kitchen. So, gather your ingredients and get ready to impress yourself and your loved ones with these irresistible No Bake Pumpkin Cheesecake Balls!
Frequently Asked Questions:
Can I make these cheesecake balls ahead of time?
Absolutely! These No Bake Pumpkin Cheesecake Balls are perfect for making ahead. You can store them in an airtight container in the refrigerator for up to 3-4 days. For longer storage, they freeze beautifully. Simply place them in a single layer on a baking sheet to freeze, then transfer to a freezer-safe bag or container for up to 2 months. Thaw them in the refrigerator before serving.
What if I don’t have pumpkin pie spice?
No problem! You can easily create your own pumpkin pie spice blend. A common combination is 1 teaspoon ground cinnamon, 1/4 teaspoon ground ginger, 1/8 teaspoon ground nutmeg, and a pinch of ground cloves. Adjust the ratios to your preference. You can also just use cinnamon if that’s all you have on hand, though it won’t have the full depth of pumpkin pie spice.
No Bake Pumpkin Cheesecake Balls
Easy no-bake fall treat featuring creamy pumpkin cheesecake filling rolled into balls and coated in white almond bark.
Ingredients
-
8 oz cream cheese, softened
-
⅓ cup powdered sugar
-
⅔ cup pumpkin puree
-
1 tsp pumpkin pie spice
-
1 ½ cups graham cracker crumbs
-
1 ½ cups gingersnap crumbs
-
12 oz white almond bark (for coating)
-
1 cup orange candy melts (for drizzle, optional)
Instructions
-
Step 1
Prepare the cheesecake filling: Beat softened cream cheese and powdered sugar until light and fluffy. Mix in pumpkin puree and pumpkin pie spice on low speed until just combined. -
Step 2
Add the crumbs: Gradually add the graham cracker and gingersnap crumbs to the cream cheese mixture, mixing on low speed until fully incorporated and a thick dough forms. -
Step 3
Chill and shape: Cover the bowl and refrigerate for at least 1 hour until firm. Line a baking sheet with parchment paper. Scoop and roll the mixture into uniform balls, about 1 to 1.5 inches in diameter, and place them on the prepared baking sheet. -
Step 4
Melt the coating: Melt the white almond bark in a microwave-safe bowl at 50% power in 30-second intervals, stirring until smooth. If using, melt orange candy melts separately. -
Step 5
Coat the balls: Dip each chilled cheesecake ball into the melted almond bark, ensuring full coverage. Lift out excess, and place coated balls back on the parchment-lined baking sheet. -
Step 6
Add drizzle (optional): Transfer melted orange candy melts to a ziplock bag, snip a tiny corner, and drizzle over the white-coated cheesecake balls. -
Step 7
Set and serve: Allow the cheesecake balls to set at room temperature for 15-20 minutes or in the refrigerator for 10 minutes. Store leftovers in an airtight container in the refrigerator for up to a week.
Important Information
Nutrition Facts (Per Serving)
It is important to consider this information as approximate and not to use it as definitive health advice.
Allergy Information
Please check ingredients for potential allergens and consult a health professional if in doubt.

Leave a Comment