
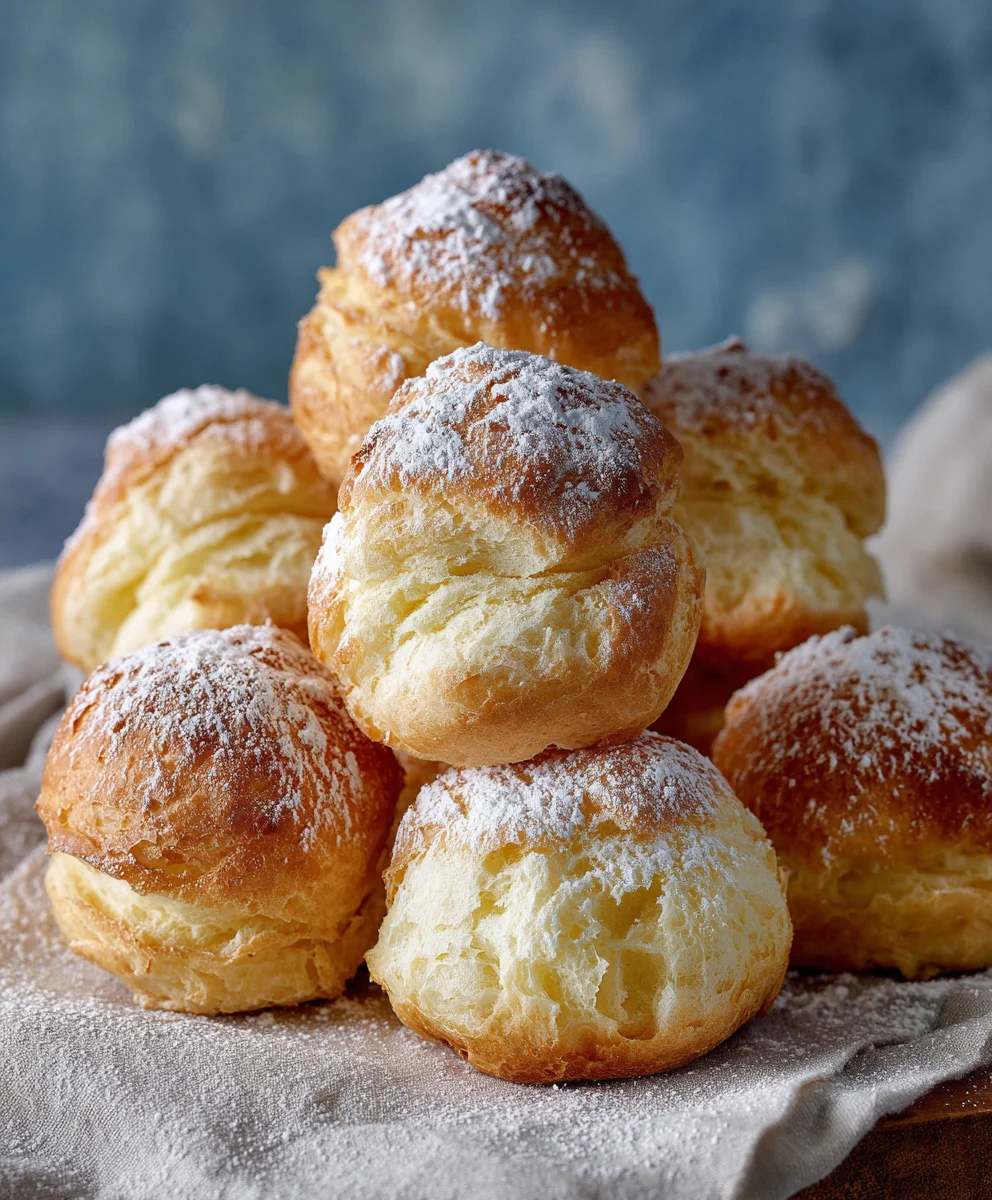
Nuns Puffs are a culinary revelation, a dessert so exquisitely light and airy, it truly feels like biting into a sweet, delicate cloud. If you’ve never experienced the pure joy of these golden-fried, sugar-dusted marvels, prepare to be utterly charmed. Today, I am absolutely delighted to guide you through the process of creating these ethereal treats right in your own kitchen.
A Glimpse into Their Delightful Past
Legend has it that these delightful morsels, often known as “Pets de Nonne” in French, originated in European convents centuries ago. Created by resourceful nuns using simple ingredients, they became a cherished, comforting delicacy. Perhaps it was their ability to bring a moment of sweet serenity, or their playful name, that secured their place in culinary history. Whatever their exact origins, the tradition of crafting these simple yet profound pastries has been passed down through generations, making Nuns Puffs a testament to timeless, comforting cookery.
People worldwide adore this dish for its unique and irresistible qualities. The magic truly lies in their texture: a subtle, barely-there crispness on the outside gives way to an astonishingly tender, melt-in-your-mouth interior. They are a celebration of simplicity, offering a gentle sweetness that perfectly complements a dusting of powdered sugar or a delicate drizzle of honey. Easy to prepare and even easier to devour, they are perfect for a special breakfast, an afternoon tea, or simply as a delightful treat to brighten any day.
Ingredients:
- For the Choux Pastry (Pâte à Choux) Base for your Nuns Puffs:
- 1 cup (240ml) Water – I find that plain water creates the crispest exterior for our Nuns Puffs, though some prefer a mix of water and milk.
- ½ cup (113g) Unsalted Butter – Cut into roughly 1-inch pieces. Using unsalted allows me to control the salt content precisely.
- ¼ teaspoon Salt – Just a touch to enhance the overall flavor profile of these delightful Nuns Puffs.
- 1 tablespoon Granulated Sugar – This helps with browning and adds a subtle sweetness, balancing the richness.
- 1 cup (125g) All-Purpose Flour – Sifted, if possible, to prevent lumps. This is the structural backbone of our Nuns Puffs.
- 4 large Eggs – At room temperature. This is crucial for proper emulsification and a smooth dough. You might need a tiny bit less or more, depending on your flour and humidity, so pay attention to the dough’s consistency.
- ½ teaspoon Vanilla Extract (optional) – For a lovely aromatic hint in your Nuns Puffs, especially if serving them sweet.
- For Frying the Nuns Puffs:
- 6-8 cups Vegetable Oil, Canola Oil, or Peanut Oil – Choose a neutral-flavored oil with a high smoke point. This amount is typically enough to achieve a depth of 2-3 inches in a medium-sized pot or Dutch oven, ensuring your Nuns Puffs can float freely.
- For Finishing and Serving your Nuns Puffs:
- ½ cup (60g) Confectioners’ Sugar (Powdered Sugar) – For dusting, giving our Nuns Puffs their classic, elegant finish.
- Optional: Cinnamon, nutmeg, or a pinch of cardamom mixed with the confectioners’ sugar for an added layer of aroma and spice.
- Optional: Chocolate sauce, fruit compote, or honey for dipping, if you’re feeling extra indulgent with your Nuns Puffs.
Preparing the Pâte à Choux for Heavenly Nuns Puffs
This stage is absolutely foundational to achieving light, airy, and hollow Nuns Puffs. Pay close attention to the details here, as they make all the difference!
- Combine Liquids and Fats: In a heavy-bottomed saucepan, ideally one that’s not too wide to minimize evaporation, combine your 1 cup of water, ½ cup of unsalted butter pieces, ¼ teaspoon of salt, and 1 tablespoon of granulated sugar. Place the saucepan over medium-high heat.
- Bring to a Rolling Boil: Heat the mixture, stirring occasionally to help the butter melt evenly and the sugar and salt dissolve. Watch it carefully! You want to bring this mixture to a full, rolling boil. This means active, vigorous bubbling. The butter should be completely melted and integrated.
- Remove from Heat and Add Flour: As soon as it reaches that rolling boil, immediately remove the saucepan from the heat. This timing is crucial. Add the 1 cup of sifted all-purpose flour all at once.
- Stir Vigorously: Using a sturdy wooden spoon or heatproof spatula, stir the flour into the hot liquid mixture very, very vigorously. At first, it might look lumpy and messy, but keep stirring. The mixture will quickly come together to form a cohesive ball of dough. This process is called creating the panade.
- Dry Out the Dough (The Panade Stage): Once the dough has formed a ball, return the saucepan to medium heat. Continue to stir and cook the dough for another 2-3 minutes. You’re essentially drying it out. You’ll know it’s ready when a thin film starts to form on the bottom of the saucepan, and the dough itself looks slightly drier, more cohesive, and less sticky. It should pull away from the sides of the pot cleanly. This step is vital for the structure of your Nuns Puffs! It helps develop the gluten and evaporates excess moisture, which leads to better puffing.
- Cool the Dough Slightly: Transfer the cooked dough (the panade) from the saucepan into a large mixing bowl. Spread it out a bit to help it cool faster. It’s important to cool the dough for about 5-10 minutes, or until it’s just warm to the touch – no longer steaming hot. If you add the eggs when the dough is too hot, you risk scrambling them, and that would be a tragedy for our Nuns Puffs! You can stir it occasionally to release steam and speed up the cooling.
- Incorporate the Eggs: Now for the delicate part! One at a time, crack the 4 large, room-temperature eggs into the slightly cooled dough. After adding each egg, beat it into the dough vigorously using your sturdy wooden spoon, spatula, or a stand mixer with the paddle attachment on medium speed.
- Beat Until Fully Incorporated: It will look like a separated, sludgy mess at first, almost as if it’s not going to come together. Don’t despair! Keep beating. The dough will eventually absorb the egg and become smooth and shiny again. Only add the next egg once the previous one is completely incorporated and the dough is uniform.
- Achieve the Right Consistency: After adding all the eggs (or potentially slightly less or more, depending on your flour and the dryness of your panade), your pâte à choux should be smooth, glossy, and thick enough to hold its shape but soft enough to fall slowly from a spoon in a “ribbon.” If you lift your spoon, the dough should hang from it in a “V” shape or a thick ribbon that breaks cleanly. This consistency is key for perfect, light Nuns Puffs. If it’s too stiff, your Nuns Puffs will be dense; too loose, and they’ll spread too much.
- Add Vanilla (Optional): If you’re using it, stir in the ½ teaspoon of vanilla extract at the very end. Your beautiful pâte à choux is now ready to be transformed into our wonderful Nuns Puffs!
The Frying Process: Transforming Dough into Golden Nuns Puffs
Frying can seem intimidating, but with careful attention to temperature, you’ll be making perfectly puffed Nuns Puffs in no time!
- Prepare Your Frying Station: Pour your 6-8 cups of neutral frying oil into a large, heavy-bottomed pot or Dutch oven. Ensure the oil depth is at least 2-3 inches. Place a deep-fry thermometer on the side of the pot, making sure the tip doesn’t touch the bottom.
- Heat the Oil: Place the pot over medium-high heat and slowly bring the oil temperature up to 350°F (175°C). Temperature control is paramount for Nuns Puffs. If the oil is too hot, the Nuns Puffs will brown too quickly on the outside and remain raw inside. If it’s too cool, they’ll absorb too much oil and be greasy.
- Prepare Your Landing Zone: While the oil heats, line a large baking sheet with several layers of paper towels. This will be where your freshly fried Nuns Puffs will drain. Have a slotted spoon or a spider skimmer ready for retrieving them.
- Scoop and Drop the Dough: Once your oil reaches the target temperature, it’s time to drop in the dough. You have a few options:
- Two-Spoon Method: My personal favorite for Nuns Puffs! Take two ordinary spoons. Use one spoon to scoop about 1 tablespoon of dough, and use the second spoon to gently push the dough off the first spoon directly into the hot oil. This creates lovely rustic, irregularly shaped Nuns Puffs.
- Piping Bag Method (for more uniform Nuns Puffs): If you prefer more uniform shapes, transfer the pâte à choux to a piping bag fitted with a large plain or star tip. Pipe 1-inch mounds of dough directly into the hot oil, using kitchen shears to snip the dough cleanly.
- Fry in Batches: Do not overcrowd the pot! This is a common mistake. Frying too many Nuns Puffs at once will drastically drop the oil temperature, leading to greasy, dense puffs. Fry only 5-7 Nuns Puffs at a time, depending on the size of your pot.
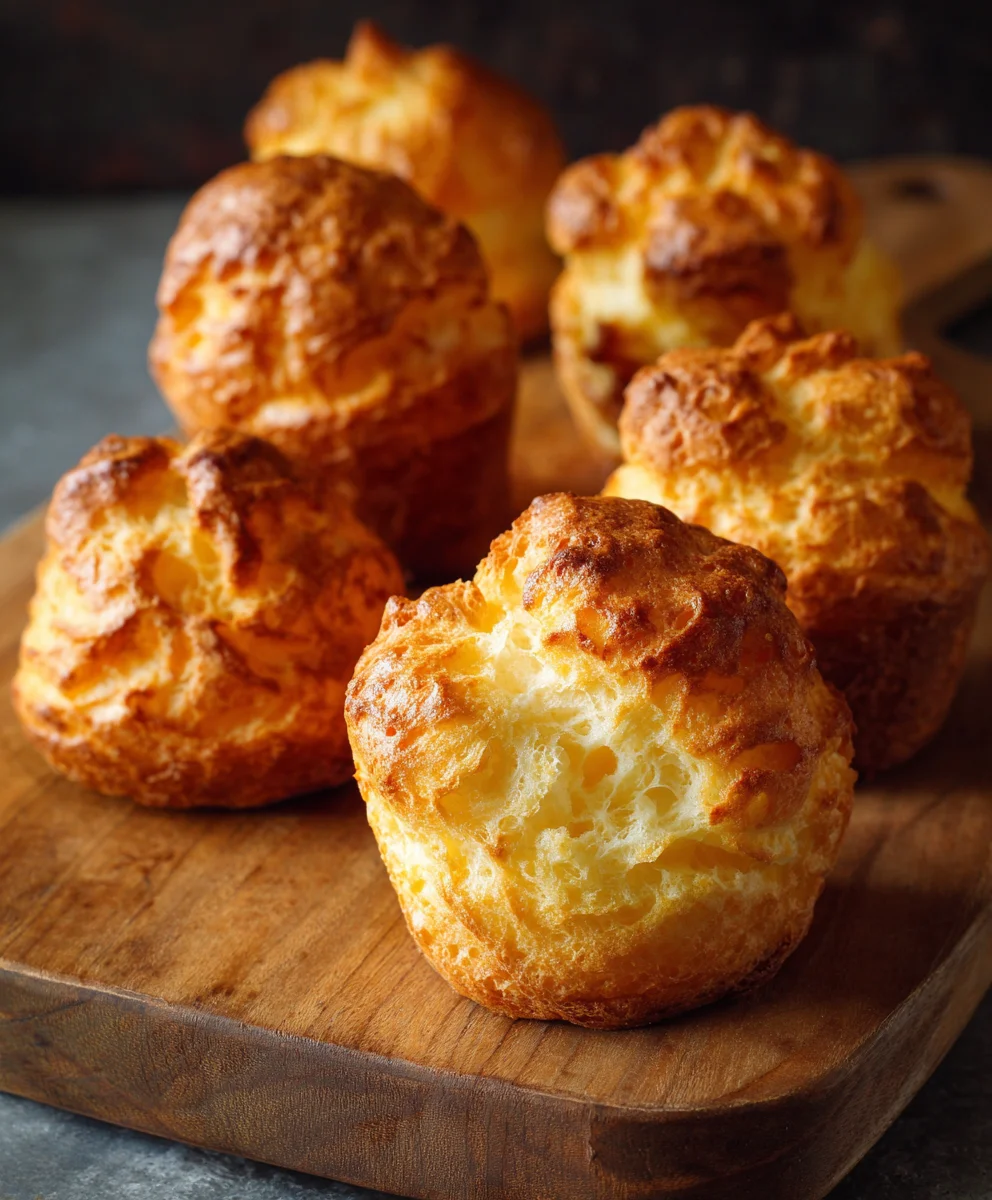
- Cook Until Golden and Puffed: Fry the Nuns Puffs for about 5-7 minutes, turning them occasionally with your slotted spoon or skimmer to ensure even browning on all sides. They will puff up dramatically and become beautifully golden brown. They should feel light when you lift them. The interior should be cooked through and hollow.
- Monitor Oil Temperature: Keep a close eye on your deep-fry thermometer throughout the entire process. Adjust the heat as needed to maintain that steady 350°F (175°C). It’s natural for the temperature to drop slightly when you add the dough, but it should recover quickly.
- Drain the Nuns Puffs: Once they are deeply golden brown and have puffed beautifully, use your slotted spoon or spider to carefully remove the Nuns Puffs from the hot oil. Transfer them immediately to the paper-towel-lined baking sheet to drain off any excess oil.
- Repeat: Continue frying the remaining dough in batches, always ensuring the oil returns to 350°F (175°C) between batches.
Finishing and Serving Your Delightful Nuns Puffs
The final touch makes these Nuns Puffs truly irresistible!
- Cool Slightly Before Dusting: Allow the Nuns Puffs to cool for just a minute or two on the paper towels. They are best served warm, but not piping hot, as the heat can melt the confectioners’ sugar too quickly.
- Prepare the Dusting Sugar: In a small bowl, measure out your ½ cup of confectioners’ sugar. If you like, you can mix in a pinch of cinnamon, nutmeg, or cardamom at this stage. I find a little spice really elevates the experience of these Nuns Puffs.
- Dust Generously: Once the Nuns Puffs are slightly cooled but still warm, transfer them to a clean, dry bowl or a large plate. Using a fine-mesh sieve, generously dust them with the confectioners’ sugar mixture. You want a lovely, ethereal coating, just like fresh snow! Toss them gently to coat evenly. Alternatively, you can place a handful of Nuns Puffs into a sturdy paper bag with the confectioners’ sugar and shake gently to coat.
- Serve Immediately: Nuns Puffs are truly at their best when served warm, almost straight from the fryer. The exterior will be wonderfully crisp, and the interior will be light and airy. The contrast is simply divine.
- Optional Accompaniments: While they are absolutely perfect on their own, you can offer little bowls of chocolate sauce, a berry compote, or a drizzle of local honey for dipping. These additional flavors can complement the simple elegance of the Nuns Puffs beautifully.
- Storage (If there are any left!): Nuns Puffs are definitely best enjoyed fresh. However, if you happen to have any leftovers (a rare occurrence in my kitchen!), they can be stored in an airtight container at room temperature for a day. They will lose their crispness but can be gently reheated in a toaster oven for a few minutes to crisp them up slightly.
Enjoy your homemade Nuns Puffs! There’s something incredibly satisfying about creating these delicate, airy treats from scratch. They are a testament to simple ingredients coming together to create something truly magical and comforting.
Conclusion:
As we wrap up our journey with this delightful recipe, I find myself already looking forward to my next batch. I truly believe that what we’ve explored today isn’t just a recipe; it’s an invitation to experience a moment of pure, unadulterated joy in your own kitchen. This isn’t just another dessert; it’s a testament to how a few simple ingredients, when combined with a little love and patience, can transform into something truly extraordinary. I’ve often said that the best recipes are those that offer a blend of comfort and surprise, and this one, without a doubt, delivers on both fronts. The sheer lightness, the delicate crispness giving way to a tender, airy interior – it’s an experience that tantalizes the senses and leaves a lasting impression of sophisticated sweetness. Imagine the quiet satisfaction of presenting these beautiful creations to your family and friends, watching their faces light up with the first bite. It’s a moment that transcends the ordinary, turning a simple gathering into a memorable occasion. The ease with which these come together, especially considering their impressive outcome, makes them an absolute gem for both seasoned bakers and enthusiastic beginners alike. You’re not just making a sweet treat; you’re crafting edible clouds of happiness, a little piece of culinary art that speaks volumes about your care and creativity.
Elevating Your Experience with Nuns Puffs: Serving Suggestions and Creative Twists
Now that you’ve mastered the art of creating these exquisite delights, let’s talk about how to truly make them shine on your table. While a simple dusting of powdered sugar is a classic and always welcome finish, don’t hesitate to let your imagination run wild with variations. For a touch of rich decadence, a warm drizzle of melted dark chocolate or a luxurious salted caramel sauce can elevate them to new heights. Picture the glossy sheen, the contrasting flavors – absolutely divine! If you’re leaning towards something fruitier and fresher, consider serving them alongside a vibrant berry compote, perhaps made with summer strawberries or tangy raspberries. A dollop of freshly whipped cream, lightly sweetened with vanilla bean paste, or a scoop of your favorite vanilla bean ice cream, creates a delightful textural contrast that is simply irresistible. For an elegant brunch presentation, a citrus glaze, infused with lemon or orange zest, adds a bright, zesty counterpoint to their inherent sweetness. And for those who appreciate a hint of spice, a sprinkle of cinnamon or nutmeg mixed with the powdered sugar before dusting can introduce a wonderfully aromatic warmth. Don’t forget the power of a perfect pairing; these are absolutely magnificent with a robust cup of coffee, a delicate Earl Grey tea, or even a glass of sparkling wine for a truly celebratory feel. Consider making them miniature for adorable petit fours at your next tea party, or larger for a more substantial dessert that still retains its ethereal quality. The possibilities are truly endless, limited only by your culinary curiosity.
Your Culinary Adventure Awaits!
I genuinely encourage you, with all my heart, to set aside some time very soon – perhaps this coming weekend – and embark on this wonderful baking adventure. Don’t let any lingering doubts hold you back; the process is incredibly forgiving, and the rewards are immense. There’s a profound satisfaction that comes from creating something so beautiful and delicious from scratch, and I promise you, these Nuns Puffs will deliver that feeling in spades. Imagine the aroma filling your kitchen, a sweet invitation promising deliciousness to come. This recipe is designed to bring joy, both in the making and in the tasting. It’s a perfect opportunity to practice mindfulness in the kitchen, to slow down and savor the process, and to create something truly special for yourself and your loved ones. Once you’ve experienced the sheer delight of biting into one of your freshly made puffs, you’ll understand exactly what I mean. But my encouragement doesn’t stop there! I am absolutely thrilled to hear about your experiences. I want to know how your Nuns Puffs turned out! Did you try a unique serving suggestion? Did you have a funny anecdote from the kitchen? Please, please, share your triumphs, your photos, and any tips you discovered along the way. Your feedback and creativity inspire not just me, but our entire community of fellow food lovers. Let’s make this recipe a shared experience, a testament to the simple pleasures of baking and sharing. So, grab your apron, preheat your oven, and prepare to fall in love with your new favorite sweet treat. Happy baking, and I can’t wait to see what you create!
Nuns Puffs: Light & Fluffy Sweet Treats!
Nuns Puffs, known in French as ‘Pets de Nonne’, are exquisite light and airy golden-fried pastries. These sweet, sugar-dusted treats feature a delicate crisp exterior and a melt-in-your-mouth interior, perfect for a special breakfast, afternoon tea, or any delightful occasion.
Ingredients
-
1 cup (240ml) Water
-
½ cup (113g) Unsalted Butter, cut into pieces
-
¼ teaspoon Salt
-
1 tablespoon Granulated Sugar
-
1 cup (125g) All-Purpose Flour, sifted
-
4 large Eggs, room temperature
-
½ teaspoon Vanilla Extract (optional)
-
6-8 cups Vegetable Oil (or Canola Oil, Peanut Oil) for frying
-
½ cup (60g) Confectioners’ Sugar
-
Optional: Cinnamon, nutmeg, or cardamom (for dusting)
-
Optional: Chocolate sauce, fruit compote, or honey (for dipping)
Instructions
-
Step 1
{‘@type’: ‘HowToStep’, ‘name’: ‘Prepare Choux Pastry Base: Boil Liquid Mixture’, ‘text’: ‘In a heavy-bottomed saucepan, combine 1 cup water, ½ cup unsalted butter, ¼ teaspoon salt, and 1 tablespoon granulated sugar. Bring to a full, rolling boil over medium-high heat, stirring until butter melts.’, ‘itemListElement’: [{‘@type’: ‘HowToSupply’, ‘name’: ‘Saucepan’}]} -
Step 2
{‘@type’: ‘HowToStep’, ‘name’: ‘Add Flour & Form Panade’, ‘text’: ‘Immediately remove saucepan from heat. Add 1 cup sifted all-purpose flour all at once. Stir vigorously with a sturdy spoon until the mixture forms a cohesive ball of dough (the panade).’, ‘itemListElement’: [{‘@type’: ‘HowToSupply’, ‘name’: ‘Wooden spoon or heatproof spatula’}]} -
Step 3
{‘@type’: ‘HowToStep’, ‘name’: ‘Dry Out the Panade’, ‘text’: ‘Return the saucepan with the dough to medium heat. Continue stirring and cooking for 2-3 minutes. The dough is ready when a thin film forms on the bottom of the pan, and the dough pulls cleanly away from the sides, indicating excess moisture has evaporated.’, ‘itemListElement’: [{‘@type’: ‘HowToSection’, ‘name’: ‘Choux Pastry’}]} -
Step 4
Transfer the panade to a large mixing bowl and spread it to cool for 5-10 minutes, until just warm. One at a time, beat in 4 large room-temperature eggs vigorously until each is fully incorporated and the dough is smooth, glossy, and thick enough to fall slowly from a spoon in a ‘ribbon’. Stir in ½ teaspoon vanilla extract, if using. -
Step 5
{‘@type’: ‘HowToStep’, ‘name’: ‘Heat Frying Oil’, ‘text’: ‘Pour 6-8 cups neutral frying oil into a large, heavy-bottomed pot (2-3 inches deep). Heat oil to 350°F (175°C) using a deep-fry thermometer. Line a baking sheet with paper towels for draining.’, ‘itemListElement’: [{‘@type’: ‘HowToSupply’, ‘name’: ‘Deep-fry thermometer’}, {‘@type’: ‘HowToSupply’, ‘name’: ‘Heavy-bottomed pot or Dutch oven’}, {‘@type’: ‘HowToSupply’, ‘name’: ‘Baking sheet’}]} -
Step 6
{‘@type’: ‘HowToStep’, ‘name’: ‘Fry Nuns Puffs in Batches’, ‘text’: ‘Once oil reaches 350°F (175°C), use two spoons to drop 1-tablespoon portions of dough into the hot oil. Fry 5-7 puffs at a time to avoid overcrowding and maintain oil temperature. Cook for 5-7 minutes, turning occasionally, until golden brown, significantly puffed, and hollow inside.’, ‘itemListElement’: [{‘@type’: ‘HowToSupply’, ‘name’: ‘Slotted spoon or spider skimmer’}]} -
Step 7
Remove fried puffs with a slotted spoon and transfer to the paper-towel-lined baking sheet to drain excess oil. Ensure the oil returns to 350°F (175°C) between batches before frying the remaining dough. -
Step 8
{‘@type’: ‘HowToStep’, ‘name’: ‘Dust & Serve’, ‘text’: “Allow Nuns Puffs to cool for 1-2 minutes. In a small bowl, combine ½ cup confectioners’ sugar with optional spices. Generously dust the warm puffs using a fine-mesh sieve or by shaking them in a paper bag. Serve immediately, plain or with chocolate sauce, fruit compote, or honey for dipping.”, ‘itemListElement’: [{‘@type’: ‘HowToSupply’, ‘name’: ‘Fine-mesh sieve’}, {‘@type’: ‘HowToSupply’, ‘name’: ‘Small bowl’}]} -
Step 9
Nuns Puffs are best enjoyed fresh. Leftovers can be stored in an airtight container at room temperature for one day and gently reheated in a toaster oven to re-crisp.
Important Information
Nutrition Facts (Per Serving)
It is important to consider this information as approximate and not to use it as definitive health advice.
Allergy Information
Please check ingredients for potential allergens and consult a health professional if in doubt.

Leave a Comment