
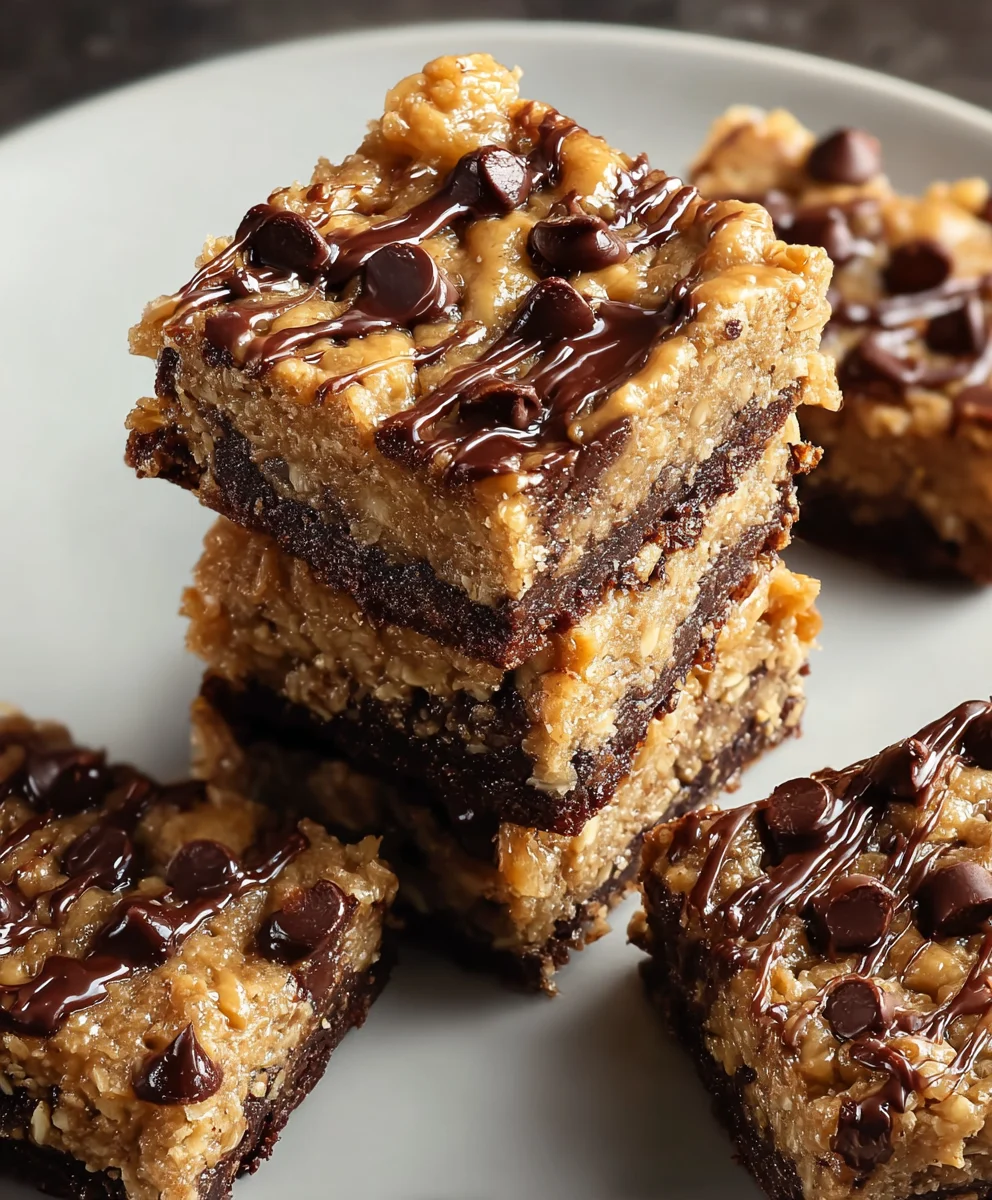
Peanut Butter Banana Bars are truly a match made in culinary heaven, bringing together two universally beloved ingredients into one irresistible treat. I am absolutely delighted to share this incredible recipe with you today, as it promises to become a firm favorite in your home. Imagine a soft, chewy bar bursting with the creamy richness of peanut butter and the natural sweetness of ripe bananas—it’s a symphony of flavors and textures that simply melts in your mouth, leaving you craving just one more bite.
The timeless pairing of peanut butter and banana has long held a special place in comfort food culture, evolving from simple sandwiches to delightful baked goods. People adore these homemade Peanut Butter Banana Bars not just for their undeniably delicious taste, but also for their incredible versatility and convenience. They are perfect as a quick breakfast on the go, a satisfying afternoon snack, or a wholesome dessert. The tender crumb, combined with that characteristic sweet and salty profile, makes them a genuinely comforting and approachable baked good that anyone can enjoy, regardless of their baking experience.
Ingredients:
- For the Peanut Butter Banana Bars:
- 2 ½ cups (300g) all-purpose flour, spooned and leveled
- 1 cup (200g) granulated sugar
- ½ cup (100g) light brown sugar, packed
- 1 teaspoon baking soda
- ½ teaspoon salt
- ½ cup (113g) unsalted butter, melted and cooled slightly
- 2 large eggs, at room temperature, lightly beaten
- 1 teaspoon vanilla extract
- 1 ½ cups (about 3-4 medium) very ripe bananas, mashed (approximately 360g)
- ½ cup (128g) creamy peanut butter (I prefer natural, unsweetened for a richer flavor, but any creamy kind works!)
- 1 cup (170g) chocolate chips (milk, semi-sweet, or dark – your choice!)
- For the Creamy Peanut Butter Frosting:
- ½ cup (113g) unsalted butter, softened to room temperature
- 1 cup (256g) creamy peanut butter
- 2 cups (240g) powdered sugar (confectioners’ sugar), sifted
- ¼ cup (60ml) milk (any kind, I often use whole milk for creaminess)
- 1 teaspoon vanilla extract
- Pinch of salt (optional, but enhances flavor)
- Optional Toppings:
- Extra chocolate chips
- Chopped roasted peanuts
- A drizzle of melted chocolate
- Flaky sea salt
Preparing for Baking
- First things first, I always get my oven preheating! I set it to 350°F (175°C). This ensures that when our delicious Peanut Butter Banana Bars are ready to go in, the oven is at the perfect, consistent temperature, which is crucial for even baking. If the oven isn’t fully preheated, your bars might not rise properly or could bake unevenly, nobody wants that! A properly preheated oven is the first step towards baking success for any recipe, especially for tender, moist bars like these. I usually give it at least 15-20 minutes to reach and hold the temperature steady.
- Next, I grab a 9×13 inch baking pan. To make sure our Peanut Butter Banana Bars don’t stick and are super easy to remove, I like to either lightly grease it with butter or non-stick spray, and then line it with parchment paper. If you’re using parchment, make sure to leave an overhang on the sides; this acts as little handles, making it a breeze to lift the cooled bars right out of the pan with minimal effort. This step is a real time-saver later when you’re eager to cut and serve, and it also helps prevent any sticky situations that might compromise the structure of your beautiful bars. Trust me, a little parchment goes a long way!
- Now, for the bananas! I take my very ripe bananas – the ones with lots of brown spots are the best because they’re full of natural sweetness and flavor – and mash them up. I usually use a fork or a potato masher right in a medium-sized bowl until they are mostly smooth, but a few small lumps are perfectly fine and actually add a bit of rustic texture to the Peanut Butter Banana Bars. We’re aiming for about 1 ½ cups of mashed banana, so adjust the number of bananas accordingly. For reference, three medium-sized very ripe bananas typically yield about 1 cup, so you’ll likely need 4-5 medium ones for the full amount. The riper the better here, folks, it truly makes a difference in the moisture and intense banana flavor of the finished bars. Don’t use under-ripe bananas; they won’t provide the sweetness or the essential moisture needed for this recipe.
Crafting the Peanut Butter Banana Bar Base
- In a large mixing bowl, I like to whisk together all of my dry ingredients. This step is super important for ensuring that every bite of our delicious Peanut Butter Banana Bars has a consistent flavor and texture. I typically add the all-purpose flour, making sure it’s lightly spooned into the measuring cup and then leveled off with a straight edge to avoid adding too much. Adding too much flour can make the bars dense and dry, which is the opposite of what we want! Then, I stir in the granulated sugar and the light brown sugar. The combination of both sugars adds a wonderful depth of sweetness: the granulated sugar provides classic sweetness, while the light brown sugar adds a touch of molasses flavor and helps keep the bars extra moist and chewy. Next, I’ll add the baking soda, which is our essential leavening agent that will help these bars rise beautifully and become wonderfully tender and soft. A pinch of salt is crucial here; it doesn’t just make the bars salty, it actually enhances all the other flavors, particularly the sweet and nutty notes we’re aiming for, providing a delightful balance. I take a whisk and gently combine everything, making sure there are no lumps of flour or sugar and that the leavening and salt are evenly distributed throughout. This thorough mixing now will save us from overmixing later when we add the wet ingredients, which is key for a tender crumb.
- Now, it’s time for the wet ingredients! In a separate medium bowl, I combine the slightly cooled melted butter. It’s important that it’s not piping hot, as hot butter could start to cook the eggs, leading to scrambled eggs in your batter – a definite no-go! To this, I add the two large eggs, which I’ve let come to room temperature and lightly beaten beforehand. Room temperature eggs emulsify much better with other ingredients, leading to a smoother, more uniform batter and a more consistent texture in the final bars. Then comes the lovely vanilla extract, which adds a warm, aromatic note that complements the banana and peanut butter flavors perfectly, tying them all together beautifully. I give these a good whisk until they are well combined and look homogeneous, a smooth yellow liquid ready for the next step.
- To this wet mixture, I now add the mashed ripe bananas we prepared earlier. I also add the creamy peanut butter. For these Peanut Butter Banana Bars, I find that a good quality, creamy peanut butter without too much added sugar or oil works best, as it lets the natural peanut flavor shine through without being masked by artificial sweetness. If using natural peanut butter that separates, make sure to stir it very well before measuring. I stir these together vigorously with a spoon or whisk until everything is fully incorporated and smooth. It might look a bit thick and luscious, and that’s exactly what we’re going for! This combination forms the heart of the amazing flavor in our bars, delivering that classic peanut butter and banana pairing we all adore.
- It’s time to bring the two mixtures together! I pour the wet banana-peanut butter mixture into the large bowl with our dry ingredients. Using a spatula or a sturdy spoon, I gently fold the wet into the dry. The key here is to mix just until no streaks of dry flour remain. You want to be gentle but thorough. Overmixing can develop the gluten in the flour too much, resulting in tough, dense bars instead of the soft, tender texture we’re aiming for. A few small lumps of batter are totally fine; in fact, they’re often a sign that you haven’t overmixed! The goal is just to combine, not to vigorously beat.
- Finally, I fold in the chocolate chips. I love a generous amount of chocolate chips in my Peanut Butter Banana Bars – they add little pockets of melted chocolate goodness that burst with flavor in every bite! You can use milk chocolate, semi-sweet, or even dark chocolate, depending on your preference and how sweet you like your treats. If you’re feeling adventurous, mini chocolate chips or even chopped peanut butter cups would be a fantastic addition here for an extra layer of decadence. I gently stir them in until they are evenly distributed throughout the batter, trying not to crush them or overmix in the process. This ensures every piece gets a delightful chocolatey surprise.
Baking the Bars
- Now that our batter is ready, I carefully pour it into the prepared 9×13 inch baking pan. I use my spatula to gently spread the batter evenly across the bottom of the pan, making sure it reaches all the corners and forms a uniform layer. A smooth, even layer will ensure uniform baking, preventing thin spots from overbaking and thick spots from being undercooked, and also contributes to a beautiful presentation once sliced. I might lightly tap the pan on the counter a couple of times to release any large air bubbles.
- I carefully place the pan into our preheated 350°F (175°C) oven. The baking time will be approximately 25-30 minutes. However, every oven is a little different and can have hot spots, so I always keep a close eye on them starting around the 22-minute mark. You’ll know the Peanut Butter Banana Bars are done when the edges are lightly golden brown and look set, and a wooden skewer or toothpick inserted into the center comes out clean or with just a few moist crumbs attached. If it comes out with wet batter, they definitely need a few more minutes. If it comes out perfectly clean with no crumbs, you might be heading into overbaked territory. Don’t overbake, as that can lead to dry, crumbly bars instead of the moist, tender ones we’re aiming for! The sweet spot is usually when the top springs back lightly when gently pressed.
- Once baked to perfection, I carefully remove the pan from the oven. At this point, the aroma filling your kitchen will be absolutely incredible – a delightful blend of sweet banana, rich peanut butter, and warm chocolate that will make your mouth water! I let the bars cool in the pan on a wire rack for at least 15-20 minutes. This initial cooling period allows them to set up properly and firm up before we attempt to remove them, preventing them from breaking apart. It also continues the internal cooking process slightly as the residual heat dissipates.
- After the initial cooling, I use those parchment paper “handles” to gently lift the entire slab of Peanut Butter Banana Bars out of the pan and transfer it to the wire rack to cool completely. This step is important because we want the bars to be fully cooled before we apply the frosting. If you try to frost warm bars, the frosting will simply melt and slide right off, creating a messy puddle instead of a delicious, creamy topping. Depending on the room temperature, this cooling process can take anywhere from 1 to 2 hours. Patience is a virtue here! A fully cooled bar ensures a perfect frosting application.
Whipping Up the Creamy Peanut Butter Frosting
- While the bars are cooling, let’s get started on this absolutely irresistible creamy peanut butter frosting. In a large mixing bowl, I add the softened unsalted butter and the creamy peanut butter. It’s really important that the butter is at room temperature – not melted, but soft enough that you can easily press an indentation into it with your finger. This ensures a smooth, lump-free frosting because room temperature butter creams beautifully and emulsifies well with other ingredients. If your butter isn’t soft enough, you can cut it into smaller pieces and let it sit for another 10-15 minutes, or gently warm it in the microwave for a few seconds (but be careful not to melt it!).
- Using an electric mixer (either a stand mixer with the paddle attachment or a hand mixer), I cream the butter and peanut butter together on medium speed until they are light, fluffy, and well combined. This usually takes about 2-3 minutes. I make sure to scrape down the sides of the bowl occasionally with a spatula to ensure everything is incorporated evenly and no pockets of unmixed butter or peanut butter remain. This thorough initial creaming makes the base of your frosting incredibly smooth. This step builds the creamy, airy foundation for our frosting, ensuring a luxurious texture.
- Now, I gradually add the sifted powdered sugar, one cup at a time, mixing on low speed until each addition is just incorporated before adding the next. Sifting the powdered sugar beforehand is a small but mighty step that prevents lumps in your frosting, resulting in a perfectly smooth, silky texture that melts in your mouth. If you skip sifting, you might end up with gritty frosting, which is less appealing. As the frosting gets thicker with each addition of sugar, I might need to increase the mixer speed slightly to keep things moving.
- Once all the powdered sugar is in, the mixture will be quite thick and possibly a little crumbly. This is when I start adding the milk and vanilla extract. I add about half of the milk first, along with the vanilla extract and an optional pinch of salt. The salt really helps to balance the sweetness of the powdered sugar and bring out the deep, nutty peanut butter flavor even more, making the frosting even more craveable. I mix this on medium speed, adding the remaining milk a tablespoon at a time until the frosting reaches my desired consistency. I like it thick enough to hold its shape beautifully when spread on the bars, but still wonderfully spreadable and creamy. Don’t be afraid to adjust the milk amount slightly; it can vary based on the humidity in your kitchen and the natural consistency of your peanut butter. If it’s too thick, add a tiny bit more milk; if too thin, a spoonful more sifted powdered sugar.
- Finally, I increase the mixer speed to medium-high and beat the frosting for another 1-2 minutes. This incorporates additional air, making the frosting wonderfully light, airy, and fluffy, almost like a cloud of peanut butter goodness. Scrape down the bowl one last time to ensure everything is perfectly blended and there are no stray bits of unmixed ingredients hiding at the bottom. The finished frosting should be irresistibly smooth and spreadable.
Assembling and Finishing the Peanut Butter Banana Bars
- Once the Peanut Butter Banana Bars are completely cool – and I mean completely! – it’s time for the best part: frosting them. As I mentioned before, if the bars are even slightly warm, your beautiful, carefully made frosting will melt and create a runny mess. So, patience pays off here! I use an offset spatula or the back of a large spoon to spread the creamy peanut butter frosting evenly over the top of the cooled bars. I try to get a nice, thick, consistent layer from edge to edge, ensuring every bite of our Peanut Butter Banana Bars gets a generous dollop of that delicious topping. You can create swirls or smooth it out perfectly – whatever look you prefer.
- Now for the fun part: optional toppings! This is where you can really personalize your Peanut Butter Banana Bars and add extra flair and texture. I often sprinkle extra chocolate chips on top for an added chocolatey burst and visual appeal, or a handful of chopped roasted peanuts for extra crunch and an intensified nutty flavor. A light sprinkle of flaky sea salt is also fantastic; it truly elevates all the flavors, cutting through the sweetness and highlighting the richness of the peanut butter and banana. Sometimes, I even melt a little extra chocolate (milk, dark, or white) and drizzle it artfully over the top for a more decorative and gourmet finish. Get creative here!
- Once frosted and topped, I like to pop the Peanut Butter Banana Bars into the refrigerator for about 15-30 minutes. This chilling period helps the frosting set up nicely and firm up, making them much easier to cut into neat, clean squares without the frosting sticking to your knife or smudging. It also slightly firms up the bars themselves, making for a cleaner cut.
- After chilling, remove the pan from the refrigerator. Using a sharp knife, I carefully cut the bars into squares or rectangles of your desired size. I usually get about 24 bars from a 9×13 inch pan when cutting them into fairly standard two-bite pieces, but you can make them larger or smaller depending on your preference for serving. For super clean cuts, which makes for beautiful presentation, wipe your knife with a warm, damp cloth and clean it between each slice. This prevents frosting from dragging and smearing onto the next piece.
- Finally, serve these incredible Peanut Butter Banana Bars and watch them disappear! They are truly a crowd-pleaser and perfect for snacks, desserts, or even a delightful breakfast treat (I won’t tell if you grab one with your morning coffee!). These bars store well in an airtight container at room temperature for up to 3 days, keeping them wonderfully moist. For longer storage, you can keep them in the refrigerator for up to a week. For even longer term enjoyment, they freeze beautifully for up to 2-3 months. Just make sure they are well-wrapped in plastic wrap and then foil to prevent freezer burn. To thaw, simply take them out of the freezer and let them come to room temperature. Enjoy every single bite of these homemade delights; they’re truly a labor of love that pays off in deliciousness!

Conclusion:
Well, my friends, we’ve reached the sweet end of our journey through this incredible recipe, and I truly hope you’re as excited as I am about what you’ve learned. If there’s one recipe I could urge you to try this week, it would undoubtedly be this one. Why, you ask? Because these aren’t just any ordinary baked goods; they are the quintessential treat that effortlessly marries health-conscious ingredients with an utterly irresistible flavor profile. I’m talking about a snack or dessert that feels indulgent, yet is packed with the natural goodness of ripe bananas and the comforting richness of peanut butter. The simplicity of preparation is a game-changer for busy schedules, allowing you to whip up a batch with minimal fuss and maximum reward. Imagine biting into a soft, chewy bar, where the sweet, fruity notes of banana dance perfectly with the creamy, nutty undertones of peanut butter – it’s a symphony for your taste buds, truly. These Peanut Butter Banana Bars are more than just a recipe; they are a ticket to a moment of pure, unadulterated culinary bliss, a go-to for breakfast on the run, an afternoon pick-me-up, or a satisfying dessert after dinner. They’re a testament to the fact that wholesome can also mean utterly delicious, and I promise you, they will become an instant favorite in your kitchen, adored by adults and kids alike. Their moist texture and deeply satisfying flavor make them incredibly versatile, perfect for stashing in lunchboxes, bringing to potlucks, or simply enjoying with a cup of coffee or tea on a lazy weekend morning. You’ll find yourself reaching for them again and again, and your friends and family will be begging you for the recipe. They are, quite simply, a joy to make and an even greater joy to eat.
Elevate Your Bar Experience: Serving Suggestions & Creative Twists
Now that you’re ready to bake (or perhaps have already pulled a warm batch from the oven!), let’s talk about how to truly make these bars shine. While they are absolutely divine on their own, whether served at room temperature, slightly warm with a melty center, or even chilled for a firmer, fudgier bite, there are so many ways to customize your experience. For an extra touch of decadence, I love to sprinkle a few dark chocolate chips on top right after they come out of the oven, allowing them to soften and create a beautiful, gooey swirl. A light dusting of sea salt can also beautifully enhance the sweet and savory notes. For a truly dessert-worthy treat, consider serving a warm bar with a scoop of vanilla bean ice cream or a dollop of freshly whipped cream – it’s an absolute dream combination! If you’re leaning more towards a healthy breakfast option, a drizzle of pure maple syrup or a sprinkle of toasted shredded coconut can add another layer of flavor and texture. Don’t be afraid to experiment with other nut butters, either; almond butter or cashew butter can offer a slightly different, yet equally delicious, flavor profile. For an added boost of nutrition and texture, try folding in a handful of chopped walnuts or pecans into the batter. A dash of cinnamon or nutmeg can also introduce a lovely warmth, especially appealing during colder months. If you’re catering to dietary restrictions, remember that these bars are often easily adaptable. You can typically use gluten-free all-purpose flour blends to make them suitable for those avoiding gluten, and plant-based milks and egg substitutes can easily transform them into a vegan delight, ensuring everyone can enjoy this fantastic treat. The possibilities are truly endless, limited only by your imagination, and that’s one of the things I love most about this particular recipe – its incredible adaptability. From a simple snack to an elaborate dessert, these bars are ready to be transformed.
Your Turn to Bake and Share!
So, what are you waiting for? I wholeheartedly encourage you to roll up your sleeves, gather your ingredients, and give these magnificent bars a try. I promise you, the effort is minimal, and the reward is immense. You’ll be amazed at how quickly these disappear once your loved ones get a taste! There’s nothing quite like the aroma of freshly baked goods filling your home, and these bars deliver that comforting scent in spades. Once you’ve baked your batch, don’t keep all that deliciousness to yourself! I would absolutely love to hear about your experience. Did you add any unique twists? How did your family react? What’s your favorite way to enjoy them? Please, feel free to share your thoughts, tips, and even photos in the comments section below. Your feedback and creativity not only inspire me but also help other bakers in our community discover new ways to enjoy this wonderful recipe. Baking is a journey, and I believe it’s best when shared. So, go ahead, embrace the joy of baking, savor every bite, and become a part of our culinary conversation. I’m genuinely excited to see and hear about your baking adventures with these truly irresistible bars. Happy baking!
Peanut Butter Banana Bars: Easy & Delicious Recipe!
Peanut Butter Banana Bars are truly a match made in culinary heaven, bringing together two universally beloved ingredients into one irresistible treat. Imagine a soft, chewy bar bursting with the creamy richness of peanut butter and the natural sweetness of ripe bananas—it’s a symphony of flavors and textures that simply melts in your mouth. Perfect as a quick breakfast, satisfying snack, or wholesome dessert, these bars are adored for their delicious taste, versatility, and convenience, offering a comforting sweet and salty profile.
Ingredients
-
2 ½ cups (300g) all-purpose flour
-
1 cup (200g) granulated sugar
-
½ cup (100g) light brown sugar, packed
-
1 teaspoon baking soda
-
½ teaspoon salt
-
½ cup (113g) unsalted butter, melted
-
2 large eggs, at room temperature, lightly beaten
-
1 teaspoon vanilla extract
-
1 ½ cups (360g) very ripe bananas, mashed
-
½ cup (128g) creamy peanut butter
-
1 cup (170g) chocolate chips
-
For the frosting:
-
½ cup (113g) unsalted butter, softened
-
1 cup (256g) creamy peanut butter
-
2 cups (240g) powdered sugar, sifted
-
¼ cup (60ml) milk
-
1 teaspoon vanilla extract
-
Pinch of salt (optional)
-
Optional toppings:
-
Extra chocolate chips
-
Chopped roasted peanuts
-
Drizzle of melted chocolate
-
Flaky sea salt
Instructions
-
Step 1
Preheat oven to 350°F (175°C). -
Step 2
Grease a 9×13 inch baking pan or line with parchment paper, leaving an overhang. -
Step 3
Mash 1 ½ cups (360g) very ripe bananas in a medium bowl; set aside. -
Step 4
In a large bowl, whisk together flour, granulated sugar, light brown sugar, baking soda, and salt. -
Step 5
In a separate medium bowl, whisk together melted butter, eggs, and vanilla extract. -
Step 6
Add mashed bananas and creamy peanut butter to the wet mixture; stir until smooth. -
Step 7
Pour the banana-peanut butter mixture into the dry ingredients. Gently fold until just combined and no dry streaks remain. -
Step 8
Gently fold in the chocolate chips until evenly distributed. -
Step 9
Pour batter into the prepared pan and spread evenly. -
Step 10
Bake for 25-30 minutes, or until edges are golden brown and a toothpick inserted into the center comes out clean or with a few moist crumbs. -
Step 11
Remove from oven and let cool in the pan on a wire rack for 15-20 minutes. -
Step 12
Lift bars out of the pan using parchment overhang and transfer to a wire rack to cool completely (1-2 hours) before frosting. -
Step 13
For the frosting, in a large mixing bowl, cream softened butter and creamy peanut butter with an electric mixer on medium speed for 2-3 minutes, scraping down sides. -
Step 14
Gradually add sifted powdered sugar, one cup at a time, mixing on low speed until incorporated. -
Step 15
Add milk, vanilla extract, and optional pinch of salt. Mix on medium speed, adding remaining milk a tablespoon at a time until desired spreadable consistency is reached. -
Step 16
Increase mixer speed to medium-high and beat for 1-2 minutes until light and fluffy. Scrape bowl to ensure blending. -
Step 17
Once bars are completely cool, spread creamy peanut butter frosting evenly over the top. -
Step 18
Optionally, sprinkle with extra chocolate chips, chopped peanuts, a drizzle of melted chocolate, or flaky sea salt. -
Step 19
Chill bars in the refrigerator for 15-30 minutes to set the frosting. -
Step 20
Remove from refrigerator and cut into squares. For clean cuts, wipe knife between slices. -
Step 21
Serve and enjoy. Store in an airtight container at room temperature for up to 3 days, or refrigerate for up to a week. Freeze for 2-3 months.
Important Information
Nutrition Facts (Per Serving)
It is important to consider this information as approximate and not to use it as definitive health advice.
Allergy Information
Please check ingredients for potential allergens and consult a health professional if in doubt.


Leave a Comment