
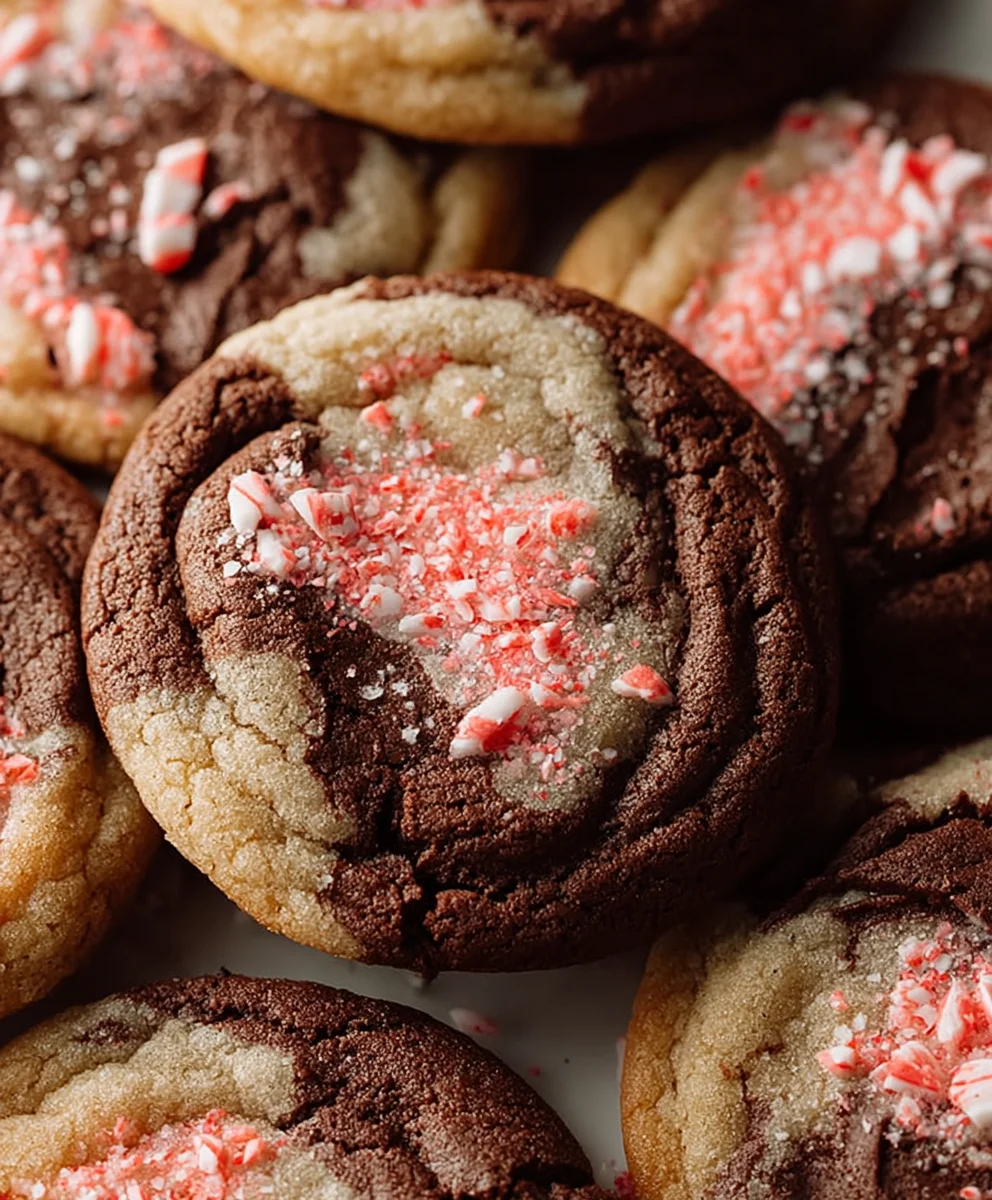
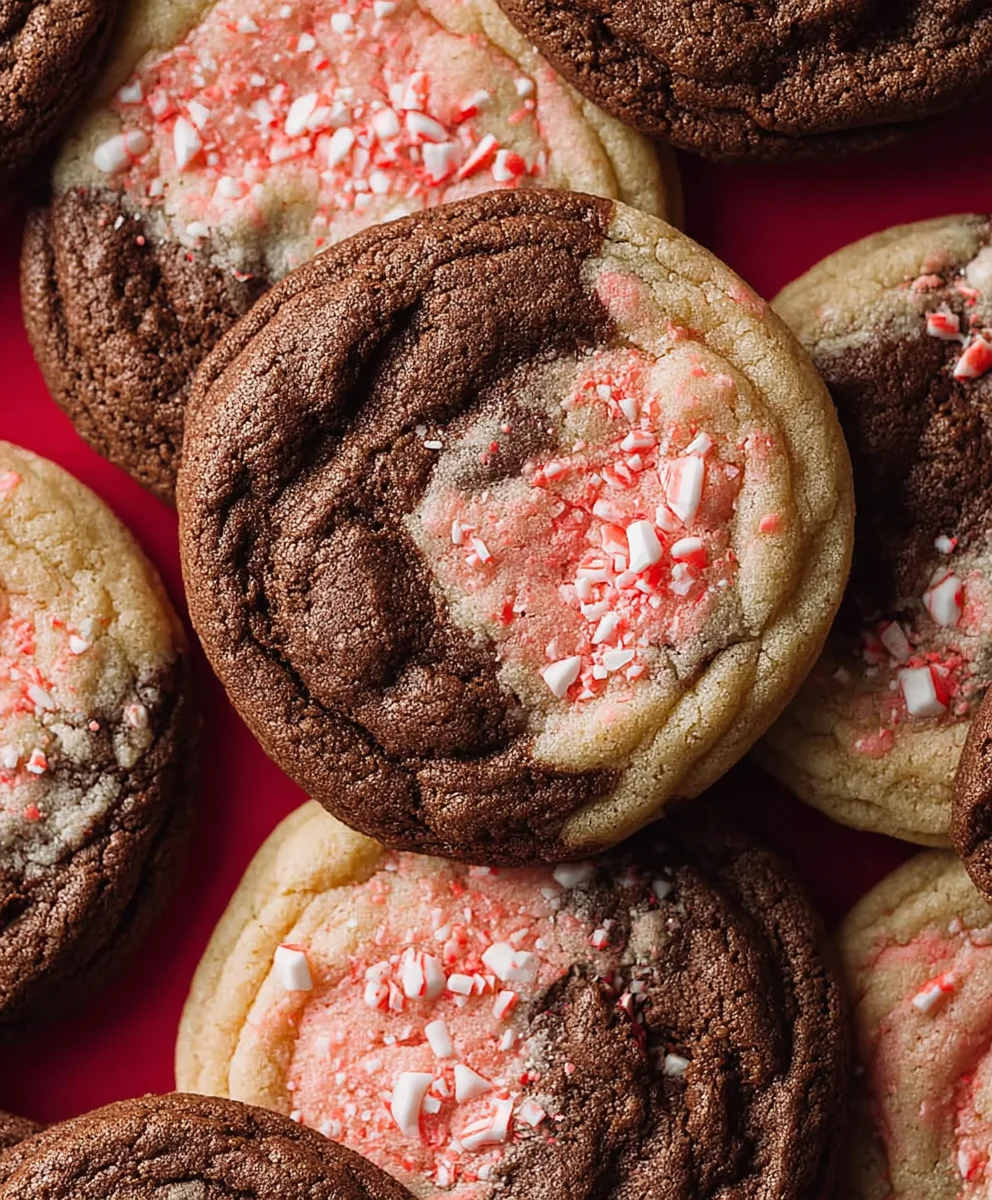
Peppermint Mocha Cookies are more than just a holiday treat; they’re a little piece of winter magic baked into every bite. Imagin extracte the rich, dark allure of chocolate meeting the invigorating coolness of peppermint, all perfectly balanced in a delightfully chewy cookie. It’s no wonder these festive delights are a crowd-pleaser, evoking cozy evenings by the fire and the joyous spirit of the season. What truly elevates our Peppermint Mocha Cookies is the careful balance of flavors – the deep, roasted notes of espresso powder amplifying the chocolate, while the subtle kiss of peppermint oil cuts through, creating a sensation that’s both warming and refreshing. These aren’t your average cookies; they’re an experience, a decadent escape that’s surprisingly simple to bring to life in your own kitchen. Get ready to fall in love with the irresistible charm of these spectacular cookies.
Ingredients:
- 1 cup (227g) unsalted butter, softened
- 1¼ cup (250g) granulated sugar, plus extra for rolling
- 1 large egg
- 1 teaspoon pure vanilla extract
- ½ teaspoon pure peppermint extract
- ½ teaspoon baking powder
- ½ teaspoon salt
- ¼ teaspoon baking soda
- 2¼ cups (280g) all-purpose flour
- ½ teaspoon instant coffee granules
- 2 tablespoons unsweetened cocoa powder
- Pink food gel (for coloring)
Preparing the Dough
Creaming the Butter and Sugar
The foundation of any great cookie is a well-creamed butter and sugar mixture. Start by ensuring your unsalted butter is truly softened – it should yield slightly when pressed but not be melted. In a large mixing bowl, combine the softened butter with the 1¼ cups of granulated sugar. Using an electric mixer (a stand mixer with a paddle attachment is ideal, but a hand mixer works beautifully too), beat these together on medium speed. You’re looking for a light and fluffy consistency, which usually takes about 3-5 minutes. The mixture will turn pnon-alcoholic ale yellow and increase in volume. This aeration step is crucial for creating a tender cookie. Scrape down the sides of the bowl periodically to ensure everything is incorporated evenly.
Adding Wet Ingredients
Once the butter and sugar are perfectly creamed, it’s time to add the egg and extracts. Crack the large egg directly into the bowl. Follow with the pure vanilla extract and the distinct, invigorating pure peppermint extract. Beat again on medium speed until everything is just combined and smooth. Don’t overmix at this stage; you don’t want to develop the gluten in the flour too much later on. The aroma at this point is already heavenly, a promising preview of your Peppermint Mocha Cookies!
Incorporating Dry Ingredients
In a separate medium bowl, whisk together the all-purpose flour, unsweetened cocoa powder, baking powder, baking soda, salt, and the instant coffee granules. Whisking these dry ingredients before adding them to the wet mixture ensures they are evenly distributed, preventing pockets of leavening agents or cocoa. You can even sift them together for extra lightness if you desire. Gradually add this dry ingredient mixture to the wet ingredients in the mixing bowl, starting on low speed. Mix only until just combined. Overmixing the flour can lead to tough cookies, so stop as soon as you no longer see streaks of dry flour. The dough will be thick and slightly crum extractbly at first, but will come together.
Chilling and Coloring the Dough
Dividing and Coloring
This recipe offers a fun visual element. Once your dough is formed, divide it into two roughly equal portions. Place one portion back into the mixing bowl (or a clean bowl). To this portion, add a few drops of pink food gel. Start with a small amount; you can always add more to achieve your desired shade of pink. Gently mix the food gel into the dough until the color is uniform. This will be your peppermint-hued dough. The second portion of dough will remain its natural mocha color.
Chilling the Dough
Both the pink and mocha dough portions need to chill. Turn each portion out onto separate pieces of plastic wrap. Shape each portion into a flat disk. Wrap them tightly. Refrigerate both disks for at least 1 hour, or until firm. Chilling the dough is essential. It allows the flour to hydrate fully, which results in a more tender cookie. It also firms up the butter, preventing the cookies from spreading too much during baking and helping them hold their shape. This step is non-negotiable for achieving the best texture and appearance for your Peppermint Mocha Cookies.
Shaping and Baking
Forming the Cookies
Once the doughs are well-chilled and firm, it’s time to bring them together. Lightly flour your work surface and your hands. Take the chilled mocha dough and roll it into a log about 1 ½ inches in diameter. Do the same with the pink peppermint dough. Place the two logs side-by-side. Gently press them together so they adhere. You can lightly knead them together for a moment to ensure they are fully joined. The goal is to have a marbled effect when sliced. Once the logs are joined, roll them again gently to ensure a cohesive log. Wrap the combined log tightly in plastic wrap and chill for another 30 minutes. This second chill helps the logs firm up again, making them easier to slice and preventing the colors from blurring too much.
Slicing and Rolling
Preheat your oven to 350°F (175°C). Line baking sheets with parchment paper. This prevents sticking and makes for easy cleanup. Remove the chilled, marbled log from the refrigerator. Unwrap it. Using a sharp knife, slice the log into ¼-inch thick rounds. As you slice them, you’ll see the beautiful swirls of pink and mocha. Immediately before baking, gently roll each cookie slice in the extra granulated sugar you set aside. This creates a delightful sugary crust that adds a touch of sparkle and sweetness. Place the sugared cookie rounds onto the prepared baking sheets, leaving about 2 inches between them to allow for slight spreading.
Baking to Perfection
Bake the Peppermint Mocha Cookies for 10-12 minutes, or until the edges are set and lightly golden, and the centers appear almost done. They will still look a little soft in the middle, but will continue to cook as they cool on the baking sheet. Keep a close eye on them, as ovens can vary. You don’t want to overbake these, as they can become dry. For an even more pronounced peppermint flavor and visual appeal, you can gently press an extra candy cane shard or a small dollop of white chocolate ganache onto the center of each cookie immediately after they come out of the oven. Allow the cookies to cool on the baking sheets for 5 minutes before carefully transferring them to a wire rack to cool completely. This resting period on the baking sheet is important for the cookies to set up properly.
Conclusion:
And there you have it – the ultimate guide to crafting your own delicious Peppermint Mocha Cookies! We’ve walked through each step to ensure you achieve that perfect balance of rich chocolate, invigorating peppermint, and that subtle coffee undertone that makes these cookies so irresistible. Imagin extracte a batch of these warm from the oven, filling your kitchen with their festive aroma. They are truly the star of any holiday gathering, or a delightful treat to enjoy with a cozy cup of coffee or tea any time of year.
When it comes to serving, these Peppermint Mocha Cookies are fantastic on their own, but they also pair wonderfully with a glass of cold milk, a steaming mug of hot chocolate, or of course, another coffee! For variations, consider adding a sprinkle of sea salt on top before baking for a salty-sweet contrast, or dipping half of the cooled cookie in melted dark chocolate for an extra indulgent touch. You could also experiment with different types of coffee extracts or even a pinch of espresso powder for a deeper coffee flavor.
Don’t be afraid to get creative and make these Peppermint Mocha Cookies your own! The joy of baking is in the personal touch. I encourage you to try this recipe and share the delicious results with your loved ones. Happy baking!
Frequently Asked Questions:
Can I make the dough ahead of time?
Yes, absolutely! The dough for these Peppermint Mocha Cookies can be made up to 2-3 days in advance and stored in an airtight container in the refrigerator. Just bring it to room temperature for about 30 minutes before scooping and baking.
How should I store leftover Peppermint Mocha Cookies?
Store your cooled Peppermint Mocha Cookies in an airtight container at room temperature for up to 4-5 days. If you want them to stay fresher for longer, you can also freeze them for up to 3 months. Simply thaw at room temperature before enjoying.
Can I use peppermint extract instead of crushed candy canes?
While crushed candy canes provide a delightful crunch and visual appeal, you can certainly use peppermint extract for a similar flavor. Start with about 1/2 teaspoon of peppermint extract and adjust to your taste. Be cautious not to add too much, as peppermint extract can be quite potent.
Peppermint Mocha Cookies-Festive Chocolate Delight
Festive chocolate cookies with a delightful peppermint and coffee flavor, featuring a beautiful marbled design.
Ingredients
-
1 cup (227g) unsalted butter, softened
-
1¼ cup (250g) granulated sugar, plus extra for rolling
-
1 large egg
-
1 teaspoon pure vanilla extract
-
½ teaspoon pure peppermint extract
-
½ teaspoon baking powder
-
½ teaspoon salt
-
¼ teaspoon baking soda
-
2¼ cups (280g) all-purpose flour
-
½ teaspoon instant coffee granules
-
2 tablespoons unsweetened cocoa powder
-
Pink food gel
Instructions
-
Step 1
Cream softened butter and granulated sugar in a large bowl with an electric mixer until light and fluffy (about 3-5 minutes). Add the egg, vanilla extract, and peppermint extract, beating until just combined. -
Step 2
In a separate bowl, whisk together flour, cocoa powder, baking powder, baking soda, salt, and instant coffee granules. Gradually add this dry mixture to the wet ingredients, mixing on low speed until just combined. Do not overmix. -
Step 3
Divide the dough into two equal portions. Tint one portion with pink food gel until uniform. Shape each colored dough into a flat disk, wrap tightly in plastic wrap, and refrigerate for at least 1 hour until firm. -
Step 4
On a lightly floured surface, roll each chilled dough portion into a log about 1 ½ inches in diameter. Place the logs side-by-side and gently press them together. Roll the combined log again to ensure cohesion, wrap tightly, and chill for another 30 minutes. -
Step 5
Preheat oven to 350°F (175°C) and line baking sheets with parchment paper. Unwrap the chilled log, slice into ¼-inch thick rounds, and gently roll each slice in extra granulated sugar. Place rounds on prepared baking sheets, leaving 2 inches between them. -
Step 6
Bake for 10-12 minutes, or until edges are set and lightly golden. Let cookies cool on baking sheets for 5 minutes before transferring to a wire rack to cool completely.
Important Information
Nutrition Facts (Per Serving)
It is important to consider this information as approximate and not to use it as definitive health advice.
Allergy Information
Please check ingredients for potential allergens and consult a health professional if in doubt.

Leave a Comment