
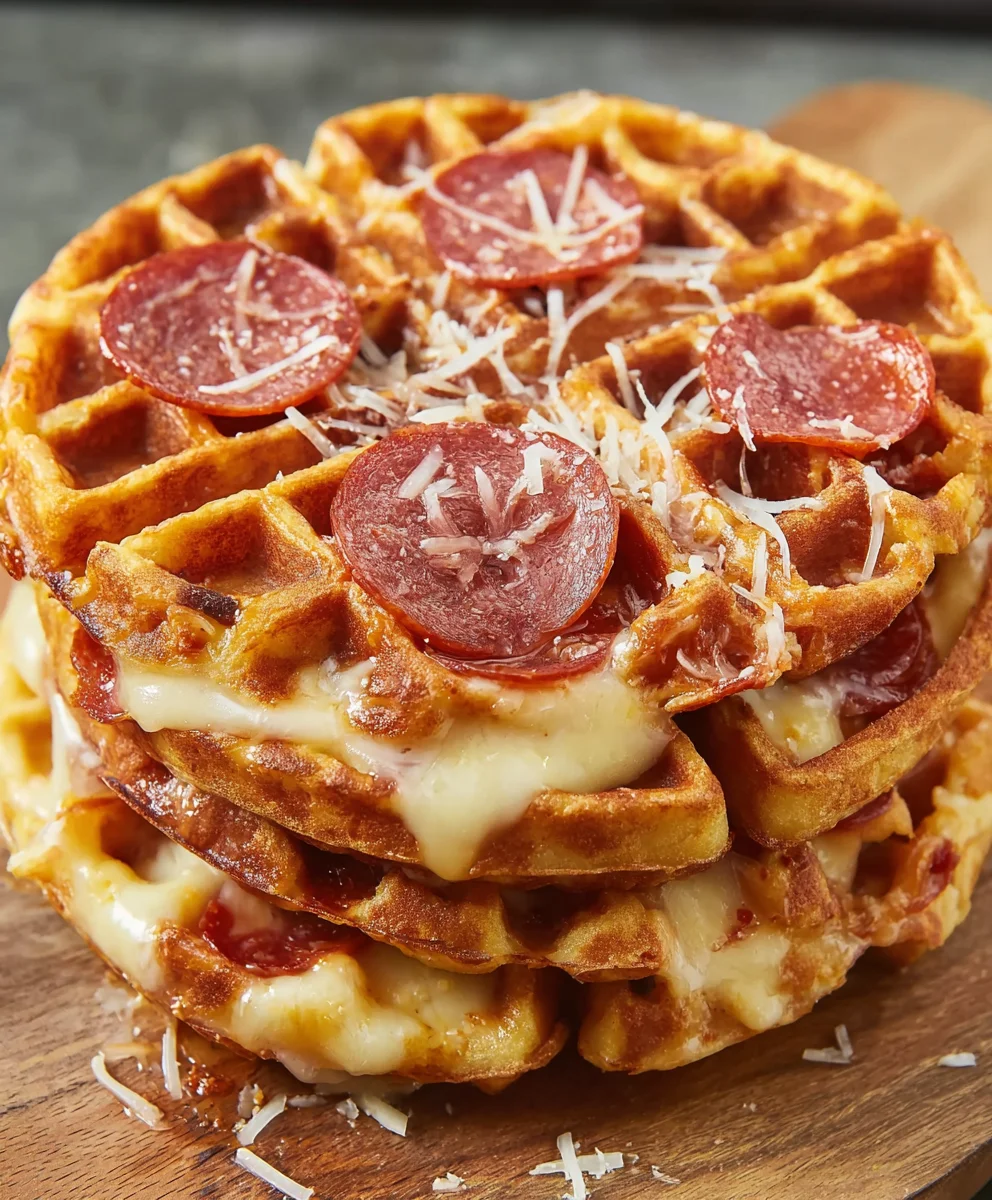
Pizza Stuffed Waffles are not just a meal; they’re a culinary revelation that promises to transform your perception of comfort food forever. Imagine the irresistible allure of a classic pizza—its savory sauce, gooey cheese, and your favorite toppings—all encased within the perfectly golden, crispy pockets of a freshly made waffle. This creation is a modern marvel that elegantly bridges the gap between two universally adored dishes, offering a delightful twist on tradition. While pizza itself boasts a rich history spanning centuries and waffles have graced breakfast tables across the globe for generations, the innovative fusion of these two titans is a testament to contemporary culinary creativity, born from a desire for delicious novelty.
We’ve all experienced the joy of a perfect slice of pizza and the comforting crunch of a warm waffle, but bringing them together elevates both to an entirely new level. People absolutely adore this dish not only for its incredible taste—the harmonious blend of salty, savory, and subtly sweet—but also for its captivating texture. The satisfying crispness of the waffle exterior gives way to a soft, fluffy interior filled with molten cheese and flavorful ingredients, creating a symphony in every bite. It’s also incredibly convenient, turning a simple waffle iron into a powerful tool for crafting quick, fun, and incredibly satisfying meals for any time of day. Get ready to fall in love with these extraordinary Pizza Stuffed Waffles; they’re guaranteed to become a new favorite in your home.
Ingredients:
- For the Pizza Stuffed Waffles:
- 1 (13.8 ounce) tube refrigerated classic pizza dough (I find brands like Pillsbury or store-brand work wonderfully here, choose a classic or thin-crust style for best results, avoiding ultra-thick crusts that might not cook evenly in a waffle iron).
- ½ cup pizza sauce (your favorite brand of marinara or traditional pizza sauce will do, make sure it’s not too watery).
- 1 ½ cups shredded mozzarella cheese (low-moisture, part-skim mozzarella is ideal for melting beautifully without making the waffles soggy. You can also mix in a little provolone or Monterey Jack for extra flavor).
- ¼ cup mini pepperoni slices, or regular pepperoni cut into quarters (mini pepperoni are excellent because they distribute evenly and don’t create lumpy spots).
- Optional: ¼ cup of your favorite cooked pizza toppings, finely diced. Think sautéed mushrooms, finely diced bell peppers (pre-cooked to avoid excess moisture), cooked crumbled sausage, or black olives. Remember to pre-cook any vegetable toppings to prevent a soggy waffle and ensure they are heated through.
- 1-2 tablespoons olive oil or non-stick cooking spray, for greasing the waffle iron.
- For Serving (Optional):
- Extra pizza sauce, warmed, for dipping.
- Grated Parmesan cheese.
- Fresh basil leaves, chopped.
- Red pepper flakes, for a touch of heat.
Prepping Your Pizza Dough Base
- Get Your Dough Ready: First things first, you’ll want to take your refrigerated pizza dough out of the fridge about 15-20 minutes before you plan to use it. This allows it to come closer to room temperature, making it much easier to unroll and work with. If it’s too cold, it will be stiff and prone to tearing. While the dough is warming up, gather all your filling ingredients so they’re ready to go.
- Prepare Your Work Surface: Lightly flour a clean, dry work surface. This is crucial to prevent the dough from sticking. You don’t need a huge amount of flour, just enough to create a non-stick barrier. Open the tube of pizza dough carefully and unroll it onto your floured surface. You’ll likely find it comes in a rectangular shape.
- Gently Stretch and Roll the Dough: Using a rolling pin, gently roll the dough out a bit further. The goal here isn’t to make it paper-thin, but to even out any thickness and potentially enlarge it slightly. For most standard pizza dough tubes, you’ll want to aim for a rectangle that’s roughly 10×14 inches, or a size that you can easily cut into pieces suitable for your waffle iron. The exact dimensions will depend on the size and shape of your waffle iron. We’re aiming for pieces that will fit neatly into each section of the waffle iron without too much overhang, so keep your waffle iron’s dimensions in mind. A good thickness is about ¼ inch; thick enough to hold the fillings, but thin enough to cook thoroughly.
- Cut Your Dough Sections: Now, carefully cut the rolled-out dough into even sections. The size of these sections will depend entirely on your waffle iron. For a standard square or round waffle iron, you might cut the dough into four equal squares or rectangles. If you have a larger Belgian waffle maker, you might only get two larger sections, or you might choose to make smaller, snack-sized ones. The key is to cut pieces that, when folded in half, will fit comfortably within one section of your waffle iron’s grids. I usually aim for rectangles that are roughly 4×5 inches for a standard waffle iron, allowing for a good fold. This step is where you decide the final size of your “Pizza Stuffed Waffles.”
Assembling Your Pizza Stuffed Waffles
- Set Up Your Assembly Line: Have your cut dough pieces, pizza sauce, shredded cheese, pepperoni, and any other desired toppings readily accessible. This will make the assembly process smooth and efficient. It helps to visualize each dough piece as a canvas ready for its delicious fillings.
- Sauce It Up (Carefully!): Take one of your dough sections. Spoon about 1-2 tablespoons of pizza sauce onto one half of the dough piece, leaving a small border (about ½ inch) around the edges. This border is crucial for sealing the waffle later, so don’t over-sauce! Too much sauce will lead to a messy, potentially soggy waffle that’s hard to seal and prone to leaking in the waffle iron. Less is more when it comes to the sauce inside these waffles. You want flavor, not a swimming pool.
- Layer on the Cheese: Next, sprinkle a generous amount of shredded mozzarella cheese over the sauced half of the dough. I usually go for about ¼ to ⅓ cup per waffle, depending on its size. The cheese acts as a delicious binder and creates that iconic pizza pull. Again, keep it within the sauce border, avoiding the very edge where we need to seal.
- Add Your Toppings: Now it’s time for the pepperoni and any other pre-cooked toppings you’ve chosen. Distribute them evenly over the cheese. For pepperoni, I like to layer them slightly overlapping to ensure every bite gets some savory goodness. If you’re using other toppings like pre-cooked mushrooms or peppers, spread them out thinly to avoid creating too much bulk in one spot. Remember the golden rule of stuffed waffles: don’t overfill! Overfilling is the number one cause of explosions and cheese leaks in the waffle iron. We want perfectly contained cheesy goodness, not a volcanic eruption.
- Folding and Sealing the Pizza Stuffed Waffles: Carefully fold the plain half of the dough over the top of the filled half, creating a pocket. Gently align the edges. Now, this is a critical step: use your fingertips to firmly press and seal the edges all around the perimeter of your dough pocket. You want to create a good, strong seal to keep all that delicious filling inside. You can even crimp the edges with a fork, much like you would a pie crust, to ensure a robust seal. This extra step helps prevent any cheese or sauce from escaping into your waffle iron, which can lead to sticking and a sticky cleanup. Take your time with each one to ensure they are well-sealed. You should now have what looks like a mini, stuffed pizza turnover, ready for its waffle transformation. Repeat this process for all your remaining dough sections and fillings.
Waffle Iron Magic: Cooking Your Pizza Stuffed Waffles
- Preheat Your Waffle Iron: Plug in your waffle iron and set it to medium-high heat. Most waffle irons have an indicator light that tells you when it’s preheated and ready to go. You want it nice and hot so that when the dough hits the grids, it immediately starts to cook and crisp up, creating those perfect waffle patterns. A properly preheated iron also helps prevent sticking.
- Grease the Grids: Once your waffle iron is preheated, lightly spray both the top and bottom grids with non-stick cooking spray, or brush them with a little olive oil. Even if your waffle iron boasts non-stick capabilities, this extra step provides insurance, especially with cheesy fillings that love to adhere to hot surfaces. You want to make sure your beautiful “Pizza Stuffed Waffles” lift out easily.
- Place Your Stuffed Waffles: Carefully place one (or two, if your waffle iron is large enough and your stuffed waffles are small enough to fit without touching) of your assembled pizza dough pockets onto the center of the bottom waffle grid. Try to center it as best as possible. If you’re making multiple waffles, ensure they have a little space between them if your waffle iron allows. Don’t overcrowd the iron, as this can lead to uneven cooking and difficulty closing the lid.
- Close and Cook: Gently close the lid of the waffle iron. You might feel a slight resistance, especially if your waffles are generously stuffed. Do not force the lid down. Let the heat and pressure of the iron slowly compress the dough. If it feels like it’s struggling to close, your waffle might be a little too thick or overfilled. Just let it cook, and the dough will soften and flatten. Cook for approximately 5-8 minutes. The exact cooking time will vary depending on your specific waffle iron and how crispy you like your waffles.
- Look for the Signs of Doneness: You’re looking for a few key indicators. The steam coming from the waffle iron should significantly decrease. The indicator light on your waffle iron will likely signal when it’s “done.” Most importantly, when you carefully lift the lid, your “Pizza Stuffed Waffles” should be beautifully golden brown and crispy on the outside. They should also feel firm to the touch, indicating that the dough is cooked through and the cheese inside is melted and gooey. If they’re not golden enough for your liking, close the lid and cook for another minute or two. Don’t be afraid to peek after 5 minutes to check on their progress. You want that perfect crispy crust and thoroughly cooked dough.
- Carefully Remove and Repeat: Once your “Pizza Stuffed Waffles” are perfectly cooked, use a non-metal spatula or tongs to carefully lift them from the waffle iron. Place them on a wire rack for a moment while you cook the remaining waffles. This prevents them from getting soggy on the bottom. Repeat the greasing, placing, and cooking process for the rest of your stuffed pizza dough pockets. It’s always a good idea to re-grease the waffle iron between each batch to ensure consistent non-stick performance and a beautiful golden crust every time. You’ll notice the delightful aroma of baking pizza dough and melting cheese filling your kitchen—that’s how you know you’re doing it right!
Serving Your Delicious Pizza Stuffed Waffles
- Allow to Cool Slightly: While it’s incredibly tempting to devour these “Pizza Stuffed Waffles” straight from the waffle iron, please exercise a little patience! The cheese inside will be molten hot, and you risk a serious burn. Let them cool on the wire rack for about 2-3 minutes. This brief resting period also allows the internal structure to set slightly, making them less likely to fall apart when cut or handled. Plus, it gives you a moment to admire their golden, crispy perfection.
- Cut and Serve: Once slightly cooled, you can serve these “Pizza Stuffed Waffles” whole for a hearty snack, or for easier eating, cut them in half or into quarters. A sharp knife or even a pizza cutter works perfectly for this. You’ll hear a satisfying crunch as you cut through the crispy waffle exterior, revealing the glorious melted cheese and toppings within.
- Dipping Delights: These “Pizza Stuffed Waffles” are fantastic on their own, but they truly shine when served with some warm marinara sauce for dipping. Pour a small bowl of warmed pizza or marinara sauce on the side, and let everyone dip to their heart’s content. The tang of the sauce complements the rich, savory waffles beautifully.
- Garnish and Elevate: For an extra touch of freshness and flavor, consider garnishing your “Pizza Stuffed Waffles.” A sprinkle of grated Parmesan cheese adds a salty, umami kick. A scattering of fresh chopped basil leaves brightens the flavor profile and adds a lovely pop of color. And for those who enjoy a little heat, a pinch of red pepper flakes offers a spicy contrast. These small additions can really elevate the experience of these fun, creative waffles.
- Storage and Reheating: If by some miracle you have any leftover “Pizza Stuffed Waffles,” they store surprisingly well. Allow them to cool completely, then place them in an airtight container in the refrigerator for up to 3 days. For best reheating results, pop them back into a toaster oven, air fryer, or even the waffle iron itself (without greasing, just to re-crisp) at a medium temperature until heated through and crispy again. The microwave will heat them but won’t restore that desired crispiness. These make excellent leftovers for a quick lunch or snack!
- Enjoy the Versatility: Remember, the beauty of “Pizza Stuffed Waffles” is their versatility. Feel free to experiment with different cheese blends, a variety of pre-cooked vegetables, or even other meats like cooked ham or shredded chicken. Each variation offers a new culinary adventure within that crispy waffle shell. Have fun with it, and enjoy every cheesy, savory bite!

Conclusion:
So, there you have it! We’ve journeyed through the simple yet ingenious process of creating what I truly believe will become a new favorite in your kitchen. This isn’t just another snack; it’s a culinary revelation, a delightful fusion that takes two universally loved foods and elevates them into something spectacular. Imagine biting into that warm, cheesy center, bursting with your favorite savory toppings, all encased in a perfectly cooked, slightly crisp waffle shell. It’s a game-changer for any meal of the day, offering an unbeatable combination of speed, ease, and mouth-watering results that will leave everyone asking for more.
What makes this recipe an absolute must-try? It’s the sheer ingenuity of combining the crispy, golden perfection of a waffle with the gooey, savory delight of a pizza. This isn’t just about convenience; it’s about a superior texture and flavor experience. Forget the usual struggles with complicated dough or a soggy crust; this method offers a quick path to cheesy, saucy satisfaction wrapped in a delightful golden crunch. It’s ideal for those busy weeknights when you need something quick yet satisfying, perfect for a fun and interactive weekend brunch, or even as a surprisingly elegant appetizer when cut into smaller, bite-sized pieces. The versatility means it fits perfectly into almost any occasion, turning an ordinary meal into an extraordinary culinary adventure. This recipe truly simplifies gourmet snacking, making it accessible and utterly delicious for everyone.
Serving Suggestions and Creative Variations:
Now, let’s talk about taking your experience with these delightful creations even further. While they are undoubtedly fantastic on their own, a little accompaniment or a creative twist can elevate them to another level entirely. Consider serving your finished waffles with a warm bowl of your favorite marinara sauce for dipping – it’s a classic pairing that enhances the pizza essence, creating that perfect balance of tangy and savory. For those who enjoy a bit more sophistication, a dollop of fresh pesto or a creamy garlic aioli could add an unexpected, gourmet touch. If you like a kick, a sprinkle of red pepper flakes or even a drizzle of hot honey post-cooking would be absolutely phenomenal, adding a sweet and spicy contrast that’s truly addictive.
But don’t stop there with just the accompaniments! The beauty of these waffles lies in their incredible adaptability. Don’t be shy about experimenting with the fillings. Think beyond classic pepperoni and mozzarella. How about a ‘Hawaiian’ version with diced ham and pineapple? Or a ‘Veggie Lovers’ delight, incorporating finely chopped bell peppers, onions, mushrooms, and fresh spinach for a burst of vibrant flavor and texture? For a truly indulgent treat, a ‘Breakfast’ variation with scrambled eggs, crumbled cooked bacon, and sharp cheddar cheese inside would be an incredible way to kickstart your day. You could also explore different cheese blends – a mix of mozzarella, provolone, and a touch of Parmesan will give you that perfect stretch and depth of flavor. And for our gluten-free friends, many excellent gluten-free waffle mixes are available, making this recipe accessible to everyone. The Pizza Stuffed Waffles are truly a canvas for your culinary imagination, inviting you to personalize every bite!
I can’t emphasize enough how much I encourage you to whip up a batch of these incredible Pizza Stuffed Waffles soon. They are more than just a recipe; they are an experience, a conversation starter, and guaranteed to bring smiles to faces around your table. Whether you’re feeding a hungry family, hosting a casual get-together with friends, or simply treating yourself to something truly special, this recipe delivers on every front. Don’t just read about it; make it happen! Gather your ingredients, fire up that waffle iron, and prepare to be amazed by the deliciousness that unfolds. Once you’ve had a taste of this golden, cheesy goodness, I would absolutely love to hear about your adventure. What toppings did you choose? Did you create a new dipping sauce? Did your kids (or your inner child) declare it the best thing ever? Please, share your photos, your stories, and your clever variations in the comments below. Your feedback and creativity inspire me and our entire community of food lovers. Let’s make delicious memories together, one perfectly stuffed waffle at a time!
Pizza Stuffed Waffles
Creative fusion food! Crispy homemade waffles stuffed with pizza sauce, mozzarella, and beef pepperoni. Perfect for lunch, dinner, or snacks.
Ingredients
-
1 (13.8 ounce) tube refrigerated classic pizza dough
-
½ cup pizza sauce
-
1 ½ cups shredded mozzarella cheese
-
¼ cup mini beef pepperoni slices, or regular beef pepperoni cut into quarters
-
Optional: ¼ cup cooked finely diced beef sausage or other pre-cooked vegetable toppings (e.g., sautéed mushrooms, bell peppers, black olives)
-
1-2 tablespoons olive oil or non-stick cooking spray
-
For Serving (Optional): Extra pizza sauce, warmed
-
For Serving (Optional): Grated Parmesan cheese
-
For Serving (Optional): Fresh basil leaves, chopped
-
For Serving (Optional): Red pepper flakes
Instructions
-
Step 1
Allow refrigerated pizza dough to come to room temperature (15-20 minutes). Lightly flour a work surface, then unroll and gently roll the dough to about 10×14 inches and ¼ inch thick. Cut the dough into 4-6 equal sections (e.g., 4×5 inches for a standard waffle iron). -
Step 2
For each dough section: Spoon 1-2 tablespoons of pizza sauce onto one half, leaving a ½ inch border. Sprinkle ¼ to ⅓ cup shredded mozzarella cheese and ¼ cup mini beef pepperoni (or other pre-cooked toppings) evenly over the sauce. Fold the plain half of the dough over the filled half. Firmly press and crimp the edges with a fork to seal securely. Repeat for all dough sections. -
Step 3
Preheat your waffle iron to medium-high heat and lightly grease the grids. Place one or two assembled pizza pockets onto the center of the waffle iron. Gently close the lid. Cook for 5-8 minutes, or until beautifully golden brown, crispy, and cooked through. Carefully remove with a non-metal spatula and place on a wire rack. Re-grease and repeat for any remaining waffles. -
Step 4
Allow waffles to cool on a wire rack for 2-3 minutes before cutting in half or quarters. Serve warm with extra warmed pizza sauce for dipping, grated Parmesan cheese, fresh chopped basil, or red pepper flakes, if desired. Store leftovers in an airtight container in the refrigerator for up to 3 days; reheat in a toaster oven or air fryer for best crispiness.
Important Information
Nutrition Facts (Per Serving)
It is important to consider this information as approximate and not to use it as definitive health advice.
Allergy Information
Please check ingredients for potential allergens and consult a health professional if in doubt.


Leave a Comment