
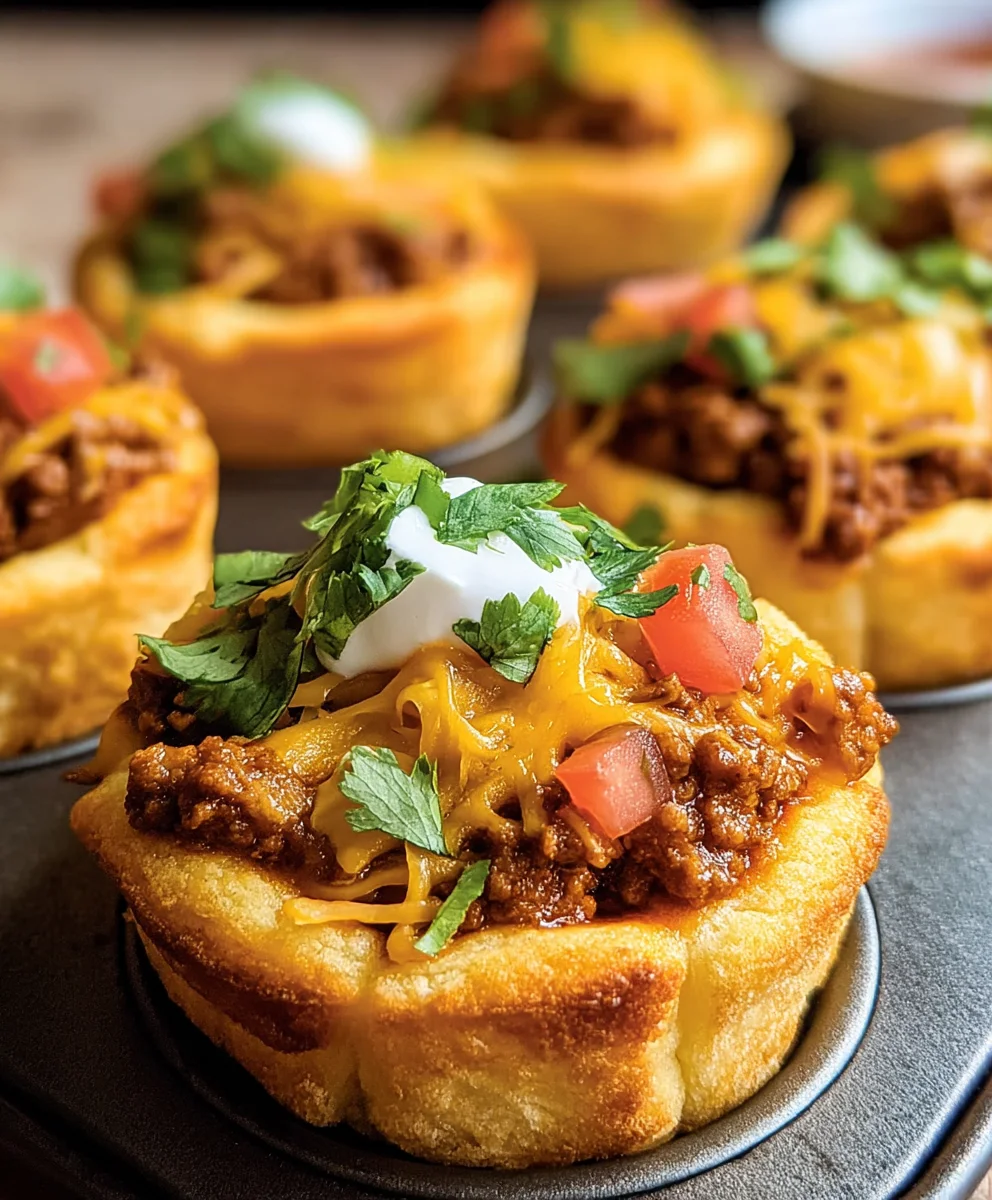
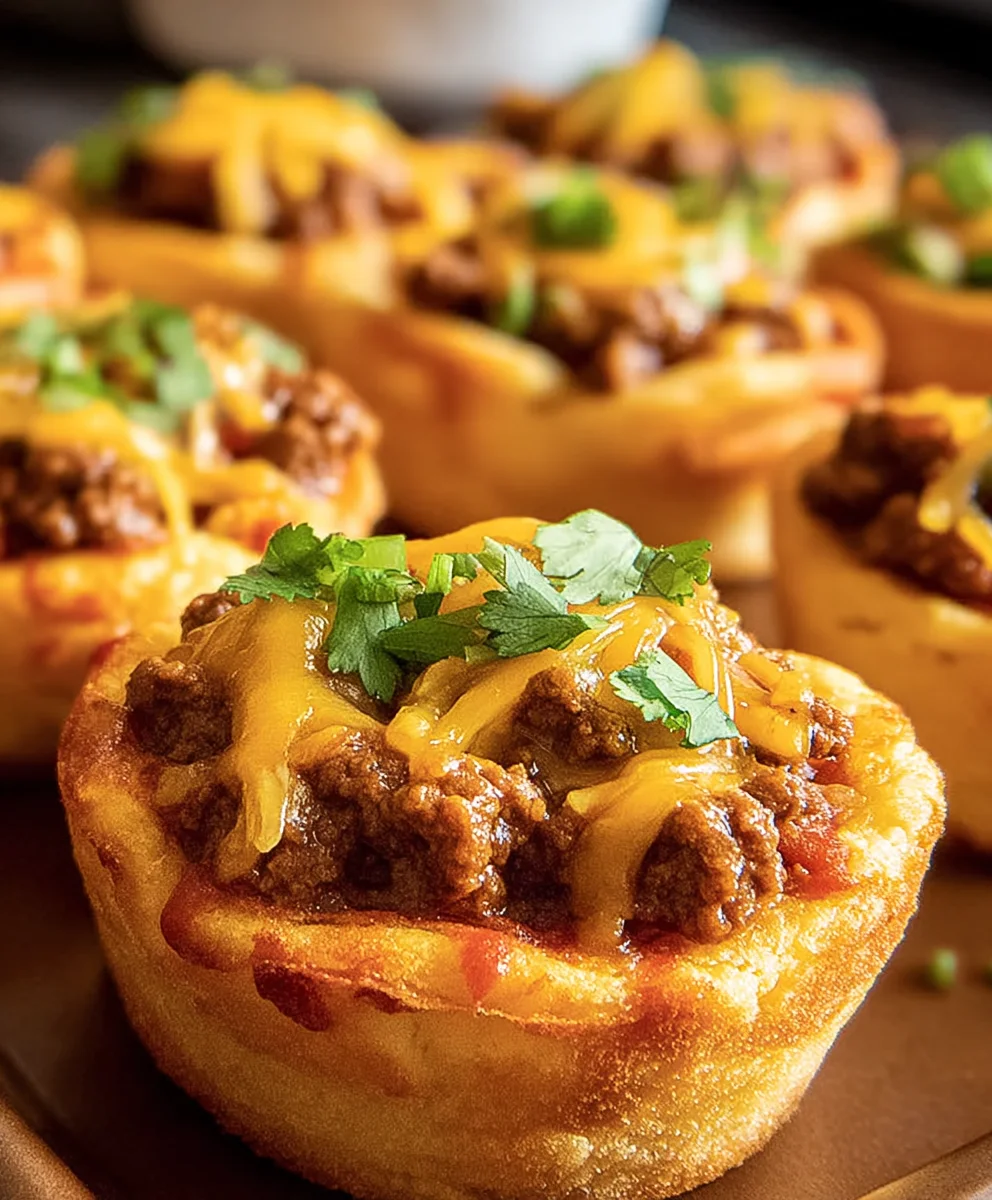
Taco Biscuit Cups are about to revolutionize your weeknight dinner routine with their irresistible charm and incredible ease! As someone who cherishes both the vibrant flavors of a classic taco and the comforting embrace of a warm biscuit, I am thrilled to share a recipe that perfectly marries these two culinary delights into one delightful package. Forget the mess of traditional tacos; these individual cups offer all the zesty, savory goodness you crave, neatly contained and utterly dippable. It’s a wonderful example of modern fusion cuisine, taking the beloved, communal spirit of taco night and transforming it into a convenient, bite-sized sensation that’s perfect for busy families, casual get-togethers, or even a fun solo meal.
What makes these Taco Biscuit Cups truly special is their universal appeal. The golden-brown, flaky biscuit exterior provides a satisfying crunch that gives way to a tender, seasoned ground meat filling, generously topped with melty cheese and all your favorite taco fixings. It’s the ultimate comfort food experience, combining familiar tastes in an exciting new format. I believe you’ll find them not just simple to prepare, but also incredibly versatile, making them a fantastic addition to your culinary repertoire. Get ready to impress with minimal effort!
Ingredients:
- 1 lb (450g) Ground Beef: I typically opt for an 80/20 or 85/15 lean ground beef for a good balance of flavor and less grease, though you can certainly use leaner options like ground turkey or chicken if you prefer. Just remember to adjust cooking times accordingly.
- 1 small Onion: Finely chopped. A yellow or white onion works beautifully, adding a subtle sweetness and aromatic depth to our taco filling.
- 1 (1.25 oz / 35g) packet Taco Seasoning: This is my go-to for convenience and consistent flavor. Feel free to use your favorite brand or even a homemade blend of chili powder, cumin, paprika, garlic powder, onion powder, and a pinch of cayenne for a more personalized touch.
- 2/3 cup (160ml) Water: Essential for helping the taco seasoning dissolve and meld with the meat, creating that perfect savory sauce.
- 2 cans (10.2 oz / 290g each) Refrigerated Biscuit Dough: The star of our Taco Biscuit Cups! I usually grab the flaky, large size biscuits, as they provide a good sturdy base for our cups. Standard size will work too, just be aware they might be a bit smaller.
- 1 cup (115g) Shredded Cheddar Cheese: Or a Mexican blend cheese. You can never go wrong with a generous amount of cheese, adding that classic gooey, melty texture and savory taste that perfectly complements the taco flavors.
- Optional Toppings:
- Shredded lettuce
- Diced tomatoes
- Sour cream or plain Greek yogurt
- Salsa or pico de gallo
- Sliced jalapeños (fresh or pickled)
- Chopped fresh cilantro
- Guacamole or diced avocado
These toppings are where you can really customize your Taco Biscuit Cups to your heart’s content, so don’t be shy!
Preparing Your Taco Filling:
This is where the magic begins for our delicious Taco Biscuit Cups. A flavorful filling is the heart of this dish, so let’s get it right!
- Preheat and Brown the Meat: First things first, you’ll want to preheat your oven to 375°F (190°C). While that’s warming up, grab a large skillet or a sturdy frying pan and place it over medium-high heat on your stovetop. Once it’s sufficiently hot, add your 1 pound of ground beef. Break up the meat with a wooden spoon or spatula as it cooks, stirring frequently. My goal here is to brown it evenly on all sides, ensuring no pink remains. This usually takes about 5-7 minutes. Don’t rush this step; good browning equals good flavor!
- Drain the Fat: Once the ground beef is fully browned, you’ll likely notice a fair amount of accumulated fat in the pan, especially if you used an 80/20 blend. It’s crucial to drain this excess fat. You can carefully tip the pan and spoon out the fat, or use a colander placed over a heat-safe bowl to drain it completely. I always make sure to dispose of the fat properly – never down the sink! A common trick is to let it cool and solidify in a disposable container before tossing it in the trash. Draining the fat helps prevent our Taco Biscuit Cups from becoming greasy.
- Sauté the Onion: Return the drained ground beef to the skillet. Now, add your finely chopped small onion. I love how the onion softens and becomes translucent, releasing its natural sweetness and aroma into the meat mixture. Continue to cook for another 3-5 minutes, stirring occasionally, until the onion is tender. This step builds another layer of flavor that’s just essential for a truly great taco filling.
- Add Taco Seasoning and Water: This is where our mixture really starts to smell like tacos! Sprinkle the entire packet of taco seasoning over the ground beef and onion mixture. Give it a good stir to ensure the seasoning evenly coats everything. Then, pour in your 2/3 cup of water. Bring the mixture to a gentle simmer, stirring constantly. The water helps to dissolve the seasoning, distributing the flavors throughout the meat and creating a lovely, slightly saucy consistency. Simmer for about 2-3 minutes, or until most of the liquid has been absorbed and the mixture has thickened slightly. You want it moist but not watery, as excessive moisture can make our biscuit cups soggy. Remove the skillet from the heat and set it aside to cool slightly while we prepare the biscuits.
Assembling Your Taco Biscuit Cups:
Now that our savory taco filling is ready, it’s time to bring everything together into those irresistible Taco Biscuit Cups! This part is quite fun and surprisingly quick.
- Prepare Your Muffin Tin: Grab a standard 12-cup muffin tin. I always give each cup a light spray with non-stick cooking spray, even if it’s non-stick. This ensures our Taco Biscuit Cups pop out easily after baking. You don’t want any sticking, trust me! If you’re concerned, you can also use paper muffin liners, but I find the spray is usually sufficient for these.
- Flatten the Biscuit Dough: Open your two cans of refrigerated biscuit dough. You’ll have 16 biscuits in total. Take one biscuit at a time and, on a lightly floured surface or even just a clean counter, use your hands or a rolling pin to flatten each biscuit into a roughly 4-inch (10 cm) circle. The goal here is to make them thin enough to form a cup but not so thin that they tear easily. I aim for a thickness of about 1/8 to 1/4 inch. If you find the dough is sticking, a tiny bit of flour on your hands or the rolling pin will help. This flattened shape will be perfect for lining our muffin cups.
- Form the Biscuit Cups: Carefully press each flattened biscuit into the prepared muffin cups. You want to gently push the dough down into the bottom and up the sides of each cup, creating a little “cup” or “bowl” made of biscuit dough. Make sure there are no large gaps or tears in the dough, as this could cause the filling to leak out. I try to get the dough to come up almost to the top edge of the muffin cup to give it a good structure. If you have extra dough that’s too high, you can trim it or just gently fold it in. We are essentially making little edible bowls for our taco filling. Since you have 16 biscuits and a 12-cup muffin tin, you will need to bake these in two batches, or use two muffin tins if you have them.
- Fill with Taco Mixture: Once all your biscuit cups are nestled into the muffin tin, it’s time for the delicious taco filling! Spoon an equal amount of the cooled ground beef taco mixture into each biscuit cup. I usually fill them about two-thirds of the way full. It’s important not to overfill them, as we still need space for the cheese, and we don’t want the filling to bubble over excessively during baking. Using a spoon or a small ice cream scoop can help with even distribution. The filling should be warm, but not piping hot, as extreme heat might start cooking the biscuit dough prematurely.
- Top with Cheese: The final touch before baking! Generously sprinkle about a tablespoon or so of shredded cheddar cheese (or your favorite blend) over the top of the taco filling in each biscuit cup. I love how the cheese melts and forms a savory, golden-brown crust, sealing in all those wonderful flavors. Feel free to adjust the amount of cheese to your liking – if you’re a big cheese fan like me, a little extra never hurts! This step really brings that classic taco-inspired element to our delightful Taco Biscuit Cups.
Baking Your Taco Biscuit Cups:
The moment of truth! Baking transforms our assembled components into golden, crispy, and utterly delicious Taco Biscuit Cups. Your kitchen is about to smell amazing!
- Place in the Oven: Carefully transfer your muffin tin, filled with the beautiful biscuit cups, into your preheated 375°F (190°C) oven. I like to place it on the middle rack to ensure even baking and browning. If you’re using two muffin tins, try to space them out evenly on different racks, swapping their positions halfway through baking if your oven tends to have hot spots.
- Bake Until Golden: Bake for 12-18 minutes. The exact time can vary depending on your oven and the thickness of your biscuit dough. I always keep a close eye on them during this stage. You’re looking for the biscuit dough to turn a beautiful golden brown on the edges and bottom, and for the cheese on top to be melted, bubbly, and slightly browned. The internal temperature of the biscuit should reach 200-210°F (93-99°C) if you want to be precise, but visual cues are usually sufficient here. If the tops are browning too quickly, you can loosely tent the muffin tin with aluminum foil for the last few minutes of baking.
- Cool Slightly: Once your Taco Biscuit Cups are perfectly golden and cooked through, carefully remove the muffin tin from the oven. Resist the urge to dive in immediately! Let them cool in the muffin tin for about 5 minutes. This cooling period is crucial because it allows the biscuit cups to set slightly, making them much easier to remove without breaking. If you try to take them out too soon, the bottoms might stick or tear, and we want them perfectly intact!
- Remove and Serve: After the brief cooling period, use a butter knife or a small offset spatula to gently loosen the edges of each Taco Biscuit Cup. Carefully lift them out of the muffin tin and transfer them to a serving platter or individual plates. They should pop out quite easily if you greased the tin properly. Be mindful, as they will still be very hot.
Serving and Enjoying Your Taco Biscuit Cups:
The hard work is done, and now it’s time for the best part – digging into these incredible Taco Biscuit Cups! This is where you can truly make them your own.
-
Offer an Array of Toppings: Arrange your optional toppings in small bowls around the serving platter. I love to set out a “taco bar” style spread:
- Shredded lettuce: Adds a cool, crisp contrast.
- Diced tomatoes: For freshness and a pop of color.
- Sour cream or plain Greek yogurt: A dollop on top adds a creamy, cooling element that balances the spice.
- Salsa or pico de gallo: For an extra kick and vibrant flavor.
- Sliced jalapeños: If you love a bit of heat, these are fantastic. Pickled ones offer a nice tangy crunch.
- Chopped fresh cilantro: Brightens everything up with its herbaceous notes.
- Guacamole or diced avocado: Creamy, rich, and utterly delicious.
Encourage everyone to customize their Taco Biscuit Cups exactly how they like them. It makes for a fun and interactive meal!
- Serve Warm: These are definitely best served warm, fresh out of the oven. The biscuit is soft, the filling is savory, and the cheese is perfectly melted and gooey. They make a fantastic weeknight dinner, a fun appetizer for a gathering, or even a delightful lunch option. The individual portion size makes them incredibly convenient and mess-free.
- Storage and Reheating: If you happen to have any leftovers (which is a rare occurrence in my house!), you can store them in an airtight container in the refrigerator for up to 3-4 days. To reheat, I recommend popping them back into a preheated oven at 350°F (175°C) for about 10-15 minutes, or until heated through and the biscuit crisps up again. You can also microwave them, but the biscuit won’t be as crispy. However you choose to enjoy them, these Taco Biscuit Cups are a guaranteed crowd-pleaser and a regular rotation in my kitchen! They are incredibly versatile and always a hit with my family.
Conclusion:
Well, my friends, we’ve reached the delicious finale of our culinary journey together, and I truly hope you’re as excited as I am about what we’ve just explored. This isn’t just another recipe; it’s an invitation to elevate your weeknight dinners, revolutionize your snack game, and bring a burst of flavor and fun to any gathering.
Why are these Taco Biscuit Cups an absolute game-changer? It’s simple: they perfectly marry the irresistible comfort of a flaky, golden-brown biscuit with the vibrant, zesty flavors of your favorite tacos. Imagine bite-sized pockets of pure joy, each one bursting with seasoned meat, melty cheese, and all the fixings you adore. They’re incredibly simple to prepare, making them an ideal solution for those busy evenings when you crave something homemade and hearty but are short on time. I’ve found that even the pickiest eaters at my table are instantly charmed by their appealing presentation and delicious taste. They’re mess-free, easy to handle, and provide that satisfying crunch and savory goodness in every single bite. This recipe truly delivers on its promise of big flavor with minimal fuss, transforming ordinary ingredients into something truly extraordinary. You’ll be amazed at how quickly these disappear from the plate, leaving everyone asking for more!
Endless Possibilities: Serving Suggestions to Spark Your Imagination
The beauty of these delightful creations lies not just in their incredible taste, but also in their versatility. While they are certainly a showstopper on their own, pairing them with a few complementary sides can turn a simple meal into a feast. For a casual lunch or dinner, I love serving them alongside a crisp, fresh green salad tossed with a light vinaigrette. The freshness of the salad perfectly balances the richness of the biscuit cups. You could also offer a side of fluffy Mexican rice or a simple bowl of black beans for a more substantial meal.
But let’s talk about toppings! Oh, the toppings! Think of these Taco Biscuit Cups as a blank canvas for all your favorite taco embellishments. A dollop of cool sour cream or Greek yogurt is always a winner, adding a creamy contrast. Freshly made guacamole or a chunky salsa, whether mild or spicy, adds another layer of flavor and texture that is simply divine. Don’t forget a sprinkle of fresh cilantro or diced green onions for that pop of color and herbaceous note. For those who love a bit of heat, a drizzle of your favorite hot sauce or some pickled jalapeños can really take things up a notch. Seriously, don’t hold back! Encourage your family and friends to customize their own, making mealtime an interactive and fun experience.
Get Creative: Variations to Make Them Uniquely Yours
One of the things I love most about cooking is the freedom to experiment, and this recipe is absolutely perfect for that! While the classic ground beef filling is undeniably delicious, don’t hesitate to venture out and make these Taco Biscuit Cups truly your own. Consider swapping the ground beef for ground turkey or chicken for a leaner option. If you’re looking for a plant-based alternative, seasoned black beans, refried beans, or a mixture of roasted vegetables like bell peppers and corn would be fantastic. You could even use crumbled plant-based meat substitutes.
Cheese choices are also wonderfully flexible. While cheddar is a classic, a Monterey Jack, a spicy pepper jack, or a Mexican blend would all be absolutely fantastic, each adding its own unique melt and flavor profile. You can also play around with the seasonings. Want a smokier flavor? Add a pinch of smoked paprika. Craving more heat? A dash of cayenne pepper or a chopped serrano pepper will do the trick. For an unexpected twist, try adding a tablespoon of chipotle in adobo sauce to the filling – it adds an incredible depth and a subtle smoky heat that is simply addictive. These modifications allow you to tailor the recipe to your family’s preferences or whatever ingredients you happen to have on hand, ensuring they never get boring.
Your Turn: Embrace the Joy of Cooking!
So, there you have it. My sincere hope is that this recipe inspires you to get into the kitchen, roll up your sleeves, and create something truly special. These Taco Biscuit Cups are more than just a meal; they’re an experience, a delightful fusion of comfort and excitement that will surely become a staple in your recipe rotation. I wholeheartedly encourage you to give them a try this week. You’ll be amazed at how simple they are to assemble and how incredibly satisfying they are to eat. Imagine the smiles around your table as everyone digs into these golden, savory parcels of goodness.
Once you’ve whipped up your own batch, I would absolutely love to hear about your experience! What variations did you try? What were your favorite toppings? Did they become an instant hit with your family and friends? Please, share your culinary adventures! Snap a photo, share your thoughts, and let us all bask in the collective joy of delicious food made with love. Happy cooking, and I can’t wait to hear all about your amazing creations!
Taco Biscuit Cups
Taco Biscuit Cups are a quick and easy family dinner idea that brings together the vibrant flavors of tacos with the comforting embrace of warm biscuits. This recipe revolutionizes weeknight meals by offering all the zesty, savory goodness of tacos in a neat, dippable package. The flaky biscuit exterior provides a satisfying crunch, giving way to a tender, seasoned ground beef filling topped with melty cheese. These hand-held cups are a perfect solution for busy families, casual gatherings, or a fun solo meal, making dinner interactive and mess-free. They’ve become a secret weapon for fun, easy dinners that everyone loves.
Ingredients
-
1 lb (450g) Ground Beef
-
1 small Onion, finely chopped
-
1 (1.25 oz / 35g) packet Taco Seasoning
-
2/3 cup (160ml) Water
-
2 cans (10.2 oz / 290g each) Refrigerated Biscuit Dough (16 biscuits total)
-
1 cup (115g) Shredded Cheddar Cheese
-
Optional Toppings: shredded lettuce, diced tomatoes, sour cream or plain Greek yogurt, salsa or pico de gallo, sliced jalapeños, chopped fresh cilantro, guacamole or diced avocado
Instructions
-
Step 1
Preheat oven to 375°F (190°C). Lightly spray a standard 12-cup muffin tin with non-stick cooking spray. -
Step 2
In a large skillet over medium-high heat, brown ground beef for 5-7 minutes, breaking it apart. Drain any excess fat. -
Step 3
Return beef to skillet. Add the finely chopped onion and cook for another 3-5 minutes until the onion is tender. -
Step 4
Stir in the entire packet of taco seasoning and the 2/3 cup of water. Bring the mixture to a gentle simmer for 2-3 minutes, stirring constantly, until most of the liquid has been absorbed and the mixture has thickened slightly. Remove from heat and set aside to cool slightly. -
Step 5
Open biscuit dough cans. On a lightly floured surface, flatten each of the 16 biscuits into a roughly 4-inch (10 cm) circle. Press each flattened biscuit into a prepared muffin cup, forming a cup shape up the sides. (Note: You will need to bake in two batches or use two muffin tins for 16 biscuits). -
Step 6
Spoon an equal amount of the cooled ground beef taco mixture into each biscuit cup, filling them about two-thirds full. -
Step 7
Generously sprinkle about a tablespoon of shredded cheddar cheese over the top of the taco filling in each biscuit cup. -
Step 8
Carefully transfer the muffin tin to the preheated oven. Bake for 12-18 minutes, or until the biscuit dough is golden brown and the cheese on top is melted, bubbly, and slightly browned. If tops brown too quickly, tent with foil. -
Step 9
Once baked, remove the muffin tin from the oven and let the taco biscuit cups cool in the tin for about 5 minutes. This allows them to set and makes removal easier. -
Step 10
Use a butter knife or small spatula to gently loosen edges and lift the taco biscuit cups out of the muffin tin. Transfer to a serving platter or individual plates. -
Step 11
Serve warm with your choice of optional toppings like shredded lettuce, diced tomatoes, sour cream, salsa, or guacamole. Store any leftovers in an airtight container in the refrigerator for up to 2 days; reheat in a 350°F (175°C) oven for 5-10 minutes to crisp up the biscuits.
Important Information
Nutrition Facts (Per Serving)
It is important to consider this information as approximate and not to use it as definitive health advice.
Allergy Information
Please check ingredients for potential allergens and consult a health professional if in doubt.


Leave a Comment