
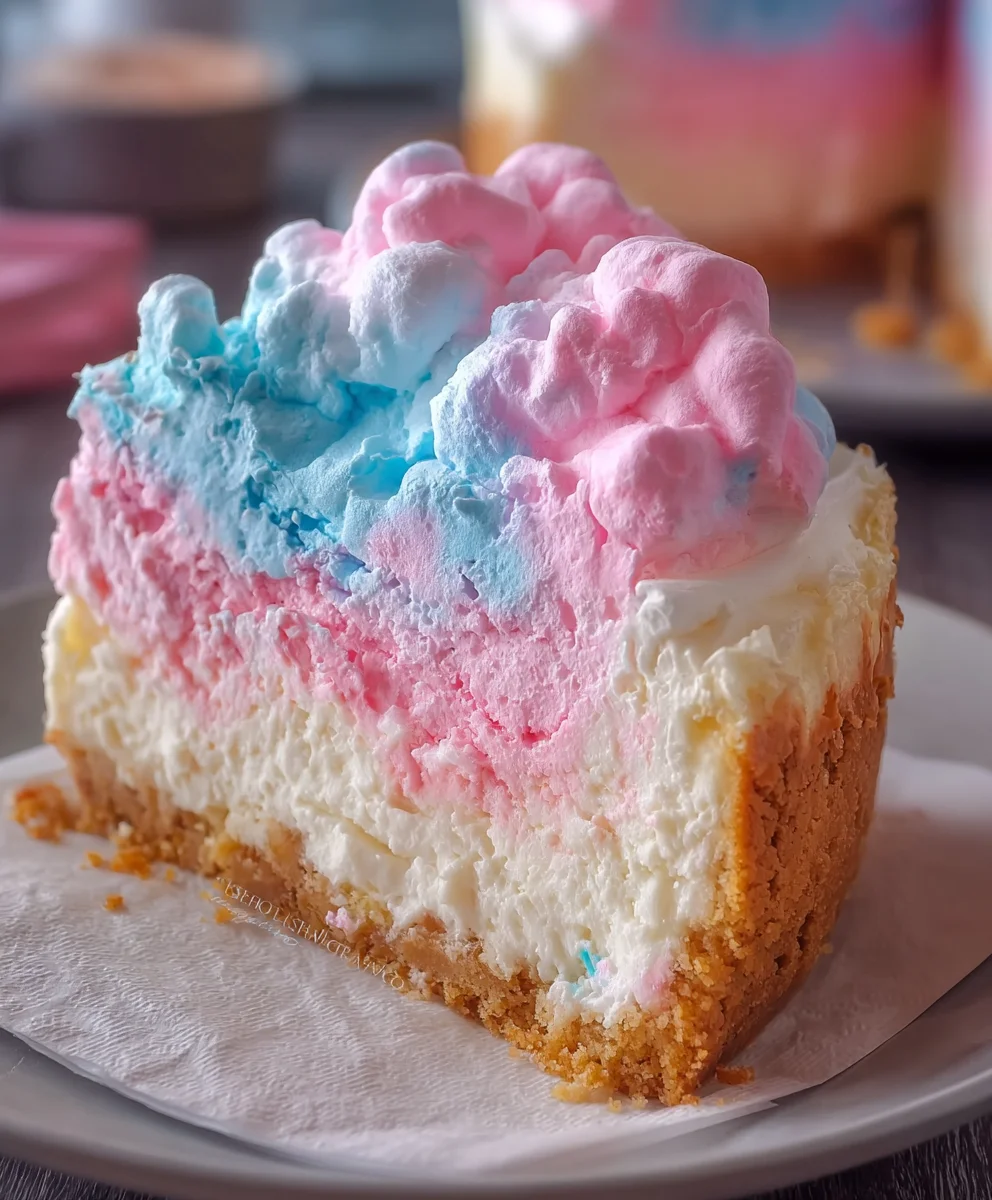
Cotton Candy Cheesecake Recipe – are you ready to embark on a whimsical culinary journey that promises to delight your senses and transport you straight back to the joyful days of childhood fairs and festivals? I am absolutely thrilled to share a dessert that perfectly marries sophisticated indulgence with playful nostalgia. Imagine the velvety richness of a classic cheesecake, but infused with the delicate, ethereal sweetness and vibrant hues of everyone’s favorite spun sugar confection. This isn’t just any dessert; it’s a showstopper, a conversation starter, and an unforgettable treat that brings a smile to every face, instantly elevating any occasion into something truly magical.
While the concept of a cotton candy-flavored cheesecake might seem like a modern marvel, it truly embodies the spirit of innovative dessert artistry, bridging the gap between beloved traditional baking and contemporary culinary creativity. It speaks to a growing trend of infusing nostalgic, joy-inducing flavors into elevated dishes, making the familiar excitingly new again. People adore this dish not only for its incredibly unique and enchanting flavor profile – that sweet, airy essence of cotton candy perfectly complementing the creamy tang of cheesecake – but also for its stunning visual appeal and its incredibly smooth, delightful texture. Every bite is an experience, a blend of melt-in-your-mouth creaminess and a hint of that magical, sugary fluff. This extraordinary Cotton Candy Cheesecake Recipe is designed to be approachable yet impressively elegant, perfect for birthdays, anniversaries, or simply making any ordinary day feel extraordinary.
Ingredients:
-
For the Graham Cracker Crust:
- 1 ½ cups (approximately 180g) finely crushed graham cracker crumbs (about 10-12 full sheets)
- ¼ cup (50g) granulated sugar
- ½ cup (113g) unsalted butter, melted
-
For the Cotton Candy Cheesecake Filling:
- 3 (8-ounce/226g each) blocks full-fat cream cheese, softened to room temperature
- 1 cup (200g) granulated sugar
- 1 tablespoon all-purpose flour (this helps prevent cracks)
- ½ cup (120g) full-fat sour cream, softened to room temperature
- 2 teaspoons pure vanilla extract
- 1 ½ teaspoons cotton candy extract (or more, to taste, depending on brand potency)
- A few drops of pink or blue gel food coloring (optional, for that whimsical cotton candy swirl effect)
- 3 large eggs, softened to room temperature
-
For the Cotton Candy Whipped Cream Topping:
- 1 ½ cups (360ml) cold heavy cream
- ½ cup (60g) powdered sugar, sifted
- 1 teaspoon pure vanilla extract
- ½ teaspoon cotton candy extract
- A drop of pink or blue gel food coloring (optional)
-
For Garnish (just before serving):
- Fresh cotton candy (pink, blue, or a mix)
- Optional: Edible glitter, rainbow sprinkles, or tiny meringue kisses
Prepare the Crust
-
Preheat and Prepare Your Pan:
Begin by preheating your oven to 350°F (175°C). This ensures the oven is at the correct temperature when you’re ready to bake, which is crucial for even cooking. For your cheesecake, you’ll need a 9-inch springform pan. It’s incredibly important to prepare this pan properly to prevent leaks during the water bath and to ensure easy removal of your beautiful Cotton Candy Cheesecake Recipe later. First, lightly grease the bottom and sides of the springform pan. Then, wrap the outside of the pan with several layers of heavy-duty aluminum foil. Make sure the foil extends all the way up the sides, creating a secure barrier that will prevent water from seeping into the pan when it bakes in a water bath. I usually use at least three layers of foil to be absolutely certain.
-
Combine Crust Ingredients:
In a medium-sized mixing bowl, combine the finely crushed graham cracker crumbs, ¼ cup of granulated sugar, and the ½ cup of melted unsalted butter. Use a fork or your clean hands to mix these ingredients thoroughly until the crumbs are evenly moistened and resemble wet sand. The melted butter acts as a binding agent, creating a firm and flavorful base for your cheesecake.
-
Press the Crust into the Pan:
Pour the crumb mixture into the bottom of your prepared springform pan. Using the bottom of a flat glass or your knuckles, press the mixture down firmly and evenly across the bottom of the pan. Make sure to get it as compact as possible, as this will help the crust hold together once baked and sliced. You want a really solid foundation for your Cotton Candy Cheesecake Recipe. You can also press it slightly up the sides of the pan if you prefer a crust that extends further, but for a classic look, just the bottom is perfect.
-
Bake and Cool the Crust:
Place the pan with the pressed crust into the preheated oven and bake for 8-10 minutes. This short bake time helps to set the crust, making it sturdy and preventing it from becoming soggy once the filling is added. Keep an eye on it to ensure it doesn’t brown too much. Once baked, remove the pan from the oven and set it aside on a wire rack to cool completely while you prepare the cheesecake filling. It’s important that the crust is cool before adding the filling to prevent any premature melting or separation.
Craft the Cotton Candy Cheesecake Filling
-
Ensure Room Temperature Ingredients:
This is perhaps the most crucial step for achieving a smooth, lump-free cheesecake filling. All your dairy ingredients – cream cheese, sour cream, and eggs – absolutely must be at room temperature. If they are cold, they won’t emulsify properly with the other ingredients, leading to a lumpy texture and potentially overmixing the batter, which can cause cracks during baking. I usually take them out of the refrigerator at least 1-2 hours before I plan to start baking.
-
Cream the Cream Cheese:
In a large mixing bowl, using an electric mixer (either stand mixer with paddle attachment or a handheld mixer), beat the softened cream cheese on medium speed for about 2-3 minutes. You want it to be incredibly smooth, light, and completely free of any lumps. Scrape down the sides and bottom of the bowl frequently with a rubber spatula to ensure everything is evenly incorporated. This initial beating creates the creamy base for your Cotton Candy Cheesecake Recipe.
-
Incorporate Sugar and Flour:
Gradually add the granulated sugar to the cream cheese mixture, beating on low to medium speed until just combined, about 1-2 minutes. Again, scrape down the bowl. Then, add the all-purpose flour and mix until it’s fully incorporated. The flour acts as a stabilizer, helping to prevent cracks and creating a wonderfully smooth texture in the final cheesecake.
-
Add Sour Cream and Extracts:
Now, add the room temperature sour cream, pure vanilla extract, and the star of our show, cotton candy extract. Mix on low speed until everything is just combined and smooth. Be careful not to overmix at this stage. If you’re using food coloring for a whimsical touch, add a few drops of pink or blue gel food coloring here. Mix just enough to distribute the color evenly throughout the batter. You can even swirl in a second color if you want a marbling effect, but don’t overdo it with the mixing!
-
Gently Fold in the Eggs:
This is another critical step to prevent cracks. Add the large eggs one at a time to the cheesecake batter, beating on the lowest speed possible only until each egg is just incorporated. After adding each egg, stop the mixer and scrape down the sides of the bowl before adding the next. Do not overmix the batter once the eggs are added. Overmixing introduces too much air, which can cause the cheesecake to puff up too much during baking and then collapse and crack as it cools. We want a dense, creamy texture, not an airy one.
-
Prepare for Baking:
Once your filling is silky smooth and beautifully colored, pour it gently over the cooled graham cracker crust in the springform pan. Lightly tap the pan on the counter a few times to release any large air bubbles that might be trapped within the batter. This helps ensure an even bake and a smooth top surface for your magnificent Cotton Candy Cheesecake Recipe.
Baking the Cheesecake
-
Set Up the Water Bath:
A water bath (bain-marie) is essential for baking cheesecakes. It provides a moist, gentle heat environment that helps the cheesecake bake evenly, prevents cracking, and ensures a creamy, custardy texture. Place your foil-wrapped springform pan into a larger roasting pan. Carefully pour hot water into the roasting pan, making sure the water level comes about halfway up the sides of the springform pan. Be very careful not to get any water into the cheesecake batter itself!
-
Bake the Cheesecake:
Carefully transfer the roasting pan with the cheesecake and water bath to your preheated 350°F (175°C) oven. Bake for an initial 15 minutes. This higher temperature helps to set the edges. After 15 minutes, reduce the oven temperature to 325°F (160°C) without opening the oven door. Continue baking for another 60-75 minutes, or until the edges of the cheesecake are set, but the center (about a 2-inch diameter) still jiggles slightly when you gently shake the pan. Do not overbake. An overbaked cheesecake will be dry and prone to cracking.
-
Cool Slowly in the Oven:
Once the baking time is complete and the cheesecake has the right jiggle, turn off the oven. Leave the cheesecake in the water bath inside the oven with the oven door propped open slightly (you can use a wooden spoon or a heat-safe oven mitt) for at least one hour. This slow, gradual cooling process is another critical step in preventing cracks and ensuring a perfectly smooth top for your Cotton Candy Cheesecake Recipe. It allows the cheesecake to cool down without experiencing a drastic temperature change, which can shock the delicate custard.
-
Final Cooling and Chilling:
After the hour in the cooling oven, carefully remove the roasting pan from the oven. Take the springform pan out of the water bath and remove the foil from around its sides. Place the cheesecake on a wire rack to cool completely to room temperature. This can take several hours. Once it has reached room temperature, cover the cheesecake loosely with plastic wrap and transfer it to the refrigerator to chill for at least 6-8 hours, but preferably overnight. This extended chilling period is absolutely non-negotiable for a perfect cheesecake. It allows the flavors to meld, the texture to firm up, and ensures your cheesecake slices cleanly and beautifully. Patience is key for this Cotton Candy Cheesecake Recipe!
Chilling and Finishing Touches
-
Prepare the Cotton Candy Whipped Cream:
Once your cheesecake is thoroughly chilled and you’re ready to serve, it’s time to prepare the luscious whipped cream topping. To achieve the best results, make sure your heavy cream is very cold, and for an extra boost, chill your mixing bowl and whisk attachment in the freezer for 10-15 minutes beforehand. In your chilled bowl, combine the cold heavy cream, sifted powdered sugar, pure vanilla extract, and cotton candy extract. If desired, add a tiny drop of pink or blue gel food coloring to match the cotton candy theme.
Using an electric mixer, start on low speed and gradually increase to high, whipping until stiff peaks form. Be careful not to overbeat, or you’ll end up with butter! The whipped cream should be light, airy, and hold its shape beautifully. This topping adds another layer of cotton candy flavor and a delightful textural contrast to the rich cheesecake.
-
Unmold and Top the Cheesecake:
Once the cheesecake has fully chilled overnight, carefully run a thin knife around the edge of the pan to loosen the cheesecake from the sides. Then, unclip and gently remove the springform ring. Transfer the cheesecake to a serving platter. Now, you can either spread the cotton candy whipped cream evenly over the top of the cheesecake with an offset spatula, or for a more decorative finish, pipe it on using a piping bag fitted with a star tip. Create beautiful swirls or rosettes – whatever inspires you for your unique Cotton Candy Cheesecake Recipe.
-
Add the Grand Finale Garnish:
This step is crucial and must be done just before serving. Take your fresh cotton candy and gently pull apart small tufts, arranging them artfully on top of the whipped cream. The delicate strands of cotton candy will melt and dissolve if left out for too long or if exposed to moisture, so timing is everything for this stunning visual. You can use a single color or mix pink and blue cotton candy for a vibrant, whimsical display that perfectly captures the essence of a cotton candy dream.
If you’re feeling extra fancy, sprinkle some edible glitter or colorful rainbow sprinkles around the cotton candy and on the edges of the cheesecake. This adds an extra layer of sparkle and fun to your dessert. The combination of the smooth, creamy cheesecake, the light, flavored whipped cream, and the ethereal cotton candy creates an unforgettable experience for both the eyes and the palate.
-
Serve and Enjoy:
Slice your magnificent Cotton Candy Cheesecake Recipe with a sharp, warm knife (run it under hot water and wipe dry between slices for clean cuts). Serve immediately to appreciate the fresh cotton candy at its best. Each bite will transport you to a carnival of flavors, with the tang of cream cheese, the sweet nostalgia of cotton candy, and the delightful textures of crust, filling, and topping.
Tips for the Perfect Cotton Candy Cheesecake
-
Embrace Room Temperature Ingredients:
I cannot stress this enough! Cold ingredients, especially cream cheese and eggs, will lead to a lumpy batter and an overmixed cheesecake, which are primary causes of cracks. Plan ahead and take them out of the fridge at least 1-2 hours before you begin your baking adventure. This simple step makes a world of difference for the texture of your Cotton Candy Cheesecake Recipe.
-
Don’t Overmix the Batter:
Especially once the eggs are added. Overmixing incorporates too much air, which causes the cheesecake to rise rapidly in the oven and then fall and crack dramatically as it cools. Mix on low speed, only until ingredients are just combined. A gentle hand leads to a smooth, uncracked top.
-
The Water Bath is Your Best Friend:
It’s not just a suggestion; it’s a necessity for classic cheesecakes. The steam from the water bath creates a moist baking environment, ensuring your cheesecake bakes evenly and gently. This prevents the edges from setting too quickly and drying out, which can also lead to unsightly cracks. It’s the secret to that perfectly creamy, custardy texture we all adore in a Cotton Candy Cheesecake Recipe.
-
Slow and Steady Cooling Wins the Race:
Resist the urge to pull your cheesecake out of the oven immediately. The drastic temperature change can shock the delicate custard and cause it to crack. Allowing it to cool gradually in the turned-off oven with the door ajar helps it settle beautifully and prevents those dreaded fissures.
-
Chilling is Crucial:
While it’s tempting to dig in, thorough chilling is essential for the cheesecake to fully set and for the flavors to meld. A minimum of 6-8 hours, or ideally overnight, in the refrigerator will ensure firm slices and an incredible taste experience. This patience will be rewarded with the most delectable slices of Cotton Candy Cheesecake Recipe.
-
Timing is Everything for Cotton Candy Garnish:
Remember, fresh cotton candy is delicate! It will melt and dissolve if exposed to air or moisture for too long. Always add the fresh cotton candy garnish just moments before serving your cheesecake. If you’re preparing this for a party, arrange the cotton candy right before you present it to your guests for maximum visual impact.
-
Storage Tips:
Store any leftover cheesecake (without the fresh cotton candy) tightly covered in the refrigerator for up to 3-4 days. If you know you’ll have leftovers, it’s best to garnish individual slices with cotton candy just before serving, rather than topping the whole cake. This way, the integrity of your beautiful Cotton Candy Cheesecake Recipe remains intact.
-
Flavor and Color Adjustments:
The amount of cotton candy extract can be adjusted to your preference. Some brands are stronger than others, so start with the recommended amount and add a little more if you desire a more intense flavor. For the food coloring, gel colors provide vibrant hues without adding excess liquid. You can omit them entirely for a pure white cheesecake with just the cotton candy flavor, or swirl in multiple colors for an extra whimsical effect.
-
Troubleshooting Cracks:
If your cheesecake does crack despite all your efforts, don’t despair! A dollop of whipped cream, a generous amount of fresh cotton candy, or some sprinkles can easily hide any imperfections, and it will still taste absolutely divine. Every bake is a learning experience, and sometimes, even with the best intentions, cracks happen. The flavor of your Cotton Candy Cheesecake Recipe will still be outstanding!
Conclusion:
Well, my friends, we’ve reached the sweet end of our journey, and I genuinely hope you’re feeling inspired and excited to dive into your kitchen. This isn’t just another dessert recipe; it’s truly an experience, a delightful fusion of whimsical charm and classic indulgence. I can confidently say that if you’re looking for a show-stopping treat that will leave everyone talking, then you’ve found your match. This particular Cotton Candy Cheesecake Recipe is more than just a list of ingredients and steps; it’s an invitation to create a masterpiece that looks as incredible as it tastes. The vibrant colors, the cloud-like texture of the cotton candy topping, and the rich, creamy tang of the cheesecake base come together in a symphony of flavors and aesthetics that is absolutely unparalleled.
I remember the first time I perfected this recipe, seeing the sheer joy and surprise on my friends’ faces as they took their first bite. It’s that blend of nostalgic sweetness from the cotton candy combined with the sophisticated creaminess of a perfectly baked cheesecake that makes it so utterly irresistible. It’s the kind of dessert that instantly brightens a room, making any gathering feel a little more special, a little more magical. Imagine serving this at a birthday party, a family reunion, or even just a cozy evening get-together; it’s guaranteed to be the star of the show, eliciting gasps of delight and excited chatter. It’s surprisingly accessible to create, too, meaning you don’t need to be a professional pastry chef to achieve stunning results. With a little patience and a lot of love, you’ll be whipping up a cheesecake that will impress even the most discerning palates.
Serving Suggestions & Creative Twists to Elevate Your Cheesecake
Now, let’s talk about how to make your cheesecake experience even more unforgettable, or how to put your own unique spin on this already spectacular dessert. While this cheesecake is utterly divine on its own, a few thoughtful additions can really elevate it. For a classic presentation, simply letting the beautiful colors of the cotton candy shine is perfect. However, if you’re feeling a bit adventurous, consider adding a light dusting of edible glitter over the cotton candy just before serving for an extra touch of sparkle – perfect for a festive occasion! Another fantastic idea is to serve individual slices with a dollop of freshly whipped cream, perhaps infused with a hint of vanilla bean or almond extract, to complement the sweetness without overpowering it. For a refreshing contrast, a scattering of fresh berries, like raspberries or blueberries, can add a lovely tartness and a vibrant pop of color against the pastel hues of the cotton candy. Imagine the vibrant red of a raspberry juxtaposed with the ethereal blues and pinks – simply stunning!
Thinking outside the box, you could also experiment with the crust. While a classic graham cracker crust is always a winner, a vanilla wafer crust or even a crushed shortbread cookie crust could introduce a delightful new texture and flavor profile. For those who love a bit of chocolate, a chocolate cookie crust would make for a truly decadent base, creating an interesting contrast with the light, airy topping. And why stop at just one type of cotton candy? If you can find different flavored or colored cotton candy, feel free to swirl them together on top for a truly multi-dimensional visual and taste experience. Perhaps a hint of cherry or green apple cotton candy could add another layer of playful flavor. For smaller gatherings, or to make portioning easier, consider preparing this as individual mini cheesecakes in cupcake liners. They’re just as impressive and make for an elegant, easy-to-serve dessert at any event.
Your Turn to Create and Share the Magic!
My greatest hope is that you’ll take this recipe and make it your own. Don’t be shy about experimenting a little; that’s where some of the best culinary discoveries happen! I promise you, the effort is so worth it for the smiles and delighted expressions you’ll receive. This isn’t just about baking a dessert; it’s about creating memories, sharing joy, and bringing a little bit of wonder to your table. So, please, gather your ingredients, set aside some dedicated baking time, and prepare to enchant your taste buds and those of your loved ones. I am genuinely so excited for you to experience the magic of this unique treat.
Once you’ve whipped up your masterpiece, I would absolutely love to hear all about it! Did you try any of my serving suggestions? Did you come up with a brilliant variation of your own? What was the reaction from your friends and family? Please, don’t keep the delicious details to yourself! Share your photos and stories on social media, tag me if you can, and certainly leave a comment below. Your experiences and insights are invaluable, not just to me, but to fellow home bakers who are looking for inspiration and confirmation. Let’s build a community of enthusiastic dessert makers who aren’t afraid to dream big and bake even bigger. I can’t wait to see your incredible creations and hear how this delightful cheesecake brought a little extra sweetness and whimsy into your life. Happy baking, everyone!
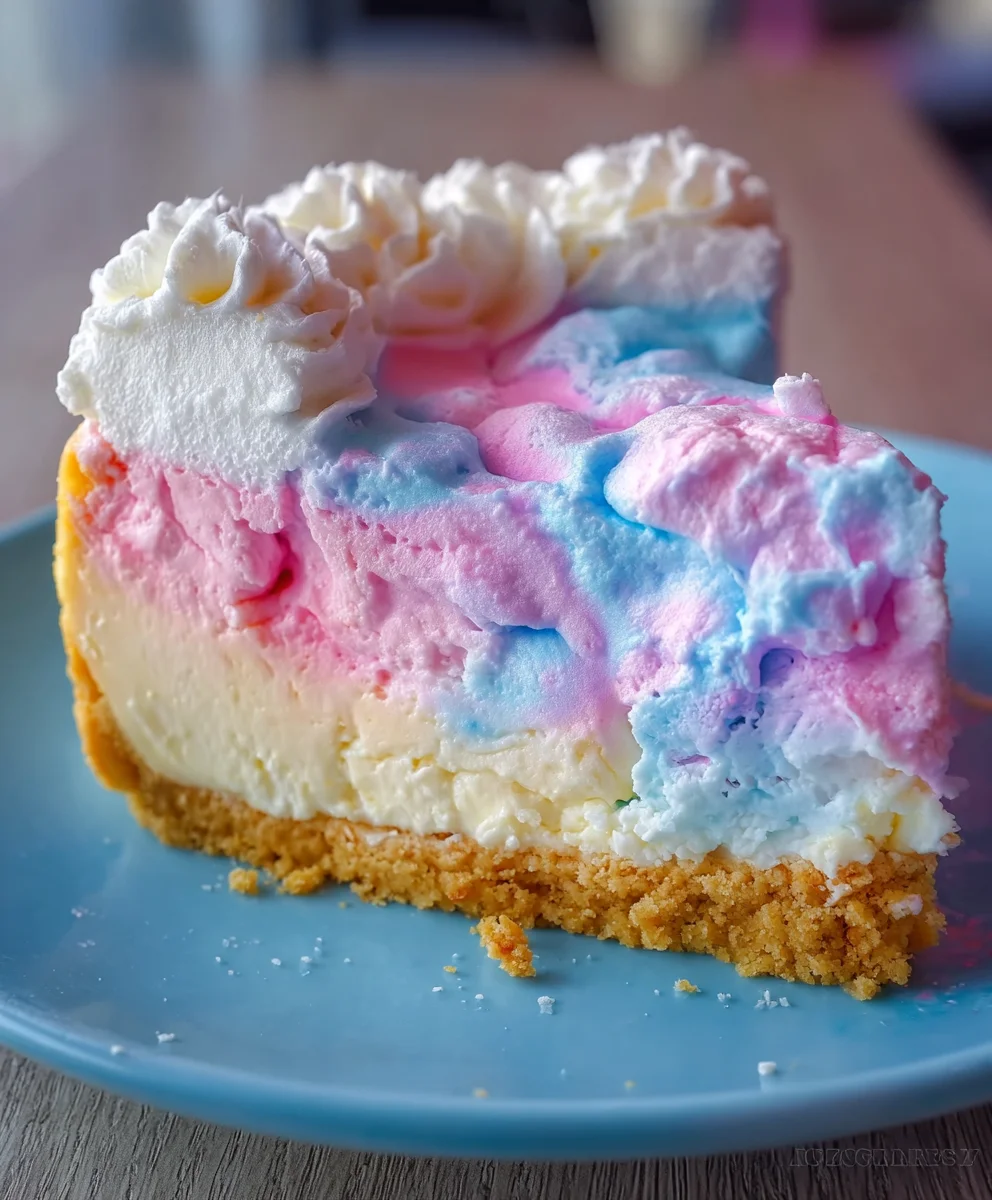
Cotton Candy Cheesecake Recipe
Embark on a whimsical culinary journey with this dreamy Cotton Candy Cheesecake. Marrying sophisticated indulgence with playful nostalgia, this dessert combines the velvety richness of classic cheesecake with the ethereal sweetness and vibrant hues of spun cotton candy. A showstopper perfect for any celebration, offering a unique flavor profile, stunning visual appeal, and delightful texture.
Ingredients
-
1 ½ cups graham cracker crumbs
-
¼ cup granulated sugar (for crust)
-
½ cup unsalted butter, melted
-
3 (8-ounce) blocks full-fat cream cheese, softened
-
1 cup granulated sugar (for filling)
-
1 tablespoon all-purpose flour
-
½ cup full-fat sour cream, softened
-
2 teaspoons pure vanilla extract (for filling)
-
1 ½ teaspoons cotton candy extract (for filling)
-
A few drops of pink or blue gel food coloring (optional, for filling)
-
3 large eggs, softened
-
1 ½ cups cold heavy cream
-
½ cup powdered sugar, sifted
-
1 teaspoon pure vanilla extract (for whipped cream)
-
½ teaspoon cotton candy extract (for whipped cream)
-
A drop of pink or blue gel food coloring (optional, for whipped cream)
-
Fresh cotton candy (for garnish)
-
Edible glitter (optional, for garnish)
-
Rainbow sprinkles (optional, for garnish)
Instructions
-
Step 1
Preheat oven to 350°F (175°C). Lightly grease a 9-inch springform pan; wrap the outside with several layers of heavy-duty aluminum foil. In a medium bowl, combine graham cracker crumbs, ¼ cup granulated sugar, and melted butter. Press mixture firmly into the bottom of the prepared pan. Bake for 8-10 minutes, then cool completely on a wire rack. -
Step 2
Ensure all dairy ingredients (cream cheese, sour cream, eggs) are at room temperature. In a large mixing bowl, beat softened cream cheese on medium speed for 2-3 minutes until smooth. Gradually add 1 cup granulated sugar and flour, mixing until just combined. Mix in softened sour cream, 2 tsp pure vanilla extract, and 1 ½ tsp cotton candy extract. If desired, add a few drops of pink or blue gel food coloring and mix until evenly distributed. -
Step 3
Add large eggs one at a time to the batter, beating on the lowest speed possible only until each egg is just incorporated. Do not overmix. Pour the silky-smooth filling gently over the cooled graham cracker crust. Lightly tap the pan on the counter a few times to release any large air bubbles. -
Step 4
Place the foil-wrapped springform pan into a larger roasting pan. Carefully pour hot water into the roasting pan, ensuring it comes halfway up the sides of the springform pan. Transfer to the preheated oven and bake at 350°F (175°C) for 15 minutes. Reduce oven temperature to 325°F (160°C) and continue baking for another 60-75 minutes, or until the edges are set and the center (about 2-inch diameter) still jiggles slightly. -
Step 5
Turn off the oven. Leave the cheesecake in the water bath inside the oven with the door propped open slightly for at least 1 hour for slow cooling. Remove from the oven, take the springform pan out of the water bath, and remove the foil. Cool completely to room temperature on a wire rack (several hours). Cover loosely with plastic wrap and transfer to the refrigerator to chill for at least 6-8 hours, preferably overnight, for best results. -
Step 6
Once cheesecake is thoroughly chilled, prepare the topping. In a chilled mixing bowl, combine cold heavy cream, sifted powdered sugar, 1 tsp pure vanilla extract, and ½ tsp cotton candy extract. If desired, add a drop of pink or blue gel food coloring. Whip on low, then gradually increase to high speed until stiff peaks form. Do not overbeat. -
Step 7
Run a thin knife around the edge of the chilled cheesecake to loosen it from the pan, then unclip and remove the springform ring. Transfer to a serving platter. Spread or pipe the cotton candy whipped cream evenly over the top. Just before serving, gently pull apart and arrange fresh cotton candy artfully on top of the whipped cream. Optionally, sprinkle with edible glitter or rainbow sprinkles. Slice with a sharp, warm knife and serve immediately.
Important Information
Nutrition Facts (Per Serving)
It is important to consider this information as approximate and not to use it as definitive health advice.
Allergy Information
Please check ingredients for potential allergens and consult a health professional if in doubt.
Leave a Comment