
Cookie Butter Caramel Cheesecake. Just the sound of that conjures up images of pure decadence, doesn’t it? I know for me, it’s a dessert that hits all the right notes, a symphony of creamy, sweet, and utterly addictive flavors. It’s no wonder this cookie butter caramel cheesecake has become such a sensation. People adore it because it takes two beloved treats—creamy cheesecake and the irresistible allure of cookie butter—and elevates them to an entirely new level of deliciousness. What makes this particular cookie butter caramel cheesecake so special is the masterful balance of textures and tastes. The smooth, rich cheesecake is perfectly complemented by the warm, spiced notes of cookie butter, all drizzled with a luscious, salty-sweet caramel that cuts through the richness just so. It’s a hug in dessert form, guaranteed to bring smiles to any gathering, or just make your own quiet moment a little brighter.
Cookie Butter Caramel Cheesecake
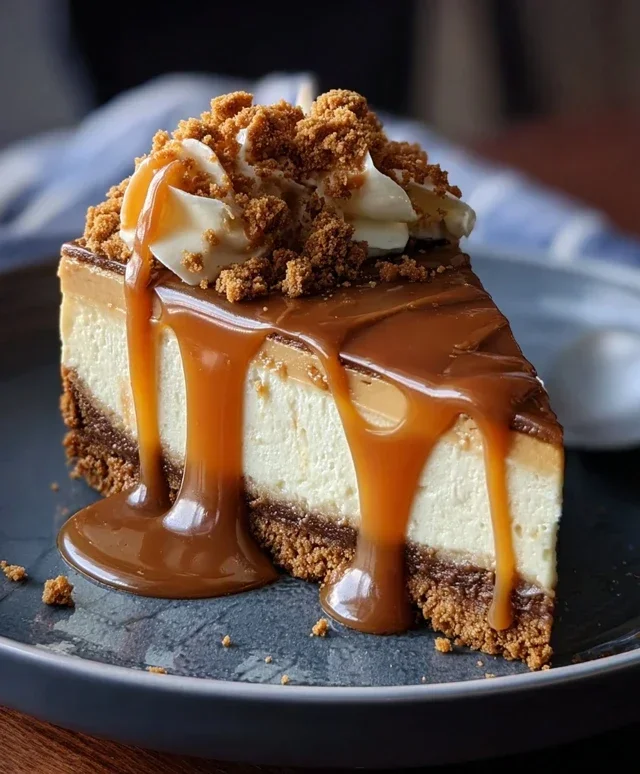
Get ready to indulge in a dessert that’s truly out of this world! This Cookie Butter Caramel Cheesecake is a symphony of rich, creamy cheesecake, the irresistible warmth of cookie butter, and a decadent swirl of caramel. It’s the perfect showstopper for any occasion, from a cozy night in to a festive gathering. The magic starts with a deeply flavorful cookie crust, which cradles a silky smooth cheesecake filling infused with beloved cookie butter. To top it all off, a generous drizzle of gooey caramel sauce and a scattering of extra cookie crum extractbs make every bite an unforgettable experience. This recipe balances the comforting flavors of both cookie butter and caramel in a way that’s sophisticated yet utterly approachable. Whether you’re a seasoned baker or just starting, this cheesecake is designed to impress.
Ingredients:
Prepping the Crust
The foundation of any great cheesecake is a sturdy and flavorful crust. For this recipe, we’re leaning into the deliciousness of Biscoff cookies. You can easily create these crum extractbs by pulsing them in a food processor until they resemble coarse sand, or for a more rustic texture, place them in a zip-top bag and crush them with a rolling pin. The goal is to have enough fine pieces to bind together. In a medium bowl, combine your Biscoff cookie crum extractbs with the melted butter. Stir until the crum extractbs are evenly moistened, resembling wet sand. This mixture will hold together when pressed.
Assembling and Baking the Cheesecake
Now, let’s get that crust into its pan! Press the cookie crum extractb mixture firmly and evenly into the bottom of a 9-inch springform pan. Using the flat bottom of a glass or measuring cup helps achieve a compact and uniform layer. This is crucial for preventing the crust from crum extractbling when you slice the cheesecake later. For the baked version, preheat your oven to 325°F (160°C). Once the oven is preheated, place the springform pan on a baking sheet. This will catch any potential drips and make it easier to move the cheesecake in and out of the oven. We’ll be baking this for about 50-60 minutes, or until the edges are set and the center is still slightly jiggly. A water bath is highly recommended for cheesecakes to ensure even baking and prevent cracks. To do this, wrap the outside of your springform pan tightly with a couple of layers of heavy-duty aluminum foil. Place this wrapped pan inside a larger baking pan. Then, carefully pour boiling water into the larger pan, ensuring the water level comes about halfway up the sides of the springform pan. Bake as directed.
Creating the Creamy Filling
While the crust is chilling or the cheesecake is baking, it’s time to whip up the star of the show: the cheesecake filling. In a large bowl, using an electric mixer (stand mixer with paddle attachment or a hand mixer), beat the softened cream cheese until it’s completely smooth and creamy, with no lumps. This step is crucial for a lump-free cheesecake. Gradually add the brown sugar and continue beating until well combined and the mixture is light and fluffy. Next, incorporate the cookie butter, beating until it’s fully blended with the cream cheese and sugar. This is where that irresistible cookie butter flavor really starts to shine through. Add the heavy whipping cream and vanilla extract, and mix on low speed until just combined. Don’t overmix at this stage. Finally, add the eggs, one at a time, beating on low speed after each addition until just incorporated. Be careful not to overbeat the eggs, as this can lead to a tougher cheesecake.
Adding the Caramel Swirl and Chilling
Once your cheesecake is baked (if you’re making the baked version) and has cooled slightly, it’s time to add that decadent caramel touch. If you’re opting for a no-bake version, you can proceed directly to this step after assembling the crust. Drizzle about half of the caramel sauce over the top of the cheesecake filling. Then, using a knife or a skewer, gently swirl the caramel into the filling. Don’t over-swirl; you want distinct ribbons of caramel throughout. This creates beautiful patterns and pockets of intense caramel flavor. Once swirled, if you’ve baked your cheesecake, let it cool completely at room temperature on a wire rack. After it has cooled, cover the cheesecake tightly with plastic wrap and refrigerate for at least 6 hours, or preferably overnight. This chilling period is absolutely essential for the cheesecake to set properly and for the flavors to meld. A properly chilled cheesecake will be firm enough to slice cleanly and will have a superior texture.
Serving Your Masterpiece
The moment of truth has arrived! When you’re ready to serve your Cookie Butter Caramel Cheesecake, carefully remove the sides of the springform pan. This is often the most nerve-wracking part, but taking your time and using a thin knife to gently loosen the edges can help. Transfer the cheesecake to a serving platter. Before slicing, warm your knife under hot water and dry it thoroughly for the cleanest cuts. Drizzle the remaining caramel sauce generously over the top of the cheesecake. For the ultimate indulgence, top with a dollop of fluffy whipped cream and a sprinkle of extra Biscoff cookie crum extractbs. The combination of textures and flavors – the creamy cheesecake, the crunchy crum extractbs, the smooth caramel, and the airy whipped cream – is simply divine. Enjoy every single bite of this truly sensational dessert!
Conclusion:
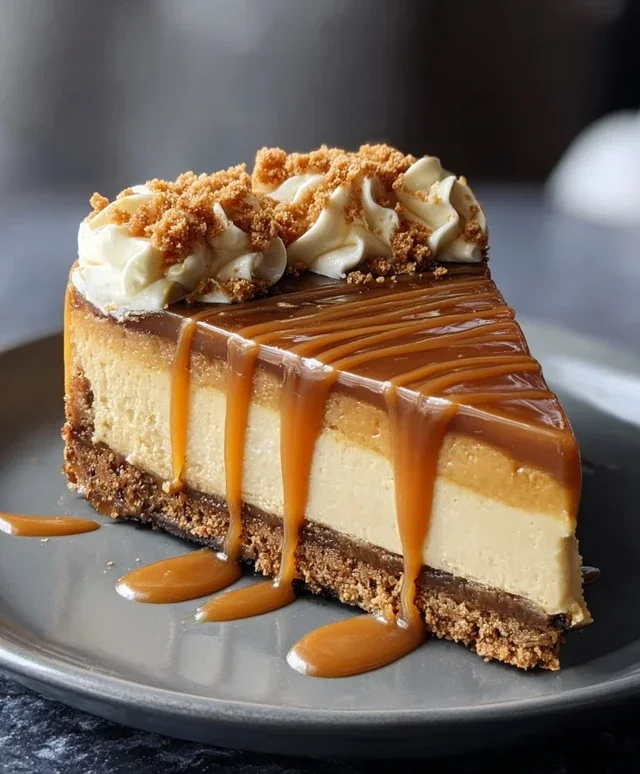
I hope you’ve been inspired to bake this incredible Cookie Butter Caramel Cheesecake! This recipe is truly a showstopper, combining the rich, creamy indulgence of cheesecake with the warm, spiced notes of cookie butter and the sweet, decadent swirl of homemade caramel. It’s the perfect dessert for holidays, special occasions, or simply when you crave something utterly delicious and comforting. The contrast of textures – the buttery cookie crust, the velvety cheesecake filling, and the gooey caramel – is simply divine.
For serving, I love to present it with an extra drizzle of warm caramel sauce and a sprinkle of crushed speculoos cookies on top. A dollop of lightly sweetened whipped cream also makes a delightful accompaniment. If you’re feeling adventurous with variations, consider adding a layer of chopped chocolate chips into the cheesecake batter, or infusing your caramel with a hint of sea salt for a salted caramel variation. Don’t be afraid to experiment! I truly encourage you to give this cookie butter caramel cheesecake a try; you won’t be disappointed!
Frequently Asked Questions:
Can I make this cheesecake ahead of time?
Absolutely! This cookie butter caramel cheesecake is perfect for making ahead. In fact, the flavors meld even more beautifully overnight. I recommend baking it, letting it cool completely, then refrigerating it for at least 4-6 hours, or preferably overnight, before serving. This also makes it a fantastic option for entertaining guests, as you can prepare it the day before and focus on other things on the day of your event.
What kind of cookie butter should I use?
For the best flavor, I recommend using a good quality origin extractal cookie butter, like Biscoff. These tend to have the most authentic and rich spiced cookie flavor that pairs perfectly with the cheesecake and caramel. You can find it in most grocery stores, often in the peanut butter aisle or specialty baking sections.
My caramel sauce broke, what can I do?
Don’t worry, it happens! If your caramel sauce separates or looks oily, you can often rescue it by whisking in a tablespoon of warm water or heavy cream off the heat. Gradually whisk it in until the sauce comes back together. For future caramel making, ensure your sugar doesn’t get too dark, and add your butter and cream slowly while whisking constantly.
Cookie Butter Caramel Cheesecake
A decadent cheesecake featuring a cookie butter crust and a smooth, creamy filling swirled with rich caramel sauce.
Ingredients
-
1 ½ cups Biscoff cookie crumbs
-
¼ cup melted butter
-
16 oz cream cheese, softened
-
½ cup cookie butter
-
½ cup brown sugar
-
½ cup heavy whipping cream
-
1 tsp vanilla extract
-
2 eggs
-
½ cup caramel sauce
-
Whipped cream, for serving
-
Extra Biscoff cookie crumbs, for garnish
Instructions
-
Step 1
Preheat oven to 350°F (175°C). For the crust, mix Biscoff cookie crumbs and melted butter. Press mixture into the bottom of a 9-inch springform pan. -
Step 2
In a large bowl, beat cream cheese until smooth. Add cookie butter and brown sugar, beating until well combined. -
Step 3
Beat in heavy whipping cream and vanilla extract until smooth. Add eggs one at a time, mixing until just combined. Do not overmix. -
Step 4
Pour half of the cream cheese mixture over the crust. Drizzle half of the caramel sauce over the top. Gently swirl with a knife. -
Step 5
Pour the remaining cream cheese mixture over the caramel swirl. Drizzle with the remaining caramel sauce and swirl again. -
Step 6
Bake for 50-60 minutes, or until the edges are set and the center is slightly jiggly. Turn off the oven and let the cheesecake cool in the oven with the door slightly ajar for 1 hour. -
Step 7
Remove from oven and cool completely on a wire rack. Chill in the refrigerator for at least 4 hours, or preferably overnight. -
Step 8
Before serving, loosen the sides of the springform pan. Top with whipped cream and extra Biscoff cookie crumbs.
Important Information
Nutrition Facts (Per Serving)
It is important to consider this information as approximate and not to use it as definitive health advice.
Allergy Information
Please check ingredients for potential allergens and consult a health professional if in doubt.
Leave a Comment