
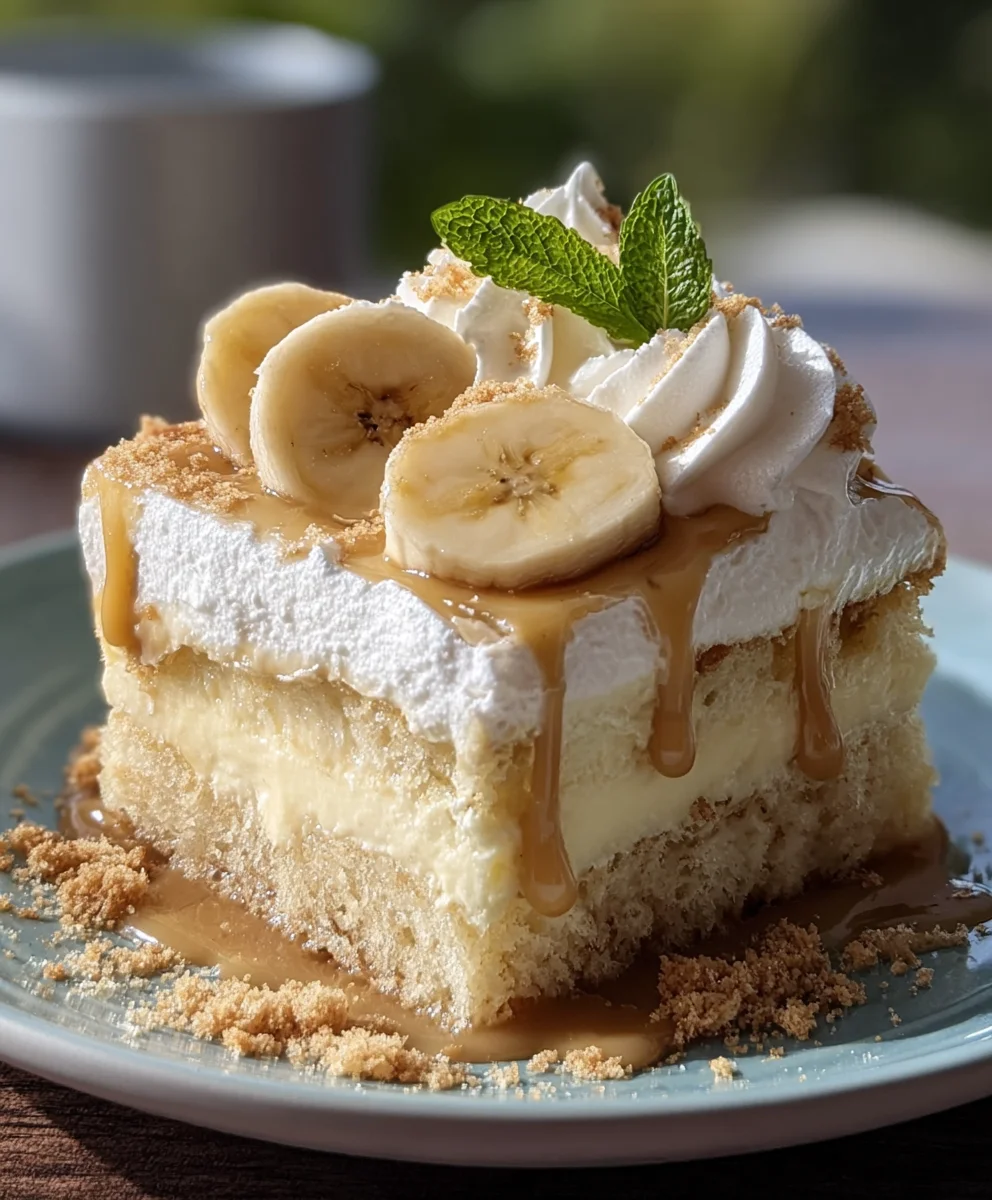
Banana Pudding Tres Leches Cake – allow me to introduce you to what I believe is the ultimate dessert fusion, a culinary dream where two beloved titans meet in glorious harmony. Have you ever imagined the creamy, comforting embrace of classic banana pudding uniting with the incredibly moist, milky sweetness of a traditional Tres Leches cake? Well, prepare to have your dessert dreams not just met, but gloriously exceeded! I’ve been fascinated by the rich histories behind these two classics: the Tres Leches cake, with its origins deeply rooted in various Latin American countries, is celebrated for its ethereal sponge soaked in three types of milk, resulting in an unparalleled succulence. Meanwhile, banana pudding, a true American comfort food, conjures images of sweet bananas, vanilla wafers, and a luxurious custard.
I’ve meticulously crafted this recipe to ensure every forkful delivers that perfect balance – a light, airy cake infused with a rich, milky goodness, layered with fresh banana slices and soft vanilla wafers, all crowned with a cloud of whipped cream. People, myself included, adore this Banana Pudding Tres Leches Cake not only for its stunning presentation but for the symphony of textures and flavors it offers: the delicate sponge, the lush milky soak, the tender bananas, and the delightful crunch of wafers, all culminating in an unforgettable experience that is both familiar and excitingly new. It’s a guaranteed crowd-pleaser, perfect for any gathering or simply as a well-deserved treat.
Ingredients:
-
For the Vanilla Sponge Cake:
- 2 ½ cups (300g) all-purpose flour, sifted
- 2 teaspoons baking powder
- ½ teaspoon salt
- 1 cup (226g) unsalted butter, softened to room temperature
- 2 cups (400g) granulated sugar
- 4 large eggs, at room temperature
- 1 tablespoon pure vanilla extract
- 1 cup (240ml) whole milk, at room temperature
-
For the Tres Leches Soak:
- 1 (12-ounce/354ml) can evaporated milk
- 1 (14-ounce/396g) can sweetened condensed milk
- ½ cup (120ml) whole milk or heavy cream
- 1 teaspoon pure vanilla extract
-
For the Creamy Banana Pudding Layer:
- 4 large egg yolks
- ¾ cup (150g) granulated sugar
- ¼ cup (30g) cornstarch
- ¼ teaspoon salt
- 2 cups (480ml) whole milk
- ½ cup (120ml) heavy cream
- 2 tablespoons unsalted butter, cut into small pieces
- 1 ½ teaspoons pure vanilla extract
- 3-4 ripe, but firm, medium bananas (about 1 pound/450g), divided
- 1 (11-ounce/312g) box vanilla wafers (Nilla Wafers recommended), crushed and whole for garnish
-
For the Whipped Cream Topping:
- 2 cups (480ml) cold heavy cream (at least 36% fat)
- ½ cup (55g) powdered sugar (confectioners’ sugar)
- 1 teaspoon pure vanilla extract
-
For Garnish (Optional):
- Additional vanilla wafers, whole or crushed
- Fresh banana slices (tossed lightly in lemon juice to prevent browning, if desired)
Preparing the Vanilla Sponge Cake
- Preheat and Prepare: First things first, let’s get our oven ready. Preheat your oven to 350°F (175°C). Then, take a 9×13-inch (23×33 cm) baking pan and lightly grease it with butter or cooking spray. For easy removal, I like to line the bottom with parchment paper, leaving a slight overhang on the sides, and then grease the parchment too. This little trick makes transferring the cake so much simpler later on.
- Combine Dry Ingredients: In a medium bowl, whisk together your sifted all-purpose flour, baking powder, and salt. Make sure these are thoroughly combined; we want the leavening to be evenly distributed for a light and airy cake. Set this bowl aside for a moment.
- Cream Butter and Sugar: In a large mixing bowl, using an electric mixer (either a stand mixer with a paddle attachment or a handheld mixer), cream together the softened unsalted butter and granulated sugar. Beat them on medium-high speed for about 3-5 minutes, until the mixture is visibly light in color and fluffy. This step is crucial for incorporating air, which contributes to the cake’s tender texture. Scrape down the sides of the bowl occasionally to ensure everything is evenly mixed.
- Add Eggs Gradually: With the mixer on medium speed, add the large eggs one at a time, beating well after each addition. Allow each egg to fully incorporate into the butter-sugar mixture before adding the next. This prevents the mixture from curdling and ensures a smooth batter. Once all eggs are in, mix in the pure vanilla extract. The batter should look rich and slightly yellow.
- Alternate Dry and Wet Ingredients: Now, with the mixer on low speed, slowly add about one-third of the dry ingredient mixture to the wet ingredients, mixing just until combined. Then, pour in half of the whole milk and mix until it’s incorporated. Repeat this process: add another third of the dry ingredients, mix, then the remaining milk, mix, and finally the last of the dry ingredients. Be careful not to overmix the batter at this stage; overmixing can develop the gluten in the flour too much, leading to a tough cake. Mix just until no dry streaks of flour remain. A quick scrape of the bowl with a spatula to catch any unmixed bits is always a good idea.
- Bake the Cake: Pour the prepared cake batter into your greased and floured (or parchment-lined) 9×13-inch baking pan, spreading it evenly with a spatula. Place the pan in the preheated oven and bake for 30-35 minutes. You’ll know it’s done when a wooden skewer or toothpick inserted into the center comes out clean. The top should be golden brown and spring back lightly when touched.
- Cool and Prepare for Soaking: Once baked, remove the cake from the oven and let it cool in the pan on a wire rack for about 15-20 minutes. While it’s still warm, use the skewer or a fork to poke holes all over the surface of the cake. These holes will be like little canals, allowing our delicious tres leches soak to penetrate deeply, ensuring every bite is moist and flavorful.
Crafting the Tres Leches Soak
- Combine the Milks: While the cake is cooling, let’s prepare the signature tres leches soak. In a medium bowl or a large measuring cup, combine the entire can of evaporated milk, the entire can of sweetened condensed milk, the ½ cup of whole milk (or heavy cream for an even richer soak), and the 1 teaspoon of pure vanilla extract. Whisk these together vigorously until everything is thoroughly blended and homogenous. The sweetened condensed milk can be quite thick, so make sure it’s fully incorporated with the other liquids.
- Soak the Cake: Carefully and slowly pour the entire tres leches mixture evenly over the warm, poked cake. You might think it looks like a lot of liquid, but trust me, the cake will absorb it beautifully. Take your time, pouring little by little, allowing the cake to drink up the milky goodness. Once all the milk mixture has been poured, cover the pan loosely with plastic wrap and refrigerate the cake for at least 2 hours, or ideally overnight. This chilling time is absolutely essential for the cake to fully absorb the milks and for the flavors to meld. Do not skip this step! It’s what makes a tres leches cake truly special.
Preparing the Creamy Banana Pudding Layer
- Whisk Dry Custard Ingredients: In a medium-sized heavy-bottomed saucepan, whisk together the egg yolks, ¾ cup granulated sugar, cornstarch, and salt until smooth and pale yellow. The cornstarch helps to thicken our pudding, giving it that classic creamy consistency.
- Heat Milk and Cream: In a separate small saucepan or microwave-safe bowl, gently heat the 2 cups of whole milk and ½ cup of heavy cream until it’s steaming, but not boiling. You’ll see small bubbles forming around the edges.
- Temper the Egg Yolks: This is a key step to prevent scrambling the eggs! Slowly, in a thin stream, pour about half of the hot milk mixture into the egg yolk mixture, whisking continuously and vigorously. This process, called tempering, gradually brings the temperature of the egg yolks up without cooking them too quickly.
- Cook the Pudding: Once tempered, pour the entire egg yolk mixture back into the saucepan with the remaining hot milk. Place the saucepan over medium heat and cook, whisking constantly. It’s really important to keep whisking to prevent lumps and to stop the bottom from scorching. The mixture will gradually thicken. Continue to cook for 5-7 minutes, until it reaches a thick pudding-like consistency that coats the back of a spoon. When you draw your finger across the spoon, the line should hold.
- Add Butter and Vanilla: Remove the pudding from the heat. Stir in the 2 tablespoons of unsalted butter until melted and fully incorporated, then stir in the 1 ½ teaspoons of pure vanilla extract. The butter adds richness and a silky texture.
- Cool the Pudding: Pour the hot pudding into a clean bowl. To prevent a skin from forming on top (which can be unappetizing), press a piece of plastic wrap directly onto the surface of the pudding. Let it cool at room temperature for about 30 minutes, then transfer it to the refrigerator to chill completely for at least 2-3 hours. It must be thoroughly chilled and firm before assembly. You can even make this a day ahead!
- Prepare Bananas and Wafers: Once the pudding is chilling, prepare your bananas. Slice two of the ripe, firm bananas into ¼-inch thick rounds. For the remaining 1-2 bananas, you can either slice them as well or lightly mash them with a fork if you prefer a softer banana element within the pudding layer. To prevent browning, you can lightly toss the banana slices with a tiny bit of lemon juice, though for this recipe, given how quickly they’ll be incorporated, it’s often not strictly necessary. Crush about half of your box of vanilla wafers. I usually put them in a zip-top bag and gently crush them with a rolling pin or my hands; we want a mix of crumbs and small pieces, not fine dust.
Whipping Up the Creamy Topping
- Chill Your Equipment: For the best results when whipping cream, I always recommend chilling your mixing bowl (preferably a metal one) and your whisk attachment (or beater) in the freezer for about 10-15 minutes before you start. Cold equipment helps the cream whip up faster and hold its peaks better.
- Whip the Cream: Pour the 2 cups of cold heavy cream into your chilled bowl. Add the ½ cup of powdered sugar and 1 teaspoon of pure vanilla extract. Using an electric mixer, start on low speed to prevent splattering, then gradually increase to medium-high speed.
- Achieve Stiff Peaks: Continue to whip until the cream holds firm, stiff peaks. This usually takes about 3-5 minutes, depending on your mixer and the temperature of your cream. Be careful not to overmix, as whipped cream can quickly turn into butter! You want it light, airy, and stable enough to spread beautifully.
Assembling Your Banana Pudding Tres Leches Cake
- Retrieve the Soaked Cake: After the tres leches cake has thoroughly chilled and absorbed all the milky goodness, take it out of the refrigerator. It should feel denser and incredibly moist. If you used parchment paper with an overhang, you can carefully lift the cake out of the pan and place it on a large serving platter, or simply assemble it directly in the baking pan if you prefer.
- First Banana and Wafer Layer: Arrange about half of your sliced fresh bananas directly over the soaked cake layer. Try to get an even spread. Then, sprinkle about half of the crushed vanilla wafers over the bananas. These layers add texture and a delightful banana-vanilla flavor.
- Add the Chilled Banana Pudding: Retrieve your completely chilled banana pudding from the refrigerator. Give it a good whisk or stir to loosen it up and make it smooth. Gently spoon or spread the entire banana pudding mixture evenly over the layer of bananas and wafers. Take your time to make sure it’s spread from edge to edge.
- Second Banana and Wafer Layer: Now, arrange the remaining sliced bananas over the banana pudding layer. If you decided to mash some bananas earlier, this would be a great spot to add them too, or if you prefer a smoother pudding top, you can omit them. Sprinkle the remaining crushed vanilla wafers over the bananas.
- Top with Whipped Cream: Finally, dollop the freshly whipped cream generously over the entire cake. Using an offset spatula or the back of a spoon, spread the whipped cream evenly across the top, creating soft swirls or peaks.
- Garnish and Chill (Again!): For a beautiful presentation and even better flavor melding, garnish the top with a few whole vanilla wafers, additional crushed wafers, or some fresh banana slices (tossed in lemon juice if you want them to stay pristine for longer). Cover the cake loosely and return it to the refrigerator for at least another 2-4 hours, or even better, overnight. This final chill is crucial. It allows the flavors to truly marry, the pudding to fully set with the other layers, and the entire cake to become a cohesive, delightful experience. The texture improves immensely with this final rest.
Serving and Storage
- Slice and Serve: When you’re ready to enjoy this masterpiece, remove the Banana Pudding Tres Leches Cake from the refrigerator. Use a sharp knife to cut it into generous slices. I like to wipe my knife clean between each cut to ensure neat edges. Serve immediately and watch your friends and family be utterly delighted! The combination of the moist cake, creamy pudding, fresh bananas, and crunchy wafers is simply irresistible.
- Storage: Any leftover cake should be stored in an airtight container in the refrigerator. It will keep well for up to 3-4 days. While the fresh banana slices on top might brown slightly over time, the overall flavor of the cake only gets better as it sits, allowing all those wonderful components to fully meld together. It’s one of those desserts that truly shines on day two!
Conclusion:
Well, my friends, we’ve reached the sweet end of our journey, but truly, it’s just the beginning of a magnificent culinary adventure for you! If there’s one recipe I could implore you to try this year, it’s this incredibly special creation. What makes it a must-try? Imagine the classic, comforting hug of a perfectly ripe banana pudding, layered with the unbelievably moist, melt-in-your-mouth richness of a traditional tres leches cake. It’s not merely a dessert; it’s an experience, a symphony of textures and flavors that will tantalize your taste buds and leave everyone at your table utterly speechless, asking for seconds, maybe even thirds! I designed this recipe specifically to deliver that ‘wow’ factor without overwhelming you with complicated steps. Every bite offers that perfect balance of sweet, creamy, and wonderfully moist, a true testament to how two beloved classics can merge to create something even greater than the sum of their parts. This isn’t just another cake; it’s a celebration, a conversation starter, and quite frankly, a dessert that redefines indulgence. The tender cake, infused with that decadent three-milk soak, becomes an ethereal foundation for the creamy, banana-laden pudding and the delicate crunch of vanilla wafers. And let’s not forget that cloud-like whipped topping, providing the perfect airy finish. Trust me when I say, your dessert table will never be the same after introducing this masterpiece.
Serving Suggestions to Elevate Your Experience:
Serving this incredible dessert is an art in itself, and I have a few suggestions to elevate your experience even further. While it’s utterly divine straight from the pan, perfectly chilled, I often find a light dusting of cocoa powder or a delicate drizzle of homemade caramel sauce adds an extra layer of visual appeal and flavor complexity. For a truly elegant presentation, consider serving individual slices on small plates, garnished with a single, perfectly ripe banana slice and a crumbled vanilla wafer for texture. If you’re hosting a more casual gathering, presenting it in a beautiful glass trifle bowl allows your guests to admire its stunning layers before diving in. Don’t be afraid to get creative with your garnishes – a sprinkle of toasted coconut flakes can introduce a lovely tropical note, or a few chocolate shavings could add a sophisticated touch.
Creative Variations to Personalize Your Dessert:
For those who love a hint of warmth, a very small splash of dark rum or banana liqueur can be added to the milk mixture before soaking the cake, transforming it into an even more adult-friendly treat. And speaking of variations, while the classic vanilla wafer is quintessential, feel free to experiment with shortbread cookies for a richer butter flavor, or even a gluten-free wafer alternative if catering to dietary needs. I’ve even seen adventurous bakers add a thin layer of dulce de leche between the cake and pudding for an extra caramel punch, which, while not traditional, sounds absolutely heavenly! If you’re keen on making individual portions, assembling this delightful creation in small mason jars makes for an adorable, portable dessert perfect for picnics or potlucks. Imagine each guest having their own little jar of this creamy, dreamy goodness! Just layer crumbled wafers, cake pieces soaked in milk, banana slices, and pudding, finishing with whipped cream. It’s a fantastic way to impress with minimal fuss.
So, what are you waiting for? I genuinely hope you feel inspired to roll up your sleeves and dive into making your very own batch of this sensational Banana Pudding Tres Leches Cake. There’s something so incredibly satisfying about baking a dessert that brings so much joy to those who taste it, and I promise you, this recipe delivers on that promise tenfold. It’s more than just a recipe; it’s an invitation to create lasting memories around your table. I pour my heart into developing these recipes, and nothing makes me happier than seeing your successes and hearing about your experiences. So, once you’ve whipped up this delightful treat, please don’t keep it to yourself! I would absolutely love for you to share your triumphs, your photos, and any creative twists you might have added. Tag me on social media, leave a comment below, or even send an email – I’m genuinely eager to see your beautiful creations and hear your feedback. Did you serve it with a special garnish? Did you have a favorite part of the process? Did your family rave about it? Your stories inspire me and help our wonderful community of home bakers grow. Baking is a journey, and I’m thrilled to be on it with you. Go forth, bake with passion, and prepare to be utterly smitten by this incredible fusion dessert. Happy baking, everyone!
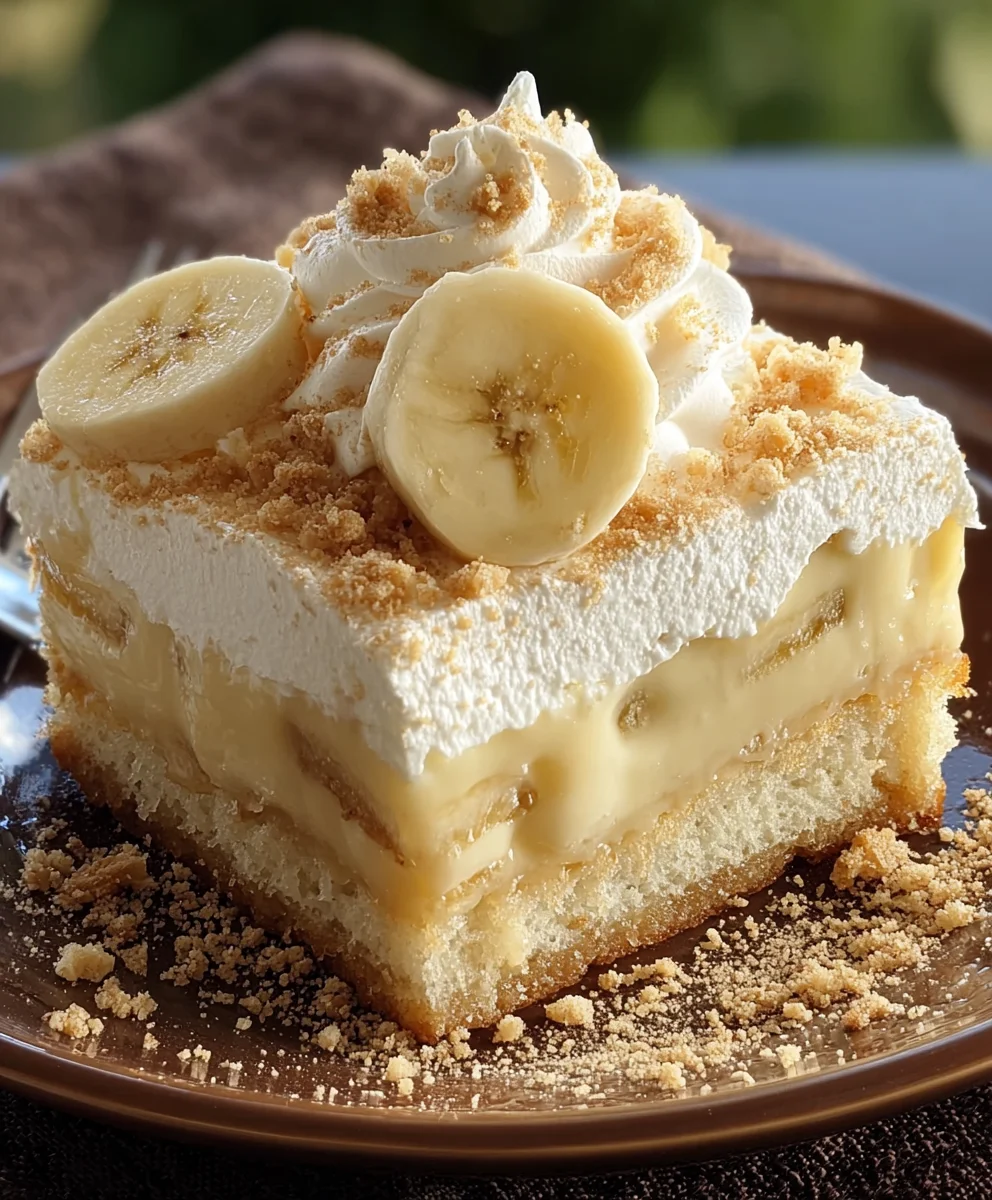
Banana Pudding Tres Leches Cake
This ultimate dessert fusion combines the creamy comfort of banana pudding with the moist, milky sweetness of Tres Leches cake. Featuring a light sponge soaked in three milks, layered with fresh bananas, vanilla wafers, and crowned with whipped cream, it’s a symphony of textures and flavors.
Ingredients
-
2 ½ cups (300g) all-purpose flour, sifted
-
2 teaspoons baking powder
-
½ teaspoon salt
-
1 cup (226g) unsalted butter, softened to room temperature
-
2 cups (400g) granulated sugar
-
4 large eggs, at room temperature
-
1 tablespoon pure vanilla extract
-
1 cup (240ml) whole milk, at room temperature
-
1 (12-ounce/354ml) can evaporated milk
-
1 (14-ounce/396g) can sweetened condensed milk
-
½ cup (120ml) whole milk or heavy cream (for soak)
-
1 teaspoon pure vanilla extract (for soak)
-
4 large egg yolks
-
¾ cup (150g) granulated sugar (for pudding)
-
¼ cup (30g) cornstarch
-
¼ teaspoon salt (for pudding)
-
2 cups (480ml) whole milk (for pudding)
-
½ cup (120ml) heavy cream (for pudding)
-
2 tablespoons unsalted butter, cut into small pieces (for pudding)
-
1 ½ teaspoons pure vanilla extract (for pudding)
-
3-4 ripe, but firm, medium bananas (about 1 pound/450g), divided
-
1 (11-ounce/312g) box vanilla wafers (Nilla Wafers recommended), crushed and whole for garnish
-
2 cups (480ml) cold heavy cream (for topping)
-
½ cup (55g) powdered sugar (confectioners’ sugar)
-
1 teaspoon pure vanilla extract (for topping)
-
Additional vanilla wafers, whole or crushed (optional, for garnish)
-
Fresh banana slices (tossed lightly in lemon juice to prevent browning, if desired, for garnish)
Instructions
-
Step 1
Preheat oven to 350°F (175°C). Grease and line a 9×13-inch pan. Whisk 2½ cups flour, 2 tsp baking powder, and ½ tsp salt. Cream 1 cup butter and 2 cups sugar for 3-5 min until light and fluffy. Add 4 eggs one at a time, beating well, then mix in 1 tbsp vanilla. Alternately add dry ingredients and 1 cup milk, mixing until just combined. Pour batter into pan, bake 30-35 min until a toothpick comes out clean. Cool 15-20 min in pan, then poke holes over the warm cake. -
Step 2
Combine 1 can evaporated milk, 1 can sweetened condensed milk, ½ cup whole milk/heavy cream, and 1 tsp vanilla extract. Whisk well. Slowly pour over the poked, warm cake. Cover and refrigerate for at least 2 hours or ideally overnight. -
Step 3
In a saucepan, whisk 4 egg yolks, ¾ cup granulated sugar, ¼ cup cornstarch, and ¼ tsp salt. Heat 2 cups whole milk and ½ cup heavy cream until steaming. Temper egg yolks by slowly whisking half of the hot milk into them, then return to saucepan with remaining hot milk. Cook over medium heat, whisking constantly, 5-7 min until thickened. Remove from heat, stir in 2 tbsp unsalted butter and 1½ tsp vanilla. Pour into a bowl, press plastic wrap directly on surface, cool at room temp 30 min, then chill completely for 2-3 hours or overnight. Slice 3-4 bananas and crush half of vanilla wafers. -
Step 4
Chill mixing bowl and whisk. Pour 2 cups cold heavy cream into chilled bowl, add ½ cup powdered sugar and 1 tsp vanilla extract. Whip on low, then medium-high speed until firm, stiff peaks form (3-5 min). Do not overmix. -
Step 5
Remove chilled, soaked cake from refrigerator. Arrange half sliced bananas over cake, then sprinkle with half crushed vanilla wafers. Whisk chilled pudding until smooth, then spread evenly over bananas and wafers. Arrange remaining bananas and wafers. Dollop and spread whipped cream evenly over the top, creating swirls. Garnish with whole/crushed wafers or fresh banana slices. Cover loosely and chill for another 2-4 hours, or overnight, for flavors to meld. -
Step 6
Slice and serve chilled. Store any leftover cake in an airtight container in the refrigerator for 3-4 days.
Important Information
Nutrition Facts (Per Serving)
It is important to consider this information as approximate and not to use it as definitive health advice.
Allergy Information
Please check ingredients for potential allergens and consult a health professional if in doubt.

Leave a Comment