
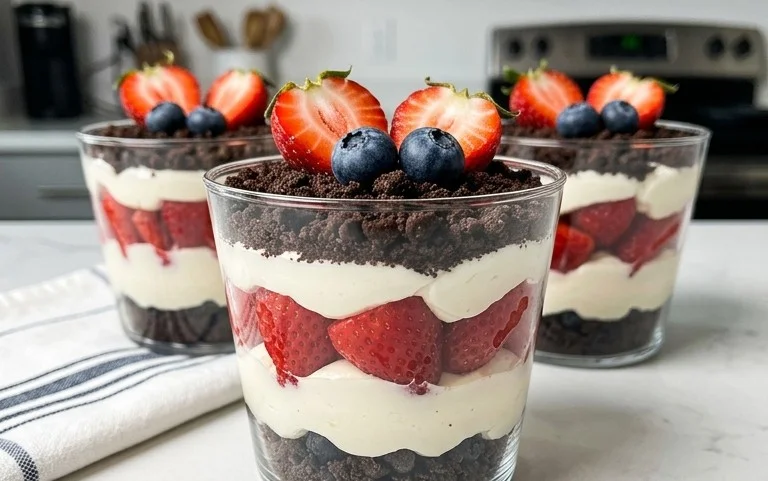
Red, White and Blue Dirt Cups are a fun and festive treat that’s perfect for any patriotic celebration, or really, any occasion that calls for a bit of playful indulgence! These aren’t just any dessert; they’re a delightful explosion of textures and flavors that have captured hearts for generations. Imagin extracte the satisfying crunch of chocolate cookie crum extractbs, reminiscent of freshly turned earth, mingling with creamy pudding and topped with vibrant bursts of red and blue. What truly makes these Red, White and Blue Dirt Cups so special is their undeniable charm and how effortlessly they bring smiles to faces, young and old. They’re incredibly easy to assemble, making them an ideal activity for kids to help with, and they always disappear in a flash. Get ready to dig into a truly memorable dessert experience!
Red, White and Blue Dirt Cups
Looking for a fun, festive, and utterly delicious treat that’s perfect for any patriotic celebration or just a fun afternoon with the kids? These Red, White, and Blue Dirt Cups are sure to be a crowd-pleaser! They’re incredibly easy to make, requiring no baking, and the vibrant colors make them as visually appealing as they are tasty. The layers of creamy pudding, crushed cookies that resemble rich soil, and the whimsical gummy worms create a delightful dessert that everyone will love diggin extractg into. Get ready to unleash your inner child with this playful and patriotic creation!
Ingredients:
Making Your Patriotic Pudding Masterpiece
This recipe is designed for simplicity and maximum fun. We’ll be working with a few simple components that come together to create something truly special. The cheesecake pudding provides a creamy, dreamy base, while the crushed Oreos give us that essential “dirt” element that makes these cups so iconic. The pop of red and blue food coloring will transform our pudding into festive layers, and of course, no dirt cup is complete without those wiggly, jiggly gummy worms! Let’s get started.
Step 1: Preparing the Pudding Base
The first step is to create the creamy foundation for our dirt cups. In a medium-sized bowl, whisk together the contents of both cheesecake pudding boxes. This is where we’ll add our liquid. Gradually pour in the 4 cups of milk while continuously whisking. It’s important to whisk vigorously for about 2 minutes to ensure that all the pudding powder is fully incorporated into the milk and that there are no lumps. This will help create a smooth and consistent pudding texture. Once you have a well-combined mixture, cover the bowl with plastic wrap, pressing the wrap directly onto the surface of the pudding. This prevents a skin from forming. Place the pudding in the refrigerator to chill and set for at least 5 minutes. While this is setting, we can prepare our “dirt.”
Step 2: Crushing the Oreos for “Dirt”
Now it’s time to create the delicious “dirt” for our cups. Take your 19 Oreo cookies and place them into a resealable plastic bag. Seal the bag tightly, removing as much air as possible. You can use a rolling pin, the bottom of a heavy glass, or even your hands to crush the cookies into fine crum extractbs. You’re aiming for a texture that resembles soil, so a mix of finer crum extractbs and some slightly larger pieces is perfectly acceptable. For a more uniform crum extractb, you can also pulse them a few times in a food processor. Once crushed, set the Oreo crum extractbs aside in a bowl.
Step 3: Dividing and Coloring the Pudding
This is where the magic of the red, white, and blue theme truly comes to life! Once your pudding has had at least 5 minutes to set, remove it from the refrigerator. Divide the pudding evenly into three separate bowls. To the first bowl, we’ll add the red gel food dye. Carefully add ¼ teaspoon of red gel food dye. Stir gently but thoroughly until the color is evenly distributed and you have a vibrant red pudding. Wash your whisk or use a clean one for the next step. To the second bowl, add ¼ teaspoon of blue gel food dye. Stir until you achieve a beautiful, deep blue color. The third bowl will remain plain, serving as our “white” layer. It’s important to use gel food coloring as it provides a more concentrated color and won’t thin out your pudding.
Step 4: Assembling the Dirt Cups
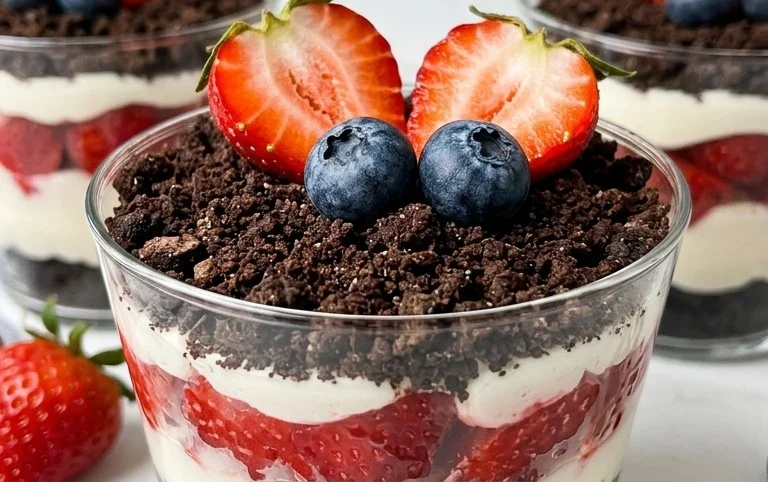
Now for the fun part – layering! Grab your individual serving cups or glasses. Start by spooning a layer of the plain (white) pudding into the bottom of each cup. You want enough to create a distinct white layer. Next, sprinkle a generous layer of your crushed Oreo “dirt” over the white pudding. Don’t be shy with the “dirt”! Then, add a layer of the red pudding. Follow that with another layer of Oreo crum extractbs. Finally, top with the blue pudding. Again, aim for distinct layers. You can use the back of a spoon to gently flatten each layer for a neater appearance, but some texture is also charming.
Step 5: Adding the Finishing Touches and Final Chill
With our layers beautifully in place, it’s time to add the final, festive elements. Take your red and blue gummy worms and artfully arrange them on top of the blue pudding layer. You can have them peeking out as if they’re crawling through the dirt, or simply placed on top. This is where your creativity can shine! Once all your gummy worms are in place, cover the cups loosely with plastic wrap or lids. Place the assembled dirt cups back into the refrigerator to chill for at least another 30 minutes. This allows the flavors to meld and the pudding to firm up completely. These Red, White, and Blue Dirt Cups are perfect for picnics, barbecues, or any occasion where you want to add a splash of patriotic fun and a whole lot of deliciousness! Enjoy!
Conclusion:
So there you have it – a delightful and easy way to create festive Red, White and Blue Dirt Cups that are perfect for any patriotic celebration or just a fun afternoon treat! This recipe is a winner because it’s incredibly simple to assemble, making it an ideal activity for kids and adults alike. The combination of creamy chocolate pudding, crushed cookies, and fresh fruit creates a satisfying texture and a burst of classic flavors that everyone will love. Whether you’re hosting a Fourth of July barbecue, a Memorial Day picnic, or a summer birthday party, these dirt cups are sure to be a crowd-pleaser, adding a touch of homemade charm to your dessert table.
I highly encourage you to give these Red, White and Blue Dirt Cups a try! They’re not only visually appealing but also delicious and customizable. Feel free to get creative with your toppings – extra whipped cream dollops, sprinkles, or even a few gummy worms peeking out can add even more fun. Serve them in individual cups for easy portioning, or in a large trifle dish for a stunning centerpiece. No matter how you present them, I’m confident you’ll enjoy making and devouring these festive treats!
Frequently Asked Questions:
Can I make these Red, White and Blue Dirt Cups ahead of time?
Absolutely! You can prepare the chocolate pudding and crush the cookies a day in advance. Store them separately in airtight containers in the refrigerator. Assemble the cups a few hours before serving to prevent the cookies from becoming too soggy. Add the fresh berries just before serving for the best texture and appearance.
What kind of cookies work best for the “dirt” layer?
Oreo cookies are the classic choice and provide that perfect “dirt” look and chocolaty flavor. However, you can experiment with other chocolate sandwich cookies or even chocolate grabeef ham crackers if you prefer a slightly different taste and texture. Just make sure to crush them finely!
Are there any gluten-free or dairy-free options for this recipe?
Yes, you can easily adapt this recipe! Use gluten-free chocolate sandwich cookies and ensure your chocolate pudding mix is gluten-free. For dairy-free options, opt for a dairy-free chocolate pudding mix (often made with soy or almond milk) and a dairy-free whipped topping.
Red, White and Blue Dirt Cups
A festive and easy-to-make dessert featuring layers of creamy cheesecake pudding, crushed Oreos, and colorful gummy worms, perfect for patriotic celebrations.
Ingredients
-
2 boxes cheesecake pudding (3.4 ounces each)
-
4 cups milk
-
19 Oreo cookies (crushed)
-
1/4 teaspoon red gel food dye
-
1/4 teaspoon blue gel food dye
-
8 red and blue gummy worms
Instructions
-
Step 1
In a large bowl, whisk together the cheesecake pudding mix and milk until well combined and thickened. Let it sit for 5 minutes. -
Step 2
Divide the pudding into three separate bowls. Leave one bowl plain for the white layer. Add red gel food dye to the second bowl and stir until evenly colored. Add blue gel food dye to the third bowl and stir until evenly colored. -
Step 3
In the bottom of 8 small cups or jars, place a layer of crushed Oreo cookies. This will be the ‘dirt’. -
Step 4
Spoon a layer of plain (white) pudding over the crushed Oreos in each cup. -
Step 5
Add another layer of crushed Oreo cookies on top of the white pudding. -
Step 6
Spoon a layer of red pudding over the second layer of crushed cookies. Repeat with a layer of blue pudding on top of the red. -
Step 7
Top each dirt cup with a final layer of crushed Oreo cookies to resemble more dirt. Garnish with red and blue gummy worms sticking out of the ‘dirt’. -
Step 8
Chill the dirt cups in the refrigerator for at least 15 minutes before serving.
Important Information
Nutrition Facts (Per Serving)
It is important to consider this information as approximate and not to use it as definitive health advice.
Allergy Information
Please check ingredients for potential allergens and consult a health professional if in doubt.

Leave a Comment