
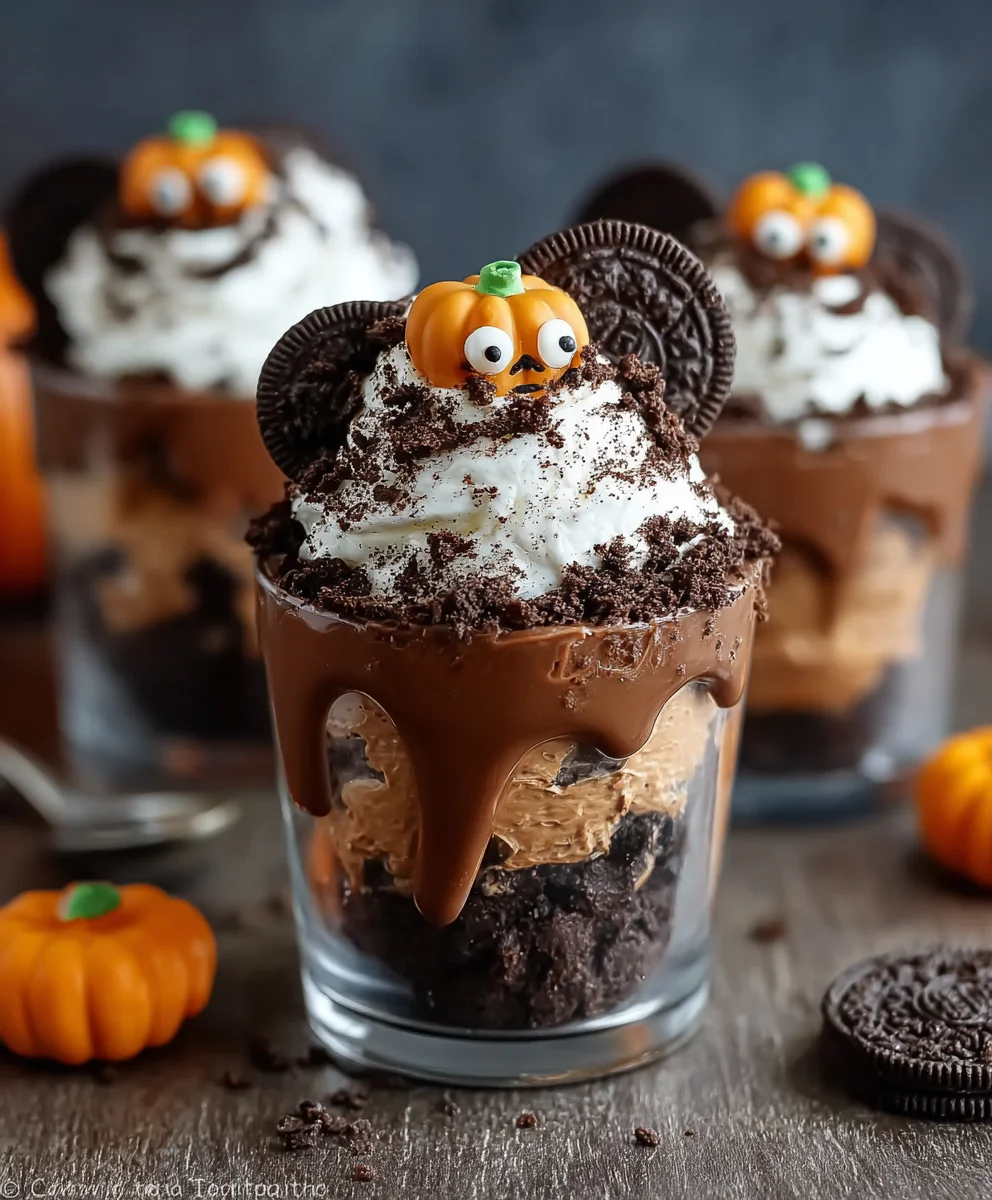
Halloween Dirt Cups are more than just a dessert; they are a delightful centerpiece that perfectly blends spooky fun with irresistible flavor. As someone who absolutely adores the magic of Halloween, I find immense joy in crafting treats that are both visually captivating and incredibly easy to make. Imagine serving a dessert that evokes gasps of delight and amusement, a treat that appears straight out of a ghoulish garden but tastes like pure, chocolatey heaven. That’s precisely what these charming cups deliver, making them a perennial favorite for trick-or-treat gatherings and costume parties alike.
While the concept of “dirt” desserts, typically involving crushed cookies and pudding, has been a beloved no-bake staple for decades, their transformation into a spooky seasonal sensation for Halloween is truly inspired. These iconic treats have firmly established themselves as a cultural highlight of autumn, cherished for their whimsical appeal and a nod to all things eerie. People, myself included, absolutely adore Halloween Dirt Cups for their incredible simplicity, their rich and creamy chocolate layers, and the delightful crunch of crushed cookies, all brought to life with playful gummy worms and edible gravestones. They offer a fantastic sensory experience, appealing to both the eyes and the palate, and are wonderfully convenient to prepare, making them an ideal project for all ages.

Ingredients:
- For the Chocolate Pudding Base:
- 2 (3.9 ounce) packages instant chocolate pudding mix (or 1 large 5.9 ounce package)
- 4 cups cold milk (dairy or non-dairy like almond or oat milk work well here, just ensure it’s very cold)
- 1 (8 ounce) container frozen whipped topping, thawed (like Cool Whip), or 2 cups freshly made whipped cream
- Optional: 1 teaspoon vanilla extract (if using unsweetened whipped cream or for extra flavor boost)
- Optional: 1/4 cup powdered sugar (if making fresh whipped cream, to sweeten)
- For the “Dirt” Crumble:
- 1 (14.3 ounce) package chocolate sandwich cookies (like Oreos), about 36-40 cookies
- Optional: A few drops of green food coloring (for “mossy” dirt)
- For the Spooky Decorations:
- 1-2 packages gummy worms, various colors
- Small candy pumpkins or candy corn
- Cookie or candy gravestones (you can buy these pre-made or make your own with shortbread cookies and icing)
- Plastic spiders or other small Halloween-themed candies (e.g., candy eyes, skeleton candies)
- Sprinkles (orange, black, or Halloween themed)
- Optional: Fresh mint leaves or edible flowers for a contrasting pop of color (like a graveyard flower)
- Equipment Needed:
- 8-10 clear individual serving cups (plastic cups, mason jars, or small glass bowls work perfectly)
- Large mixing bowl
- Whisk or electric mixer
- Food processor or a large resealable plastic bag and rolling pin
- Spatula
- Measuring cups
Preparing the Creamy Pudding Base for Your Halloween Dirt Cups
Creating the rich, chocolatey foundation for our Halloween Dirt Cups is the first essential step. While there are options for making pudding from scratch, for convenience and consistent results, I find instant pudding mixes work wonderfully here, especially when you’re preparing a larger batch for a party. The key is to ensure your milk is extremely cold, as this helps the pudding set quickly and achieve that perfect creamy consistency.
- Whisk the Pudding Mix and Milk: In a large mixing bowl, combine the two packages of instant chocolate pudding mix with the 4 cups of cold milk. Begin whisking vigorously. I recommend using an electric mixer on medium speed for about 2 minutes, or a good old-fashioned whisk and some elbow grease for 3-4 minutes. You’re looking for the mixture to thicken significantly. It should coat the back of a spoon and no longer look watery.
- Allow to Set: Once thoroughly mixed and visibly thickened, place the bowl of pudding in the refrigerator. Let it chill for at least 5-10 minutes. This short chilling period allows the pudding to firm up even further, which is crucial for the structure of our Halloween Dirt Cups. Don’t skip this step! It makes a big difference in the final texture.
- Prepare the Whipped Topping: While your pudding is chilling, if you’re using frozen whipped topping, ensure it’s fully thawed but still very cold. If you’re opting for fresh whipped cream, now is the time to whip it. In a separate bowl, whip 2 cups of heavy cream until soft peaks form. If desired, add 1/4 cup powdered sugar and 1 teaspoon vanilla extract, then continue whipping until stiff peaks form. Fresh whipped cream adds an incredible richness, but thawed whipped topping is a fantastic shortcut.
- Fold in the Whipped Topping: Once your pudding has chilled and is nicely set, gently fold in the thawed whipped topping (or freshly whipped cream). Use a spatula to incorporate the two mixtures. You want to maintain as much airiness as possible, so fold slowly and carefully, bringing the pudding from the bottom up over the whipped topping. Continue until no streaks of white whipped topping remain and you have a light, airy, and uniformly chocolate-colored pudding mixture. This step transforms the dense pudding into a lighter, mousse-like consistency, making our Halloween Dirt Cups feel truly decadent. This lightened texture also makes it easier to layer and gives a delightful contrast to the crunchy “dirt.”
- Final Chill for Pudding Mixture: For the best results and easiest layering, I like to pop this combined pudding mixture back into the fridge for another 10-15 minutes while I prepare the “dirt.” This ensures it’s perfectly firm and scoopable when we start assembling. A well-chilled pudding mixture is key to preventing your Halloween Dirt Cups from becoming a soupy mess.
Creating the “Dirt” Crumble for Your Halloween Dirt Cups
The “dirt” is arguably the most iconic component of Halloween Dirt Cups, providing a delightful textural contrast and, of course, the signature look. We’ll be using chocolate sandwich cookies, which perfectly mimic the appearance of rich, dark earth. Getting the right consistency is important – we want fine crumbs, but not a powdery dust, and definitely no large chunks. It should be reminiscent of freshly tilled soil, ready for some creepy crawlies!
- Prepare Your Cookies: Open your package of chocolate sandwich cookies. You’ll want to use the entire cookie, filling and all. The creamy filling adds a little bit of moisture and richness to the “dirt” which enhances the overall flavor.
- Choose Your Crushing Method:
- Food Processor Method (Recommended for ease and consistency): If you have a food processor, this is by far the easiest and most efficient way to create your “dirt.” Add the entire package of cookies, a few at a time if your processor is smaller, into the bowl of the food processor. Pulse in short bursts, about 5-10 seconds at a time. Periodically check the consistency. You’re aiming for fine crumbs that resemble soil – a mix of very fine powder and tiny, grit-like pieces. Avoid over-processing, as this can turn the cookies into a paste due to the oils in the chocolate and the cream filling. Stop once you reach your desired “dirt” consistency.
- Manual Method (If no food processor): If you don’t have a food processor, no worries! Place the cookies in a large, heavy-duty resealable plastic bag. Make sure to remove as much air as possible from the bag before sealing it. Lay the bag flat on a sturdy surface, like a cutting board. Using a rolling pin, meat tenderizer, or even the bottom of a heavy pot, carefully crush the cookies. Apply even pressure and roll over them repeatedly. This method takes a bit more effort, but it’s very effective. Focus on breaking down all the larger pieces until you have a fine, uniform “dirt” texture. Be mindful not to break the bag! You might want to double-bag them for extra security.
- Optional “Mossy” Dirt: For an extra spooky touch, you can separate about 1/4 to 1/3 of your crushed cookie “dirt” into a smaller bowl. Add a drop or two of green food coloring and mix it in thoroughly. This will create a subtle “mossy” green dirt, perfect for scattering on top or creating patches in your Halloween Dirt Cups, adding another layer of visual interest to your graveyard scene.
- Set Aside the “Dirt”: Once your “dirt” is perfectly crumbled, set it aside. You’ll need it within arm’s reach for the assembly stage.
Assembling Your Spooktacular Halloween Dirt Cups
Now comes the really fun part – bringing all the components together to create these iconic Halloween Dirt Cups! The layering is what makes them visually appealing, allowing us to build a little edible graveyard scene right in the cup. Clear cups are highly recommended so you can appreciate those distinct layers of rich chocolate pudding and dark cookie “dirt.”
- Gather Your Supplies: Line up your 8-10 clear serving cups on your counter. Have your chilled pudding mixture and your crushed “dirt” crumble ready. Also, get your gummy worms and any other decorative elements prepared so they are easy to grab.
- First Layer of “Dirt”: Start by spooning a generous tablespoon or two of your crushed cookie “dirt” into the bottom of each cup. This creates the foundational layer of our graveyard. Gently press it down lightly with the back of the spoon, just enough to create an even base.
- First Layer of Pudding: On top of the cookie “dirt,” spoon a layer of your creamy chocolate pudding mixture. I usually aim for about 1/4 to 1/3 of the cup’s height for this layer. You can carefully spread it to the edges of the cup using the back of your spoon, making sure it covers the “dirt” completely.
- Introduce Your First Worms (Optional but Fun!): This is where the magic starts! Before adding more “dirt,” you can insert a gummy worm or two into the pudding layer. You can have them peeking out from the side of the cup, looking like they’re burrowing through the “earth,” or completely submerged, waiting to be “discovered.” This initial worm placement makes the final decoration look more natural.
- Second Layer of “Dirt”: Sprinkle another generous layer of cookie “dirt” over the pudding. Again, aim for a good coverage. This layer helps to encapsulate the worms and create that authentic “buried” effect. If you made the “mossy” green dirt, you could use a little of that here for variation.
- Second Layer of Pudding: Add another layer of the chocolate pudding mixture. You should be filling the cup up to about two-thirds or three-quarters full at this point. Smooth it out gently.
- Top with More “Dirt”: Finish the layering with a final, thick layer of your cookie “dirt.” This will be the main surface of your graveyard scene. You can mound it slightly in the center or keep it flat, depending on how you plan to decorate. This top layer of “dirt” is where most of your spooky decorations will reside.
- Repeat for All Cups: Continue this layering process for all of your individual cups until you’ve used up all the pudding and cookie “dirt.” Aim for consistent layers across all cups for a professional and appealing presentation.
Decorating Your Spooky Halloween Dirt Cups
The decoration phase is where you can unleash your creativity and make each Halloween Dirt Cup uniquely eerie and fun! This is where they truly transform from simple dessert cups into mini edible Halloween masterpieces. Don’t be afraid to experiment and have fun with it.
- Bring on the Gummy Worms: This is arguably the most essential decoration for Halloween Dirt Cups. Arrange gummy worms so they appear to be crawling out of the “dirt.” You can have them half-buried, with just their heads sticking out, or wriggling across the surface. Use a variety of colors for a more vibrant, creepy effect. Don’t be shy with the worms! The more, the merrier and spookier.
- Add Gravestones: Carefully place a cookie gravestone (or a candy gravestone) into the “dirt” on top of each cup. You can gently push it into the pudding layer underneath the top layer of dirt for stability. If you’re feeling extra crafty, you can use edible food markers or a fine-tipped piping bag with royal icing to write “R.I.P.” or funny epitaphs like “Worm Food” on your cookie gravestones before placing them. This adds a wonderfully personalized and humorous touch to your Halloween Dirt Cups.
- Scatter Candy Pumpkins and Candy Corn: Scatter a few small candy pumpkins, candy corn, or other small Halloween-themed candies around the base of the gravestone and among the worms. These add pops of color and further enhance the autumnal, spooky graveyard theme.
- Introduce Spiders and Other Creepy Crawlies: For an extra fright, place a plastic spider or a few edible candy spiders on the “dirt” surface. Edible candy eyes are also fantastic for making your worms or other small candies look alive and staring back at you!
- Finishing Touches with Sprinkles and “Moss”: If you have Halloween-themed sprinkles (like orange, black, or ghost shapes), sprinkle a few over the top for extra festivity. If you made the “mossy” green dirt, you can strategically sprinkle little patches of it around the gravestones or worms to give the impression of an aged, overgrown graveyard. A tiny sprig of fresh mint can even look like a little plant growing in the graveyard, adding a touch of freshness.
- Personalize Each Cup: Encourage creativity if kids are helping! Let each cup tell its own spooky story. No two Halloween Dirt Cups have to be exactly alike. This makes the decorating process even more enjoyable.
Chilling and Serving Your Halloween Dirt Cups
Once your Halloween Dirt Cups are assembled and beautifully decorated, a final chill is absolutely essential. This not only allows the pudding to fully set and firm up, but it also lets the flavors meld together, resulting in a more cohesive and delicious dessert experience. Rushing this step will compromise the texture and enjoyment of your hard work!
- The Critical Chill: Once all your Halloween Dirt Cups are assembled and decorated, place them gently into the refrigerator. It’s crucial that they chill for at least 1 to 2 hours before serving. This allows the pudding to become perfectly firm, the cookie “dirt” to soften ever so slightly from the moisture, and the overall dessert to be refreshingly cold. Do not skip this chilling time, as it’s what truly sets the dessert and enhances its appeal.
- Serving Suggestions: Serve your Halloween Dirt Cups directly from the refrigerator. They are perfect for Halloween parties, school events, or just a fun family treat. The individual portions make them incredibly convenient for guests to grab and enjoy. You can arrange them on a tray, perhaps with some faux spiderwebs or plastic spiders around them for an extra festive display.
- Storage: If you have any leftover Halloween Dirt Cups (which is rare, as they’re always a hit!), cover them loosely with plastic wrap and store them in the refrigerator. They are best enjoyed within 2-3 days. After a day or two, the cookie “dirt” will soften quite a bit, making it less crunchy, but still perfectly delicious. The worms and other candies will hold up well in the fridge.
- Enjoy the Smiles: There’s something truly magical about watching people discover the gummy worms and the layers in these Halloween Dirt Cups. They are always a crowd-pleaser and bring a smile to everyone’s face, especially the kids! Enjoy the fruits of your spooky labor and have a fantastic Halloween!
Conclusion:
Why You Absolutely Must Try These Delicious Treats!
Seriously, if there’s one recipe you whip up this season, let it be this one. I can’t express enough how much joy and excitement these simple, yet utterly delightful, treats bring to any gathering. We’re talking about a crowd-pleaser that checks all the boxes: incredibly easy to make, fantastic for involving little helpers in the kitchen, and undeniably delicious. The rich chocolatey layers, the satisfying crunch of the cookie “dirt,” and the playful, creepy-crawly garnishes make for an unforgettable dessert experience. It’s not just a snack; it’s an event, a conversation starter, and a surefire way to spread smiles. Imagine the looks on everyone’s faces when you present these adorable yet spooky concoctions! They are truly perfect for adding a touch of whimsical macabre to your festive table, creating memories that last long after the last spoonful has been savored.
Unleash Your Creativity: Serving Suggestions & Spooky Variations
One of the best things about this recipe is its incredible versatility. While they are utterly charming served in individual clear cups, allowing all those delightful layers to shine through, don’t feel limited! For a truly show-stopping centerpiece, consider preparing a large batch in a clean, new plant pot (lined with plastic wrap, of course!) with a trowel stuck in it. It’s an instant talking point that will have everyone reaching for a scoop! These are fantastic for school parties, office potlucks, or simply as a fun, themed dessert for a family movie night. They store beautifully in the fridge for up to two days (before the cookies get too soggy), making them an excellent make-ahead option when you’re anticipating a busy day of festivities. You can even prepare the pudding and crush the cookies in advance, then assemble them closer to serving time for optimal freshness.
Get Creative with Flavors and Toppings:
Beyond the classic chocolate, feel free to experiment with different pudding flavors. A rich vanilla pudding can provide a wonderful contrast to the dark cookie crumbs, or imagine a vibrant green pistachio pudding for an even more eerie, moss-like effect! Pumpkin spice pudding could also be a seasonal hit, offering a warming autumn twist that complements the festive atmosphere beautifully. Don’t stop at just Oreos for the “dirt” either; while they are iconic, consider using chocolate chip cookies, graham crackers, or even a mix for varied textures and flavors. For those with dietary restrictions, gluten-free sandwich cookies work perfectly, and dairy-free pudding options are widely available, ensuring everyone can join in the fun without missing out on the deliciousness.
Elevate the Spooky Factor:
The fun truly begins with the decorations! Gummy worms are a classic for a reason, but let your imagination run wild. Think edible gravestones made from Milano cookies or shortbread, adorned with edible marker ‘RIP’ messages. Crushed up green candy could simulate moss, while candy corn scattered on top adds a pop of seasonal color and extra sweetness. For a truly gruesome effect, add some candy eyeballs peeking out from the “dirt,” or even a few red sprinkles to look like drops of blood. Mini chocolate tombstone candies, plastic spiders (for decoration only, of course, and removed before serving!), or even a small toy skeleton limb emerging from the soil can take your creation to the next level of spooky charm. You can even layer in some whipped cream in the middle for an extra creamy texture, or drizzle a little raspberry sauce for a “bloody” effect right before serving. The possibilities are genuinely endless, allowing each batch of these amazing Halloween Dirt Cups to be uniquely yours, reflecting your personal style and spooky vision!
Your Turn! Share Your Spooky Creations!
So, now it’s your turn to dive into the deliciously spooky world of these treats. I promise, the smiles and delightful gasps you’ll receive will make every moment spent in the kitchen utterly worthwhile. Gather your ingredients, enlist your little monsters, and prepare for some serious fun and deliciousness. This recipe is a fantastic way to engage kids in the kitchen, teaching them simple cooking skills while creating something magical and edible. When you’ve brought your own incredible creations to life, I would absolutely love to see them! Please, don’t hesitate to share your photos and tell me all about your experience. Did you discover a new favorite topping? Did your kids invent a hilarious new “graveyard” scene? Your creativity inspires me and fellow home cooks to try new things and push the boundaries of fun food! Happy spooky baking, and enjoy every single delightful spoonful of these unforgettable treats!
Spooky Halloween Dirt Cups Recipe: Easy No-Bake Treat!
Halloween Dirt Cups are a spooky and fun dessert that’s perfect for any Halloween gathering. With layers of creamy chocolate pudding, crunchy crushed Oreo cookies, and chewy gummy worms, these cups are as delicious as they are festive. The addition of whipped topping makes the pudding extra creamy, while the gummy worms and optional candy corn add a playful touch. Simple to make and sure to be a hit with both kids and adults, these dirt cups are the ultimate Halloween dessert. Serve them chilled for the best experience, and enjoy the spooky fun!
Ingredients
-
2 (3.9 oz) packages instant chocolate pudding mix (or 1 large 5.9 oz package)
-
4 cups cold milk
-
1 (8 oz) container frozen whipped topping, thawed, or 2 cups freshly made whipped cream
-
Optional: 1 tsp vanilla extract
-
Optional: 1/4 cup powdered sugar
-
1 (14.3 oz) package chocolate sandwich cookies (e.g., Oreos)
-
Optional: Green food coloring
-
1-2 packages assorted gummy worms
-
Small candy pumpkins or candy corn
-
Cookie or candy gravestones
-
Plastic spiders or small Halloween candies (e.g., candy eyes)
-
Halloween-themed sprinkles
-
Optional: Fresh mint leaves or edible flowers
Instructions
-
Step 1
In a large bowl, whisk instant chocolate pudding mix with 4 cups cold milk for 2-4 minutes until thickened. Chill in the refrigerator for 5-10 minutes. -
Step 2
Thaw 1 (8 oz) container frozen whipped topping. If using fresh cream, whip 2 cups heavy cream (with optional 1/4 cup powdered sugar and 1 tsp vanilla extract) until stiff peaks form. -
Step 3
Gently fold the thawed whipped topping (or fresh whipped cream) into the chilled pudding until combined and airy. Chill for another 10-15 minutes. -
Step 4
Process or crush 1 (14.3 oz) package chocolate sandwich cookies (with filling) into fine crumbs. For ‘mossy’ dirt, optionally mix green food coloring into a portion. Set aside. -
Step 5
Spoon 1-2 tablespoons of cookie ‘dirt’ into the bottom of 8-10 clear serving cups. Top with a layer of chocolate pudding mixture (about 1/4 to 1/3 cup height). Optionally, insert 1-2 gummy worms into the pudding layer. -
Step 6
Sprinkle another layer of ‘dirt’ over the pudding. Add a second layer of pudding mixture, filling cups to about 2/3 or 3/4 full. -
Step 7
Finish with a final, thick layer of cookie ‘dirt’ on top of each cup. Repeat layering for all cups. -
Step 8
Arrange gummy worms on top, appearing to crawl out. Place a cookie or candy gravestone. Scatter small candy pumpkins, candy corn, plastic spiders, or Halloween candies. Finish with sprinkles or ‘mossy’ green dirt patches. -
Step 9
Chill assembled and decorated Halloween Dirt Cups for at least 1-2 hours before serving. Serve directly from the refrigerator. Store leftovers covered in the refrigerator for 2-3 days.
Important Information
Nutrition Facts (Per Serving)
It is important to consider this information as approximate and not to use it as definitive health advice.
Allergy Information
Please check ingredients for potential allergens and consult a health professional if in doubt.

Leave a Comment