
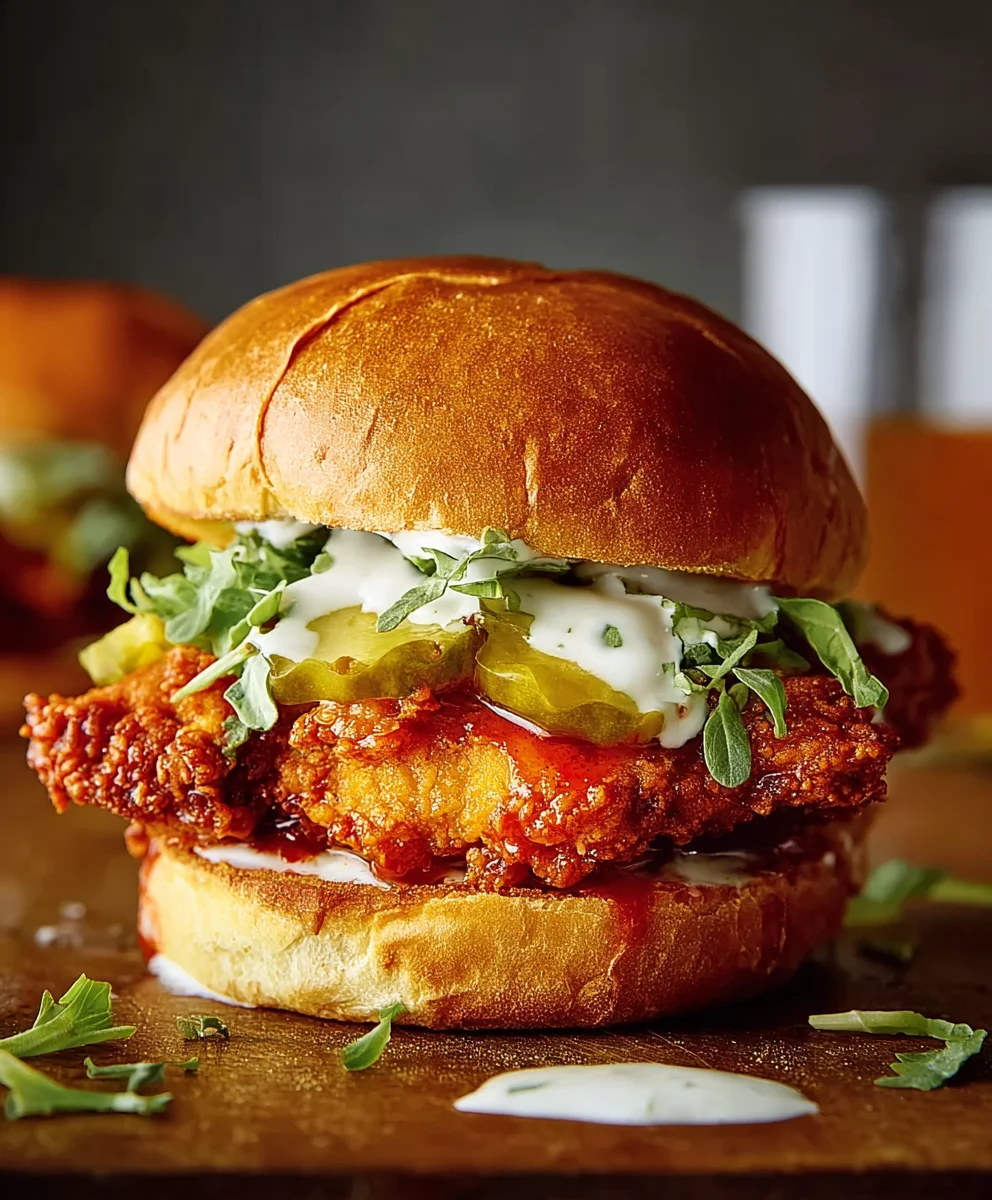
Baked Nashville Hot Chicken Sandwich is not merely a recipe; it’s an exhilarating culinary journey, a symphony of spicy, savory, and satisfying flavors that has captivated food enthusiasts worldwide. I am absolutely thrilled to share my take on this iconic dish, offering all the fiery delight without the deep-fried guilt. Originating from a fascinating tale of playful revenge in Nashville, Tennessee, the classic hot chicken has evolved from a local secret into a global culinary sensation, renowned for its distinct cayenne-infused oil coating and a heat level that ranges from pleasantly warm to intensely inferno. What I truly adore about this particular Baked Nashville Hot Chicken Sandwich is how it masterfully balances the traditional intense flavor profile and satisfying texture with a much healthier preparation method. Prepare to indulge in tender, juicy chicken, perfectly seasoned and baked to a crisp perfection, then generously slathered in that signature spicy oil, all nestled between soft buns with cool, tangy pickles. It’s a revolutionary approach for anyone craving that legendary Nashville kick with a mindful twist.

Ingredients:
- For the Baked Nashville Hot Chicken:
- 4 boneless, skinless chicken thighs or breasts (about 6-8 oz each), pounded to an even ½-inch thickness if very thick. I find thighs give a juicier result, but breasts work beautifully too!
- For the Brine:
- 4 cups cold water
- ¼ cup kosher salt
- 2 tablespoons granulated sugar
- 1 tablespoon hot sauce (your favorite brand will do!)
- For the Dredging Station:
- 1 ½ cups all-purpose flour
- ½ cup cornstarch – this is my secret for extra crispiness!
- 1 tablespoon baking powder – another crisping agent, trust me!
- 2 teaspoons smoked paprika
- 1 teaspoon garlic powder
- 1 teaspoon onion powder
- ½ teaspoon cayenne pepper (adjust to your heat preference, or omit for a milder base)
- 1 teaspoon salt
- ½ teaspoon black pepper
- 2 large eggs, whisked with 2 tablespoons of milk or water
- Vegetable oil or non-stick cooking spray for the baking rack.
- For the Nashville Hot Oil:
- ¾ cup neutral oil (like canola, vegetable, or peanut oil)
- ¼ cup cayenne pepper – this is where the real heat and color come from!
- 2 tablespoons dark brown sugar, packed – it balances the heat beautifully.
- 1 tablespoon chili powder
- 1 tablespoon smoked paprika
- 1 teaspoon garlic powder
- 1 teaspoon onion powder
- ½ teaspoon salt
- ¼ teaspoon black pepper
- 1 tablespoon apple cider vinegar – adds a crucial tang.
- 1 tablespoon hot water or chicken stock (optional, but helps create a smoother emulsion)
- For the Creamy Coleslaw:
- 4 cups pre-shredded coleslaw mix (or half a small head of green cabbage and 1 large carrot, shredded)
- ½ cup mayonnaise
- 2 tablespoons apple cider vinegar
- 1 tablespoon granulated sugar
- ½ teaspoon salt
- ¼ teaspoon black pepper
- For Assembling the Sandwiches:
- 4 brioche buns, or your favorite sturdy sandwich bun
- Dill pickle chips, for serving – absolutely essential for that authentic Nashville Hot experience!
For the Baked Nashville Hot Chicken:
- Begin with the Brine: In a medium bowl or a resealable plastic bag, combine the cold water, kosher salt, granulated sugar, and hot sauce. Stir until the salt and sugar are mostly dissolved. Add your chicken pieces, ensuring they are fully submerged. Cover the bowl or seal the bag and refrigerate for at least 2 hours, or up to 4 hours. Do not skip this step! Brining is what keeps the chicken incredibly juicy and tender, even after baking. It’s the secret to moist chicken every time.
- Prepare for Dredging: While your chicken is brining, set up your dredging station. In a shallow dish or pie plate, whisk together the all-purpose flour, cornstarch, baking powder, smoked paprika, garlic powder, onion powder, cayenne pepper, salt, and black pepper. In a separate shallow dish, whisk the two large eggs with the milk or water until well combined.
- Preheat Your Oven and Prepare Baking Sheet: Preheat your oven to 425°F (220°C). Line a large baking sheet with foil for easy cleanup, then place an oven-safe wire rack on top. Lightly spray the wire rack with vegetable oil or non-stick cooking spray. This setup allows air to circulate around the chicken, ensuring an even, crispy crust without frying.
- Pat the Chicken Dry: Once the brining time is complete, remove the chicken from the brine and pat each piece thoroughly dry with paper towels. This is critical! Excess moisture will prevent the flour mixture from adhering properly and will result in a less crispy crust. We want that golden, craggy texture, and a dry surface is the first step.
-
Dredge the Chicken (The Triple-Coat Method): Now for the fun part – building that beautiful crust!
- First, take one piece of dry chicken and dredge it completely in the flour mixture, pressing firmly to ensure the flour adheres to every nook and cranny. Shake off any excess.
- Next, dip the flour-coated chicken into the egg wash, allowing any excess to drip off.
- Finally, return the chicken to the flour mixture for a second coating. Again, press firmly to build up a thick, craggy crust. This double-flour dredge, combined with the cornstarch and baking powder, is what gives our baked chicken that deep-fried crispiness without the actual deep frying. Place the fully coated chicken on the prepared wire rack. Repeat this process for all remaining chicken pieces.
- Bake the Chicken: Carefully place the baking sheet with the coated chicken into your preheated oven. Bake for 20-25 minutes, or until the chicken is cooked through and the internal temperature reaches 165°F (74°C) using a meat thermometer. About halfway through the baking time (around 10-12 minutes), carefully flip the chicken pieces to ensure even browning and crisping on both sides. Depending on the thickness of your chicken, you might need a few more minutes. We’re looking for a beautiful golden-brown color and a visibly crispy crust. Don’t be afraid to let it get deeply golden!
- Rest the Chicken: Once baked, remove the chicken from the oven and let it rest on the wire rack for 5 minutes. This allows the juices to redistribute, keeping the chicken tender and delicious. While it rests, we’ll whip up that incredible hot oil.
For the Nashville Hot Oil:
- Gently Heat the Oil: In a small saucepan, pour in the ¾ cup of neutral oil. Heat it over medium-low heat until it reaches about 300-325°F (150-160°C). If you don’t have a thermometer, you’re looking for the oil to be shimmering, but not smoking. It’s crucial not to overheat the oil, as we don’t want to burn our spices! Burnt spices taste bitter, and we’re aiming for a complex, vibrant heat.
- Prepare the Spice Blend: While the oil heats, in a heat-proof bowl (preferably a metal or ceramic bowl, not plastic), combine the cayenne pepper, dark brown sugar, chili powder, smoked paprika, garlic powder, onion powder, salt, and black pepper. Give it a good whisk to ensure all the spices are evenly distributed. This is the heart and soul of the Nashville Hot Chicken flavor.
- Infuse the Oil: Once the oil is at the correct temperature, carefully remove it from the heat. Slowly and cautiously pour the hot oil directly over the spice mixture in the bowl. It will sizzle and bubble as the spices bloom and release their fragrant oils. Stir immediately with a whisk or a heat-proof spatula, making sure to scrape down the sides of the bowl to incorporate all the spices.
- Add the Tang and Smoothness: Stir in the apple cider vinegar and the hot water or chicken stock (if using). The vinegar adds that essential sour note that cuts through the richness and heat, while the liquid helps to create a slightly smoother, more sauce-like consistency. Continue stirring vigorously until everything is well combined and forms a thick, vibrant red-orange paste or oil. It should smell incredible – spicy, smoky, and slightly sweet!
- Taste and Adjust (Carefully!): Give it a very small taste (dip the tip of a spoon) and adjust the seasoning if necessary. You might want a pinch more salt, or if you’re brave, a little more cayenne for extra fire! Keep it warm or reheat gently if it cools too much before you’re ready to use it.
For the Creamy Coleslaw:
- Prepare the Cabbage and Carrots: If you’re not using pre-shredded mix, finely shred your green cabbage and grate your carrot. A food processor with the shredding attachment works wonders here, or you can do it by hand with a sharp knife and box grater. Place the shredded vegetables in a medium-sized mixing bowl.
- Whisk the Dressing: In a separate small bowl, whisk together the mayonnaise, apple cider vinegar, granulated sugar, salt, and black pepper until completely smooth and creamy. The sugar helps to balance the tang of the vinegar and the richness of the mayo, creating a perfectly balanced dressing.
- Combine and Chill: Pour the dressing over the shredded cabbage and carrots. Toss everything together thoroughly until all the vegetables are evenly coated. Cover the bowl and refrigerate for at least 30 minutes, or up to several hours, to allow the flavors to meld and the cabbage to soften slightly. This chilling time is important; it really makes a difference in the overall flavor and texture of the slaw.
For Assembling Your Baked Nashville Hot Chicken Sandwich:
- Prepare the Buns: While your chicken rests, you can lightly toast your brioche buns. I love to butter them and toast them in a dry skillet over medium heat for a couple of minutes until golden, or simply pop them into your toaster. A warm, slightly crisp bun adds so much to the sandwich experience.
- Coat the Chicken in Hot Oil: Now for the grand finale! Place the rested, crispy baked chicken pieces into the bowl with your Nashville Hot Oil. Using tongs or a brush, generously coat each piece of chicken with the fiery hot oil, making sure to get every bit of that amazing spice mixture onto the chicken. You can go for a light brush or a full dunk, depending on your preferred level of heat and sauciness. Don’t be shy here; this is what makes it “Nashville Hot”!
-
Build Your Sandwich:
- Place a generous dollop of the creamy coleslaw onto the bottom half of each toasted brioche bun. The cool, crisp slaw provides a perfect counterpoint to the hot chicken.
- Next, place one fully coated Nashville Hot Chicken thigh or breast on top of the coleslaw.
- Pile on a generous handful of dill pickle chips on top of the chicken. The tang and crunch of the pickles are non-negotiable for an authentic Nashville Hot experience; they cut through the richness and heat beautifully.
- Finally, crown your masterpiece with the top half of the bun.
- Serve Immediately: Serve your Baked Nashville Hot Chicken Sandwich piping hot and enjoy the incredible explosion of flavors and textures! These are best enjoyed right away, while the chicken is still crispy and the hot oil is potent. Get ready for a delicious, spicy, and incredibly satisfying meal that tastes just like the real deal, but with the added bonus of being baked!
Conclusion:
And there you have it, my friends! We’ve reached the delicious finale of our culinary journey, and I genuinely hope you’re feeling inspired to roll up your sleeves and get cooking. This isn’t just another chicken recipe; it’s an experience, a flavor explosion that truly stands out. When I first experimented with baking instead of frying, I was skeptical, but the results speak for themselves. This recipe delivers all the iconic, mouth-watering heat and savory depth you crave from a classic Nashville hot chicken, but with a lighter touch and significantly less mess in your kitchen. Imagine sinking your teeth into a perfectly juicy piece of chicken, encased in that glorious, spicy, golden-brown crust, without the guilt or the spatter of deep-frying. That, my friends, is why this particular rendition is an absolute game-changer and a non-negotiable addition to your cooking repertoire.
What makes this dish truly special is its remarkable balance. The initial punch of cayenne and chili powder, tempered by the smoky paprika and a hint of sweetness, creates a complex flavor profile that keeps you coming back for more. The baking process ensures the chicken remains incredibly tender and moist inside, while still achieving that delightful crispy exterior that’s essential for any truly great hot chicken. It’s an unforgettable feast for the senses, from the vibrant aroma filling your kitchen to the satisfying crunch and fiery kick with every bite. Trust me, once you try this method, you might just find yourself wondering why you ever bothered with traditional frying. It’s comforting, exciting, and utterly delicious – everything a perfect meal should be.
Serving Suggestions to Elevate Your Experience:
Now that you’ve mastered the art of the perfect Baked Nashville Hot Chicken Sandwich, let’s talk about how to present and enjoy it! While the classic presentation on soft white bread with a generous helping of pickle slices is undeniably authentic and fantastic, there are so many ways to customize your feast. For a traditional sandwich, I love a toasted brioche bun; its slight sweetness beautifully contrasts the spicy heat of the chicken. Don’t skimp on the pickles – dill pickle chips or even homemade bread and butter pickles offer that crucial tangy counterpoint. A simple coleslaw, either creamy or vinegar-based, is also a fantastic addition, providing a refreshing crunch that cuts through the richness.
But why stop there? Think beyond the bun! You could serve the chicken pieces on their own as an appetizer with a side of cool ranch or blue cheese dressing for dipping. Transform it into a platter with some crispy waffle fries or sweet potato fries. A side of creamy macaroni and cheese or a refreshing potato salad would also complement the spice wonderfully, turning your meal into a full-fledged Southern comfort spread. For those who love a bit of greens, a simple garden salad with a light vinaigrette can be a lovely contrast. And to drink? A tall glass of sweet iced tea or a cold, crisp lager would be the perfect companion to tame the heat.
Creative Variations to Try:
Feel free to get creative and make this recipe truly your own! If you’re a heat seeker, don’t hesitate to increase the amount of cayenne pepper in the hot oil basting mixture. For a milder version, you can reduce it or even use smoked paprika for a gentle warmth. Experiment with different spices in your dredge – a touch of garlic powder or onion powder can add another layer of flavor. You could even try using boneless, skinless chicken thighs for an even juicier result. If you’re feeling adventurous, add a slice of pepper jack cheese to your sandwich after the chicken comes out of the oven, letting it melt slightly on the warm chicken before topping it with your pickles and bun. A drizzle of honey mustard or a tangy comeback sauce could also introduce an exciting new dimension. The possibilities are truly endless, and that’s part of the fun!
Your Turn to Ignite the Kitchen!
I’ve shared my tips, my passion, and my absolute conviction that this baked version is a winner. Now, it’s your turn to bring this incredible recipe to life in your own kitchen. Don’t be shy; embrace the process, savor the aromas, and get ready for a truly spectacular meal that will impress everyone at your table. I promise you, the joy of biting into that perfectly spicy, juicy, and crispy chicken, knowing you made it yourself, is incredibly rewarding. It’s not just food; it’s an experience, a moment of culinary triumph. So, go ahead, gather your ingredients, turn on your oven, and prepare for a flavor sensation!
Once you’ve experienced the magic of this dish, I would absolutely love to hear from you! What were your favorite serving suggestions? Did you try any exciting variations? Please, share your culinary triumphs, your photos, and your honest feedback. Your experiences inspire me and the entire community. Happy cooking, and get ready to enjoy the most fantastic hot chicken you’ve ever baked!
Baked Nashville Hot Chicken Sandwich
A revolutionary take on the classic Nashville Hot Chicken Sandwich, offering fiery delight without deep-fried guilt. Features tender, juicy chicken, perfectly seasoned and baked to crisp perfection, slathered in signature spicy oil, nestled between soft buns with cool, tangy pickles. Crave that legendary Nashville kick with a mindful twist.
Ingredients
-
4 boneless, skinless chicken thighs or breasts (6-8 oz each)
-
For Brine: 4 cups cold water
-
For Brine: ¼ cup kosher salt
-
For Brine: 2 tablespoons granulated sugar
-
For Brine: 1 tablespoon hot sauce
-
For Dredging: 1 ½ cups all-purpose flour
-
For Dredging: ½ cup cornstarch
-
For Dredging: 1 tablespoon baking powder
-
For Dredging: 2 teaspoons smoked paprika
-
For Dredging: 1 teaspoon garlic powder
-
For Dredging: 1 teaspoon onion powder
-
For Dredging: ½ teaspoon cayenne pepper
-
For Dredging: 1 teaspoon salt
-
For Dredging: ½ teaspoon black pepper
-
For Dredging: 2 large eggs, whisked with 2 tablespoons milk or water
-
Vegetable oil or non-stick cooking spray
-
For Hot Oil: ¾ cup neutral oil (canola, vegetable, or peanut)
-
For Hot Oil: ¼ cup cayenne pepper
-
For Hot Oil: 2 tablespoons dark brown sugar, packed
-
For Hot Oil: 1 tablespoon chili powder
-
For Hot Oil: 1 tablespoon smoked paprika
-
For Hot Oil: 1 teaspoon garlic powder
-
For Hot Oil: 1 teaspoon onion powder
-
For Hot Oil: ½ teaspoon salt
-
For Hot Oil: ¼ teaspoon black pepper
-
For Hot Oil: 1 tablespoon apple cider vinegar
-
For Hot Oil: 1 tablespoon hot water or chicken stock (optional)
-
For Coleslaw: 4 cups pre-shredded coleslaw mix
-
For Coleslaw: ½ cup mayonnaise
-
For Coleslaw: 2 tablespoons apple cider vinegar
-
For Coleslaw: 1 tablespoon granulated sugar
-
For Coleslaw: ½ teaspoon salt
-
For Coleslaw: ¼ teaspoon black pepper
-
4 brioche buns
-
Dill pickle chips, for serving
Instructions
-
Step 1
Combine cold water, salt, sugar, and hot sauce for the brine. Submerge chicken and refrigerate for 2-4 hours to ensure juiciness. -
Step 2
Prepare dredging stations: one dish with whisked flour, cornstarch, baking powder, smoked paprika, garlic/onion powder, cayenne, salt, pepper; another with whisked eggs and milk/water. -
Step 3
Preheat oven to 425°F (220°C). Line a baking sheet with foil, place an oiled wire rack on top. -
Step 4
Remove chicken from brine and pat thoroughly dry to ensure a crispy crust. -
Step 5
Triple-coat chicken: dredge in flour mixture, dip in egg wash, then dredge again in flour, pressing firmly for a thick, craggy crust. Place on wire rack. -
Step 6
Bake chicken for 20-25 minutes at 425°F (220°C), flipping halfway, until internal temperature reaches 165°F (74°C) and crust is golden brown. -
Step 7
Rest baked chicken on wire rack for 5 minutes while preparing the hot oil. -
Step 8
Heat ¾ cup neutral oil to 300-325°F (150-160°C) in a small saucepan. -
Step 9
In a heat-proof bowl, whisk together cayenne, brown sugar, chili powder, smoked paprika, garlic powder, onion powder, salt, and black pepper. -
Step 10
Carefully pour hot oil over spice mixture; stir immediately until spices bloom and are fully incorporated. -
Step 11
Stir in apple cider vinegar and optional hot water/chicken stock until well combined, forming a vibrant red-orange oil. -
Step 12
Taste and adjust seasoning as desired; keep warm. -
Step 13
Place shredded coleslaw mix (or prepared cabbage/carrot) in a bowl. -
Step 14
Whisk mayonnaise, apple cider vinegar, sugar, salt, and pepper for the dressing. -
Step 15
Pour dressing over vegetables, toss to coat, and chill for at least 30 minutes for flavors to meld. -
Step 16
Lightly toast brioche buns until golden. -
Step 17
Generously coat each piece of rested, crispy baked chicken with Nashville Hot Oil using tongs or a brush. -
Step 18
Assemble sandwich: Place coleslaw on bottom bun, top with hot chicken, then dill pickle chips, and finally the top bun. -
Step 19
Serve Baked Nashville Hot Chicken Sandwich piping hot immediately.
Important Information
Nutrition Facts (Per Serving)
It is important to consider this information as approximate and not to use it as definitive health advice.
Allergy Information
Please check ingredients for potential allergens and consult a health professional if in doubt.

Leave a Comment