
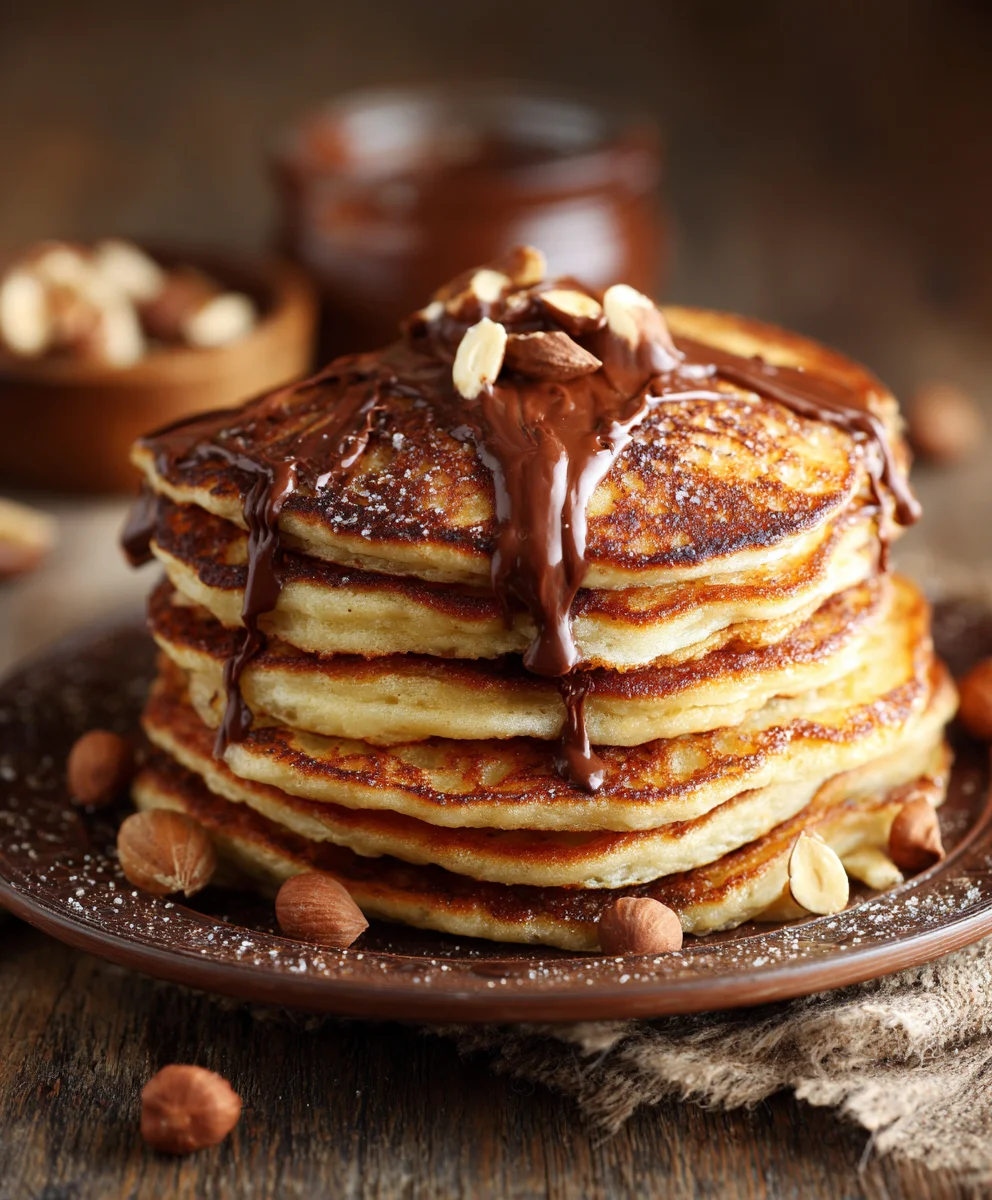
Nutella Pancakes – what a magical phrase, isn’t it? I often find myself dreaming of that perfect morning, where the aroma of freshly cooked pancakes fills the air, promising a day of unparalleled delight. But these aren’t just any pancakes; we’re elevating the beloved classic breakfast staple into an extraordinary, unforgettable indulgence that truly captivates the senses.
The Sweet Union of History and Flavor
The history of pancakes stretches back millennia, a humble yet incredibly versatile dish enjoyed across countless cultures, from ancient Greece to modern American diners, symbolizing comfort and community. Meanwhile, Nutella, a stroke of culinary genius born from post-war ingenuity in Italy, transformed a simple hazelnut spread into a global phenomenon, captivating taste buds with its unique chocolate-hazelnut richness. When these two culinary legends unite, something truly special happens, creating a modern classic that transcends ordinary breakfast fare.
People adore Nutella Pancakes for so many wonderful reasons: the incredibly fluffy texture of the golden-brown discs, the luxurious creaminess of the Nutella melting into every warm crevice, and that unmistakable, comforting blend of sweet chocolate and nutty hazelnut that dances on the palate. It’s not merely a breakfast; it’s an experience, a delightful treat that transforms any ordinary morning into something truly extraordinary. I am thrilled to guide you through a recipe that will bring this absolute joy right into your kitchen, promising smiles all around.

Ingredients:
- 2 cups (240g) all-purpose flour, preferably unbleached and sifted for an extra light texture. Sifting isn’t strictly necessary, but I find it makes the final pancakes incredibly airy!
- 2 tablespoons granulated sugar. I find this gives just the right subtle sweetness to complement the richness of the Nutella without making the whole dish overly sweet.
- 2 teaspoons baking powder. This is your primary leavening agent, crucial for those wonderfully fluffy, airy pancakes!
- 1 teaspoon baking soda. This works in conjunction with the buttermilk to create an even greater lift and tender crumb.
- ½ teaspoon salt. Don’t skip this! It truly balances all the flavors beautifully and prevents the pancakes from tasting flat.
- 1½ cups (360ml) buttermilk. This is the secret ingredient for tender, moist, and fluffy Nutella Pancakes. If you don’t have buttermilk on hand, you can easily make your own by adding 1 tablespoon of white vinegar or lemon juice to regular milk (dairy or non-dairy works) and letting it sit for 5-10 minutes until it slightly curdles.
- ½ cup (120ml) whole milk. I opt for whole milk for its richness, which contributes to a more decadent pancake, but feel free to use 2% or even non-dairy milk if that’s what you have.
- 2 large eggs, at room temperature. Room temperature eggs emulsify better with other liquids, leading to a smoother, more uniform batter. If you forget to take them out, a quick soak in warm (not hot!) water for 5 minutes will do the trick.
- 4 tablespoons (60g) unsalted butter, melted and slightly cooled, plus extra for greasing the pan. Using unsalted butter allows you to control the salt content in your recipe.
- 1 teaspoon pure vanilla extract. A touch of good quality vanilla extract always elevates the flavor profile, adding a warm, aromatic note.
- Approximately 1 cup (250g) Nutella, or more if you’re a true Nutella lover! This is the star of our show, so don’t skimp!
- Optional toppings: Sliced fresh strawberries, ripe banana slices, a dusting of powdered sugar, a dollop of freshly whipped cream, a handful of chopped toasted hazelnuts, or an extra drizzle of warmed Nutella for ultimate indulgence.
Preparing the Perfect Nutella Pancake Batter:
Creating the perfect batter for your Nutella Pancakes is the first and most crucial step in achieving that dreamy, fluffy texture. Trust me, it’s all about gentle handling and proper mixing, resisting the urge to overdo it!
-
Combining Dry Ingredients for a Lighter Texture:
In a very large mixing bowl, I always begin by whisking together all of my dry ingredients. This includes the 2 cups of all-purpose flour (sifted, if you have the time and inclination, as it truly does make a difference in the final lightness and prevents lumps!), the 2 tablespoons of granulated sugar, 2 teaspoons of baking powder, 1 teaspoon of baking soda, and ½ teaspoon of salt. It’s absolutely essential to whisk these components thoroughly for about 30 seconds to a minute. Why is this step so important? This ensures that all the leavening agents (baking powder and baking soda) and salt are evenly distributed throughout the flour mixture. You definitely don’t want a concentrated lump of baking powder in one bite and plain flour in another! I prefer using a large balloon whisk for this, making sure to get right to the bottom and sides of the bowl to incorporate everything properly.
-
Mixing Wet Ingredients for a Harmonious Blend:
In a separate, medium-sized bowl, I then proceed to combine all the wet ingredients. This is where the liquid magic starts to happen! Carefully pour in the 1½ cups of buttermilk and the ½ cup of whole milk. Next, crack in your two large eggs. If your eggs aren’t at room temperature, don’t worry too much, the recipe will still work beautifully, but if you remember to take them out of the fridge 30 minutes before, it will lead to a slightly smoother and more consistent batter. Whisk these together vigorously until they are well combined and the egg yolks are fully incorporated, without any streaks. Finally, add your 4 tablespoons of melted butter (a crucial tip here: make sure it’s cooled slightly to lukewarm; hot butter can partially scramble your eggs when added directly!) and 1 teaspoon of pure vanilla extract. Give this mixture another good whisk until everything is beautifully homogenous and ready to meet the dry ingredients. The main objective here is to combine until smooth, not to aerate excessively.
-
Bringing It All Together (The Lumpy Secret!):
Now for the most satisfying part – gently combining the wet and dry mixtures! I pour the entire wet mixture directly into the large bowl containing the dry ingredients. At this pivotal stage, I put down my whisk and switch to a rubber spatula or a sturdy wooden spoon. My singular goal here is to mix until just combined. You’re specifically looking for a batter that still has a few small lumps in it. Seriously, I cannot emphasize this enough: resist the powerful urge to overmix! Overmixing is the arch-nemesis of fluffy pancakes because it develops the gluten in the flour excessively, which inevitably leads to tough, chewy pancakes instead of the light, tender, and airy ones we’re striving for. A few lumps are perfectly acceptable, even desirable; they are actually a sign of a tender pancake to come. Stir just until there are no visible pockets of dry flour. This usually takes no more than 15-20 very gentle stirs. Once it looks like a shaggy, slightly lumpy batter, put your spatula down and stop. Your batter is now ready for a short but important rest. I typically let it sit undisturbed for about 5-10 minutes while I prepare my cooking surface. This brief resting period allows the gluten to relax further and gives the leavening agents a head start in working their magic, resulting in an even fluffier and more delectable “Nutella Pancakes” experience.
Cooking the Perfect Fluffy Nutella Pancakes:
Now that your glorious batter is rested and ready, it’s time to bring those Nutella Pancakes to life! The cooking process is just as important as the batter preparation for achieving that coveted golden-brown exterior and tender, fully cooked interior.
-
Preheating Your Griddle or Pan to the Ideal Temperature:
The very first step is to properly preheat your cooking surface. I personally prefer to use a large non-stick griddle or a heavy-bottomed frying pan (a well-seasoned cast iron pan works absolutely wonderfully if you have one!). Place it over medium heat. This is a critical nuance: you want a consistent medium heat, not high heat, and definitely not low heat. High heat will tragically burn the outside of your pancakes before the inside has a chance to cook through, leaving you with raw centers. If the heat is too low, the pancakes will absorb too much fat, become greasy, and won’t develop that beautiful golden crust. Let the pan heat up for a good 3-5 minutes, allowing it to come to an even, stable temperature across its surface. You can easily test if it’s ready by flicking a few drops of water onto the surface; if they sizzle energetically and evaporate quickly, your pan is perfectly ready. If they just sit there and barely bubble, it needs more time. If they disappear instantly with a lot of smoke, it’s too hot – immediately lower the heat and let it cool slightly before proceeding.
-
Greasing the Surface Just Right:
Once your pan is at the optimal temperature, it’s time to lightly grease it. I like to use a small pat of unsalted butter, melting it and then spreading it evenly with a paper towel or a pastry brush. The goal is a thin, even layer; too much butter can lead to pancakes that are overly greasy and develop a spotty, rather than uniform, golden color. For subsequent batches, you might need to re-grease lightly, depending on your pan’s non-stick properties and how many pancakes you’ve already cooked.
-
Portioning the Batter Consistently:
Using a ¼-cup or ⅓-cup measuring cup (the choice depends on how large you want your individual Nutella Pancakes to be), carefully pour the batter onto the hot griddle. I always make sure to leave about 2 inches of space between each pancake. This crucial spacing allows for easy flipping and prevents the pancakes from sticking together as they expand. Try to be as consistent as possible with your portions so that all your pancakes cook evenly and finish at roughly the same time. For very large, restaurant-style pancakes, you might opt for a ½-cup measure. Remember, the batter will spread slightly as it cooks, so don’t overcrowd the pan; cooking in batches is always better than sacrificing quality for speed.
-
Watching for the Bubbles (The Ultimate Flip Signal!):
This is where patience and keen observation truly pay off! Let the pancakes cook undisturbed for about 2-3 minutes on the first side. You’ll know they’re reaching the readiness point to flip when you start to see bubbles forming and rising to the surface of the batter. More importantly, look for the edges of the pancakes to set and appear slightly dry and firm. My personal secret tip: The more bubbles you observe, and the more they “pop” and create open craters on the surface, the more confident you can be that the underside is beautifully golden brown and perfectly ready for its grand flip! Do not be tempted to flip too early, or you’ll end up with undercooked, pale, and messy pancakes. Use a thin, wide spatula for the easiest and cleanest flip. Slide it completely under the pancake and, with a confident, swift motion, flip it over.
-
Cooking the Second Side and Keeping Warm:
Once flipped, let the pancakes cook for another 1-2 minutes on the second side. This side typically cooks a bit faster than the first, as the griddle is already fully heated and retaining consistent warmth. You’re aiming for a beautiful, even golden-brown color, similar to the first side, and for the pancake to feel delightfully springy to the touch in the center when gently pressed. Once cooked to perfection, transfer the pancakes to a serving plate. If you’re making a large batch for a crowd, you can keep them wonderfully warm in a preheated oven set to a very low temperature (around 200°F / 95°C) on an oven-safe plate or wire rack while you patiently finish cooking the rest of the batch. This ensures everyone gets to enjoy warm, fresh, and perfectly cooked “Nutella Pancakes”!
Nutella Filling and Assembly for Your Decadent Nutella Pancakes:
You’ve done the hard work of creating perfect fluffy pancakes, and now comes the truly delicious and fun part – transforming your golden discs into irresistible Nutella Pancakes! This is where you get to customize them to your heart’s content and create a stunning presentation.
-
Preparing the Nutella for Easy Spreading:
While your pancakes are cooking or staying warm in the oven, I always recommend preparing the Nutella for optimal spreadability. If your Nutella has been stored in a cool pantry or refrigerator, it can be quite thick and challenging to spread smoothly. My favorite method is to scoop out the desired amount (about 1 cup should be sufficient for a good stack of pancakes, but please feel free to add more if you’re a devout Nutella enthusiast!) into a microwave-safe bowl. Microwave it in short bursts – typically 15-20 seconds at a time – stirring vigorously and thoroughly after each burst, until it’s wonderfully warm, luxuriously smooth, and effortlessly spreadable. You don’t want it hot or boiling, just softened enough to glide effortlessly over the warm pancakes. Alternatively, you can place the entire jar (with the lid on) in a bowl of warm water for a few minutes to achieve a similar, perfectly fluid consistency. This small, extra step makes a colossal difference in the ease of assembly and significantly enhances the overall eating experience.
-
The Art of Stacking and Spreading:
Now, let’s begin to construct those glorious, mouth-watering Nutella Pancake stacks! Take one warm, freshly cooked pancake and place it gently on your chosen serving plate. Using a spoon, the back of a knife, or an offset spatula, spread a generous and even layer of your wonderfully warmed Nutella over the entire surface of the pancake, extending almost to the edges. Do not be shy here; this is precisely what makes them “Nutella Pancakes,” after all! The ambient warmth from the pancake will help the Nutella melt ever so slightly upon contact, creating an even more luscious, gooey texture that is simply divine. Carefully place another pancake directly on top of the Nutella-covered layer, and then repeat the exact same process: spread with another rich layer of Nutella. Continue stacking and spreading until you have a majestic tower of 3-4 pancakes, or as high as your plate can handle and your appetite dares to stack them!
-
Adding Your Favorite Toppings for the Grand Finale:
Once your impressive Nutella Pancake stack is assembled, it’s time for the magnificent grand finale – the toppings! This is where you can truly unleash your creativity and customize them to your unique preferences. I personally absolutely adore the freshness that fruit brings to my Nutella Pancakes. Sliced fresh strawberries and ripe banana slices are classic, foolproof pairings that add a lovely contrasting freshness and a touch of tang, beautifully cutting through the delightful richness of the Nutella. Arrange them artfully around or directly on top of your stack for a visually appealing presentation. For an extra touch of delicate decadence, you can lightly dust the entire stack with a fine layer of powdered sugar using a fine-mesh sieve. A generous dollop of freshly whipped cream on top, perhaps with a final, elegant drizzle of extra warmed Nutella, makes for a truly show-stopping presentation that will impress anyone. Other fantastic ideas for toppings include chopped toasted nuts (hazelnuts would be absolutely divine, mirroring the notes in Nutella!), delicate chocolate shavings, or even a whimsical sprinkle of mini chocolate chips. Let your culinary imagination run wild and create your perfect masterpiece!
-
Serving and Enjoying Your Masterpiece:
Serve your Nutella Pancakes immediately while they are still wonderfully warm and the Nutella is gorgeously soft, gooey, and ready to ooze with every slice. These are truly best enjoyed fresh off the griddle, perhaps accompanied by a strong, aromatic cup of coffee, a cold glass of milk, or a refreshing fruit juice. Watching that luscious Nutella ooze out with each gentle slice of your knife is pure, unadulterated bliss. Before you dive in, don’t forget to take a moment to admire your culinary creation – you’ve earned this moment of appreciation for your effort and skill!
Tips for Success & Creative Variations for Your Nutella Pancakes:
Making delicious Nutella Pancakes is an incredibly rewarding experience, and with a few extra tips and tricks up your sleeve, you can elevate your pancake game even further. Here are some of my go-to suggestions to ensure every batch is perfect and to inspire you to get creative with your breakfast or brunch!
-
Don’t Overmix the Batter (Seriously, It’s Key!):
I know I’ve mentioned this point before, but it is so fundamentally important that it bears repeating: the cardinal rule of pancake making, especially for achieving that sought-after light and fluffy texture, is to absolutely avoid overmixing! A slightly lumpy batter is not just acceptable, it’s a happy batter that promises tenderness. Overmixing develops the gluten in the flour too much, leading to tough, chewy pancakes instead of the incredibly light, tender, and airy texture we’re aiming for. Mix only until the dry ingredients are just incorporated, and there are no large, visible pockets of dry flour. A few small lumps are perfectly fine and will magically melt away during the cooking process, leaving you with wonderfully tender, airy Nutella Pancakes every single time.
-
The Importance of Resting the Batter:
Allowing your batter to rest for a crucial 5-10 minutes (or even up to 30 minutes for an exceptionally light and airy result) while you take the time to properly preheat your griddle is a true game-changer. This brief but significant rest period gives the gluten in the flour a chance to relax and allows the powerful leavening agents (baking powder and baking soda) to begin their magical work, creating more beneficial bubbles and ultimately, an even fluffier, more tender pancake. It’s a simple, often overlooked step that makes a surprisingly noticeable difference in the final texture of your Nutella Pancakes.
-
Maintaining Consistent Griddle Temperature for Even Cooking:
A consistent, medium heat on your griddle or pan is absolutely vital for perfectly cooked pancakes. If your griddle is too hot, the outside of your pancakes will burn quickly and tragically before the inside has a chance to cook all the way through, resulting in raw or doughy centers. Conversely, if the heat is too cool, the pancakes will spread too much, absorb excess oil or butter, become greasy, and won’t develop that appealing, beautiful golden-brown crust. Invest in a good quality griddle or a heavy-bottomed pan, and always take the time to preheat it properly and evenly. Be prepared to adjust the heat as needed throughout the cooking process. I often find myself turning the heat down slightly after the first batch of Nutella Pancakes if I notice them browning too quickly.
-
Keeping Cooked Pancakes Warm for a Crowd:
If you’re cooking for a hungry crowd or simply making a large batch of Nutella Pancakes, it’s a great idea to keep your cooked pancakes warm without letting them get soggy. Place them in a low oven (around 200°F / 95°C) on a wire rack placed over a baking sheet. This setup prevents them from steaming and becoming soggy, and it ensures that everyone gets to enjoy a warm, freshly cooked pancake at the same time. You can even stack them lightly with small squares of parchment paper in between if you’re planning to serve them individually, which helps prevent sticking.
-
Make-Ahead Batter for Stress-Free Mornings:
If you’re a fan of meal prep and want to save time on busy mornings, you can absolutely make the wet and dry ingredients separately the night before. Store the dry mixture in an airtight container at room temperature and the wet mixture (remember to omit the melted butter from the wet mix; add that in just before combining everything) in the fridge. Combine them just before you plan to cook. Alternatively, you can mix the entire batter, cover it tightly with plastic wrap, and refrigerate it overnight. The batter might thicken slightly in the fridge, so you might need to add a tablespoon or two of milk (or buttermilk) to reach your desired pouring consistency before cooking. This is a fantastic time-saver for those mornings when you’re deeply craving those fluffy Nutella Pancakes but are short on time!
-
Freezing Leftover Pancakes for Future Enjoyment:
Did you happen to make too many Nutella Pancakes? Lucky you! Leftover pancakes actually freeze beautifully, making for an excellent quick breakfast option. Once completely cooled to room temperature, layer them between sheets of parchment paper in an airtight freezer bag or a sturdy freezer-safe container. They can be deliciously stored in the freezer for up to 2-3 months. To reheat, simply pop them directly into the toaster, microwave them gently, or warm them in a low oven until they are once again warm, soft, and fluffy. They truly make for a quick, convenient, and incredibly easy breakfast or snack on any busy weekday!
-
Flavor Variations Beyond Just Nutella:
While classic Nutella Pancakes are undeniably amazing, don’t be afraid to experiment! Here are some creative ideas to try:
Delicious Add-ins to the Batter:
- Chocolate Chips: Stir in a ½ cup of mini or regular chocolate chips (milk, dark, or white chocolate works beautifully!) into the batter for an extra chocolatey punch and melty pockets of goodness.
- Citrus Zest: A teaspoon of finely grated orange or lemon zest can add a wonderfully bright, fresh note that surprisingly and delightfully complements the richness of the Nutella.
- Warm Spices: A pinch of ground cinnamon or nutmeg added to the dry ingredients can infuse your pancakes with a warm, cozy, and inviting flavor.
- Chopped Nuts: Finely chopped hazelnuts (to echo the Nutella’s hazelnut flavor!) or pecans can add a lovely textural crunch and nutty depth.
Alternative and Complementary Toppings and Sauces:
- Berry Compote: A simple homemade berry compote (just simmer fresh or frozen berries with a little sugar and a squeeze of lemon juice) is a fantastic tangy counterpoint to the sweet, rich Nutella.
- Caramel Sauce: Drizzle your Nutella Pancakes with a decadent salted caramel sauce for an even more luxurious and indulgent treat.
- Peanut Butter: For a delightful “Reese’s” inspired twist, spread a thin layer of creamy or crunchy peanut butter on one pancake before adding the Nutella-covered one on top!
- Cream Cheese Glaze: A simple glaze made from softened cream cheese, powdered sugar, and a splash of milk or cream can add a wonderful cheesecake-like tang and creaminess.
- Toasted Coconut Flakes: A sprinkle of lightly toasted coconut flakes adds a tropical crunch and a delightful hint of exotic flavor.
Whether you choose to stick to the beloved classic Nutella Pancakes or venture out to experiment with these exciting and delicious variations, you are guaranteed a breakfast or brunch that will not only satisfy your cravings but also impress anyone lucky enough to share them with you!
Conclusion:
And there you have it, my friends! We’ve journeyed together through the simple yet profoundly satisfying process of creating what I truly believe are some of the most delightful pancakes you’ll ever flip. This isn’t just another breakfast recipe; it’s an invitation to elevate your morning, or any time of day really, into a moment of pure, unadulterated joy. If you’ve been searching for that one dish that consistently brings smiles, fills the kitchen with an irresistible aroma, and tastes utterly divine, then this recipe is an absolute must-try. I promise you, once you experience the fluffy perfection of these pancakes, kissed with that iconic hazelnut spread, you’ll wonder how you ever started your day without them.
What makes these pancakes stand out, beyond their incredible flavor, is their sheer versatility and comforting simplicity. They’re forgiving for the novice cook and endlessly customizable for the seasoned chef. The texture is always light and airy, creating the perfect canvas for the star of our show: Nutella. The way the warm, molten Nutella oozes slightly with each bite is simply magical, balancing the sweetness with a nutty depth that’s truly addictive. It’s a guaranteed crowd-pleaser, whether you’re whipping up a batch for a lazy Sunday brunch with family, surprising a loved one with a special treat, or simply indulging yourself after a long week. Trust me when I say, the joy of making and devouring these pancakes is immeasurable, and creating these homemade treats often feels like a warm hug on a plate.
Now, while they are utterly perfect on their own, don’t be afraid to get creative with your serving suggestions and variations. For a truly decadent experience, a dollop of whipped cream on top is non-negotiable in my book, perhaps with a sprinkle of toasted hazelnuts for extra crunch and an elegant touch. Fresh berries like strawberries, raspberries, or blueberries add a lovely tartness that cuts through the richness beautifully, creating a vibrant burst of flavor with every forkful. For those with an even sweeter tooth, a drizzle of chocolate sauce or a sprinkle of mini chocolate chips can take these to an entirely new level of indulgence. Think about a banana sliced over the top, or even a light dusting of powdered sugar for that classic diner feel. The possibilities are truly endless, allowing you to tailor each stack to your personal cravings and make every serving a unique culinary adventure.
Feeling adventurous? You could even swirl a little extra Nutella directly into the batter just before cooking for pockets of gooey goodness within the pancake itself – just be careful not to overmix! For a slightly different flavor profile, consider adding a pinch of cinnamon or a tiny dash of almond extract to your batter. If you’re catering to different dietary needs, these pancakes are incredibly adaptable. You can easily substitute regular flour for a gluten-free blend, use plant-based milk alternatives, or even experiment with egg substitutes to make them vegan-friendly. The core technique remains the same, ensuring you can still enjoy those incredible Nutella Pancakes no matter your dietary preferences. This adaptability is what makes them such a cherished recipe in my kitchen, allowing everyone to partake in the deliciousness.
I genuinely encourage each and every one of you to set aside some time, gather your ingredients, and give these incredible pancakes a try. Don’t let another weekend pass without experiencing this breakfast revelation. They’re quick enough for a spontaneous weekday treat, yet special enough for a celebratory occasion. There’s something uniquely satisfying about creating something so delicious from scratch, and even more so when it brings so much happiness to those around your table. Once you’ve made them, I would absolutely love to hear about your experience! Did you stick to the classic? Did you venture into new topping territories? What was your favorite variation? Please share your stories, your photos, and your tips in the comments below. Let’s build a community of happy pancake makers and inspire each other with our delicious creations. Happy flipping!
Frequently Asked Questions
Can I make the pancake batter ahead of time?
Absolutely! Preparing the batter the night before can be a fantastic time-saver. Simply whisk all the wet and dry ingredients (except the Nutella swirl, which you’ll add just before cooking) together, cover the bowl tightly with plastic wrap, and refrigerate overnight. Give it a gentle whisk in the morning if it seems a little thick, possibly adding a tablespoon or two of milk to reach the right consistency, then proceed with cooking. This makes those special morning breakfasts even easier and less stressful!
What can I use if I don’t have Nutella?
While Nutella is the star here, you have options! Any chocolate-hazelnut spread will work as a direct substitute. If you’re looking for something different, a good quality melted chocolate (milk, dark, or white), a dollop of peanut butter or almond butter, or even a sweet cream cheese filling (like a cheesecake swirl) could be delicious alternatives. The key is to use something that melts slightly and provides a rich, creamy contrast to the fluffy pancakes, creating that wonderful gooey center.
How do I store leftover pancakes?
Leftover pancakes are a delicious bonus! Once they’ve cooled completely, you can store them in an airtight container in the refrigerator for up to 2-3 days. For longer storage, you can freeze them for up to 1 month. To do this, place a piece of parchment paper between each pancake to prevent sticking, then store them in a freezer-safe bag or container. Reheat them gently in a toaster, microwave, or on a griddle until warmed through, bringing them back to their fluffy glory.
Can I make these pancakes gluten-free or dairy-free?
Yes, absolutely! To make them gluten-free, simply substitute the all-purpose flour with your favorite 1:1 gluten-free flour blend. Ensure your blend contains xanthan gum for the best texture. For dairy-free, use a plant-based milk alternative like almond milk, soy milk, or oat milk, and a dairy-free butter substitute or oil for cooking. Most Nutella products contain dairy, so if you need a dairy-free option for the swirl, look for a certified dairy-free chocolate-hazelnut spread or use melted dairy-free chocolate. It’s totally achievable to adapt this recipe!
What are some other topping ideas for these pancakes?
Beyond the classic whipped cream and berries, the topping possibilities are truly endless! Consider sliced bananas, a sprinkle of toasted coconut flakes, a drizzle of caramel sauce, chopped nuts (peanuts, walnuts, pecans), a scoop of ice cream (vanilla bean is divine!), or even a dusting of cocoa powder for an elegant touch. For a more savory-sweet twist, a side of crispy bacon or a sprinkle of sea salt can be surprisingly delicious. Don’t be afraid to experiment and create your own signature stack – that’s half the fun of making them!
Ultimate Nutella Pancakes: Easy Chocolate Hazelnut Recipe
These easy chocolate hazelnut Nutella Pancakes transform any ordinary morning into an extraordinary indulgence. Enjoy fluffy pancakes with creamy, melted Nutella for a truly unforgettable breakfast treat. Adaptable for gluten-free diets using cup-for-cup flour and pairs perfectly with coffee or milk.
Ingredients
-
2 cups (240g) all-purpose flour
-
2 tbsp granulated sugar
-
2 tsp baking powder
-
1 tsp baking soda
-
½ tsp salt
-
1½ cups (360ml) buttermilk (or DIY with 1 tbsp white vinegar/lemon juice + milk)
-
½ cup (120ml) whole milk
-
2 large eggs, at room temperature
-
4 tbsp (60g) unsalted butter, melted and cooled, plus extra for greasing
-
1 tsp pure vanilla extract
-
1 cup (250g) Nutella, or more
-
Optional toppings: Sliced fresh strawberries, ripe banana slices, powdered sugar, whipped cream, chopped toasted hazelnuts, extra drizzle of warmed Nutella
Instructions
-
Step 1
In a large bowl, whisk together flour, sugar, baking powder, baking soda, and salt. In a separate medium bowl, whisk buttermilk, milk, eggs, cooled melted butter, and vanilla until smooth. Pour the wet mixture into the dry ingredients. Mix gently with a spatula until just combined and still lumpy; do not overmix. Let batter rest for 5-10 minutes. -
Step 2
Heat a non-stick griddle or heavy-bottomed frying pan over medium heat for 3-5 minutes. Lightly grease the surface with butter. -
Step 3
Pour ¼-cup or ⅓-cup of batter per pancake, leaving about 2 inches of space between each. Cook for 2-3 minutes until bubbles form on the surface and the edges are set. Flip with a thin spatula and cook for another 1-2 minutes until golden brown and cooked through. Transfer to a serving plate; if making a large batch, keep cooked pancakes warm in a 200°F (95°C) oven on a wire rack. -
Step 4
Scoop desired amount of Nutella (about 1 cup) into a microwave-safe bowl. Microwave in 15-20 second bursts, stirring vigorously after each, until wonderfully warm, smooth, and easily spreadable. -
Step 5
Place one warm, freshly cooked pancake on a serving plate. Spread a generous, even layer of your warmed Nutella over the entire surface. Carefully place another pancake directly on top, and then repeat the spreading process. Continue stacking until you have a tower of 3-4 pancakes. -
Step 6
Garnish your impressive Nutella Pancake stack with your favorite optional toppings such as sliced fresh strawberries, ripe banana slices, a dusting of powdered sugar, a dollop of whipped cream, or chopped toasted hazelnuts. Serve immediately while warm and enjoy your decadent creation!
Important Information
Nutrition Facts (Per Serving)
It is important to consider this information as approximate and not to use it as definitive health advice.
Allergy Information
Please check ingredients for potential allergens and consult a health professional if in doubt.

Leave a Comment