
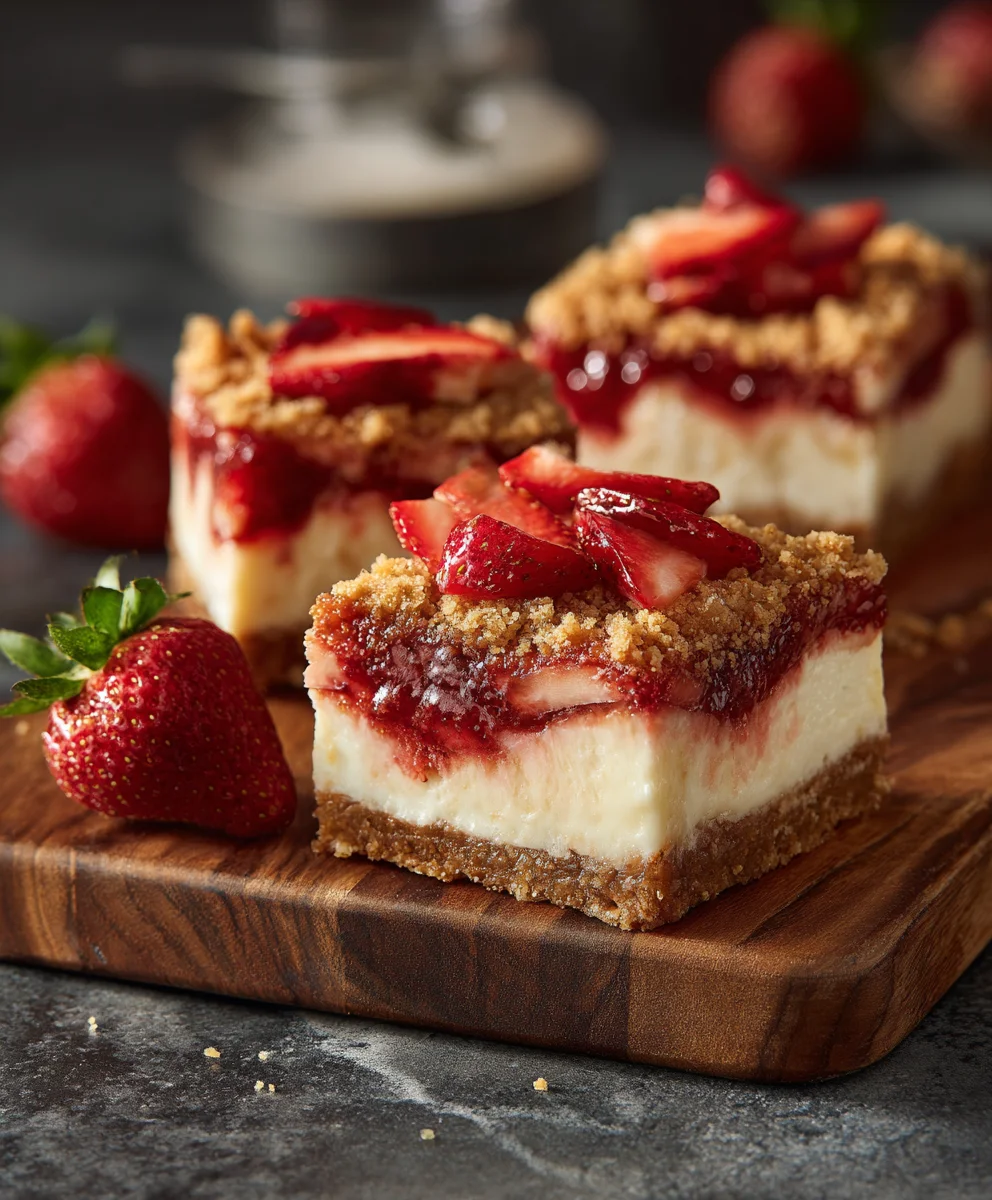
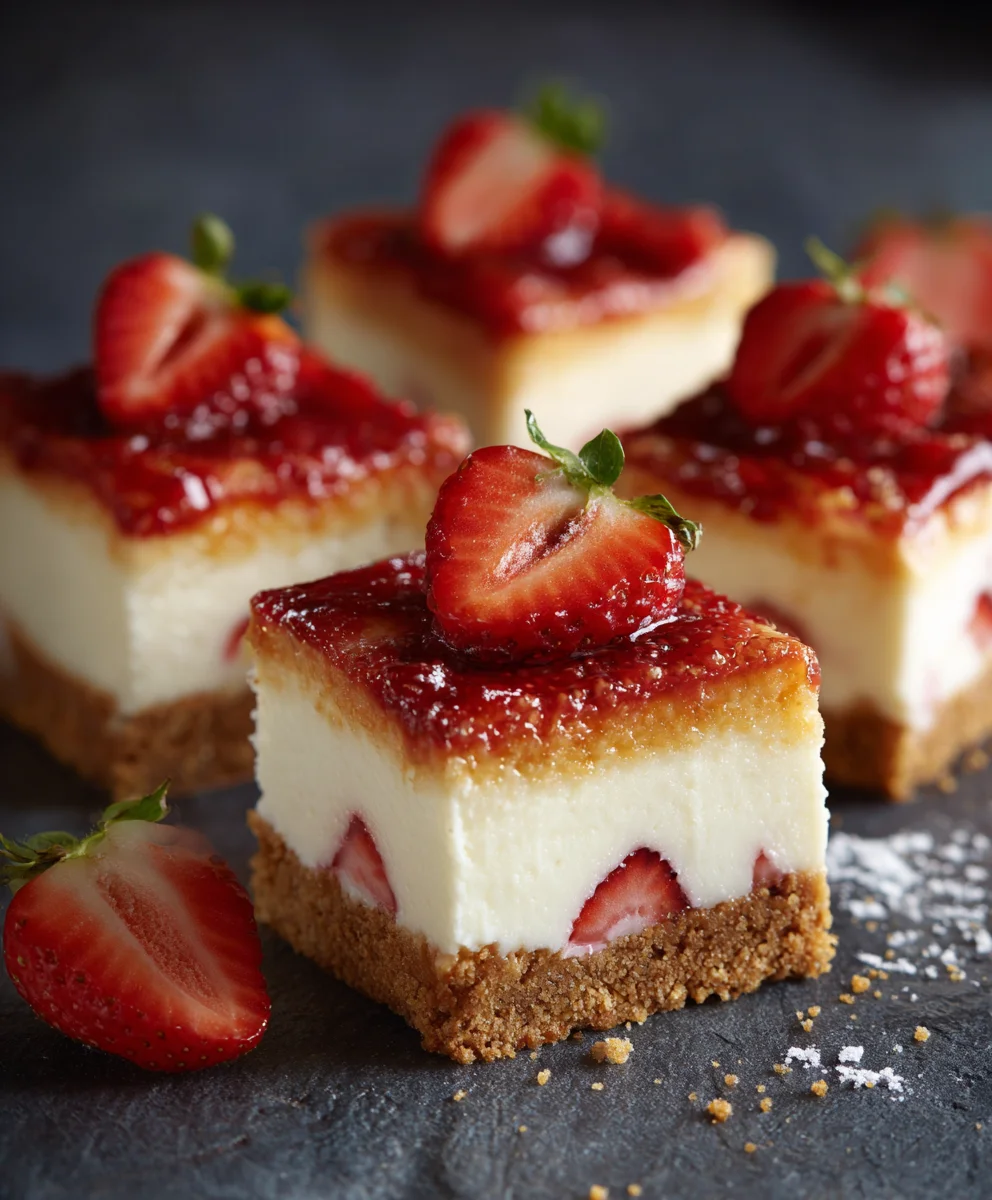
Philadelphia Strawberry Cheesecake Bars are not just a dessert; they are a celebration in every bite, a harmonious blend of classic comfort and vibrant freshness. Have you ever yearned for the luxurious richness of a traditional cheesecake combined with the sweet, sun-kissed allure of ripe strawberries, all perfectly portioned for effortless enjoyment? I know I have, and that’s precisely why I’m so thrilled to share this recipe with you. This delightful creation beautifully marries the iconic American cheesecake tradition—often epitomized by the smooth, tangy excellence of Philadelphia cream cheese—with a playful, approachable bar format.
I truly believe what makes these bars a beloved staple is their exquisite balance and convenience. Each bar promises a sturdy, buttery graham cracker crust, a velvety smooth and tangy cream cheese filling, and a generous, luscious strawberry topping that bursts with natural sweetness. It’s a symphony of textures and tastes: creamy, crunchy, sweet, and just a whisper of tartness. Unlike a grand, traditional cheesecake, these Philadelphia Strawberry Cheesecake Bars are incredibly simple to prepare, transport, and serve, making them the ultimate versatile treat for everything from casual backyard barbecues to elegant afternoon teas. Prepare to experience pure dessert bliss!
Ingredients:
-
For the Graham Cracker Crust:
- 1 ½ cups (about 10-12 full sheets) Graham Cracker Crumbs: You can buy them pre-crushed or crush your own.
- ¼ cup Granulated Sugar: To add a touch of sweetness to our buttery base.
- 6 tablespoons Unsalted Butter: Melted, this will bind our crust together beautifully.
-
For the Creamy Philadelphia Strawberry Cheesecake Filling:
- 3 (8-ounce) packages Philadelphia Cream Cheese: Softened to room temperature – this is crucial for a smooth filling!
- 1 cup Granulated Sugar: The perfect amount of sweetness for our rich cheesecake.
- 1 teaspoon Pure Vanilla Extract: For that warm, comforting flavor.
- ¼ cup Sour Cream: Softened to room temperature, adding a lovely tang and extra creaminess.
- 3 Large Eggs: Also at room temperature, they act as the binding agent for our luscious filling.
-
For the Fresh Strawberry Topping:
- 1 pound Fresh Strawberries: Hullled and sliced or quartered, depending on your preference. Choose ripe, vibrant berries!
- ½ cup Water: To help create a beautiful, pourable sauce.
- ¼ cup Granulated Sugar: Adjust to your taste, depending on the sweetness of your strawberries.
- 1 tablespoon Lemon Juice: Freshly squeezed, this brightens the flavor and prevents the topping from being too sweet.
- 1 tablespoon Cornstarch: Mixed with 2 tablespoons cold water to create a slurry – this will thicken our topping.
Equipment You’ll Need:
- 9×13 inch baking pan: Essential for creating the perfect bar shape.
- Parchment paper: To line the pan, making it incredibly easy to lift out and slice the bars.
- Large mixing bowls: Several, for different components.
- Electric mixer (stand or hand-held): Highly recommended for achieving a super smooth, lump-free cheesecake filling.
- Rubber spatula: For scraping down bowls and gentle folding.
- Saucepan: For preparing the delightful strawberry topping.
- Measuring cups and spoons: For precise ingredient measurements.
- Cooling rack: For cooling the baked cheesecake bars.
Preparing the Graham Cracker Crust for Your Philadelphia Strawberry Cheesecake Bars:
- Preheat Your Oven: First things first, let’s get that oven ready. Preheat your oven to 350°F (175°C). While it’s heating up, grab your 9×13 inch baking pan. We want to line this pan with parchment paper, leaving an overhang on the longer sides. This little trick is a game-changer when it comes to lifting your beautiful Philadelphia Strawberry Cheesecake Bars out of the pan for easy slicing! Trust me, it makes all the difference.
- Crush the Graham Crackers: Now, for the crust! If you’re using whole graham cracker sheets, it’s time to turn them into fine crumbs. You can do this in a couple of ways: my favorite is to pulse them in a food processor until they’re a fine, sandy consistency. If you don’t have a food processor, no worries! Place the crackers in a sturdy zip-top bag, seal it, and use a rolling pin or the bottom of a heavy glass to crush them until they’re nice and fine. We’re looking for about 1 ½ cups of these delicious crumbs.
- Combine Crust Ingredients: In a medium mixing bowl, combine your freshly made graham cracker crumbs with the ¼ cup of granulated sugar. Give them a quick stir to ensure the sugar is evenly distributed. Then, pour in the 6 tablespoons of melted unsalted butter. Stir everything together really well with a fork or spatula until all the crumbs are moistened and resemble wet sand. This butter is what’s going to hold our crust together beautifully.
- Press the Crust: Transfer the buttery graham cracker mixture into your prepared 9×13 inch baking pan. Now, this is where you can get a little hands-on! Use the bottom of a flat-bottomed glass, a measuring cup, or even your clean hands to press the crumbs firmly and evenly into the bottom of the pan. Make sure it’s packed down tightly from edge to edge. A well-pressed crust is a sturdy crust, which is essential for our Philadelphia Strawberry Cheesecake Bars!
- Pre-Bake the Crust: Pop the pan into your preheated oven and bake for 8-10 minutes. This brief bake helps to set the crust, making it nice and firm, and gives it a lovely toasted flavor. Once baked, remove it from the oven and set it aside on a wire rack to cool slightly while we prepare the star of the show – the creamy Philadelphia cheesecake filling!
Crafting the Creamy Philadelphia Strawberry Cheesecake Filling:
This is where the magic happens! Achieving that signature smooth and rich texture for your Philadelphia Strawberry Cheesecake Bars largely depends on these steps. Remember, room temperature ingredients are your best friend here!
- Prepare for Cream Cheese: Reduce your oven temperature to 325°F (160°C). This slightly lower temperature is ideal for baking cheesecakes, preventing cracks and ensuring a slow, even bake.
- Beat the Philadelphia Cream Cheese: In a large mixing bowl, using your electric mixer on medium speed, beat the 3 packages of softened Philadelphia Cream Cheese for about 2-3 minutes. We want it to be incredibly smooth, light, and completely free of lumps. This initial beating is vital for a silky-smooth cheesecake. Scrape down the sides of the bowl frequently to ensure everything is incorporated.
- Add Sugar and Vanilla: Gradually add the 1 cup of granulated sugar to the cream cheese mixture, continuing to beat on medium speed until well combined and fluffy. This usually takes another 2-3 minutes. Then, mix in the 1 teaspoon of pure vanilla extract and ¼ cup of room temperature sour cream until just combined. The sour cream adds a wonderful subtle tang and helps ensure the filling remains incredibly moist.
- Incorporate Eggs Carefully: This is a crucial step! Add the 3 large room temperature eggs, one at a time, beating on low speed just until each egg is incorporated. Do not overmix! Overmixing after adding the eggs can incorporate too much air into the batter, which can lead to cracks in your cheesecake as it bakes and cools. We want to gently blend them in, just until no streaks of egg yolk remain. Scrape down the bowl one last time to ensure everything is perfectly combined.
- Pour the Filling: Gently pour the luscious Philadelphia cheesecake filling over your slightly cooled graham cracker crust in the prepared pan. Use a spatula to spread it evenly from edge to edge. Give the pan a few gentle taps on the counter to release any large air bubbles.
Baking Your Perfect Philadelphia Strawberry Cheesecake Bars:
Patience is key during the baking and cooling process to achieve beautifully set and delicious Philadelphia Strawberry Cheesecake Bars.
- Bake the Cheesecake Bars: Carefully place the pan into your preheated 325°F (160°C) oven. Bake for approximately 35-45 minutes. The exact baking time can vary depending on your oven, so keep a close eye on it. You’re looking for the edges to be set, and the center should have a slight jiggle when you gently shake the pan. It shouldn’t be liquidy, but a little wobble is perfectly fine and indicates a creamy texture. Avoid overbaking, as this can lead to a dry cheesecake and potentially cracks.
- Cooling Process – Phase 1 (Oven): Once baked, turn off the oven but leave the cheesecake inside with the oven door propped open a few inches. Allow it to cool gradually in the oven for about 30 minutes to an hour. This slow cooling prevents sudden temperature changes, which are a common culprit for cracks. It’s a little trick for that picture-perfect finish for your Philadelphia Strawberry Cheesecake Bars.
- Cooling Process – Phase 2 (Counter): After the initial oven cool-down, carefully remove the pan from the oven and transfer it to a wire rack. Let it cool completely to room temperature on the counter. This can take another 1-2 hours. Resist the urge to rush this step! The gradual cooling continues to help the cheesecake set and firm up.
Creating the Fresh Strawberry Topping for Your Philadelphia Strawberry Cheesecake Bars:
A vibrant, fresh strawberry topping is the crowning glory for our Philadelphia Strawberry Cheesecake Bars, adding a burst of color and sweet-tart flavor.
- Prepare Strawberries: While your cheesecake bars are cooling, prepare your fresh strawberries. Hull them and then slice or quarter them, depending on how chunky you like your topping. I personally love a mix of slices and some smaller pieces for texture.
- Start the Sauce: In a medium saucepan, combine the ½ cup of water, ¼ cup of granulated sugar, and 1 tablespoon of fresh lemon juice. Stir gently to dissolve the sugar. Add about two-thirds of your prepared strawberries to the saucepan. Save the remaining one-third for later, as we’ll fold them in whole for extra texture.
- Simmer and Soften: Bring the mixture to a gentle simmer over medium heat, stirring occasionally. Let it simmer for about 5-7 minutes, or until the strawberries have softened and released their juices, and the sauce starts to look a little syrupy. You can lightly mash some of the strawberries with the back of your spoon if you prefer a slightly smoother sauce, but I enjoy some pieces remaining.
- Thicken the Topping: In a small separate bowl, whisk together the 1 tablespoon of cornstarch with 2 tablespoons of cold water until you have a smooth slurry (no lumps!). Pour this cornstarch slurry into the simmering strawberry mixture in the saucepan, whisking constantly. Continue to cook and stir for another 1-2 minutes, until the sauce thickens to your desired consistency. It should be glossy and able to coat the back of a spoon.
- Add Remaining Strawberries and Cool: Remove the saucepan from the heat. Stir in the remaining fresh, uncooked strawberries. This adds a lovely fresh element and contrast in texture to the cooked berries. Transfer the strawberry topping to a heatproof bowl and allow it to cool completely to room temperature. You can place it in the refrigerator to speed up the cooling process, but ensure it’s not hot when it meets your cheesecake. We want a perfectly cool and glistening topping for our Philadelphia Strawberry Cheesecake Bars!
Assembling and Chilling Your Exquisite Philadelphia Strawberry Cheesecake Bars:
The final steps are all about bringing it all together and allowing the flavors to meld beautifully. Patience during chilling is paramount for the best texture!
- Chill the Cheesecake Bars: Once the cheesecake bars have cooled completely to room temperature on the counter, it’s time for their essential chill. Cover the pan loosely with plastic wrap and transfer it to the refrigerator. Chill for a minimum of 4 hours, but preferably overnight. This long chill time is absolutely critical! It allows the cheesecake to fully set and firm up, making it easier to slice and ensuring that classic dense, creamy texture we all love in a Philadelphia Strawberry Cheesecake Bar.
- Add the Strawberry Topping: After the cheesecake bars are thoroughly chilled and set, take them out of the refrigerator. Gently pour or spoon the cooled strawberry topping evenly over the surface of the cheesecake. Spread it with a spatula to create a beautiful, even layer of vibrant red.
- Chill Again (Optional but Recommended): For the best presentation and to allow the topping to set slightly, you can return the bars to the refrigerator for another 30 minutes to an hour after adding the topping. This isn’t strictly necessary for the cheesecake itself, but it helps the topping adhere nicely.
- Slice and Serve Your Philadelphia Strawberry Cheesecake Bars: When you’re ready to serve, use the parchment paper overhangs to carefully lift the entire cheesecake slab out of the baking pan and onto a cutting board. This is where that parchment paper trick really shines! Now, for clean cuts, use a large, sharp knife. For the best results, dip your knife in hot water and wipe it clean between each slice. This will give you perfectly neat, beautiful Philadelphia Strawberry Cheesecake Bars. You can cut them into 12, 16, or even 24 squares, depending on your desired serving size.
Storage and Serving Suggestions for Your Philadelphia Strawberry Cheesecake Bars:
- Storage: Store any leftover Philadelphia Strawberry Cheesecake Bars in an airtight container in the refrigerator for up to 3-4 days. The flavors often deepen and improve a bit on the second day!
- Serving Temperature: These bars are best served chilled, straight from the refrigerator.
- Garnish: For an extra touch of elegance, you can garnish individual bars with a fresh whole strawberry, a sprig of mint, or a dusting of powdered sugar just before serving. Enjoy every delightful bite of these incredible Philadelphia Strawberry Cheesecake Bars!
Conclusion:
And there you have it, my friends! We’ve reached the delicious culmination of our journey into making what I truly believe are the most delightful and undeniably irresistible Philadelphia Strawberry Cheesecake Bars you’ll ever sink your teeth into. This isn’t just another recipe; it’s an invitation to experience pure joy, a celebration of simple ingredients coming together to create something truly magical. I’ve poured my heart into sharing every step, every little tip, because I genuinely want you to succeed and taste the incredible difference homemade makes. From that perfectly buttery, slightly crunchy graham cracker crust to the unbelievably smooth, tangy, and rich Philadelphia cream cheese filling, all crowned with a vibrant, glistening strawberry topping, every single layer contributes to a symphony of flavors and textures that will leave everyone craving more.
I can confidently say that these bars are a definite must-try for so many reasons. Firstly, their simplicity belies their sophistication. You don’t need to be a pastry chef to achieve stunning results. The steps are straightforward, making it an ideal project for seasoned bakers and enthusiastic beginners alike. Secondly, the taste! Oh, the taste is just out of this world. The classic creamy tang of Philadelphia cream cheese perfectly balances the sweet burst of fresh strawberries, creating a dessert that feels both indulgent and wonderfully refreshing. It’s a versatile treat that fits perfectly into almost any occasion – from a casual family dessert after dinner to a show-stopping addition to your next potluck or celebration. Imagine the smiles when you present a platter of these beautifully cut, glistening bars. They are truly a feast for both the eyes and the palate.
Serving Suggestions & Creative Variations to Explore
While these bars are absolutely perfect just as they are, served chilled straight from the refrigerator, sometimes a little extra touch can elevate the experience even further. For an added touch of decadence, consider serving them with a delicate dollop of freshly whipped cream, perhaps lightly sweetened with vanilla bean. A sprig of fresh mint can add a lovely burst of color and a subtle aromatic lift. For those who adore chocolate, a light drizzle of melted dark chocolate across the top just before serving can create an exquisite flavor combination. They also pair wonderfully with a hot cup of coffee, an iced latte, or a refreshing glass of lemonade on a warm day.
But don’t stop there! The beauty of this recipe lies in its adaptability. Once you master the basic technique, feel free to get creative with variations. Instead of solely strawberries, why not try a mixed berry topping with raspberries and blueberries for an explosion of different berry flavors? A little lemon zest folded into the cream cheese filling can add an extra layer of bright, citrusy notes that perfectly complement the strawberries. For the crust, you could experiment with adding finely chopped pecans or walnuts to the graham cracker mixture for a different textural dimension. If you’re catering to dietary needs, a gluten-free graham cracker crust is an easy swap. You could even bake these in mini muffin tins for adorable bite-sized versions, perfect for parties or as a small individual treat. The possibilities are truly endless, and each variation offers a chance to make this beloved dessert uniquely yours.
Your Turn! Let the Baking Begin!
Now that you’re armed with all the knowledge and inspiration, I wholeheartedly encourage you to roll up your sleeves and give these fantastic bars a try. There’s nothing quite like the satisfaction of creating something so delicious from scratch, and I promise you, the effort is minimal compared to the incredible reward. Imagine the delightful aromas filling your kitchen, the anticipation as they chill, and finally, that glorious first bite. It’s an experience worth savoring. Once you’ve made them, please, please come back and share your experience with me! I absolutely love hearing from you. Did you try a fun variation? Do you have a secret tip of your own? What did your family and friends think? Snap a photo, leave a comment, or simply tell me how much you enjoyed making and eating these delightful treats. Your stories and feedback truly make my day and help inspire others to get baking. So go forth, create, share, and most importantly, enjoy every single crumb of these exceptional Philadelphia Strawberry Cheesecake Bars!
Frequently Asked Questions (FAQs)
How long do Philadelphia Strawberry Cheesecake Bars last in the refrigerator?
Once baked and properly chilled, your Philadelphia Strawberry Cheesecake Bars can be stored in an airtight container in the refrigerator for up to 4-5 days. For the best taste and texture, I always recommend enjoying them within the first 2-3 days, as the crust will remain crispier and the strawberry topping will be at its freshest. Always ensure they are covered tightly to prevent them from drying out or absorbing other odors from the fridge.
Can I freeze Strawberry Cheesecake Bars?
Absolutely! Cheesecake bars freeze beautifully. To freeze, ensure they are completely cooled, then cut them into individual servings. Place the bars on a baking sheet lined with parchment paper and freeze until solid (about 2-3 hours). Once frozen, wrap each bar tightly in plastic wrap, then again in aluminum foil, and store them in an airtight freezer-safe container or bag. They can be kept in the freezer for up to 1-2 months. Thaw individual bars in the refrigerator overnight or at room temperature for a couple of hours before serving.
What’s the best way to cut cheesecake bars cleanly?
For beautifully clean cuts, always ensure your cheesecake bars are thoroughly chilled – preferably for at least 4 hours, or even overnight. Before cutting, run a long, sharp knife under hot water, wipe it dry, and then make your first cut. Clean the knife again between each slice to prevent sticking and ensure every bar looks pristine. A gentle, firm press down rather than a sawing motion also helps. Some bakers even lightly spray their knife with non-stick cooking spray for extra smooth slices.
Can I use fresh strawberries instead of frozen for the topping?
Yes, you can definitely use fresh strawberries! In fact, fresh strawberries can be wonderful for the topping, offering a brighter, more vibrant flavor. If you’re using fresh, you’ll still want to cook them down slightly with sugar and a thickener (like cornstarch or arrowroot) to create that lovely, slightly thickened sauce consistency that clings to the bars beautifully. This also helps to prevent them from becoming too watery. Simply follow the topping instructions in the recipe, using the same measurements for fresh berries as you would for frozen.
Why did my cheesecake crack, and how can I prevent it?
While full-sized cheesecakes are more prone to cracking, cheesecake bars can sometimes develop small cracks too, usually due to sudden temperature changes or overbaking. The key to preventing cracks is to bake your cheesecake gently and let it cool slowly. Avoid opening the oven door frequently while baking. Once baked, turn off the oven and leave the bars inside with the oven door slightly ajar for about an hour. This gradual cooling prevents the rapid contraction that causes cracks. Also, ensure you don’t overmix the cream cheese filling, as incorporating too much air can also contribute to cracks. For bars, if a small crack appears, don’t worry – your delicious strawberry topping will beautifully cover any imperfections!
Can I make these Philadelphia Strawberry Cheesecake Bars ahead of time for a party?
Absolutely! These Philadelphia Strawberry Cheesecake Bars are an excellent make-ahead dessert, which is one of their many charms. In fact, they taste even better when given ample time to chill and set up properly. You can easily prepare them a day or even two days in advance of your event. Just make sure to store them in an airtight container in the refrigerator. This allows all the flavors to meld beautifully and ensures a perfectly firm texture, making your party prep a breeze!
What kind of graham crackers are best for the crust?
For the crust, classic honey graham crackers are typically my go-to choice as they provide that traditional, slightly sweet, and nutty flavor that complements cheesecake so well. However, you can also experiment with other varieties! Chocolate graham crackers would create a lovely chocolate-strawberry combination, or you could even use digestive biscuits for a slightly less sweet, more buttery flavor. The most important thing is to ensure they are finely crushed to create a consistent and sturdy base for your bars.
Philadelphia Strawberry Cheesecake Bars
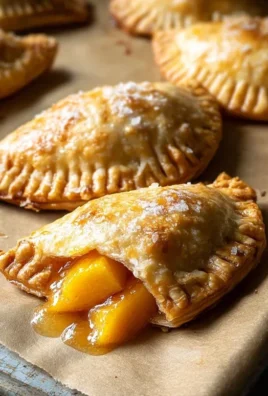
Delightful Philadelphia Strawberry Cheesecake Bars feature a buttery graham cracker crust, a velvety smooth cream cheese filling, and a luscious fresh strawberry topping. This recipe is simple to prepare, transport, and serve, making it a versatile treat for any occasion.
Ingredients
-
1 ½ cups Graham Cracker Crumbs
-
¼ cup Granulated Sugar (for crust)
-
6 tablespoons Unsalted Butter, melted
-
3 (8-ounce) packages Philadelphia Cream Cheese, softened
-
1 cup Granulated Sugar (for filling)
-
1 teaspoon Pure Vanilla Extract
-
¼ cup Sour Cream, softened
-
3 Large Eggs, room temperature
-
1 pound Fresh Strawberries, hulled and sliced or quartered
-
½ cup Water (for topping)
-
¼ cup Granulated Sugar (for topping)
-
1 tablespoon Fresh Lemon Juice
-
1 tablespoon Cornstarch
-
2 tablespoons Cold Water (for cornstarch slurry)
Instructions
-
Step 1
Preheat oven to 350°F (175°C). Line a 9×13 inch baking pan with parchment paper, leaving an overhang. Combine graham cracker crumbs and ¼ cup sugar. Stir in 6 tablespoons melted butter until moistened. Press mixture firmly and evenly into the prepared pan. Bake for 8-10 minutes. Remove from oven and set aside to cool slightly. -
Step 2
Reduce oven temperature to 325°F (160°C). In a large bowl, beat softened Philadelphia Cream Cheese with an electric mixer for 2-3 minutes until incredibly smooth. Gradually add 1 cup granulated sugar, beating for another 2-3 minutes until fluffy. Mix in 1 teaspoon pure vanilla extract and ¼ cup softened sour cream until just combined. Add 3 large room temperature eggs, one at a time, beating on low speed just until each egg is incorporated. Do not overmix. Gently pour the filling over the slightly cooled graham cracker crust. -
Step 3
Carefully place the pan into the preheated 325°F (160°C) oven and bake for 35-45 minutes, until the edges are set and the center has a slight jiggle. Turn off the oven, prop the door open a few inches, and allow the cheesecake to cool gradually in the oven for 30-60 minutes. Remove from oven and transfer to a wire rack; let cool completely to room temperature (1-2 hours). -
Step 4
While cheesecake bars cool, hull and slice or quarter 1 pound fresh strawberries. In a medium saucepan, combine ½ cup water, ¼ cup granulated sugar, 1 tablespoon fresh lemon juice, and about two-thirds of the prepared strawberries. Bring to a gentle simmer over medium heat; cook 5-7 minutes until strawberries soften. In a small separate bowl, whisk 1 tablespoon cornstarch with 2 tablespoons cold water to create a smooth slurry. Pour slurry into the simmering strawberry mixture, whisking constantly. Cook and stir for 1-2 minutes until thickened. Remove from heat, stir in the remaining fresh, uncooked strawberries. Transfer to a heatproof bowl and allow to cool completely to room temperature. -
Step 5
Once the cheesecake bars have cooled completely, cover the pan loosely with plastic wrap and chill in the refrigerator for a minimum of 4 hours, preferably overnight, until fully set and firm. After chilling, gently pour or spoon the cooled strawberry topping evenly over the surface of the cheesecake. For best presentation, you may return the bars to the refrigerator for another 30 minutes to an hour after adding the topping. Use the parchment paper overhangs to carefully lift the entire cheesecake slab out of the baking pan onto a cutting board. For clean cuts, use a large, sharp knife dipped in hot water and wiped clean between each slice. Cut into 12-24 squares as desired. -
Step 6
Store any leftover Philadelphia Strawberry Cheesecake Bars in an airtight container in the refrigerator for up to 3-4 days. Serve chilled. For an extra touch of elegance, garnish individual bars with a fresh whole strawberry, a sprig of mint, or a dusting of powdered sugar just before serving.
Important Information
Nutrition Facts (Per Serving)
It is important to consider this information as approximate and not to use it as definitive health advice.
Allergy Information
Please check ingredients for potential allergens and consult a health professional if in doubt.
Leave a Comment