
Almond Joy Cookie Bars are more than just a sweet treat; they’re a nostalgic journey back to simpler times, a portable slice of pure indulgence that instantly elevates any occasion. Have you ever craved that perfect balance of chewy cookie, creamy coconut, and satisfying crunch? If so, you’re in for a serious delight. These bars capture the essence of the beloved candy bar, transforming its iconic flavors into a dessert that’s both comforting and exciting. What makes Almond Joy Cookie Bars so utterly irresistible is their harmonious blend of textures and tastes – the rich chocolate, the sweet, toasted coconut, and the nutty bite of almonds all come together in a symphony of deliciousness. They’re wonderfully easy to make, making them a go-to for bake sales, potlucks, or simply when that sweet craving strikes. Prepare yourself to fall in love with this incredible take on a classic.

Ingredients:
- 1 1/2 cups all-purpose flour
- 1/2 teaspoon baking soda
- 1/4 teaspoon baking powder
- 1/2 teaspoon sea salt
- 1/2 cup butter, softened
- 1/2 cup granulated sugar
- 1/2 cup light brown sugar, packed
- 1 large egg
- 1 1/2 teaspoon vanilla extract
- 1 cup chocolate chips (half a 12 oz bag)
- 1/2 cup flaked coconut
- 1/2 cup almond slivers
Preparing the Cookie Dough Base
Preheating and Pan Preparation
First things first, let’s get our oven ready for these delicious Almond Joy Cookie Bars. Preheat your oven to 350 degrees Fahrenheit (175 degrees Celsius). This consistent temperature is crucial for ensuring your bars bake evenly and achieve that perfect chewy texture. While the oven heats up, prepare an 8×8 inch baking pan. I find it easiest to line the pan with parchment paper, leaving an overhang on two opposite sides. This overhang acts as handles, making it incredibly simple to lift the baked bars out of the pan once they’ve cooled, preventing any sticking and making for much cleaner cuts later on. You can also grease the pan well with butter or cooking spray if you don’t have parchment paper, but the parchment paper method is truly a game-changer.
Combining the Dry Ingredients
In a medium-sized bowl, whisk together the dry ingredients. This includes the 1 1/2 cups of all-purpose flour, 1/2 teaspoon of baking soda, 1/4 teaspoon of baking powder, and 1/2 teaspoon of sea salt. Whisking them together thoroughly ensures that the leavening agents (baking soda and baking powder) and the salt are evenly distributed throughout the flour mixture. This is important for consistent rising and flavor in your cookie bars. Once combined, set this bowl aside.
Creaming the Butter and Sugars
Now, in a large mixing bowl, we’re going to cream together the softened butter with the sugars. You’ll need 1/2 cup of softened butter, 1/2 cup of granulated sugar, and 1/2 cup of light brown sugar, packed. Using softened butter is key here; it should be pliable enough to indent with your finger but not melted. If your butter is too cold, it won’t cream properly, leading to a denser cookie bar. If it’s too warm, it can make the dough greasy. Cream the butter and sugars together using an electric mixer (handheld or stand mixer) on medium speed until the mixture is light and fluffy. This process, often called creaming, incorporates air into the dough, which contributes to the overall texture of the finished bars. Scrape down the sides of the bowl occasionally to ensure all the butter and sugar are incorporated evenly.
Adding Wet Ingredients and Mix-ins
Once your butter and sugar mixture is light and fluffy, it’s time to add the wet ingredients. Crack in 1 large egg and add 1 1/2 teaspoons of vanilla extract. Mix on low speed until just combined. Be careful not to overmix at this stage, as it can lead to tough cookie bars. Next, gradually add the dry ingredients (the flour mixture you set aside earlier) to the wet ingredients. Mix on low speed until just combined and no dry streaks of flour remain. This is the point where we’ll gently fold in our delightful Almond Joy components. Add the 1 cup of chocolate chips, 1/2 cup of flaked coconut, and 1/2 cup of almond slivers to the dough. Using a spatula or wooden spoon, gently fold these ingredients into the dough until they are evenly distributed. Again, avoid overmixing, as we want to keep those chocolate chips and almonds intact.
Assembling and Baking the Bars
Pressing the Dough into the Pan
Now, take your prepared 8×8 inch baking pan. Spoon the cookie dough into the pan. Because this dough is a bit thicker and contains chunks, it might not spread as easily on its own. Use your hands, a spatula, or the bottom of a measuring cup to evenly press the dough into a uniform layer across the bottom of the pan. Ensure there are no significant gaps or thick spots, as this will help the bars bake evenly. Getting a nice, even surface will result in beautifully uniform bars.
Baking to Golden Perfection
Place the pan in your preheated 350-degree Fahrenheit (175-degree Celsius) oven. Bake for approximately 20 to 25 minutes, or until the edges are lightly golden brown and the center looks set. The baking time can vary slightly depending on your oven, so keep an eye on them. You don’t want to overbake them, as they will continue to firm up as they cool. A slightly underbaked center will result in a wonderfully chewy bar, which is exactly what we’re aiming for with Almond Joy Cookie Bars.
Cooling and Cutting for Serving
Once baked, carefully remove the pan from the oven. Let the bars cool in the pan on a wire rack for at least 15-20 minutes. This cooling period is essential for allowing the bars to set properly. If you try to cut them too soon, they might crumble. Once they’ve cooled for a bit, use the parchment paper overhangs to lift the entire slab of cookie out of the pan and onto the wire rack to cool completely. Once fully cooled, use a sharp knife to cut the slab into squares or rectangles. For easier cutting, you can run the knife under hot water and dry it between cuts. Enjoy these delightful Almond Joy Cookie Bars!
Conclusion:
And there you have it – the ultimate guide to creating delicious Almond Joy Cookie Bars! I hope you’ve enjoyed this journey and are ready to whip up a batch of these irresistible treats. These bars perfectly capture the classic combination of chewy chocolate, sweet coconut, and crunchy almonds, all in a portable and satisfying cookie form. They truly are a crowd-pleaser, perfect for any occasion, from casual get-togethers to special celebrations.
I love serving these Almond Joy Cookie Bars slightly warm, perhaps with a scoop of vanilla ice cream for an extra decadent dessert. They also travel wonderfully, making them ideal for potlucks or bake sales. Don’t be afraid to get creative with your own spin on this recipe! You can easily swap out the almonds for pecans or walnuts, or even add a drizzle of white chocolate for a different flavor profile. The possibilities are endless!
So, gather your ingredients, preheat your oven, and get ready to experience the joy of homemade Almond Joy Cookie Bars. I can’t wait to hear about your baking adventures and any delightful variations you come up with. Happy baking!
Frequently Asked Questions:
Can I make these Almond Joy Cookie Bars ahead of time?
Absolutely! These bars store wonderfully in an airtight container at room temperature for up to 3-4 days. They actually tend to develop even more flavor as they sit. You can also freeze them for longer storage; just wrap them tightly in plastic wrap and then aluminum foil.
What kind of chocolate chips should I use?
While semi-sweet chocolate chips are a classic choice and work perfectly, feel free to experiment! Milk chocolate chips will add extra sweetness, while dark chocolate chips will offer a more intense cocoa flavor. You could even use a mix of both for a balanced taste.
How can I ensure my cookie bars are chewy and not cakey?
A few key factors contribute to a chewy texture. Make sure not to overmix your dough once the flour is added. Also, avoid overbaking; the bars will continue to set as they cool. They should look slightly underdone in the center when you take them out of the oven.
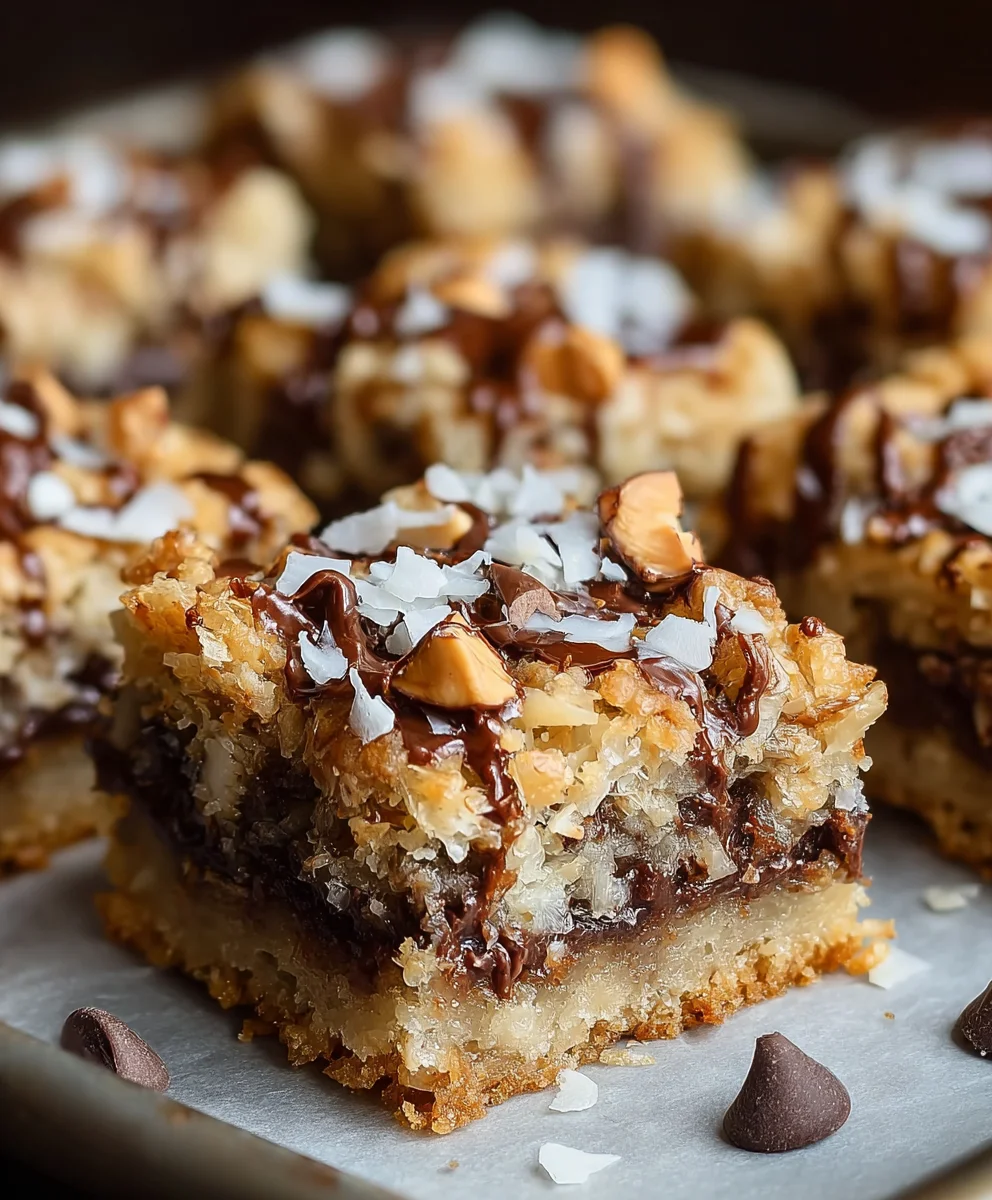
Almond Joy Cookie Bars-Decadent Chewy Treat
Indulge in these decadent and chewy Almond Joy Cookie Bars, packed with chocolate chips, coconut, and almonds for a delightful treat.
Ingredients
-
1 1/2 cups all-purpose flour
-
1/2 teaspoon baking soda
-
1/4 teaspoon baking powder
-
1/2 teaspoon sea salt
-
1/2 cup butter, softened
-
1/2 cup granulated sugar
-
1/2 cup light brown sugar, packed
-
1 large egg
-
1 1/2 teaspoon vanilla extract
-
1 cup chocolate chips
-
1/2 cup flaked coconut
-
1/2 cup almond slivers
Instructions
-
Step 1
Preheat oven to 350°F (175°C). Line an 8×8 inch baking pan with parchment paper, leaving an overhang on two sides. -
Step 2
In a medium bowl, whisk together flour, baking soda, baking powder, and sea salt. Set aside. -
Step 3
In a large bowl, cream together softened butter, granulated sugar, and packed light brown sugar until light and fluffy. -
Step 4
Beat in the egg and vanilla extract until just combined. Gradually add the dry ingredients and mix until just combined. Fold in chocolate chips, flaked coconut, and almond slivers. -
Step 5
Press the dough evenly into the prepared baking pan. -
Step 6
Bake for 20-25 minutes, or until edges are lightly golden brown and the center is set. Allow to cool in the pan on a wire rack for at least 15-20 minutes. -
Step 7
Lift the slab out of the pan using the parchment paper overhangs and cool completely on the wire rack. Cut into squares or rectangles to serve.
Important Information
Nutrition Facts (Per Serving)
It is important to consider this information as approximate and not to use it as definitive health advice.
Allergy Information
Please check ingredients for potential allergens and consult a health professional if in doubt.


Leave a Comment