
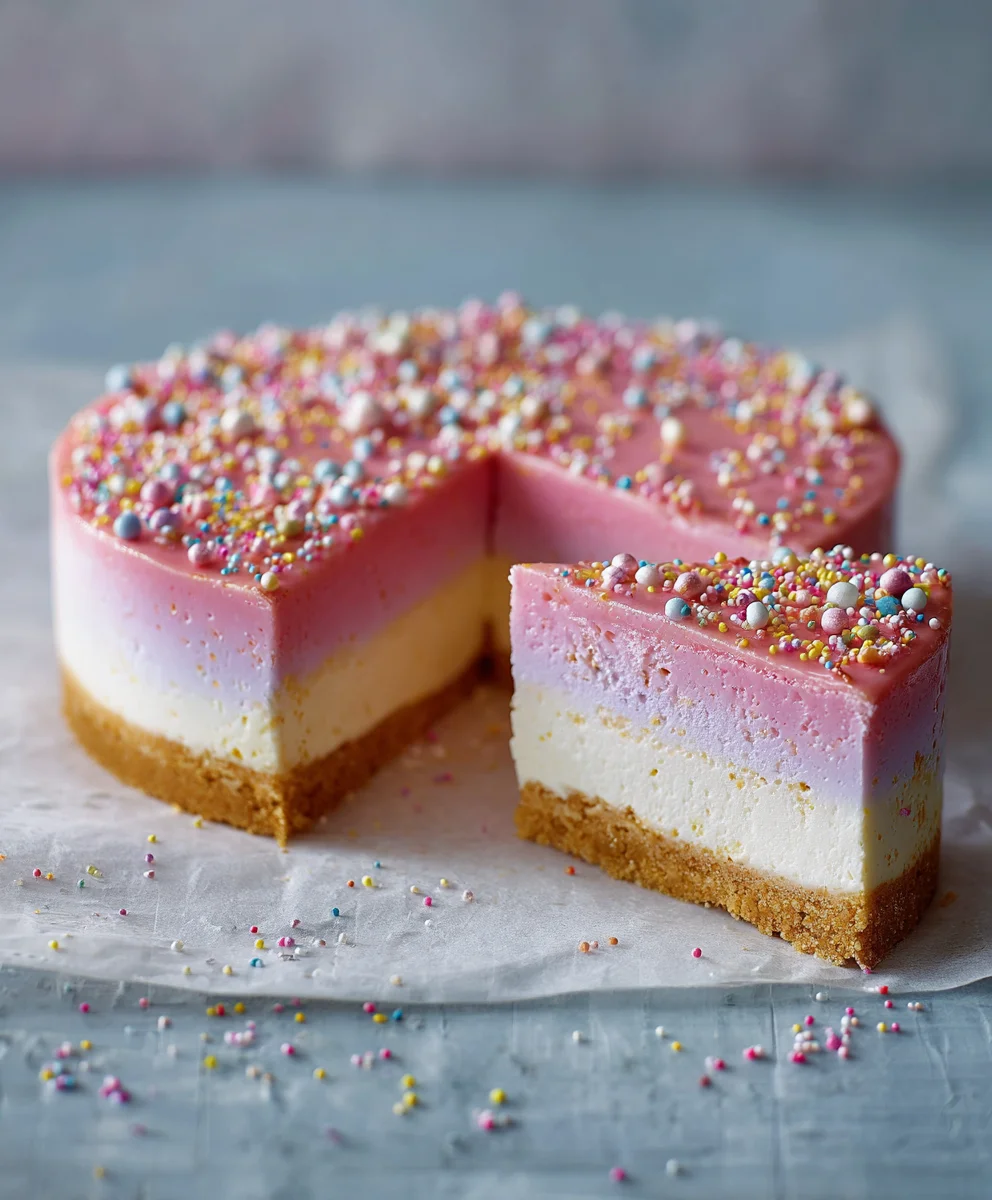
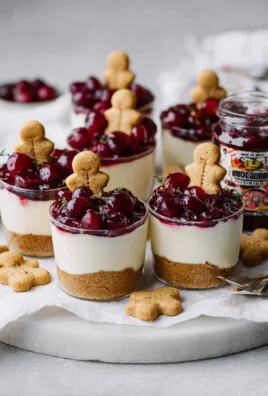
Bubblegum Cheesecake. Just reading those words likely sparks a flicker of curiosity, perhaps a nostalgic smile, or even a raised eyebrow! I know for me, the idea of infusing that playful, sweet, and undeniably unique bubblegum flavor into the rich, creamy decadence of a classic cheesecake was an irresistible challenge. This isn’t just a dessert; it’s an experience, a delightful journey back to carefree childhood days, reimagined for the sophisticated palate. People adore this creation not only for its vibrant color and intriguing taste but for the sheer unexpected joy it brings to any table.
While traditional culinary history books might not feature the exact origins of bubblegum-flavored desserts, the essence of bubblegum itself is deeply rooted in our collective memory of fun, youth, and vibrant simplicity. This particular Bubblegum Cheesecake recipe seeks to capture that whimsical spirit, marrying it with the luxurious texture and satisfying richness that only a well-made cheesecake can deliver. It’s a modern classic in the making, celebrated for its smooth, velvety consistency that melts in your mouth, followed by that unmistakable, sweet, and slightly fruity note of bubblegum that lingers pleasantly. It’s truly a conversation starter, guaranteeing smiles and second helpings when you present this unique Bubblegum Cheesecake.
Ingredients:
Crust Ingredients:
- 2 cups (about 200g) vanilla wafer cookies, finely crushed (I love using Nilla Wafers for this as they provide a classic, comforting base for our fun and unique Bubblegum Cheesecake!)
- 1/2 cup (113g) unsalted butter, melted
- 2 tablespoons granulated sugar
- 1/4 teaspoon salt
Cheesecake Filling Ingredients:
- 4 (8-ounce) packages (904g total) full-fat cream cheese, softened to room temperature (this is absolutely crucial for a silky-smooth, lump-free cheesecake filling! Do not skip this step!)
- 1 1/2 cups (300g) granulated sugar
- 1/4 cup (30g) all-purpose flour
- 1 teaspoon pure vanilla extract
- 1/2 teaspoon bubblegum flavoring extract (adjust to your preference; start with 1/2 tsp and taste test if you dare before adding the eggs!)
- A few drops of pink or red gel food coloring (gel preferred, as it delivers a vibrant hue without adding excess liquid to our delicate batter)
- 4 large eggs, room temperature (just like the cream cheese, room temperature eggs emulsify better and lead to a superior texture)
- 1/2 cup (120ml) full-fat sour cream, room temperature (this adds a beautiful tang and extra creaminess that truly elevates the cheesecake)
Bubblegum Drizzle & Garnish Ingredients:
- 1 cup (200g) granulated sugar
- 1/2 cup (120ml) water
- 1/4 teaspoon bubblegum flavoring extract (or to taste; we want a lovely burst of bubblegum!)
- A drop or two of pink or red gel food coloring (to match our cheesecake and make it visually appealing)
- 1/2 cup (120ml) heavy cream
- Assorted bubblegum candies (like mini gumballs, bubblegum-flavored taffy cut into fun shapes, or even crushed bubblegum-flavored hard candies), for decoration
- Optional: Freshly whipped cream for serving (because who doesn’t love more creaminess?)
Crust Preparation:
- Let’s get our kitchen ready! First, preheat your oven to 325°F (160°C). While the oven heats up, prepare your 9-inch springform pan. I always start by wrapping the bottom and sides of the pan with a double layer of heavy-duty aluminum foil. This isn’t just for fun; it’s a vital step to protect our delicate Bubblegum Cheesecake from any water seeping in during the water bath. A good seal means a perfectly baked cheesecake!
- Now, onto the delicious crust. In a medium bowl, combine your finely crushed vanilla wafer cookies, granulated sugar, and salt. I highly recommend using a food processor to get those wafers super fine – it makes a world of difference for a uniform, sturdy crust. You want the texture to be like fine, sandy crumbs.
- Pour the melted unsalted butter over the crumb mixture. Using a fork or your clean hands, mix everything thoroughly until the crumbs are evenly moistened. They should resemble wet sand and hold their shape if you press a small amount between your fingers.
- Firmly press this mixture into the bottom of your prepared springform pan. I find that using the flat bottom of a glass or a measuring cup helps create an incredibly even and tightly packed crust. This firm base is essential to prevent your Bubblegum Cheesecake from falling apart when sliced.
- Bake the crust for 10-12 minutes, or until it’s lightly golden around the edges and you can smell its inviting, toasty aroma. This brief bake sets the crust beautifully and enhances its flavor. Once baked, remove it from the oven and place it on a wire rack to cool slightly while we move on to the star of the show – the incredible bubblegum filling!
Cheesecake Filling Preparation:
- Alright, this is where our Bubblegum Cheesecake truly begins to take shape! In a very large bowl, using an electric mixer (a stand mixer with the paddle attachment is ideal, but a hand mixer works too), beat the softened full-fat cream cheese on medium speed. Beat it for a good 3-4 minutes, scraping down the sides of the bowl frequently, until it is unbelievably smooth, creamy, and completely free of lumps. I cannot stress enough the importance of room temperature cream cheese here! If it’s even a little cold, your cheesecake will be lumpy, and we want nothing less than perfection.
- Gradually add the granulated sugar to the cream cheese mixture, beating on medium-low speed until it’s just combined and smooth. Be mindful not to overmix at this stage. We want to incorporate the sugar, but not introduce too much air, which can cause cracks during baking.
- Next, gently sprinkle in the all-purpose flour. Mix on the lowest speed until it’s just incorporated. The flour acts as a subtle stabilizer, helping to prevent cracks and ensuring a beautifully smooth texture in your finished Bubblegum Cheesecake.
- Now for the fun part: stir in the pure vanilla extract and, most importantly, the bubblegum flavoring extract. I recommend starting with 1/2 teaspoon of the bubblegum flavoring. Extracts can be quite potent, so you can always add a tiny bit more if you desire a stronger flavor after a quick taste test (before adding the eggs, of course!). This is the moment your kitchen will start to smell wonderfully nostalgic and playful!
- Add a few drops of pink or red gel food coloring. Gel food coloring is fantastic because it’s highly concentrated and won’t thin out your batter like liquid colors can. Add a drop or two, mix well, and then assess the color. You’re aiming for that delightful, vibrant bubblegum pink that screams fun and festivity. It’s all about creating that whimsical visual appeal for our unique Bubblegum Cheesecake.
- Add the eggs, one at a time, mixing on very low speed after each addition until just combined. This is another critical point: do not overmix the eggs! Overmixing incorporates too much air, which expands during baking and then collapses, often leading to unsightly cracks on the surface of your cheesecake. Mix just enough to bring the egg into the batter, gently scraping down the bowl after each addition to ensure everything is evenly incorporated.
- Finally, gently fold in the room temperature full-fat sour cream. The sour cream contributes an amazing richness, a slight tang, and an extra layer of creaminess that enhances the luxurious texture of your Bubblegum Cheesecake. Mix until just combined and the batter is smooth and uniformly colored.
- Carefully pour the vibrant, bubblegum-pink cheesecake batter over the cooled crust in your springform pan. Gently tap the pan on your counter a few times. This simple step helps to release any large air bubbles trapped in the batter, which contributes to a smoother, more even top once baked.
Baking the Cheesecake:
- It’s time for the water bath, a cheesecake’s best friend! Place your foil-wrapped springform pan inside a larger roasting pan. Carefully pour hot water into the roasting pan, ensuring the water level comes about halfway up the sides of the springform pan. Be extra cautious not to splash any water into your precious cheesecake batter! The water bath creates a humid environment in the oven, which is paramount for baking the cheesecake evenly and preventing it from drying out and cracking, resulting in that signature silky smooth texture.
- Carefully transfer the roasting pan with the cheesecake to your preheated 325°F (160°C) oven.
- Bake for 60-75 minutes, or until the edges of the cheesecake are set, but the center (about a 2-3 inch circle) still jiggles slightly when you gently shake the pan. Please, for the love of perfect cheesecake, do not overbake! Overbaking is a very common culprit for cracks. The cheesecake will continue to set beautifully as it cools.
- Once baked to perfection, turn off the oven but leave the cheesecake inside with the oven door propped open slightly (I use a wooden spoon to keep it ajar) for one hour. This gradual cooling process prevents sudden temperature changes, which can also contribute to cracks and ensures a creamy, tender interior for your Bubblegum Cheesecake.
- After its hour of gentle cooling in the oven, carefully remove the cheesecake from the water bath and the roasting pan. Place it on a wire rack to cool completely to room temperature. This can take several hours, so be patient!
Chilling the Bubblegum Cheesecake:
- Once the cheesecake has fully reached room temperature, gently cover it loosely with plastic wrap. Try to avoid letting the plastic wrap touch the surface of the cheesecake directly to prevent any condensation marks from forming.
- Refrigerate your magnificent Bubblegum Cheesecake for at least 6-8 hours, but honestly, preferably overnight. This extended chilling time is absolutely non-negotiable for achieving the perfect texture, flavor development, and for making it perfectly sliceable. Patience truly is a virtue when crafting such a delightful dessert!
Bubblegum Drizzle & Garnish Preparation:
- With your cheesecake thoroughly chilled and setting beautifully, it’s time to prepare the dazzling bubblegum drizzle that will crown our incredible dessert. In a small saucepan, combine the granulated sugar and water. Heat this mixture over medium heat, stirring constantly, until the sugar completely dissolves and the mixture comes to a gentle simmer. Allow it to simmer for just about 2-3 minutes without stirring; this creates a lovely simple syrup base.
- Remove the syrup from the heat. Allow it to cool for a few minutes until it’s warm but no longer piping hot. While it’s cooling, stir in the bubblegum flavoring extract (adjust to your desired intensity) and a drop or two of pink or red gel food coloring to achieve that vibrant bubblegum shade we love.
- In a separate small bowl, using a clean whisk or electric mixer, whip the heavy cream until soft peaks form. This will create a beautiful, light, and airy texture that will be folded into our cooled syrup.
- It is crucial to allow the bubblegum syrup to cool completely to room temperature. If it’s still warm, it will melt the whipped cream when you combine them. Once fully cooled, gently fold the whipped heavy cream into the bubblegum syrup. This will create a light, creamy, and wonderfully flavored drizzle that is simply perfect for topping your Bubblegum Cheesecake. If you find the drizzle is a bit too thick, you can whisk in a tiny bit more heavy cream; if it’s too thin, a very small amount of powdered sugar could help thicken it, though typically this ratio works well.
Assembling and Serving Your Bubblegum Cheesecake:
- The moment has arrived! With your Bubblegum Cheesecake perfectly chilled and the bubblegum drizzle ready, it’s time for the grand reveal. Carefully run a thin, sharp knife around the inner edge of the cheesecake before unlatching and gently removing the springform pan ring. This helps to release it cleanly and ensures no sticking, preserving that beautiful smooth side.
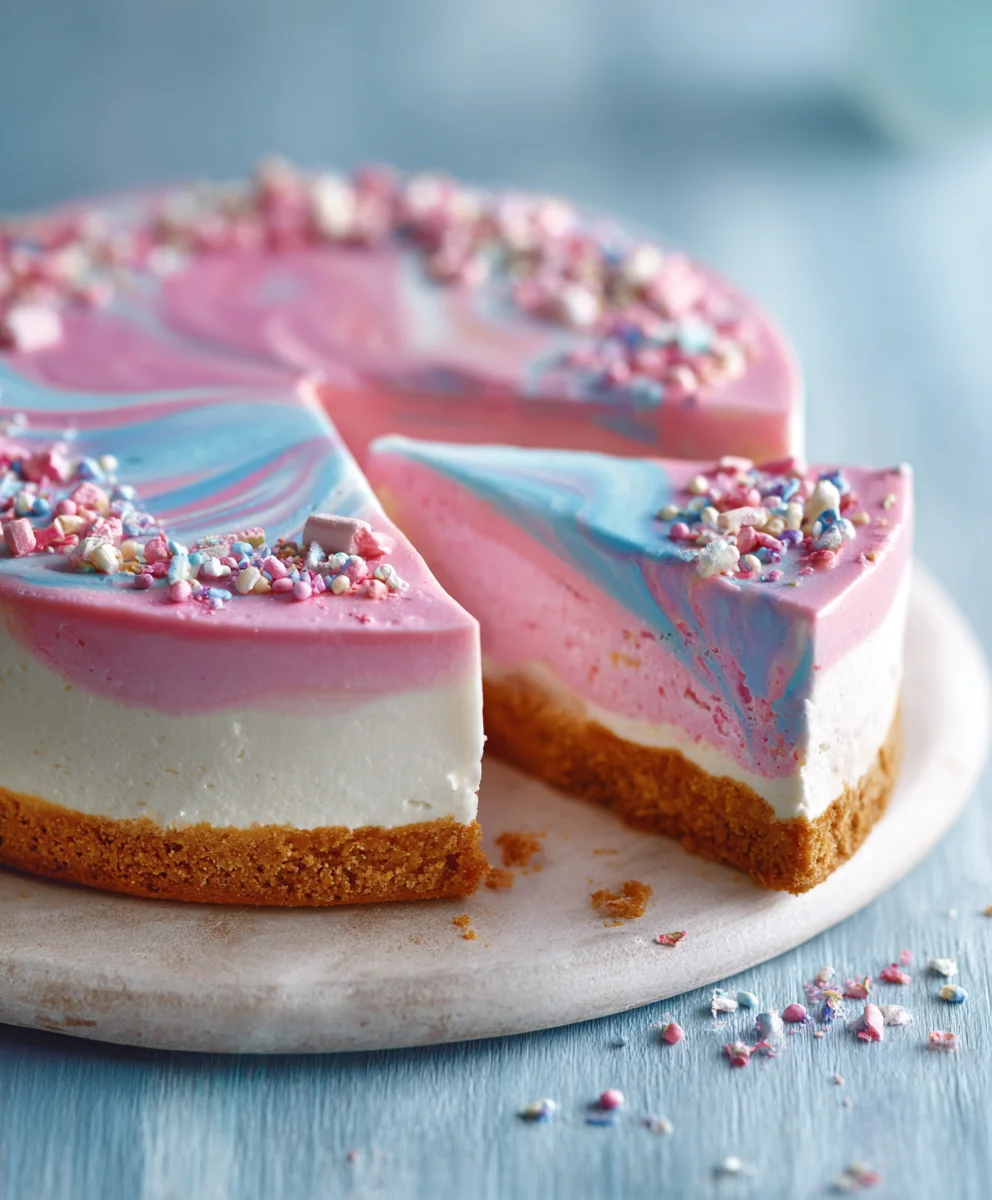
- Now, artistically pour or spoon the prepared bubblegum drizzle evenly over the top of the chilled cheesecake. Don’t be afraid to let some of it cascade gracefully down the sides for an extra touch of visual flair. This drizzle not only adds another layer of delightful bubblegum flavor but also enhances that signature pink hue, making it irresistible.
- Arrange your assorted bubblegum candies on top of the drizzle. This is your chance to get creative and make your cheesecake a true showstopper! Mini gumballs, fun shapes cut from bubblegum-flavored taffy, or even some crushed bubblegum-flavored candy pieces will make this dessert visually stunning and undeniably fun.
- To achieve the neatest slices, use a sharp, thin knife. For each slice, wipe the knife clean with a warm, damp cloth between cuts. This ensures every slice of your exquisite Bubblegum Cheesecake looks as perfect as it tastes.
- Serve your magnificent Bubblegum Cheesecake immediately! For an extra touch of indulgence, consider adding an optional dollop of fresh whipped cream alongside each slice. Each bite of this unique dessert promises a delightful burst of nostalgic bubblegum flavor perfectly complemented by the wonderfully creamy cheesecake texture. It’s truly a dessert that’s guaranteed to bring smiles, spark conversations, and create lasting memories.
- Revel in the compliments as you present this truly one-of-a-kind and delightful dessert. It’s absolutely perfect for birthday parties, festive celebrations, or simply as a fun, whimsical treat to brighten any day of the week. The harmonious combination of classic cheesecake richness with that playful, unmistakable bubblegum essence is simply irresistible. This isn’t just a dessert; it’s a delightful, flavorful experience!
Conclusion:
I truly believe that if there’s one recipe you decide to tackle this year, it simply has to be this one. The sheer delight and surprise that radiates from every slice of this creation are unparalleled. It’s more than just a dessert; it’s an experience, a conversation starter, and a vibrant burst of pure joy. I’ve poured my heart into perfecting this recipe, ensuring that each step guides you toward a result that is not only visually stunning but also incredibly delicious. This isn’t just another cheesecake; it’s a journey back to childhood, reimagined with a sophisticated twist that will impress even the most discerning palates. The creamy texture, the playful sweetness, and the unexpected pop of flavor truly elevate it beyond the ordinary. It’s a bold statement piece for any gathering, guaranteed to elicit gasps of awe and requests for the recipe.
What makes this specific dessert an absolute non-negotiable must-try, in my humble opinion, is its audacious blend of nostalgic charm and gourmet execution. We’re talking about a dessert that defies expectations, turning a beloved childhood flavor into something truly elegant and incredibly satisfying. Every bite offers that familiar, comforting sweetness, perfectly balanced by the rich, tangy creaminess of a classic cheesecake. It’s a symphony of textures and tastes that dance on your tongue, leaving a lasting impression. You’re not just making a dessert; you’re crafting a memory, a vibrant centerpiece that embodies fun and culinary adventure. The unique flavor profile ensures that it stands out from any other dessert you’ve ever served or tasted, making it an unforgettable addition to your recipe repertoire.
Serving Suggestions & Creative Variations:
When it comes to serving, this magnificent creation truly shines on its own, but a few thoughtful additions can elevate the experience even further. I love presenting individual slices with a small dollop of homemade whipped cream, perhaps infused with a hint of vanilla or almond extract, adding an extra layer of velvety texture. A scattering of rainbow sprinkles or a few additional mini candies over the whipped cream can enhance its playful aesthetic. For a sophisticated touch, consider pairing it with a light, sparkling rosé or a glass of chilled milk for the younger audience (or the young at heart!). It’s also absolutely divine with a scoop of premium vanilla bean ice cream on the side, creating a delightful hot-and-cold contrast that is simply irresistible. This dessert is perfect for birthday parties, celebratory events, or simply as a special treat to brighten an ordinary weeknight. Its vibrant appearance makes it an instant focal point on any dessert table.
But don’t stop there; feel free to get creative and make this recipe truly your own! While the original is perfect, here are a few ideas to spark your imagination:
- For the crust, you could experiment with other crushed cookies like vanilla wafers or even a mix of different colorful cereals for an extra layer of whimsical flavor and texture.
- Consider folding in some mini marshmallows or white chocolate chips into the cheesecake batter just before baking for an added textural surprise.
- As for toppings, beyond the classic candies, you could drizzle a homemade raspberry coulis for a tart counterpoint, or even a white chocolate ganache to enhance the creaminess.
- For a seasonal twist, imagine a festive version with red and green candies for the holidays, or pastel hues for spring.
- You could even try making individual mini cheesecakes in cupcake liners for bite-sized delights, perfect for sharing at a potluck or party.
The possibilities are truly endless, and each variation allows you to infuse your personality into this already incredible dessert.
So, my dear fellow bakers and dessert enthusiasts, I implore you: don’t just read about this incredible Bubblegum Cheesecake, make it! Embrace the fun, the vibrant colors, and the delightful flavors that await you. There’s a unique satisfaction that comes from creating something so extraordinary with your own hands, and I promise you, the smiles and exclamations of joy from your family and friends will be worth every moment spent in the kitchen. It’s a project that is as rewarding to make as it is to eat, a true testament to the magic of baking.
Once you’ve embarked on this delicious adventure, I would absolutely love to hear about your experience! Did you stick to the original recipe, or did you venture into some creative variations? What was the reaction of your taste-testers? Please share your stories, your photos, and any tips or tricks you discovered along the way. Your insights are invaluable, and they help build a wonderful community of passionate home bakers. Don’t hesitate to share your triumphs – and even your comical kitchen mishaps – because that’s all part of the baking journey. Together, let’s spread the joy of this spectacular dessert far and wide. I can’t wait to see your amazing creations!
Bubblegum Cheesecake
A playful and sweet dessert, this Bubblegum Cheesecake is a delightful journey back to carefree childhood days, reimagined for the sophisticated palate. People adore this creation not only for its vibrant color and intriguing taste but for the sheer unexpected joy it brings to any table. It’s truly a conversation starter, guaranteeing smiles and second helpings with its smooth, velvety consistency and unmistakable bubblegum flavor.
Ingredients
-
2 cups fresh graham cracker crumbs
-
1/2 cup unsalted butter, melted
-
2 tablespoons granulated sugar (for crust)
-
1/4 teaspoon salt
-
4 (8-ounce) packages full-fat cream cheese, softened
-
1/3 cup granulated sugar (for filling)
-
1 cup powdered sugar (for filling)
-
1/4 cup all-purpose flour
-
1 teaspoon pure vanilla extract
-
1/2 teaspoon bubblegum flavoring extract (for filling)
-
A few drops of pink or red gel food coloring (for filling)
-
4 large eggs, room temperature
-
1/2 cup full-fat sour cream, room temperature
-
1/3 cup heavy cream (for filling)
-
4 cups powdered sugar (for drizzle)
-
2 tablespoons heavy cream (for drizzle)
-
1/4 teaspoon bubblegum flavoring extract (for drizzle)
-
A drop or two of pink or red gel food coloring (for drizzle)
-
1 cup colorful gumballs, for decoration
-
Optional: Freshly whipped cream for serving
Instructions
-
Step 1
Preheat oven to 325°F (160°C). Wrap a 9-inch springform pan with a double layer of foil. In a medium bowl, combine graham cracker crumbs, 2 tablespoons granulated sugar, and salt. Mix in melted butter until evenly moistened. Press firmly into the bottom of the prepared pan. Bake for 10-12 minutes until lightly golden. Cool on a wire rack. -
Step 2
In a large bowl, beat softened cream cheese on medium speed for 3-4 minutes until smooth and lump-free. Gradually add 1/3 cup granulated sugar and 1 cup powdered sugar, then sprinkle in flour, mixing on low speed until just combined. Stir in vanilla extract, 1/2 teaspoon bubblegum flavoring extract, and a few drops of pink/red gel food coloring until a vibrant pink is achieved. Add eggs one at a time, mixing on very low speed until just combined after each. Gently fold in room temperature sour cream and 1/3 cup heavy cream until smooth. Pour batter over the cooled crust and gently tap pan to release air bubbles. -
Step 3
Place foil-wrapped springform pan into a larger roasting pan. Pour hot water into the roasting pan, coming halfway up the sides of the springform pan. Carefully transfer to the preheated oven. Bake for 60-75 minutes, or until edges are set but the center still jiggles slightly. Turn off oven, prop door open slightly, and let the cheesecake cool in the oven for 1 hour. Remove from water bath and roasting pan, then cool completely to room temperature on a wire rack (several hours). -
Step 4
Once completely cool, cover the cheesecake loosely with plastic wrap. Refrigerate for at least 6-8 hours, or preferably overnight, to achieve the perfect texture and allow flavors to develop fully. -
Step 5
In a small bowl, whisk together 4 cups powdered sugar and 2 tablespoons heavy cream until smooth. Stir in 1/4 teaspoon bubblegum flavoring extract and a drop or two of pink/red gel food coloring until desired color and flavor are reached. Adjust consistency with more cream or powdered sugar if needed. -
Step 6
Carefully run a thin, sharp knife around the inner edge of the chilled cheesecake before unlatching and removing the springform pan ring. Artistically pour the prepared bubblegum drizzle evenly over the top. Arrange 1 cup colorful gumballs and other assorted bubblegum candies for decoration. For neat slices, use a sharp knife wiped clean with a warm, damp cloth between each cut. Serve immediately, with an optional dollop of fresh whipped cream.
Important Information
Nutrition Facts (Per Serving)
It is important to consider this information as approximate and not to use it as definitive health advice.
Allergy Information
Please check ingredients for potential allergens and consult a health professional if in doubt.
Leave a Comment