
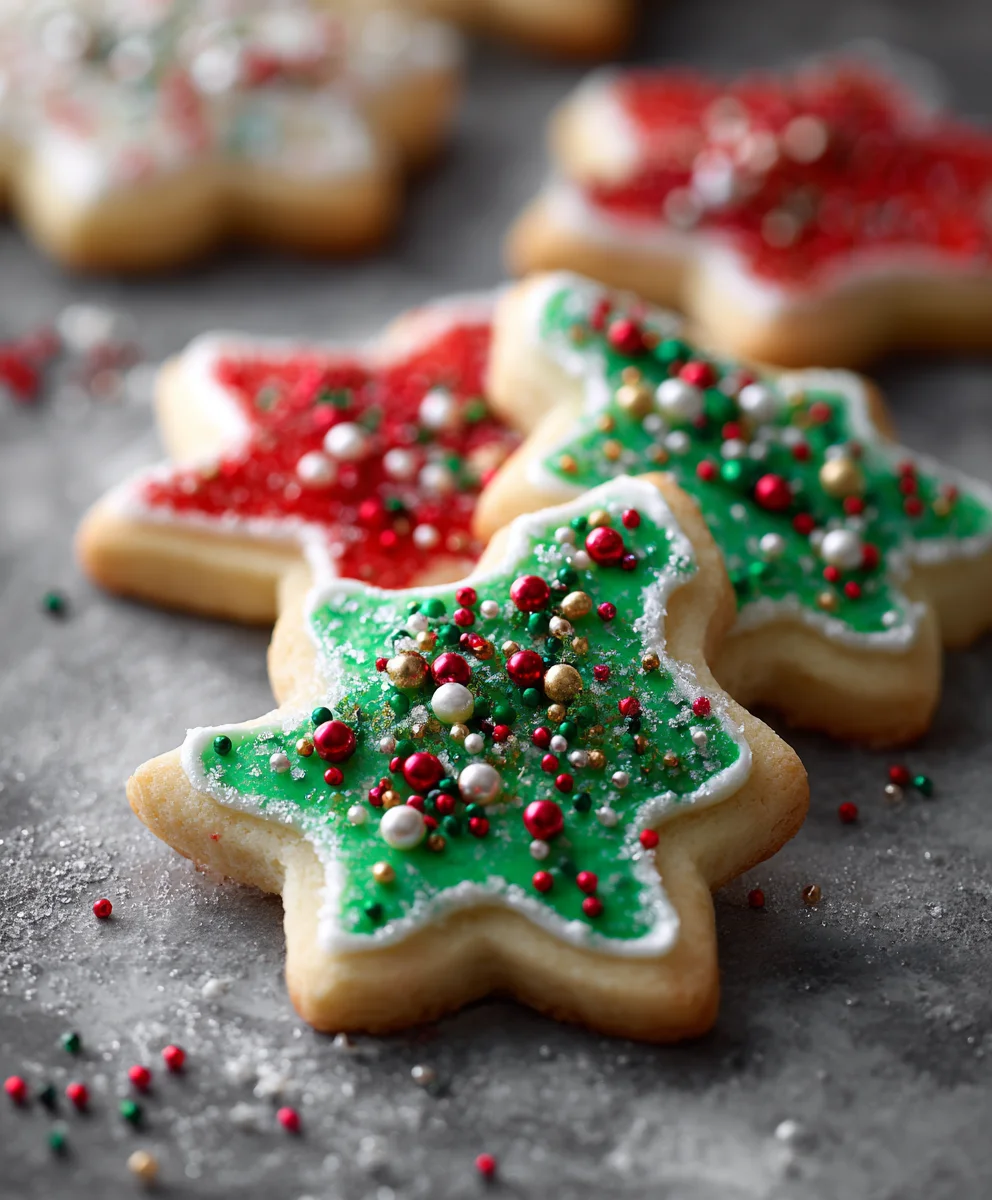
Christmas Goodies Rolled Sugar Cookies are more than just a sweet treat; they are edible symbols of holiday cheer, warmth, and cherished memories. As the festive season approaches, I find myself drawn to the comforting rituals that define this magical time, and baking these classic cookies is at the very top of my list.
The Irresistible Allure of Holiday Baking
Is there anything more evocative of the festive season than the sweet scent of vanilla and butter wafting from a freshly baked batch of sugar cookies? For generations, these delightful treats have graced holiday tables, acted as canvases for creative cookie decorating, and been lovingly exchanged as gifts. They represent a timeless tradition, bringing families together in the kitchen to roll, cut, and adorn each unique shape. I find immense joy in crafting these simple yet utterly satisfying cookies, knowing that each one carries a piece of holiday magic.
Their irresistible appeal lies in their perfect balance of a tender, melt-in-your-mouth texture, a delicate sweetness that isn’t overpowering, and the satisfying crispness around the edges. They are the quintessential canvas for all your holiday decorating dreams, from vibrant royal icing designs to simple sprinkles, making them incredibly versatile. Every bite of these Christmas Goodies Rolled Sugar Cookies transports you straight to the heart of the festive spirit, making them an undisputed highlight of any holiday celebration and a perfect way to share homemade joy.

Ingredients:
- 3 cups (360g) all-purpose flour: I always make sure to use a good quality, unbleached all-purpose flour for the best texture in my Christmas Goodies Rolled Sugar Cookies.
- 1 teaspoon baking powder: This little secret ingredient helps them rise just slightly, giving them a delightful tenderness without making them cakey.
- 1/2 teaspoon salt: A pinch of salt is crucial for balancing the sweetness and enhancing all the other flavors. Don’t skip it!
- 1 cup (226g) unsalted butter, softened: It’s absolutely vital that your butter is properly softened to room temperature. This makes it cream together beautifully with the sugar, creating a light and airy base for our dough. I usually leave mine out on the counter for at least an hour before I start.
- 1 cup (200g) granulated sugar: This provides the perfect level of sweetness and contributes to that classic sugar cookie texture.
- 1 large egg: A single large egg helps bind everything together and adds richness to the dough.
- 2 teaspoons pure vanilla extract: I believe good quality vanilla extract is non-negotiable for these cookies. It provides that comforting, traditional flavor that we all associate with holiday baking.
- 1/2 teaspoon almond extract (optional, but highly recommended): For a little extra something special, I love adding a touch of almond extract. It really elevates the flavor profile and gives these Christmas Goodies Rolled Sugar Cookies a bakery-quality taste.
For the Royal Icing (Optional, but perfect for decorating your Christmas Goodies Rolled Sugar Cookies):
- 4 cups (480g) powdered sugar (confectioners’ sugar): Sifted powdered sugar is the base for our smooth, pipeable icing.
- 3 tablespoons meringue powder: This is the magic ingredient that makes royal icing set hard and shiny, allowing for beautiful, detailed decorations. It also helps stabilize the icing.
- 5-7 tablespoons warm water: We’ll add this gradually to achieve the perfect consistency for outlining and flooding.
- Food coloring gels: A variety of festive gel food colorings will allow us to create vibrant and beautiful designs on our Christmas Goodies Rolled Sugar Cookies.
- Sprinkles, edible glitter, etc. (for decoration): Let your creativity shine with these fun additions!
Preparing the Dough for Your Christmas Goodies Rolled Sugar Cookies
- Whisk Dry Ingredients: In a medium-sized bowl, I always start by whisking together my all-purpose flour, baking powder, and salt. It’s important to make sure these dry ingredients are thoroughly combined so that the leavening and seasoning are evenly distributed throughout the cookie dough. This prevents any surprises in the texture or flavor of your finished Christmas Goodies Rolled Sugar Cookies. I usually grab a wire whisk and give it a good minute or two of vigorous mixing. Set this aside for just a moment.
- Cream Butter and Sugar: Now, in a large mixing bowl, using an electric mixer (either a stand mixer with a paddle attachment or a hand mixer), I cream together the softened unsalted butter and granulated sugar. I begin on low speed to incorporate them without a powdery cloud, then increase to medium-high speed. You’re looking for this mixture to become light and fluffy, almost pale in color. This process usually takes me about 3 to 5 minutes. This step is absolutely crucial for creating tender, melt-in-your-mouth Christmas Goodies Rolled Sugar Cookies, so don’t rush it! The air whipped into the butter and sugar contributes significantly to the cookie’s final texture.
- Add Wet Ingredients: Once the butter and sugar mixture is light and fluffy, I crack in the large egg, ensuring it’s at room temperature for better emulsion, and then pour in the pure vanilla extract and the optional but highly recommended almond extract. I mix these on medium speed until they are just combined, scraping down the sides of the bowl with a rubber spatula as needed. Overmixing at this stage can incorporate too much air, which might lead to the cookies spreading more than desired, so I stop as soon as everything is incorporated.
- Combine Wet and Dry: With the mixer on low speed, I gradually add the reserved dry ingredient mixture to the wet ingredients. I add about a third of the flour mixture at a time, allowing it to just barely combine before adding the next third. The key here is to mix until the flour is just incorporated and no dry streaks remain. It’s paramount not to overmix the dough at this stage. Overmixing develops the gluten in the flour, which can result in tough, chewy cookies instead of the delicate, tender Christmas Goodies Rolled Sugar Cookies we’re aiming for. As soon as the flour disappears, I stop the mixer. I might give it one final quick stir with my rubber spatula to catch any bits at the bottom.
- Prepare for Chilling: Gently gather the dough out of the bowl and divide it into two equal portions. On a lightly floured surface or a piece of plastic wrap, I gently form each portion into a flattened disc, about an inch thick. This shape makes it much easier to roll out later. I then wrap each disc tightly in plastic wrap, making sure there are no air gaps.
Chilling the Dough for Perfect Rolled Sugar Cookies
- Refrigerate the Dough: Place the wrapped dough discs into the refrigerator. They need to chill for at least 2 hours. However, for the very best results, I often chill mine for 4 hours or even overnight. This chilling step is absolutely non-negotiable for successful Christmas Goodies Rolled Sugar Cookies!
- Understanding the Importance of Chilling: You might be wondering why chilling is so important. Firstly, it allows the butter to firm up again. When the butter is cold, it melts slower in the oven, which helps the cookies hold their shape beautifully and prevents them from spreading excessively. If your dough isn’t properly chilled, your carefully cut shapes will likely lose definition and melt into amorphous blobs. Secondly, chilling gives the flour time to fully hydrate, which leads to a more tender and flavorful cookie. It also makes the dough much less sticky and significantly easier to work with when it comes time to roll and cut your festive shapes. Trust me, patience here pays off immensely in the final presentation of your Christmas Goodies Rolled Sugar Cookies.
Rolling and Cutting Your Christmas Goodies Rolled Sugar Cookies
- Preheat Oven and Prepare Baking Sheets: About 15-20 minutes before you’re ready to bake, I set my oven to preheat to 375°F (190°C). While the oven is heating, I line several baking sheets with parchment paper or silicone baking mats. This ensures our Christmas Goodies Rolled Sugar Cookies won’t stick and helps them bake evenly. I like to have a few ready to go, especially if I’m doing a big batch!
- Prepare Your Work Surface: Take one disc of chilled dough out of the refrigerator. It will be quite firm. Lightly flour a clean, dry work surface and your rolling pin. I prefer to work on a large cutting board or my clean kitchen counter. It’s important to use just enough flour to prevent sticking, but not so much that it gets incorporated into the dough and makes your cookies tough or dry. A pastry brush can be handy to brush off excess flour from the surface of the dough before cutting.
- Roll the Dough: Place one dough disc on your floured surface. Using your floured rolling pin, begin to roll out the dough, starting from the center and rolling outwards in all directions. As you roll, occasionally lift and rotate the dough to prevent it from sticking and to ensure an even thickness. If the dough starts to crack around the edges, that’s normal; just gently push it back together. I aim for a consistent thickness of about 1/4 inch (about 6mm). Consistency in thickness is key here, as it ensures all your Christmas Goodies Rolled Sugar Cookies bake evenly. Thinner cookies will burn before thicker ones are cooked through.
- Cut Out Shapes: Now for the fun part! Dip your favorite Christmas cookie cutters into a little flour to prevent sticking, then press them firmly into the rolled-out dough. Try to cut shapes as close together as possible to minimize scraps. Once cut, gently lift the cookie cutters straight up.
- Transfer Cookies to Baking Sheets: Carefully transfer the cut-out dough shapes to your prepared baking sheets. I use a thin metal spatula to help lift them without distorting their shape. Leave about 1 inch of space between each cookie on the baking sheet to allow for a little bit of spreading.
- Re-roll Scraps: Gather the dough scraps, gently press them together into a ball (avoiding overworking the dough), and briefly re-chill them if they become too warm and sticky (about 10-15 minutes in the fridge should do the trick). Then, you can re-roll and cut out more Christmas Goodies Rolled Sugar Cookies until all the dough is used. I try to limit re-rolling to one or two times, as overworking the dough can lead to tougher cookies.
Baking the Christmas Goodies Rolled Sugar Cookies
- Bake the Cookies: Place the baking sheets with your cut-out Christmas Goodies Rolled Sugar Cookies into the preheated oven. Bake for 7 to 10 minutes, or until the edges are very lightly golden and the centers are just set. The exact baking time will depend on the thickness of your cookies and the nuances of your oven. I usually start checking around the 7-minute mark. You want them to be just set, not deeply browned, to maintain their tender texture and light color for decorating.
- Cool on Baking Sheet: Once baked, remove the baking sheets from the oven. Allow the Christmas Goodies Rolled Sugar Cookies to cool on the baking sheet for about 5 minutes. This brief cooling period allows them to firm up slightly before you move them, reducing the risk of breakage. They are still quite delicate when hot.
- Transfer to Wire Rack: After 5 minutes, carefully transfer the slightly cooled cookies from the baking sheet to a wire cooling rack to cool completely. It’s really important that they are completely cool before you even think about decorating them with royal icing. If they’re even a little warm, the icing will melt, smear, and generally make a mess, which would be a shame after all your hard work! This cooling process usually takes at least 30 minutes to an hour, depending on your kitchen’s temperature.
Decorating Your Christmas Goodies Rolled Sugar Cookies with Royal Icing
-
Making the Royal Icing:
- Combine Ingredients: In a large mixing bowl, combine the sifted powdered sugar and meringue powder. I like to use a stand mixer with the whisk attachment for this, but a hand mixer works well too. Gradually add 5 tablespoons of warm water.
- Beat to Stiff Peaks: Start mixing on low speed, then increase to high speed. Beat the mixture for 7 to 10 minutes, or until the icing is very thick, glossy, and holds stiff peaks. When you lift the whisk, the peak should hold its shape and not flop over. If the icing seems too thick to start, add the remaining water (one teaspoon at a time) until it comes together. Conversely, if it seems too thin, you can add a little more sifted powdered sugar. The consistency here is critical for good decorating results.
- Divide and Color: Divide the stiff royal icing into separate bowls, one for each color you plan to use. Add gel food coloring to each bowl, a tiny drop at a time, mixing well until you achieve your desired festive shades. Remember, gel colors are highly concentrated, so a little goes a long way!
-
Achieve Desired Consistencies: This is where the magic happens for outlines and flooding.
- Outline Consistency: For outlining and fine details, the icing should be thick enough to hold its shape when piped, but still flow smoothly. When you draw a line through it with a spoon, it should take about 10-15 seconds for the line to disappear. If it’s too thick, add a tiny bit of water (1/4 teaspoon at a time). If it’s too thin, add a tiny bit more sifted powdered sugar.
- Flood Consistency: For flooding (filling in the outlined areas), the icing needs to be thinner. Add water (1/4 teaspoon at a time) to your colored icing, stirring gently, until it has the consistency of pancake batter. When you draw a line through it, it should disappear within 5-7 seconds. This thinner consistency will spread smoothly to fill the cookie.
Keep all unused icing covered with a damp cloth or plastic wrap touching the surface to prevent it from drying out and crusting.
-
Decorating Your Christmas Goodies Rolled Sugar Cookies:
- Prepare Piping Bags: Spoon your different consistencies of colored royal icing into separate piping bags fitted with small round tips (like PME #1.5 or #2 for outlining, and #3 or #4 for flooding) or simply snip a tiny corner off the piping bag for outlining and a slightly larger corner for flooding.
- Outline the Cookies: Using the outline consistency icing, carefully pipe a border around the edge of each completely cooled Christmas Goodies Rolled Sugar Cookie. This creates a “dam” that will hold in the thinner flood icing. Let this outline dry for about 10-15 minutes to prevent bleeding.
- Flood the Cookies: Once the outlines are set, use the flood consistency icing to fill in the outlined areas. Pipe the icing just inside the border and use a scribe tool, toothpick, or small clean paintbrush to gently spread the icing to the edges and pop any air bubbles.
- Add Details and Dry: While the flood icing is still wet, you can add sprinkles, edible glitter, or create wet-on-wet designs (e.g., polka dots or swirls that merge with the base color). For additional piped details (like intricate patterns, words, or different colored accents), you’ll want to let the flood layer dry completely for at least 4-6 hours, or preferably overnight, before adding more layers. This prevents the colors from bleeding into each other.
- Final Drying: Once all decorations are complete, allow your beautiful Christmas Goodies Rolled Sugar Cookies to dry completely at room temperature for at least 12-24 hours. The royal icing should be hard to the touch and opaque. This ensures the icing won’t smudge when stacked or handled.
- Storage: Once fully dry, store your stunning Christmas Goodies Rolled Sugar Cookies in an airtight container at room temperature for up to 2 weeks. They make wonderful gifts and are a truly delightful addition to any holiday spread! Enjoy the festive magic you’ve created!
Conclusion:
And there you have it, my dear baking enthusiasts! We’ve journeyed through the steps of creating what I genuinely believe will become your new go-to recipe for the most delightful rolled sugar cookies. This isn’t just another cookie recipe; it’s an invitation to experience pure baking joy, a chance to fill your home with the intoxicating aroma of vanilla and butter, and an opportunity to create edible works of art that taste every bit as good as they look. I promise you, the soft, tender crumb, the subtle sweetness that isn’t overpowering, and the perfect canvas it provides for all your decorating whims make this recipe truly exceptional. It’s robust enough to hold its shape beautifully through countless re-rolls, yet delicate enough to melt in your mouth. You won’t find yourself struggling with dough that’s too sticky or too crumbly; this recipe strikes that ideal balance, making the entire process enjoyable from start to finish. This is the recipe you’ll return to, year after year, for every celebration.
What truly sets these cookies apart is their incredible versatility, making them an indispensable part of your baking repertoire. While our focus keyword,
“Christmas Goodies Rolled Sugar Cookies,”
perfectly captures their festive appeal, please don’t let that limit your imagination! This base recipe is truly a blank slate. Imagine vibrant spring flowers for Easter, spooky bats and ghosts for Halloween, or charming hearts for Valentine’s Day. The possibilities are genuinely endless. I’ve personally used this same dough to craft personalized cookies for birthdays, baby showers, and even unique wedding favors. They’re not just a treat; they’re a customizable messenger of joy, capable of conveying any sentiment you wish. The fact that they retain their shape so impeccably means your intricate designs will shine through, ensuring your efforts in decorating are always rewarded with stunning results. This reliability is what makes them such a cherished recipe in my own kitchen.
Creative Serving & Variation Ideas to Spark Your Imagination:
When it comes to serving these beauties, the classic pairing with a tall glass of cold milk is always a winner. But why stop there? Imagine them artfully arranged on a festive dessert platter alongside other holiday treats, or perhaps nestled in decorative tins to create thoughtful, homemade gifts that are always appreciated. For a cozy evening, they’re absolutely divine dipped into a warm mug of hot cocoa or enjoyed with a fragrant cup of tea or coffee. They also make a fantastic base for an interactive decorating station at parties, allowing guests of all ages to unleash their inner artist with bowls of colorful icing and sprinkles.
Now, let’s talk about variations – this is where you can truly make the recipe your own! While vanilla is a timeless classic, don’t hesitate to experiment with different extracts. A touch of almond extract adds a sophisticated, nutty undertone, while lemon or orange zest can provide a bright, citrusy zing that’s especially wonderful for spring or summer themes. A hint of peppermint extract makes them extra festive during the winter months, transforming them into a delightful treat that perfectly complements the holiday spirit. You could also infuse the dough with a pinch of ground cinnamon, nutmeg, or even a tiny amount of cardamom for a warm, spiced flavor profile that’s incredibly comforting.
Beyond flavor, consider your decorating choices. While royal icing allows for intricate, long-lasting designs, a simple buttercream frosting offers a softer, creamier texture that many adore. For a quick and easy finish, a basic glaze made with powdered sugar and milk, perhaps flavored with a few drops of extract, works wonders and still provides a beautiful sheen. Don’t forget the power of sprinkles, sanding sugars, and edible glitter to add that extra sparkle! You can also press them into colored sugar before baking for a shimmering, crackled effect, or even gently press some mini chocolate chips or finely chopped nuts into the dough before baking for added texture (though be mindful this might slightly alter their smooth rolling qualities). The possibilities are as limitless as your imagination!
So, I implore you, don’t just read about these wonderful cookies – roll up your sleeves and make them! This recipe isn’t just about baking; it’s about making memories, sharing joy, and creating delicious moments that will be cherished. I am so confident that you’ll fall in love with this recipe, just as I have. Once you’ve baked your batch of these incredible rolled sugar cookies, I would absolutely love to hear about your experience. Did you try a fun new variation? What were your favorite decorating ideas? Please share your stories, tips, and especially your photos in the comments section below! Let’s inspire each other with our creativity and spread the joy of these truly special cookies. Happy baking, my friends!
Christmas Goodies Rolled Sugar Cookies: Festive & Easy Recipe!
Festive and easy rolled sugar cookies, perfect for holiday decorating and sharing. These classic sweet treats are edible symbols of holiday cheer, bringing warmth and cherished memories to the festive season. They offer a perfect balance of tender texture, delicate sweetness, and crisp edges, making them an ideal canvas for all your holiday decorating dreams.
Ingredients
-
4 cups all-purpose flour
-
1 tsp. baking powder
-
1 teaspoon baking soda
-
1/2 tsp. salt
-
1 cup unsalted butter, softened
-
1 1/2 cups granulated sugar
-
2 eggs, beaten
-
1/3 cup milk
-
1 tsp. pure vanilla extract
-
For Royal Icing:
-
4 cups powdered sugar, sifted
-
3 tablespoons meringue powder
-
5-7 tablespoons warm water
-
Food coloring gels (optional)
-
Sprinkles, edible glitter (optional)
Instructions
-
Step 1
1. In a medium bowl, whisk together the flour, baking powder, baking soda, and salt. Set aside. \n2. In a large mixing bowl, cream softened butter and granulated sugar with an electric mixer until light and fluffy (3-5 minutes). \n3. Beat in the beaten eggs, milk, and vanilla extract until just combined, scraping down the bowl sides. \n4. Gradually add the dry ingredient mixture to the wet, mixing on low speed until just incorporated. Do not overmix. \n5. Divide dough into two flattened discs, wrap tightly in plastic, and chill in the refrigerator for at least 2 hours (preferably 4 hours or overnight). -
Step 2
1. Preheat oven to 375°F (190°C). Line baking sheets with parchment paper. \n2. On a lightly floured surface, roll one disc of chilled dough to a consistent 1/4 inch thickness. \n3. Dip cookie cutters in flour, then press firmly into the dough to cut shapes. \n4. Carefully transfer cut-out shapes to prepared baking sheets, leaving 1 inch between cookies. \n5. Gather dough scraps, gently press together, re-chill if sticky (10-15 mins), then re-roll and cut. Limit re-rolling to 1-2 times. -
Step 3
1. Bake cookies for 7 to 10 minutes, or until edges are very lightly golden and centers are set. \n2. Remove from oven and let cool on baking sheets for 5 minutes. \n3. Carefully transfer cookies to a wire rack to cool completely before decorating (at least 30-60 minutes). -
Step 4
1. In a large mixing bowl, combine sifted powdered sugar and meringue powder. Gradually add 5 tablespoons of warm water. \n2. Beat on high speed for 7 to 10 minutes until the icing is very thick, glossy, and holds stiff peaks. Add more water (1 tsp at a time) if too thick, or powdered sugar if too thin. \n3. Divide stiff royal icing into separate bowls for desired colors. Add gel food coloring gradually. \n4. Adjust consistency: for outlining/details, add water (1/4 tsp at a time) until a line drawn with a spoon disappears in 10-15 seconds. For flooding, thin with water until a line disappears in 5-7 seconds (pancake batter consistency). Keep unused icing covered to prevent drying. -
Step 5
1. Spoon colored icing into piping bags fitted with small round tips or with a snipped corner. \n2. Using outline consistency, pipe a border around the edge of each completely cooled cookie. Let the outline dry for 10-15 minutes. \n3. Fill in outlined areas with flood consistency icing. Use a scribe tool or toothpick to spread and pop air bubbles. \n4. Add sprinkles, edible glitter, or wet-on-wet designs while flood icing is still wet. For additional piped details, let the flood layer dry completely (4-6 hours or overnight) before adding more layers. \n5. Allow all decorated cookies to dry completely at room temperature for 12-24 hours until the royal icing is hard. \n6. Store fully dried cookies in an airtight container at room temperature for up to 2 weeks.
Important Information
Nutrition Facts (Per Serving)
It is important to consider this information as approximate and not to use it as definitive health advice.
Allergy Information
Please check ingredients for potential allergens and consult a health professional if in doubt.
Leave a Comment