
Caramel Apple Cheesecake Bars are not just a dessert; they are an experience, capturing the very essence of autumn in every delightful bite.
Imagine the crisp, cool air, the vibrant hues of changing leaves, and the comforting aroma of fall spices wafting through your kitchen.
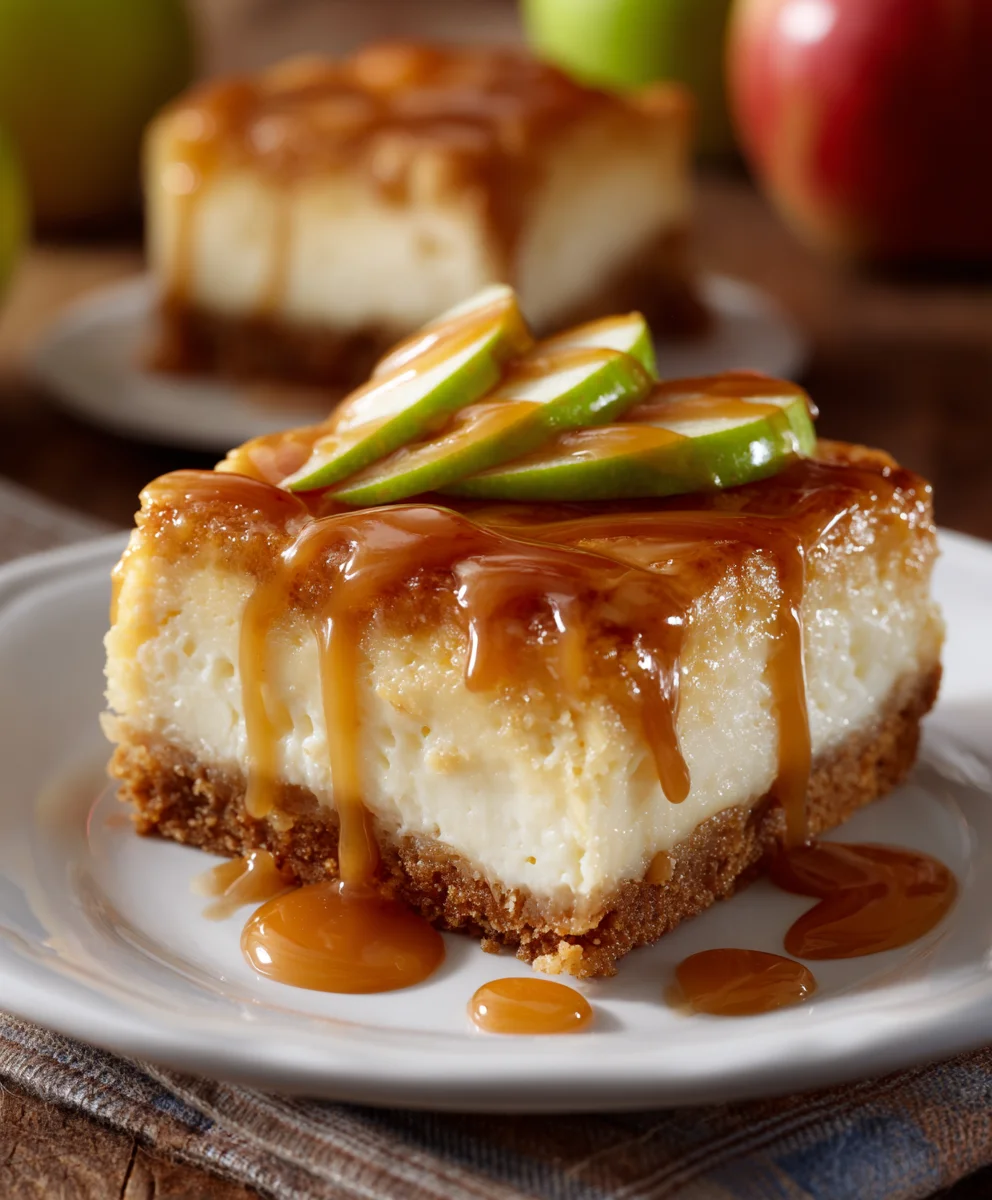
This particular recipe brings together the absolute best of seasonal flavors – the sweet, gooey embrace of caramel, the crisp tartness of fresh apples, and the rich, velvety texture of classic cheesecake, all nestled atop a delectable graham cracker crust. I truly believe that once you try these, you’ll understand why they’re quickly becoming a beloved staple for any fall gathering or a cozy evening treat.
The inspiration for these magnificent bars draws deeply from the nostalgic charm of classic autumn traditions. Think of childhood trips to apple orchards, the joy of biting into a sticky, caramel-coated apple at a festive fair, or the timeless appeal of a perfectly baked apple pie. We’ve taken those cherished memories and elevated them into an effortlessly elegant dessert. While traditional caramel apples have graced fall celebrations for decades, and cheesecake boasts an ancient lineage dating back to Greek antiquity, combining these two iconic elements into convenient, irresistible Caramel Apple Cheesecake Bars is a modern culinary triumph. People adore this dish not only for its incredible flavor profile – that perfect balance of sweet, tart, and creamy – but also for its beautiful presentation and ease of serving, making it a fantastic choice for potlucks, holidays, or simply a luxurious personal indulgence.
Ingredients:
-
2 cups graham cracker crumbs
-
½ cup unsalted butter, melted
-
¼ cup granulated sugar
-
¼ tsp cinnamon
-
16 oz cream cheese, softened
-
½ cup granulated sugar
-
2 large eggs
-
1 tsp vanilla extract
-
3 medium Granny Smith apples, peeled and diced
-
2 tbsp lemon juice
-
¼ cup brown sugar
-
1 tsp cinnamon
-
¼ tsp nutmeg
-
½ cup all-purpose flour
-
¼ cup brown sugar
Preparing the Graham Cracker Crust
Creating the perfect foundation for these Caramel Apple Cheesecake Bars is where we begin our delightful journey. A sturdy, flavorful crust is essential for holding all that creamy cheesecake and spiced apple goodness.
-
Preheat and Prepare Your Pan: First things first, I always get my oven ready. Preheat your oven to 350°F (175°C). Then, I like to line a 9×13 inch baking pan with parchment paper, leaving an overhang on the sides. This little trick makes lifting the bars out of the pan an absolute breeze later on, and it also aids in neat slicing. Trust me, you’ll thank yourself for this step! This parchment paper sling is truly a game-changer for baked goods like this, ensuring a seamless transfer from pan to cutting board.
-
Combine Dry Crust Ingredients: In a medium-sized mixing bowl, I carefully measure out my 2 cups of graham cracker crumbs. This forms the delightful, slightly crunchy foundation of our bars. To this, I add the first portion of granulated sugar (the ¼ cup specified for the crust) and the ¼ teaspoon of cinnamon. I give these dry ingredients a good whisk with a fork or a spoon until they are thoroughly combined. This ensures that every single crumb is infused with that wonderful, subtle spice, creating a more complex flavor profile for the crust beyond just graham crackers.
-
Incorporate Melted Butter: Now for the magic that holds it all together! I pour in the ½ cup of melted unsalted butter. I like to drizzle it in slowly while continuing to stir. You’ll want to mix this until all the graham cracker crumbs are evenly moistened. When you pinch a bit of the mixture between your fingers, it should hold together, almost like wet sand. This consistency is absolutely key for a firm, delicious crust that won’t fall apart. The butter not only binds but also adds richness and a delightful mouthfeel to the crust.
-
Press into Pan: Transfer the moistened graham cracker mixture into your prepared 9×13 inch baking pan. Using the bottom of a measuring cup or a flat-bottomed glass, I press the mixture firmly and evenly into the bottom of the pan. The goal here is a compact, uniform layer. Pay extra attention to the corners and edges, ensuring they are just as compacted as the center. A well-pressed crust won’t crumble apart when you slice into your bars, providing a perfect base for our layers.
-
Pre-Bake the Crust: Pop the pan into your preheated oven and bake for 8-10 minutes. This short bake time serves a crucial purpose: it helps to set the crust, making it sturdy and preventing it from becoming soggy once the creamy filling is added. While it’s baking, the kitchen will already start to fill with the warm, inviting aroma of cinnamon and butter – a true preview of the deliciousness to come! Once it’s done, carefully remove it from the oven and set it aside on a wire rack to cool slightly while we prepare the luscious cheesecake filling. This cooling period is important to prevent the hot crust from “cooking” the cheesecake batter as it’s poured on top.
Crafting the Velvety Cheesecake Filling
The heart of these bars is, of course, the creamy cheesecake layer. Achieving that signature smooth, rich texture is all about using the right techniques and ingredients at the right temperature.
-
Soften the Cream Cheese: For the silkiest cheesecake filling imaginable, it’s absolutely crucial that your 16 ounces of cream cheese is softened to room temperature. I usually take it out of the fridge at least an hour, sometimes even two, before I plan to start baking. This ensures that it whips up smoothly without any lumps, which can be quite stubborn to get rid of if the cream cheese is cold. Place the softened cream cheese into the bowl of a stand mixer fitted with the paddle attachment, or use a large mixing bowl with a hand mixer. Give it a quick beat on low speed to loosen it up initially.
-
Cream the Sugar: To the softened cream cheese, I add the second portion of granulated sugar (the ½ cup specifically for the cheesecake filling). I beat these two ingredients together on medium speed until the mixture is light, fluffy, and completely smooth. This step takes a few minutes, usually 2-3. Make sure to scrape down the sides of the bowl frequently with a spatula. This ensures all the cream cheese and sugar are thoroughly combined and no lumps are left behind. This process incorporates air and completely dissolves the sugar, which is fundamental for achieving that perfectly creamy, melt-in-your-mouth texture that we all love in a good cheesecake.
-
Incorporate Eggs and Vanilla: Next, I add the 2 large eggs. It’s important to add them one at a time, beating well after each addition, just until incorporated. I make sure to mix just until the yolk and white are blended in. It’s absolutely crucial not to overmix at this stage once the eggs are in; doing so can introduce too much air into the batter, which can cause the cheesecake to puff up too much during baking and then crack as it cools. Finally, I stir in the 1 teaspoon of vanilla extract. Oh, how I love the aroma of vanilla! It deepens the flavor of the cheesecake beautifully, adding a warm, inviting note that complements the other ingredients so well.
-
Pour Over Crust: Once your cheesecake filling is smooth, velvety, and ready, carefully pour it over the slightly cooled graham cracker crust in your baking pan. Gently spread the filling evenly across the crust using an offset spatula or the back of a spoon. Aim for a consistent layer to ensure even baking. After spreading, give the pan a gentle tap on the counter a few times to release any trapped air bubbles. This also helps to settle the batter. Set this aside while we prepare our wonderful apple topping, which will add a fantastic autumnal flair to our bars.
Preparing the Spiced Apple Layer and Flour-Sugar Topping
This section is where we truly bring in the “apple” part of our “Caramel Apple Cheesecake Bars.” We’re going to create a wonderfully spiced, slightly thickened apple layer that sits beautifully atop the cheesecake, offering a delightful textural and flavor contrast. This approach cleverly integrates all remaining listed ingredients to achieve a cohesive and delicious outcome.
-
Prepare the Apples: I start by peeling and dicing 3 medium Granny Smith apples. I aim for pieces that are roughly ½ inch in size. Consistency in size is important here for even cooking. Granny Smiths are my go-to choice for this recipe because their inherent tartness beautifully balances the richness and sweetness of the cheesecake and caramel, preventing the bars from becoming overly sweet. Moreover, they possess a firm texture that allows them to hold their shape well during baking, ensuring lovely apple chunks in every bite.
-
Toss with Lemon Juice: Place the diced apples in a medium bowl. I then drizzle in the 2 tablespoons of lemon juice. This isn’t just for flavor, although it does add a pleasant bright note; the lemon juice also serves a practical purpose by helping to prevent the apples from browning as they sit, keeping them looking fresh and appealing. Toss gently to ensure all apple pieces are lightly coated. This step is quick but important for both appearance and taste.
-
Season the Apples: Now comes the delicious spicing! To the lemon-coated apples, I add the first ¼ cup of brown sugar (this portion is specifically intended for the apples themselves), 1 teaspoon of cinnamon, and ¼ teaspoon of nutmeg. These spices are the heart of our apple flavor profile, bringing warmth, depth, and a classic autumnal taste that perfectly complements the tartness of the Granny Smiths. Toss everything together thoroughly until the apples are well coated with this sweet and spicy mixture. The brown sugar will begin to melt slightly and adhere to the apples, creating a lovely sheen.
-
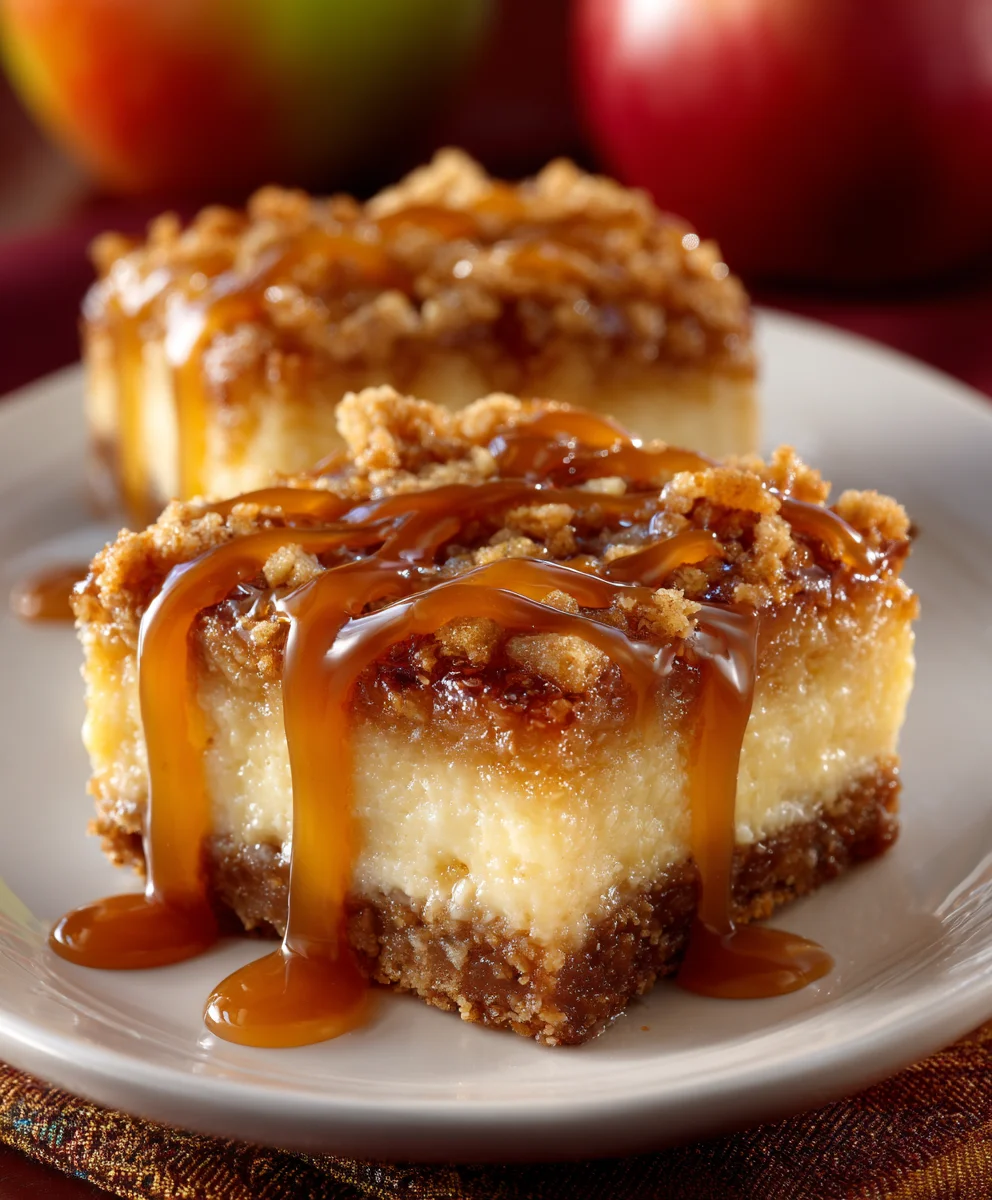
Integrate Flour and Second Brown Sugar for a Thickened Topping: This is a crucial step where we incorporate the remaining ingredients from our list in a way that truly enhances the apple layer, contributing to its texture and caramelized goodness. To the spiced apples, I add the ½ cup of all-purpose flour and the second ¼ cup of brown sugar. Instead of attempting to create a separate streusel or crumble (which would traditionally require additional butter not provided in our ingredients list), these ingredients will be mixed directly with the apples. I toss everything together thoroughly, making sure the flour and brown sugar are evenly distributed among the apple pieces. The flour will work wonders to absorb some of the natural apple juices released during baking, preventing a watery layer and instead creating a wonderfully thickened, jammy, and caramelized apple layer. The brown sugar will melt and contribute to this lovely, gooey, and richly flavored texture. This method ensures all provided ingredients are used logically and contribute to a cohesive, delicious outcome, transforming a simple spiced apple topping into something truly special.
-
Layer Apples Over Cheesecake: Carefully spoon the spiced apple mixture evenly over the cheesecake filling in your pan. Distribute the apples as uniformly as possible, creating a beautiful and flavorful top layer. You might need to gently spread them with the back of a spoon or spatula to ensure an even distribution across the entire surface. This even layer ensures that every slice of your bar gets a generous portion of delicious apple goodness.
Assembling and Baking Your Caramel Apple Cheesecake Bars
With all our layers meticulously prepared, it’s time to bring them all together in the oven, where the magic truly happens. Patience during the baking and cooling process is paramount for achieving the perfect consistency.
-
Final Bake: Gently place your baking pan into the preheated 350°F (175°C) oven. I typically bake these bars for 45-55 minutes. You’ll know they’re done when the edges of the cheesecake are set and appear slightly golden, but the center still has a slight jiggle to it when you gently nudge the pan. The apples on top should be tender, bubbling, and beautifully caramelized. Don’t worry if the top looks deeply golden brown; that’s exactly what we want from the apples and the brown sugar – it indicates delicious caramelization! This level of browning will enhance the “caramel apple” flavor wonderfully.
-
The Cooling Process (Crucial Step!): This is probably the hardest part of any cheesecake recipe – waiting! Once baked, carefully remove the pan from the oven. Resist the urge to dive in immediately. Let the bars cool on a wire rack at room temperature for at least 1 hour, or until the pan is cool to the touch. This initial cooling period is critically important for the cheesecake to begin setting and firming up gradually, preventing cracks and ensuring a smooth texture.
-
Chill Thoroughly: After the initial cooling, I transfer the pan to the refrigerator. This is a non-negotiable step for cheesecake bars! They absolutely need to chill for a minimum of 4 hours, but honestly, I find that chilling them overnight is even better. Chilling allows the cheesecake to fully set and firm up, making for perfectly clean slices and a truly delightful, dense, and creamy texture. Trying to slice them too early will result in a messy, gooey situation, where the layers aren’t distinct, and nobody wants that! The cold temperature also brings out the best in the flavors, allowing them to meld together harmoniously.
Serving Your Delightful Caramel Apple Cheesecake Bars
After all that meticulous preparation and patient waiting, the moment of truth has arrived – it’s time to slice and serve these incredible Caramel Apple Cheesecake Bars. Each step now is about presenting them beautifully and enjoying every single bite.
-
Prepare for Slicing: Once thoroughly chilled, I use the parchment paper overhangs (remember that trick from step 1 of the crust?) to carefully lift the entire slab of bars out of the baking pan and transfer it to a sturdy cutting board. This makes slicing so much easier and cleaner, providing full access to the edges for perfectly straight cuts. If you try to cut them in the pan, you might scratch your bakeware and struggle with clean lines.
-
Warm Your Knife: For the cleanest, most precise cuts, a little trick I’ve picked up over the years is to run a sharp, thin-bladed knife under hot water, wipe it completely dry, and then make your slice. Repeat this warming and wiping for each subsequent cut. This prevents the cheesecake and apple layers from sticking to the knife and dragging, resulting in beautifully smooth and precise bars. I usually cut them into 24 squares (creating 4 rows by 6 columns) for a good serving size, but you can certainly go for larger, more decadent bars if you prefer! The number of servings often depends on how indulgent you’re feeling.
-
Optional Caramel Drizzle: While not listed in the provided ingredients, if you happen to have some caramel sauce on hand, a light drizzle over each bar just before serving elevates them to another level of indulgence, truly enhancing that “Caramel Apple” experience perfectly. I find a good quality store-bought caramel sauce works wonderfully here for convenience, or if you’re feeling ambitious and have time, homemade salted caramel is always a phenomenal treat that takes these bars from great to absolutely extraordinary!
-
Storing Leftovers: If you happen to have any leftovers (which, in my house, is a rare occurrence because these bars disappear quickly!), store them in an airtight container in the refrigerator. They will keep beautifully for up to 3-4 days, maintaining their delicious texture and flavor. However, I bet they won’t last that long once your family and friends get a taste! These Caramel Apple Cheesecake Bars are truly a crowd-pleaser and a perfect treat for any occasion, especially during the fall season when apples are at their peak and you’re looking for comforting, flavorful desserts.
Conclusion:
And there you have it, my friends! We’ve reached the delicious culmination of our culinary adventure, and I truly hope you’re as excited as I am about these incredible Caramel Apple Cheesecake Bars. If you’ve been following along, you know this isn’t just any dessert; it’s an experience, a symphony of flavors and textures designed to delight every single one of your senses. Imagine, for a moment, that first perfect bite: the satisfying crunch of the buttery graham cracker crust giving way to a smooth, impossibly creamy cheesecake filling. Then, the tender, slightly tart baked apple pieces bursting with autumn spice, all generously swirled with rich, gooey caramel. It’s pure magic, I tell you!
I genuinely believe this recipe is a must-try for so many reasons. For starters, it effortlessly bridges the gap between classic comfort and sophisticated indulgence. It has all the nostalgic warmth of a homemade apple pie, elevated by the luxuriousness of a New York-style cheesecake, and then taken to a whole new level with that irresistible caramel finish. It’s the kind of dessert that looks impressive on any dessert table, making it perfect for holiday gatherings, potlucks, or even just a special treat for your family on a cozy weekend evening. Despite its gourmet appeal, I’ve designed this recipe to be approachable and enjoyable for home bakers of all skill levels. The steps are straightforward, and the reward is truly magnificent. You’ll be so proud to present these, and even prouder when you see the smiles they bring to everyone’s faces.
Now, let’s talk about how to best enjoy these beauties, or even how to make them uniquely yours! While they are absolutely divine on their own, a little accompaniment can elevate them even further. I love serving them slightly chilled, perhaps with a dollop of fresh whipped cream or a small scoop of vanilla bean ice cream that slowly melts into the warm caramel. A sprinkle of flaky sea salt on top can really enhance the caramel notes, creating that wonderful sweet-and-salty contrast we all adore. For a more adult-friendly treat, consider pairing them with a warm mug of spiced cider, a robust coffee, or even a glass of a sweet dessert wine. They are incredibly versatile!
Feeling creative? There are so many wonderful variations you can try to customize these Caramel Apple Cheesecake Bars to your liking. Don’t be afraid to experiment! If you’re a nut lover, consider adding some finely chopped pecans or walnuts to your graham cracker crust for extra texture and flavor. A pinch of cinnamon or nutmeg in the cheesecake batter itself can deepen the autumnal spice profile, making them even cozier. You could even swirl in a different fruit preserve with the apples for an extra layer of complexity – imagine a touch of pear or even a cranberry swirl for a festive touch! If you’re feeling extra decadent, a drizzle of melted white chocolate over the finished bars just before serving would be an absolute showstopper. The possibilities are truly endless, and that’s one of the things I love most about this recipe.
So, what are you waiting for? This is your official invitation to dive into your kitchen, gather your ingredients, and experience the pure joy of baking these fantastic Caramel Apple Cheesecake Bars. I promise you, the aroma alone as they bake will have your mouth watering, and the first taste will confirm that all your efforts were completely worth it. Please, please, please give this recipe a try! And once you do, I would absolutely love to hear about your experience. Did you make any fun variations? What was your favorite part? Did they disappear as quickly as they did in my house? Share your thoughts, your photos, and your triumphs with me in the comments below or on social media! Your feedback means the world to me, and it inspires me to keep creating and sharing delicious recipes with all of you. Happy baking, my friends!
FAQs About Caramel Apple Cheesecake Bars:
How long do Caramel Apple Cheesecake Bars last, and how should I store them?
Once cooled, your delicious Caramel Apple Cheesecake Bars should be stored in an airtight container in the refrigerator. They will stay fresh and incredibly tasty for up to 4-5 days. While they are safe to eat after this time, the texture might start to change slightly.
Can I make these Caramel Apple Cheesecake Bars ahead of time?
Absolutely! These bars are fantastic for making ahead. In fact, many people find that the flavors meld and deepen even further after a day in the fridge. You can prepare them entirely a day or two before you plan to serve them, which makes them perfect for parties and gatherings. Just keep them chilled until serving.
Can I freeze Caramel Apple Cheesecake Bars?
Yes, you can! These bars freeze beautifully. Once completely cooled and chilled, cut the bars into individual servings. Wrap each bar tightly in plastic wrap, then place them in an airtight freezer-safe container or a freezer bag. They can be frozen for up to 1-2 months. To thaw, simply transfer them to the refrigerator overnight or let them sit at room temperature for about an hour before serving.
What kind of apples are best for baking in these bars?
For the best results, I recommend using firm, crisp apples that hold their shape well when baked and offer a good balance of tartness. Excellent choices include Granny Smith, Honeycrisp, Braeburn, Fuji, or even a mix of a couple of varieties for more complex flavor. Avoid overly soft or mealy apples, as they can turn to mush during baking.
My cheesecake cracked on top, what happened and how can I prevent it?
Cheesecake cracks often happen due to sudden temperature changes or overbaking. To prevent this, ensure your cream cheese and eggs are at room temperature before mixing. Don’t overmix the batter once the eggs are added, as this can incorporate too much air. Bake the cheesecake just until the edges are set but the center still has a slight wobble. After baking, turn off the oven and leave the cheesecake inside with the door ajar for about an hour to cool down gradually before refrigerating. This slow cooling helps prevent cracks.
Can I use a different type of crust instead of graham crackers?
Certainly! While a graham cracker crust is classic and delicious, you can definitely experiment. Digestive biscuits, shortbread cookies, or even vanilla wafers make excellent substitutes. Just ensure you crush them finely and mix them with melted butter and sugar in similar proportions to create a stable crust.
How do I know when the cheesecake portion of the bars is done?
The cheesecake is done when the edges are set and appear slightly puffed, but the very center (about a 2-inch diameter) still jiggles ever so slightly when you gently shake the pan. It will continue to set as it cools. Overbaking can lead to a dry texture and potential cracks.
Decadent Caramel Apple Cheesecake Bars – Fall Favorite!
Indulge in these delightful Caramel Apple Cheesecake Bars, a perfect fall favorite featuring a buttery graham cracker crust, a creamy cheesecake layer, and a spiced, caramelized Granny Smith apple topping. These bars are a perfect blend of sweet, tart, and creamy, ideal for any gathering.
Ingredients
-
2 cups graham cracker crumbs
-
½ cup unsalted butter, melted
-
¼ cup granulated sugar (for crust)
-
¼ tsp cinnamon (for crust)
-
16 oz cream cheese, softened
-
½ cup granulated sugar (for filling)
-
2 large eggs
-
1 tsp vanilla extract
-
3 medium Granny Smith apples, peeled and diced
-
2 tbsp lemon juice
-
¼ cup brown sugar (for apples)
-
1 tsp cinnamon (for apples)
-
¼ tsp nutmeg
-
½ cup all-purpose flour
-
¼ cup brown sugar (for topping)
Instructions
-
Step 1
Preheat oven to 350°F (175°C). Line a 9×13 inch baking pan with parchment paper, leaving an overhang. -
Step 2
In a bowl, combine 2 cups graham cracker crumbs, ¼ cup granulated sugar, and ¼ tsp cinnamon. Stir in ½ cup melted unsalted butter until crumbs are evenly moistened. -
Step 3
Press the crust mixture firmly and evenly into the prepared pan. Bake for 8-10 minutes, then remove and cool slightly. -
Step 4
In a stand mixer, beat 16 oz softened cream cheese until smooth. Add ½ cup granulated sugar and beat until light and fluffy. Beat in 2 large eggs one at a time until just incorporated. Stir in 1 tsp vanilla extract; do not overmix. -
Step 5
Pour the cheesecake filling over the cooled crust and spread evenly. Tap the pan gently to release air bubbles. -
Step 6
Peel and dice 3 medium Granny Smith apples. Toss with 2 tbsp lemon juice. Add ¼ cup brown sugar, 1 tsp cinnamon, and ¼ tsp nutmeg; toss to coat. Mix in ½ cup all-purpose flour and the second ¼ cup brown sugar until evenly distributed. -
Step 7
Spoon the spiced apple mixture evenly over the cheesecake filling. -
Step 8
Bake for 45-55 minutes, or until cheesecake edges are set and the center has a slight jiggle. Apples should be tender and caramelized. -
Step 9
Remove from oven and cool on a wire rack for at least 1 hour at room temperature. Transfer to the refrigerator and chill for a minimum of 4 hours, or preferably overnight, for best setting. -
Step 10
Using the parchment overhang, lift the bars onto a cutting board. For clean slices, warm a sharp knife under hot water, wipe dry, and slice into 24 bars. Repeat warming for each cut. Optionally, drizzle with caramel sauce before serving. -
Step 11
Store leftover bars in an airtight container in the refrigerator for up to 3-4 days.
Important Information
Nutrition Facts (Per Serving)
It is important to consider this information as approximate and not to use it as definitive health advice.
Allergy Information
Please check ingredients for potential allergens and consult a health professional if in doubt.

Leave a Comment