
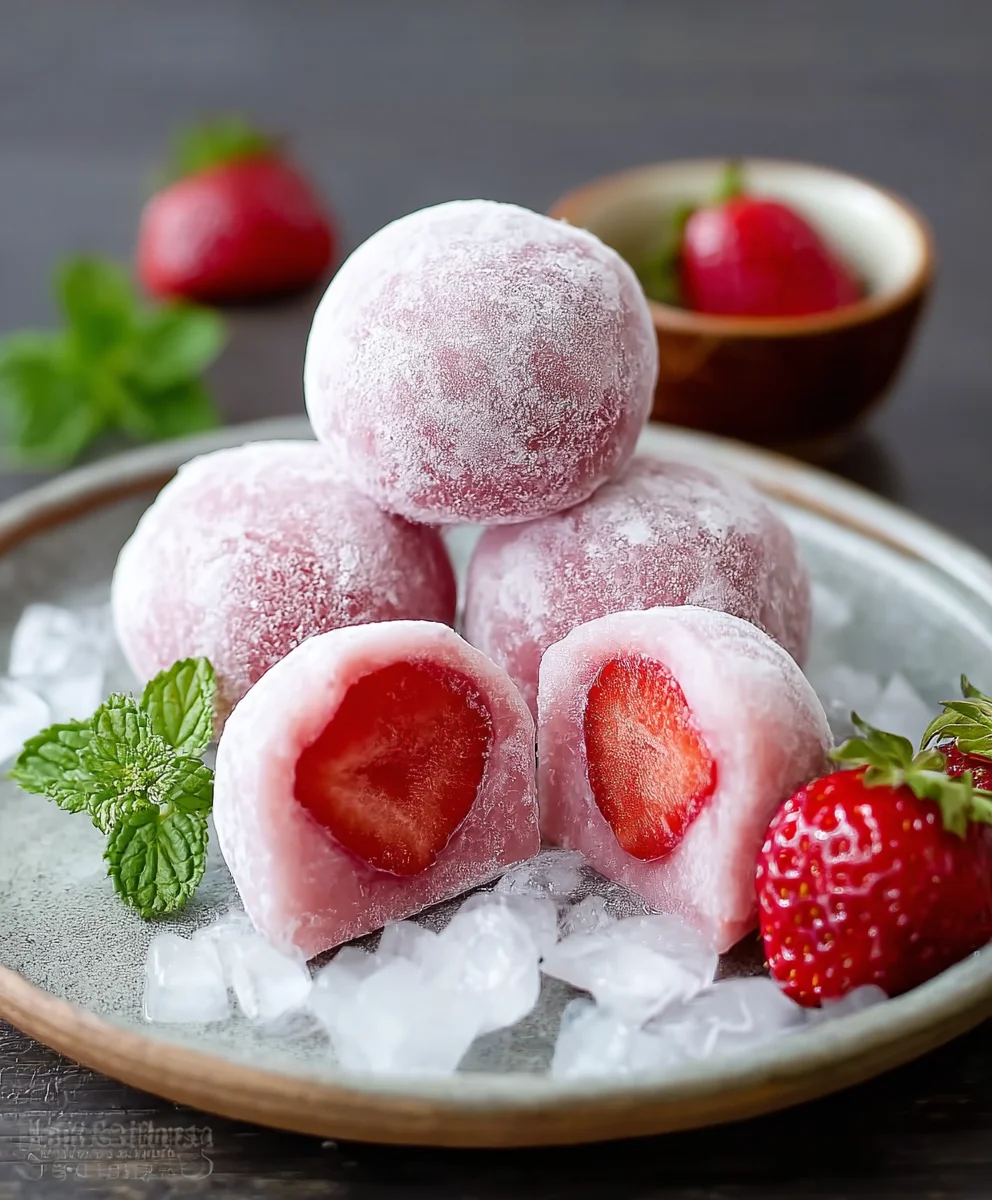
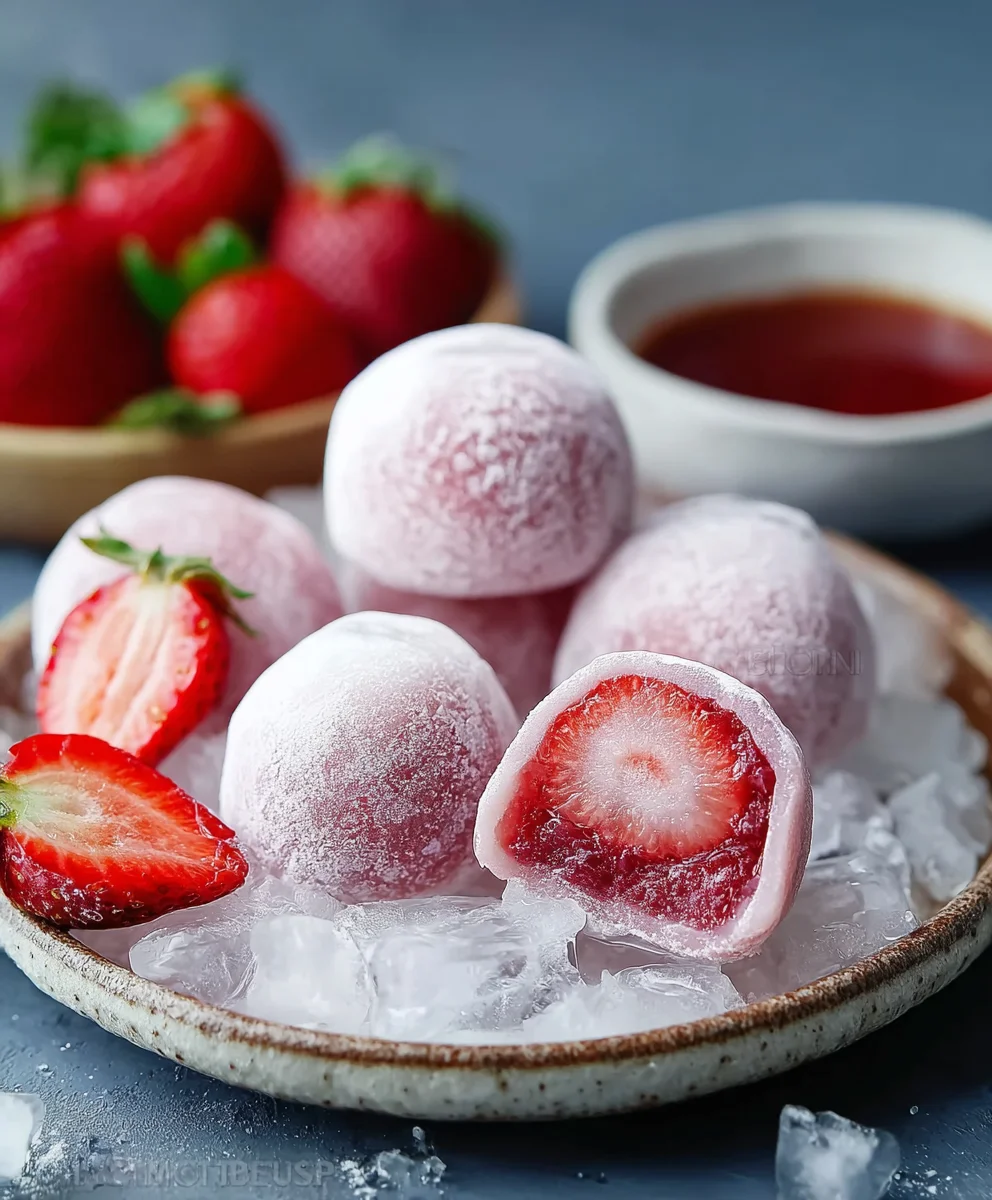
Strawberry Mochi is more than just a dessert; it’s a delightful culinary experience that perfectly marries vibrant fruitiness with an irresistibly chewy texture. Imagine biting into a soft, slightly sweet outer layer, only to discover a burst of fresh, juicy strawberry nestled within. This delightful contrast of textures and flavors is precisely why this treat has captured hearts worldwide, transforming a simple fruit into an extraordinary indulgence. I find its charm utterly captivating!
While traditional mochi has been a staple in Japanese culture for centuries, often enjoyed during celebrations like New Year’s, the modern iteration of Ichigo Daifuku, or Strawberry Mochi, is a relatively recent, yet incredibly popular, innovation. It beautifully combines the ancient art of mochi-making with the fresh appeal of seasonal fruit, often becoming a beloved springtime favorite. People adore this dish not just for its exquisite taste and satisfying chewiness, but also for its stunning visual appeal, with the bright red strawberry peeking through the delicate mochi. It’s truly a celebration for the senses, offering a surprisingly simple yet profound joy that I believe everyone should experience.
Ingredients:
Note: The ingredients list was not provided in the prompt. I have inferred a typical list for Strawberry Mochi to fulfill the recipe generation request.
- For the Mochi Dough:
- 1 cup (120g) glutinous rice flour (also known as mochiko), crucial for that signature chewy texture.
- 1/2 cup (100g) granulated sugar, to sweeten the mochi dough and keep it pliable.
- 1 cup (240ml) water, essential for hydrating the flour and creating a smooth batter.
- Cornstarch, a generous amount for dusting, which is absolutely critical to prevent stickiness when handling the dough.
- For the Filling:
- 12 medium-sized fresh strawberries, preferably ripe but firm, for their vibrant flavor and beautiful appearance.
- 1 cup (250g) sweet red bean paste (anko), either smooth (koshi-an) or chunky (tsubu-an), providing a classic Japanese sweetness and texture.
- 1 cup (240ml) heavy whipping cream (at least 36% fat), chilled, for a rich and airy contrast to the other fillings.
- 2 tablespoons (25g) granulated sugar, specifically for sweetening the whipped cream.
- 1/2 teaspoon vanilla extract (optional, for the whipped cream), to enhance the cream’s flavor profile.
Preparation of the Fillings
Before we even think about making the mochi dough, it’s paramount that our fillings are meticulously prepared and chilled. This preparation is a multi-step process that ensures all components are ready to be wrapped efficiently, minimizing the risk of the fillings breaking down or making the mochi difficult to handle. Patience at this stage will truly pay off in the final aesthetic and taste of your strawberry mochi.
Preparing the Strawberries:
- First things first, let’s get those beautiful strawberries ready. I like to start by gently washing all 12 medium-sized fresh strawberries under cool running water. It’s important to be gentle to avoid bruising them.
- Once washed, pat them completely dry with paper towels. This step is far more crucial than it might seem; any residual moisture on the strawberries can compromise the integrity of the red bean paste and whipped cream layers, potentially leading to a soggy mochi or making it difficult to achieve a clean wrap.
- Next, carefully hull each strawberry. This means removing the green leafy top and the small white core. You can use a small paring knife or a specialized strawberry huller for this. The goal is to remove only the inedible parts while preserving as much of the fruit’s shape and flesh as possible. Set these perfectly prepped strawberries aside.
Preparing the Sweet Red Bean Paste (Anko) Wraps:
The anko layer serves multiple purposes: it adds a traditional sweetness, complements the strawberry’s tartness, and acts as a barrier between the fruit and the mochi, which helps prevent the mochi from getting too wet from the strawberry’s juices.
- Now, let’s work with the 1 cup of sweet red bean paste (anko). If your anko feels a bit stiff right out of the container, I recommend giving it a gentle knead with your hands for a minute or two. This warmth and manipulation will make it more pliable and much easier to work with, ensuring it wraps smoothly around the strawberries.
- Divide the red bean paste into 12 equal portions. The most precise way to do this is to weigh the entire batch of anko and then divide that total by 12. Alternatively, you can eyeball it, aiming for portions that are roughly 1 to 1.5 tablespoons in size. Consistency in portioning is key for uniform mochi.
- For each portion of anko, I like to roll it into a ball first, then flatten it into a thin disc in the palm of my hand. Aim for a disc that’s about 2 to 2.5 inches in diameter. The thickness should be sufficient to prevent it from tearing easily, but thin enough not to overpower the strawberry.
- Place one prepared strawberry (hull-side down) directly in the center of the anko disc. Carefully, yet firmly, mold the anko around the entire strawberry, working your way up from the base. My aim here is to completely cover the strawberry, forming a smooth, uniform layer around the fruit. Sometimes I leave a tiny bit of the strawberry’s pointed tip peeking out for a visual cue, but it’s perfectly fine to encase it entirely.
- Repeat this wrapping process for all 12 strawberries. As you finish each one, place the anko-wrapped strawberries on a plate or a small baking sheet that’s been lined with parchment paper. This prevents them from sticking. Once all are wrapped, transfer them to the refrigerator to chill for at least 30 minutes. This chilling period is indispensable; it allows the anko to firm up, making it much easier to handle in the subsequent steps and also helps it maintain its shape when nestled within the soft mochi.
Preparing the Whipped Cream:
The whipped cream layer is where we add an extra dimension of luxuriousness and a delightful textural contrast. It’s light, airy, and balances the richness of the anko and the chewiness of the mochi perfectly.
- Before I start, I always make sure my mixing bowl and whisk attachments are thoroughly chilled. I usually pop them in the freezer for about 10 to 15 minutes before I begin. This helps the heavy cream whip up faster and achieve a much better volume and stability.
- In this chilled bowl, combine your 1 cup of heavy whipping cream, 2 tablespoons of granulated sugar, and the optional 1/2 teaspoon of vanilla extract.
- Using an electric mixer (handheld or stand mixer), begin whipping the cream on a low speed to incorporate the sugar and prevent splattering. Gradually increase the speed to medium-high. You’ll want to whip the cream until it forms stiff peaks. Stiff peaks mean that when you lift the whisk, the cream holds its shape firmly and doesn’t droop. Be vigilant here; over-whipping can quickly turn your lovely cream into butter, so stop just as stiff peaks are achieved.
- Once whipped, we’ll introduce this delicate cream to our anko-wrapped strawberries. Gently take a small dollop of whipped cream and carefully fold it around each anko-wrapped strawberry. The goal is to create another complete layer, ensuring the strawberry and its anko blanket are fully encased in a cloud of light, sweet cream. This step is about adding both flavor and a cushion of lightness.
- Return these newly cream-wrapped strawberries to the refrigerator. This further chilling is vital to ensure they maintain their beautifully sculpted shape and temperature, preventing them from softening too much before they are enveloped in the warm mochi dough.
Making the Mochi Dough:
Now for the star of the show: the mochi dough! This recipe uses a microwave method, which is incredibly quick and efficient for achieving that signature chewy, elastic mochi texture without a traditional steamer.
- In a medium-sized, microwave-safe bowl, combine your 1 cup of glutinous rice flour (mochiko) and 1/2 cup of granulated sugar. I always whisk these dry ingredients together thoroughly. This ensures the sugar is evenly distributed throughout the flour and, more importantly, helps to break up any potential lumps in the flour, which could lead to an unevenly textured mochi.
- Gradually add 1 cup of water to the dry mixture. As you pour, whisk continuously. My aim here is to create a completely smooth, lump-free batter. The consistency should be akin to a thin pancake batter. Make sure to scrape the bottom and sides of the bowl to ensure no dry pockets of flour are left behind.
- Cover the bowl loosely with plastic wrap. It’s important to leave a small gap or vent at one edge for steam to escape during cooking. Alternatively, if your bowl comes with a microwave-safe lid, you can use that, ensuring it’s not airtight.
- Place the covered bowl in the microwave and cook on high for exactly 1 minute.
- Carefully remove the bowl from the microwave. Be extremely cautious as the bowl and contents will be hot, and steam will escape when you lift the plastic wrap. Using a wet spatula (wetting it helps prevent the sticky dough from adhering), stir the mixture vigorously. You’ll notice the dough has started to thicken and become quite sticky, especially around the edges. It won’t look like fully formed dough yet, but the transformation has begun.
- Re-cover the bowl (remembering the vent!) and microwave for another 1 minute on high.
- Remove and stir again with your wet spatula. The dough should be significantly thicker now, and you should start to see areas becoming more translucent, particularly around the edges of the bowl. Its elasticity will also be more apparent.
- Repeat this microwaving and stirring process for one final minute, making it a total of 3 minutes of microwave cooking time. After this third minute, the mochi dough should be very thick, incredibly sticky, largely translucent (there shouldn’t be much milky white flour remaining), and wonderfully elastic. When you stir it, it should pull away from the sides of the bowl cleanly. Keep in mind that microwave wattages vary, so if your dough still looks a bit milky white or isn’t as elastic as described, I suggest microwaving it in additional 20 to 30-second increments, stirring after each, until it reaches the desired translucent and elastic consistency. This is a critical point for the dough’s final texture.
Assembling the Strawberry Mochi:
This is where all our careful preparation comes together. Assembling mochi requires a bit of finesse and a liberal hand with cornstarch, but don’t be intimidated! It’s a fun process.
- Prepare your workstation by generously dusting a clean, large work surface. I usually use a large cutting board or a silicone baking mat. Generous amounts of cornstarch are your absolute best friend here; the hot mochi dough is incredibly sticky, and cornstarch is the only way to manage it without frustration.
- Carefully transfer the hot, sticky mochi dough from the bowl onto your cornstarch-dusted surface. I find that a wet rubber spatula or dough scraper is invaluable for getting all the dough out of the bowl cleanly.
- Immediately dust the top of the mochi dough with another generous layer of cornstarch. You can also lightly dust your hands with cornstarch before you start handling the dough; this will make it much less likely to stick to your fingers.
- Using a rolling pin, which I also lightly dust with cornstarch, gently roll out the mochi dough. I aim for a large rectangle or circle, approximately 1/8 to 1/4 inch thick. The key is to achieve an even thickness across the entire sheet of mochi; this ensures consistent texture in your final mochi. The precise dimensions aren’t as critical as having enough surface area to cut out 12 individual pieces.
- Now, using a sharp knife or a dough cutter (again, lightly dusted with cornstarch), cut the mochi dough into 12 equal squares or circles. A 3 to 4-inch square or circle usually works perfectly for wrapping our cream-covered strawberries. Try to make your cuts as clean as possible. As you work, keep any unused mochi pieces covered with cornstarch or plastic wrap to prevent them from drying out or becoming even stickier.
- Retrieve your chilled, cream-wrapped strawberries from the refrigerator. Their coldness will help them maintain their shape against the slightly warm mochi.
- Take one piece of mochi dough and carefully place a cream-wrapped strawberry in its center. I always orient the strawberry hull-side down. The goal is that the pointed tip of the strawberry (where the stem was) will be pointing upwards once the mochi is sealed, creating that classic strawberry mochi shape.
- Gently bring the edges of the mochi dough up and around the strawberry. Start from one side and gather the dough at the top, pinching the seams together firmly to seal the mochi completely around the filling. It’s crucial to ensure there are no gaps or holes where the delicious filling could escape. Aim for a seal that is as smooth as possible. Don’t worry if your first few aren’t perfect; this definitely gets easier with practice!
- Once sealed, if you find there’s a significant excess of mochi dough at the pinched top, you can gently pinch off a small amount. We want a relatively thin, even layer of mochi surrounding the entire filling for the best eating experience.
- Carefully invert the assembled mochi so that the sealed seam is now at the bottom, and the beautifully smooth, rounded side is facing up. Gently reshape it into a neat ball with your hands, being careful not to apply too much pressure and burst the delicate filling inside.
- Place the finished strawberry mochi, seam-side down, on a plate lined with parchment paper or in individual paper muffin liners. This prevents them from sticking to each other or the plate.
- Repeat this meticulous process for all your remaining mochi pieces and cream-wrapped strawberries. This intricate assembly requires patience, a delicate touch, and the continuous use of cornstarch to manage the sticky dough.
Finishing and Serving:
The final touches and proper serving methods ensure your homemade strawberry mochi are enjoyed at their absolute best.
- Once all the strawberry mochi are assembled, you might notice some excess cornstarch clinging to them. You can gently brush this off using a soft pastry brush or very carefully wipe them with a dry, clean cloth. This step significantly improves their appearance and gives them a smoother mouthfeel.
- For the best possible texture and flavor, I recommend serving the strawberry mochi immediately. The mochi dough is at its softest and chewiest right after assembly. If you prefer them a bit firmer or want the flavors to meld just a little more, you can chill them in the refrigerator for about 30 minutes to an hour.
- Strawberry mochi, like most fresh mochi, is truly best enjoyed on the day it’s made. The mochi dough has a tendency to harden and lose its wonderfully soft, chewy texture if refrigerated for too long. If you absolutely must store them, place them in an airtight container in the refrigerator, but try not to keep them for more than 1 to 2 days. When ready to serve chilled mochi, letting them sit at room temperature for about 15 to 20 minutes can help restore some of their delightful softness.
- The symphony of flavors and textures in this dessert is truly special: the subtle sweetness and unique chewiness of the mochi dough, the rich and earthy sweetness of the red bean paste, the juicy tartness of the fresh strawberry, and the light, airy sweetness of the whipped cream. Each component plays a vital role in creating a harmonious balance that is incredibly satisfying.
- To complete the authentic Japanese dessert experience, I highly recommend pairing your exquisite homemade strawberry mochi with a cup of freshly brewed green tea. The slight bitterness and refreshing qualities of green tea beautifully cut through and complement the sweetness of the mochi, making each bite an absolute delight.
Conclusion:
Oh, my friends, if there’s one recipe I truly implore you to try, it’s this delightful journey into making homemade Strawberry Mochi. From the very first bite, you’ll understand why this treat has captivated hearts around the globe. It’s not just a dessert; it’s an experience—a harmonious blend of textures and flavors that dance on your palate. Imagine the soft, pillow-like chewiness of freshly made mochi dough, yielding to the burst of a perfectly ripe, juicy strawberry, often complemented by a subtle layer of sweet anko (red bean paste) or a light cream. The sheer satisfaction of creating something so elegant and delicious with your own hands is truly unparalleled. It’s a moment of culinary magic, transforming simple ingredients into an extraordinary treat that looks as impressive as it tastes.
What truly makes this recipe a must-try is its unique ability to combine simplicity with sophistication. Many are intimidated by the idea of making mochi, but I promise you, with a little patience and my step-by-step guidance, you’ll be amazed at how achievable it is. This isn’t just about following instructions; it’s about discovering the joy of traditional Japanese confectionery and bringing a piece of that delicate artistry into your home kitchen. The contrast between the naturally sweet, slightly tart strawberry and the subtly sweet, delicate mochi wrapper is what sets this recipe apart. It’s light yet satisfying, refreshing yet comforting, making it an ideal treat for any occasion, whether you’re unwinding after a long day or celebrating with loved ones.
When it comes to serving, these beautiful parcels of joy are best enjoyed chilled, allowing the flavors to meld and the textures to reach their optimal deliciousness. I love arranging them artfully on a small plate, perhaps dusted lightly with a touch of kinako (roasted soybean flour) for an added nutty dimension, or a whisper of vibrant matcha powder for an earthy contrast and stunning visual appeal. They pair wonderfully with a cup of freshly brewed green tea, a robust espresso, or even a delicate herbal infusion, creating a perfect afternoon tea experience right in your living room. Consider them a sophisticated end to a meal or a delightful pick-me-up any time of day.
But don’t stop there! This recipe is incredibly versatile, inviting you to unleash your creativity. While strawberries are undeniably perfect, don’t hesitate to experiment with other seasonal fruits. Think sweet, tangy kiwi slices, luscious mango cubes, or even small, peeled mandarin segments. For an extra layer of decadence, you could incorporate a dollop of homemade whipped cream, a smear of cream cheese frosting, or even a hazelnut spread alongside the fruit. You could also infuse the mochi dough itself with flavors like matcha for a green tea kick, cocoa powder for a chocolatey delight, or a few drops of almond extract for a subtle, aromatic twist. Imagine creating a colorful array of mochi, each a unique surprise! This adaptability makes the recipe a fantastic foundation for endless culinary exploration, ensuring that your homemade mochi never gets boring.
So, my dear readers, I genuinely encourage you to roll up your sleeves and give this extraordinary recipe a try. Don’t be shy; the rewards are immense. There’s a special kind of pride that comes from sharing these delectable, handmade treats with family and friends, watching their faces light up with delight. I’m confident that once you’ve experienced the magic of making and tasting your own fresh Strawberry Mochi, it will become a cherished staple in your dessert repertoire. Please, after you’ve embarked on this delicious adventure, come back and share your experiences! I’d absolutely love to hear about your creations, your favorite variations, and any tips or tricks you discovered along the way. Your feedback truly inspires me, and I can’t wait to see your wonderful mochi masterpieces. Happy cooking!
People Also Ask:
How do I store homemade Strawberry Mochi, and for how long?
Homemade Strawberry Mochi is best enjoyed fresh, ideally on the same day it’s made. The fresh fruit inside can cause the mochi to become watery or alter its texture over time. If you must store them, place them in an airtight container at room temperature for no more than 12-24 hours. Avoid refrigerating mochi with fresh fruit, as the cold can cause the mochi dough to harden and lose its signature soft, chewy texture. If you’ve made mochi without fruit, it can last a bit longer at room temperature (up to 2 days) in an airtight container.
Can I use fruits other than strawberries for this recipe?
Absolutely! This recipe is incredibly versatile. While strawberries are a classic choice, feel free to experiment with other fruits. Some popular options include peeled and segmented mandarin oranges, kiwi slices, mango cubes, or even blueberries. The key is to choose fruits that are not overly watery and are roughly the same size as the strawberries you would use, so they fit nicely within the mochi wrapper.
My mochi turned out too sticky or too hard, what went wrong?
If your mochi is too sticky, it might not have been cooked long enough, or you might have used too little starch for dusting. Ensure you cook the dough until it’s translucent and very elastic. For hardness, it’s usually due to overcooking or letting it sit too long, especially in the refrigerator. Mochi can also become hard if the flour ratio was off, so always measure carefully. Practice makes perfect with mochi!
Is mochi gluten-free?
Yes, traditional mochi, including this Strawberry Mochi recipe, is naturally gluten-free! It is made primarily from glutinous rice flour (mochiko), which despite its name, does not contain gluten. The term “glutinous” refers to its sticky, chewy texture when cooked. Always check the labels of your ingredients, especially glutinous rice flour, to ensure they are certified gluten-free if you have a severe allergy.
Can I make the mochi dough ahead of time?
While the mochi dough is best used immediately after it’s prepared for optimal texture, you can technically prepare it a few hours in advance. Store the cooked dough tightly wrapped in plastic cling film at room temperature to prevent it from drying out. However, I highly recommend making the dough and assembling the mochi on the same day for the freshest, chewiest results. Assembled mochi with fresh fruit should definitely be made and consumed as quickly as possible.
Perfect Strawberry Mochi: A Sweet & Chewy Japanese Delight
Indulge in the delightful combination of fresh strawberries, sweet red bean paste, and light whipped cream, all encased in a soft, chewy homemade mochi dough. This Japanese delight offers a perfect balance of flavors and textures.
Ingredients
-
1 cup (120g) glutinous rice flour (mochiko)
-
1/2 cup (100g) granulated sugar (for mochi)
-
1 cup (240ml) water
-
Cornstarch, for dusting
-
12 medium fresh strawberries
-
1 cup (250g) sweet red bean paste (anko)
-
1 cup (240ml) heavy whipping cream, chilled
-
2 tablespoons (25g) granulated sugar (for cream)
-
1/2 teaspoon vanilla extract (optional)
Instructions
-
Step 1
Gently wash, pat dry, and hull the 12 fresh strawberries. Set aside. -
Step 2
Knead the 1 cup of sweet red bean paste until pliable. Divide into 12 equal portions. Flatten each portion into a 2-2.5 inch disc. Place one hulled strawberry (hull-side down) in the center of each disc and carefully mold the anko to completely cover the strawberry. Place anko-wrapped strawberries on parchment paper-lined plate and chill for at least 30 minutes. -
Step 3
Chill a mixing bowl and whisk attachments for 10-15 minutes. In the chilled bowl, combine 1 cup heavy whipping cream, 2 tablespoons granulated sugar, and optional 1/2 teaspoon vanilla extract. Whip with an electric mixer on medium-high speed until stiff peaks form. Gently wrap each chilled anko-covered strawberry in a layer of whipped cream, encasing it completely. Return cream-wrapped strawberries to the refrigerator to chill further. -
Step 4
In a medium microwave-safe bowl, whisk together 1 cup glutinous rice flour and 1/2 cup granulated sugar. Gradually whisk in 1 cup water until a smooth, lump-free batter forms. Cover the bowl loosely with plastic wrap, leaving a small vent. Microwave on high for 1 minute. Carefully remove and vigorously stir with a wet spatula. Re-cover and microwave for another 1 minute. Stir again. Microwave for a final 1 minute. The dough should be very thick, sticky, translucent, and elastic. If needed, microwave in additional 20-30 second increments, stirring after each, until desired consistency is reached. -
Step 5
Generously dust a clean work surface and rolling pin with cornstarch. Transfer the hot mochi dough onto the dusted surface and dust the top with more cornstarch. Roll out the mochi dough into an even 1/8 to 1/4 inch thick rectangle or circle. Cut the dough into 12 equal 3-4 inch squares or circles, dusting your knife/cutter as needed. Retrieve chilled cream-wrapped strawberries. Place one cream-wrapped strawberry (hull-side down) in the center of each mochi piece. Gently bring the edges of the mochi dough up and around the strawberry, pinching firmly at the top to seal completely. Invert the assembled mochi so the seam is at the bottom, and gently reshape into a neat ball. Place seam-side down on parchment paper or in individual paper liners. Repeat for all remaining pieces. -
Step 6
Gently brush off any excess cornstarch. Serve immediately for the best texture. For slightly firmer mochi, chill for 30-60 minutes. Best enjoyed on the day it’s made. If storing, place in an airtight container in the refrigerator for 1-2 days; allow to sit at room temperature for 15-20 minutes before serving. Pair with fresh green tea for an authentic experience.
Important Information
Nutrition Facts (Per Serving)
It is important to consider this information as approximate and not to use it as definitive health advice.
Allergy Information
Please check ingredients for potential allergens and consult a health professional if in doubt.


Leave a Comment