
Beef Ham Gravy is truly a culinary marvel that possesses the power to transform even the simplest meal into an unforgettable dining experience. Have you ever yearned for that deeply savory, wonderfully rich accompaniment that elevates everything it touches, from a succulent Sunday roast to a humble plate of mashed potatoes? I’ve discovered that the secret to achieving such gastronomic delight lies in mastering this exceptional gravy. While not rooted in ancient history, the tradition of a robust, homemade gravy has long been the cornerstone of comfort food across countless kitchens, often symbolizing warmth, nourishment, and cherished family gatherings.
The Allure of Homemade Beef Ham Gravy
People absolutely adore this specific Beef Ham Gravy for its unparalleled depth and complexity. It’s a masterful fusion where the hearty, umami notes of beef perfectly intertwine with the subtle, smoky undertones of ham, creating a symphony of flavors that is both comforting and profoundly satisfying. Its velvety-smooth texture and rich aroma make it an indispensable addition to virtually any savory dish. I guarantee that once you taste the profound difference a homemade Beef Ham Gravy makes, you’ll never look back. It’s not merely a sauce; it’s a celebration of flavor, convenience, and culinary artistry.
Ingredients:
- 2 tablespoons unsalted butter (or, ideally, the rendered drippings from your roasted beef and/or ham, if available. This foundational fat is crucial for developing deep flavor right from the start. If using drippings, aim for 2-3 tablespoons, adjusting based on how much fat has rendered. Using drippings provides an unparalleled depth and authentic savory character to your Beef Ham Gravy.)
- 1/2 medium yellow onion, very finely minced (The onion provides a subtle sweetness and aromatic depth that beautifully complements the robust flavors of beef and ham. Mincing it very finely ensures it practically melts into the gravy, contributing flavor without noticeable texture.)
- 2 cloves garlic, minced (Garlic adds a pungent, savory kick that elevates the overall profile of the gravy. Freshly minced garlic offers the best, most vibrant flavor; avoid pre-minced garlic for the freshest taste.)
- 1/4 cup all-purpose flour (This is our primary thickening agent, forming a roux with the fat. The flour helps to create a smooth, velvety texture that coats the back of a spoon perfectly, giving the gravy its characteristic body.)
- 4 cups low-sodium beef broth (A high-quality beef broth is essential for the base flavor. Opting for low-sodium allows you more control over the final seasoning of your gravy, preventing it from becoming overly salty too early.)
- 1 cup ham broth or pan drippings liquid (If you’ve cooked a ham, the liquid from the pan after deglazing, or even a store-bought ham broth, adds a distinct, salty, and slightly sweet ham essence that makes this Beef Ham Gravy truly unique. If ham broth isn’t available, an additional cup of beef broth can be used, though the specific “ham” character will be less pronounced, or you can use water to deglaze the ham roasting pan and incorporate that liquid.)
- 1/4 cup dry red wine (such as Merlot or Cabernet Sauvignon – optional, but highly recommended for an extra layer of complexity and acidity. The alcohol cooks off during cooking, leaving behind a rich, fruity note that significantly enhances the savory flavors. If omitting, simply proceed without it or add a splash more broth.)
- 1 tablespoon Worcestershire sauce (A secret weapon for gravies, Worcestershire sauce provides umami depth, a touch of tang, and a slight savory fermentation note that rounds out the flavor profile beautifully, giving your Beef Ham Gravy an extra dimension.)
- 1 teaspoon Dijon mustard (Just a small amount of Dijon mustard adds a subtle piquancy and helps to emulsify the gravy, contributing to its smooth texture. Don’t worry, your gravy won’t taste like mustard; its role here is purely as a flavor enhancer and emulsifier.)
- 1 teaspoon fresh thyme leaves, chopped (or 1/2 teaspoon dried thyme. Thyme offers an earthy, slightly minty, and peppery flavor that pairs wonderfully with both beef and ham, making it an ideal herb for this gravy.)
- 1/2 teaspoon fresh rosemary leaves, chopped (or 1/4 teaspoon dried rosemary. Rosemary contributes a piney, slightly citrusy aroma and flavor that provides an elegant counterpoint to the rich meats, adding sophistication to your Beef Ham Gravy.)
- 1 bay leaf (This unassuming leaf infuses a subtle, herbal background note that deepens the overall flavor as the gravy simmers, contributing to its complexity.)
- Salt, to taste (Essential for seasoning. Remember to taste as you go, especially if using store-bought broths which can vary significantly in sodium content. It’s easier to add more salt than to fix overly salty gravy.)
- Freshly ground black pepper, to taste (Adds a sharp, aromatic finish and a subtle warmth, providing a pleasant contrast to the richness of the gravy.)
- Pinch of sugar (optional, to balance flavors, especially if your ham drippings are particularly salty or the wine is very dry. A small amount can round out the entire profile.)
- 1-2 tablespoons heavy cream or half-and-half (optional, for an extra touch of richness and a velvety mouthfeel at the very end, giving the Beef Ham Gravy a luxurious finish.)
- Fresh parsley, finely chopped, for garnish (optional, adds a pop of vibrant color and a fresh, herbaceous note just before serving, enhancing visual appeal.)
Preparing Your Foundation: The Roux and Aromatics
- Gather Your Tools and Prep Your Ingredients: Before you even think about turning on the heat, it’s crucial to ensure all your ingredients are measured, chopped, and ready to go – this culinary practice, known as “mise en place,” is invaluable for smooth cooking. For this Beef Ham Gravy, you’ll need a sturdy, heavy-bottomed saucepan or a Dutch oven, a whisk, and a wooden spoon. Having everything at your fingertips prevents frantic searching and ensures you can focus on the delicate timing required for a truly exceptional gravy. Remember, gravies can be quite forgiving, but precision in the initial stages sets you up for success. This preparation not only makes the cooking process more enjoyable but also helps prevent common mishaps, like burning aromatics while you’re scrambling for the next ingredient.
- Render Fat and Sauté Aromatics: Place your heavy-bottomed saucepan over medium heat. This initial step is where the rich foundation of your Beef Ham Gravy begins to form. If you’re fortunate enough to have rendered beef or ham drippings from a roast, now is the time to leverage that liquid gold! Add 2-3 tablespoons of these drippings directly to the pan. These drippings are packed with concentrated flavor that will immediately elevate your gravy. If drippings aren’t available, add your 2 tablespoons of unsalted butter. Allow the butter to melt and shimmer, or the drippings to gently warm. Once shimmering, add the finely minced yellow onion to the pan. Sauté for 3-5 minutes, stirring occasionally, until the onion softens and becomes translucent, releasing its sweet aroma. Avoid browning the onion at this stage; we want its gentle flavor to infuse the fat without bitterness. Next, add the minced garlic and sauté for just another minute until fragrant. Be vigilant here, as garlic can burn quickly, turning bitter and unpleasant if overcooked, which would negatively impact the entire gravy. The combination of onion and garlic, gently sweated in the rich fat, creates a foundational layer of aromatic complexity that will make your Beef Ham Gravy incredibly savory.
- Create the Roux: This is arguably the most critical step for achieving a smooth, lump-free gravy with incredible body and a beautiful sheen. Sprinkle the 1/4 cup of all-purpose flour directly over the sautéed onions and garlic. Immediately begin whisking vigorously to incorporate the flour into the fat. Continue to whisk constantly for 2-3 minutes, allowing the flour to cook out its raw, pasty flavor. The mixture will form a thick paste, often referred to as a “roux.” For a lighter gravy, aim for a pale, blonde roux – the color of straw. If you prefer a nuttier, deeper flavor profile for your Beef Ham Gravy, you can cook the roux for an additional minute or two until it reaches a peanut butter color, but be careful not to burn it. This cooking process is vital; an undercooked roux can leave your gravy tasting like raw flour, while a burnt roux will impart an irreversible bitter taste, necessitating a fresh start. The fat molecules in the butter or drippings coat the starch granules of the flour, preventing them from clumping together when liquid is added and ensuring a silky smooth texture that is the hallmark of a well-made gravy.
Building Layers of Flavor: Deglazing and Liquid Addition
- Deglaze with Red Wine (Optional, but Recommended): If you’re incorporating the dry red wine, now is the moment to add it. This step adds a crucial layer of complexity and helps scrape up all the flavorful bits from the pan. Pour the 1/4 cup of red wine directly into the hot pan with your roux. The wine will immediately sizzle and create steam as it hits the hot surface. Use your whisk or a wooden spoon to scrape up any browned bits (known as “fond”) stuck to the bottom of the pan. These bits are packed with concentrated flavor, especially if you used drippings, and will add immense depth to your Beef Ham Gravy. Continue to stir and cook the wine for 2-3 minutes until it has almost completely evaporated and the strong alcohol aroma has cooked off. This process, called deglazing, not only captures those delicious browned bits but also introduces a wonderful acidity and fruity complexity that brightens and balances the rich, savory flavors of the gravy. If you’re omitting the wine, simply skip this step and proceed directly to adding the broth, perhaps adding a little more broth to compensate.
- Gradually Incorporate Broths: This step requires a bit of patience and a steady hand to prevent lumps – the arch-nemesis of smooth gravy. Begin by slowly pouring about 1 cup of the low-sodium beef broth into the roux mixture while continuously whisking. At first, the mixture will become very thick and pasty, almost like a gravy concentrate. This is normal and exactly what you want! Keep whisking until it’s perfectly smooth. Then, gradually add the remaining beef broth and the ham broth (or additional beef broth, if you’re not using ham broth) in small increments, whisking constantly after each addition until fully incorporated and smooth. The key here is not to rush. Adding the liquid slowly allows the flour particles in the roux to swell and absorb the liquid evenly, creating a perfectly smooth base without any frustrating lumps. If you find any small lumps forming despite your best efforts, don’t despair – a whisk is usually sufficient to break them up. For stubborn lumps, an immersion blender used carefully in the pan for a few seconds can be a savior, but generally, consistent whisking is your best defense against a lumpy Beef Ham Gravy.
- Infuse with Herbs and Flavor Boosters: Once all the broth has been incorporated and your gravy base is smooth, it’s time to build on the foundation of flavors. Add the fresh (or dried) thyme, fresh (or dried) rosemary, and the bay leaf. Stir in the tablespoon of Worcestershire sauce and the teaspoon of Dijon mustard. Give everything a good stir to ensure these potent flavor agents are evenly distributed throughout the liquid. These ingredients work synergistically; the herbs provide an earthy, aromatic backdrop that complements the meats, the Worcestershire sauce delivers a crucial umami punch and depth, and the Dijon mustard, though subtle, adds a touch of sharpness and helps to emulsify the gravy for a creamier texture. Bringing these ingredients in at this stage allows their flavors to meld and deepen as the Beef Ham Gravy simmers, creating a more complex and harmonious profile.
Simmering to Perfection: Thickening and Seasoning
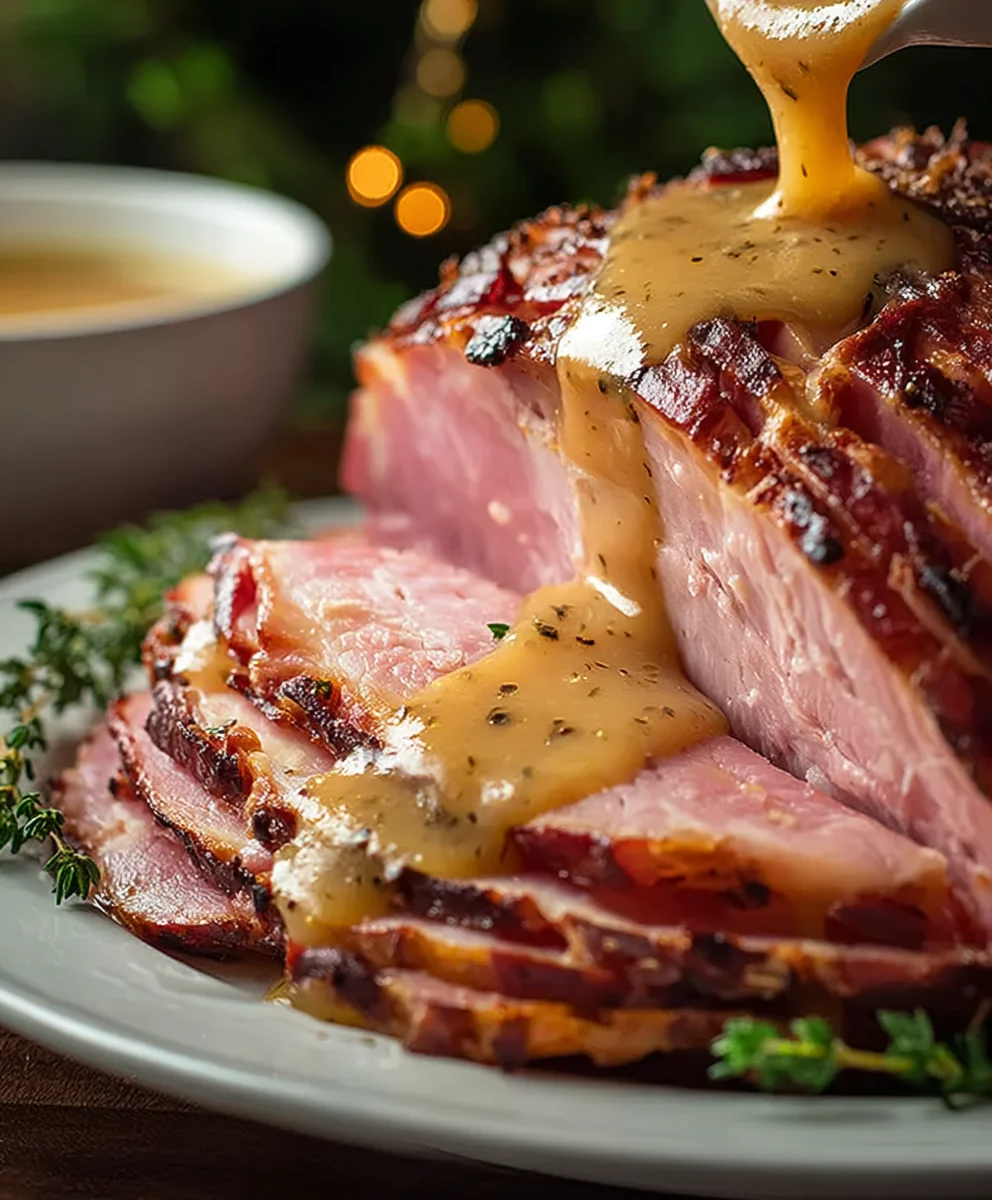
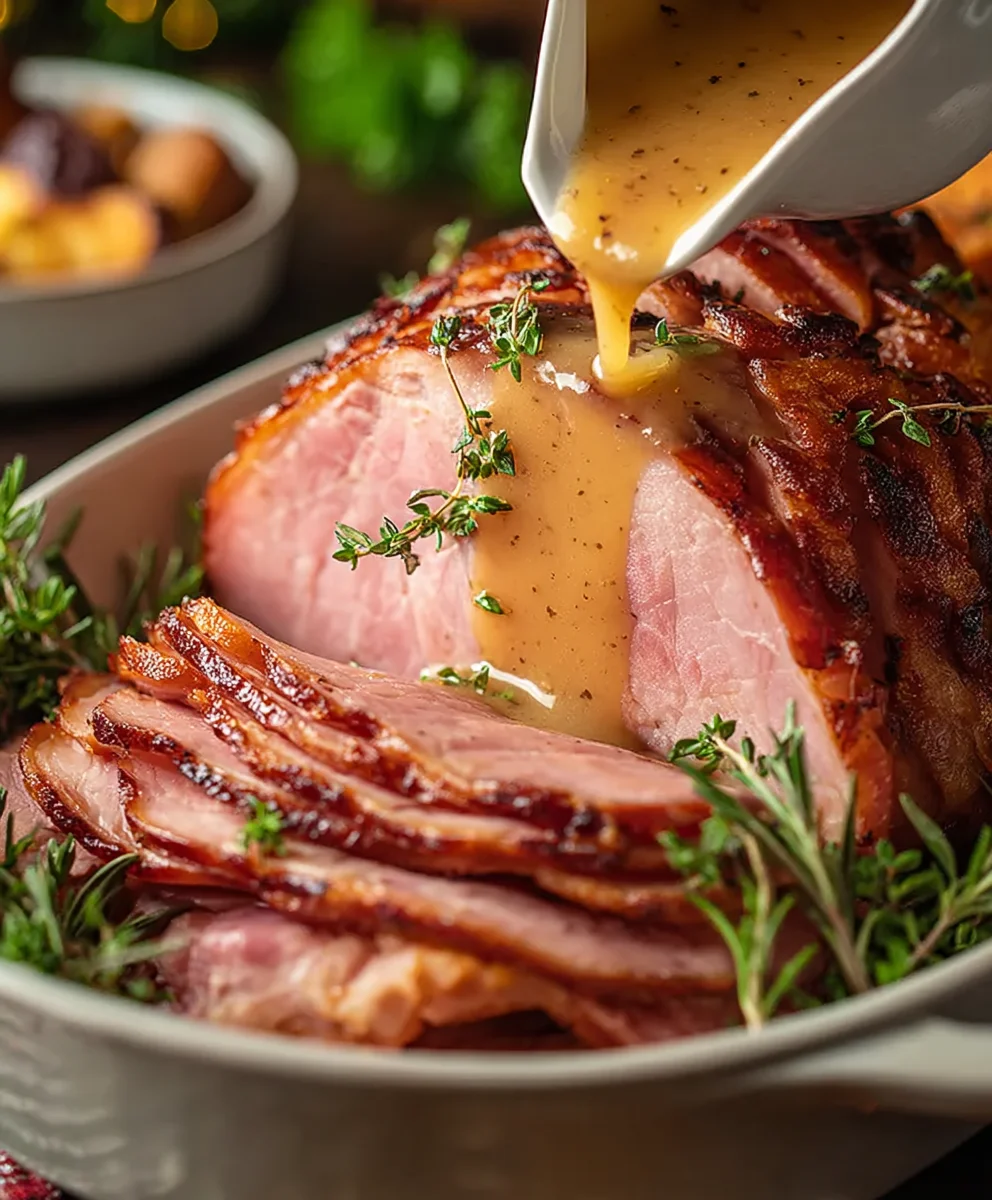
- Simmer and Thicken: Bring the gravy mixture to a gentle simmer over medium-low heat. Once simmering, reduce the heat to low and continue to cook, stirring occasionally to prevent sticking, for at least 10-15 minutes, or even longer (up to 30 minutes for deeper flavor). During this simmering phase, several important things happen that transform your liquid into a rich Beef Ham Gravy: the flavors from all your ingredients meld and deepen, the starches in the flour fully hydrate and gelatinize, causing the gravy to thicken to your desired consistency, and any residual raw flour taste completely dissipates. As it simmers, the gravy will visibly thicken. You want it to be thick enough to lightly coat the back of a spoon. If it becomes too thick for your liking, you can always whisk in a little more beef broth or even hot water, a tablespoon at a time, until it reaches the perfect pourable consistency. Conversely, if it’s not thickening enough, continue to simmer it gently, uncovered, to allow more liquid to evaporate. Patience here is key to achieving the ideal texture.
- Strain for a Silky Smooth Texture (Optional, but Recommended): For an exceptionally smooth, restaurant-quality gravy, carefully pour the finished gravy through a fine-mesh sieve set over a clean bowl or back into a clean saucepan. Use the back of a spoon or a ladle to press down on any solids (like the cooked onion, garlic, and herbs) to extract all their flavorful liquids. Discard the strained solids, including the bay leaf. This step removes any tiny bits of onion, garlic, or herb stems, resulting in a gravy with an unbelievably velvety texture and a luxurious mouthfeel that is a hallmark of fine dining. While optional, it makes a significant difference in the final presentation and eating experience of your Beef Ham Gravy. If you prefer a slightly rustic gravy with visible specks of herbs, you can skip this step, just be sure to remove the bay leaf before serving.
- Adjust Seasoning and Final Touches: Now is the moment to taste your masterpiece and make any final adjustments. Season the gravy generously with salt and freshly ground black pepper. Remember that broths can vary wildly in sodium content, so always taste before adding a lot of salt. If the Beef Ham Gravy tastes a little flat or lacks vibrancy, a tiny pinch of sugar (as suggested in the ingredients) can often balance the flavors beautifully, especially if your ham drippings were very salty or the wine was particularly acidic. Stir it in and taste again. If you desire an extra layer of richness and a truly decadent finish, whisk in 1-2 tablespoons of heavy cream or half-and-half at this stage. This optional addition creates a beautiful, almost creamy sheen and a smoother, more indulgent texture without making the gravy taste overtly “creamy,” perfecting its mouthfeel.
- Serve and Enjoy: Your Beef Ham Gravy is now ready! Serve it piping hot over mashed potatoes, roasted meats (especially beef and ham!), stuffing, polenta, or biscuits. This gravy is robust enough to stand up to hearty dishes and delicate enough to enhance lighter ones. Garnish with a sprinkle of fresh, finely chopped parsley for a burst of color and a fresh herbal note, if desired. This gravy is a true testament to building flavor in layers and will elevate any meal it accompanies, turning an ordinary dinner into an extraordinary culinary experience.
Achieving Gravy Excellence: Tips for Success
- Utilize Pan Drippings: We cannot stress enough the importance of using actual beef and/or ham pan drippings if you have them. When roasting beef or cooking ham, the savory juices and rendered fat that collect at the bottom of the pan are liquid gold, bursting with concentrated flavor. To use them, pour the contents of your roasting pan into a fat separator. Allow the fat to separate from the meat juices (the “fond”). Use the rendered fat in place of butter for your roux, and use the concentrated meat juices, diluted with water or additional broth if necessary, in place of some or all of your beef/ham broth. This imbues the Beef Ham Gravy with an unparalleled depth of flavor directly tied to your roast, creating a cohesive and truly unforgettable meal.
- Preventing Lumps: The key to lump-free gravy lies in two main techniques: first, ensuring your roux is properly cooked and smooth, and second, adding your cold or room-temperature liquid gradually to the hot roux while whisking continuously. The temperature difference helps the starch granules absorb the liquid without clumping, which is the primary cause of lumpy gravy. If lumps do form despite your best efforts, whisk vigorously to break them up. As a last resort, an immersion blender used briefly in the saucepan or pressing the gravy through a fine-mesh sieve will eliminate any stubborn lumps, ensuring your Beef Ham Gravy is perfectly smooth.
- Adjusting Consistency: Gravy consistency is a matter of personal preference. If your Beef Ham Gravy is too thick, simply whisk in a tablespoon or two of hot beef broth or hot water until it reaches your desired pourable consistency. If it’s too thin, allow it to simmer gently, uncovered, for a longer period. This allows excess water to evaporate, concentrating the flavors and thickening the gravy naturally. You could also create a small “slurry” of a teaspoon of cornstarch mixed with an equal amount of cold water, then whisk this into the simmering gravy and cook for another minute or two until thickened. However, a flour-based roux gravy typically thickens perfectly with just simmering and reduction.
- Flavor Variations: Don’t be afraid to experiment with your Beef Ham Gravy! For an earthier gravy, consider adding a few sliced mushrooms (sauté them with the onions and garlic). A splash of balsamic vinegar or apple cider vinegar can brighten the flavor profile even further, adding a delightful tang. For a spicier kick, a tiny pinch of cayenne pepper or a dash of your favorite hot sauce can be incorporated. If serving with poultry, you could even add a hint of dried sage alongside the thyme and rosemary. The beauty of gravy is its versatility, allowing you to tailor it to your specific tastes and the meal you’re serving.
- Making Ahead and Storing: This Beef Ham Gravy can be made ahead of time, making it a perfect companion for holiday meals or busy weeknights. Once cooled, store the gravy in an airtight container in the refrigerator for up to 3-4 days. To reheat, gently warm the gravy in a saucepan over low heat, whisking frequently. You may need to add a splash of beef broth or water to thin it out to its original consistency, as it tends to thicken significantly in the fridge. Gravy also freezes well for up to 3 months; simply thaw overnight in the refrigerator and reheat as directed, whisking out any separation.
- Seasoning is Key: Always taste your gravy at multiple stages, but especially right before serving. Flavors can change as the gravy simmers and reduces, becoming more concentrated. The goal is a balanced taste where all the ingredients shine. Consider the saltiness of your broths and any drippings you’re using. If it tastes bland, it likely needs more salt or a touch of a savory enhancer like Worcestershire sauce. If it’s too salty, a small addition of water, a pinch of sugar, or a touch of acid (like a squeeze of lemon juice) can sometimes help to balance the flavors without diluting them too much. Trust your palate, it’s your best guide for perfecting your Beef Ham Gravy.
<h2>Conclusion:</h2>
<p>Well, my friends, we’ve reached the grand finale, and I truly hope you’re feeling as inspired as I am to whip up a batch of this incredible <strong>Beef Ham Gravy</strong>. This isn’t just any gravy; it’s a testament to how humble ingredients can come together to create something truly spectacular, transforming an ordinary meal into an extraordinary culinary experience. I can confidently say that once you taste the deeply savory, perfectly balanced, and utterly comforting flavor of this gravy, you’ll understand why it’s a non-negotiable addition to your recipe repertoire. It’s the kind of dish that makes you close your eyes, savoring every single bite, and wonder how you ever managed without it. Trust me, this recipe is a must-try for anyone who appreciates the art of flavor and the joy of a truly satisfying meal.</p>
<p>What makes this recipe stand out, you ask? It’s the unique combination of rich beef drippings and the subtle, smoky notes of ham, creating an unparalleled depth of flavor that a single-meat gravy simply can’t achieve. The simplicity of the steps belies the complex taste, meaning you don’t need to be a seasoned chef to create something profoundly delicious. It’s comforting, hearty, and versatile, making it a perfect companion for a vast array of dishes, from the most elaborate holiday feast to a simple weeknight dinner. We’ve meticulously crafted the instructions to ensure your success, guiding you through each stage to achieve that perfect consistency and mouthwatering aroma that will have everyone at your table asking for seconds, maybe even thirds!</p>
<h3>Serving Suggestions & Variations:</h3>
<p>Now, let’s talk about how to truly make this gravy shine on your table. While it’s undeniably superb simply poured over a succulent roast beef or a pan-fried pork chop, the possibilities are truly endless!</p>
<ul>
<li><strong>Classic Comfort:</strong> My absolute favorite way to enjoy this gravy is generously spooned over a mountain of creamy mashed potatoes. The way it pools in the center and slowly seeps into every fluffy bit is pure bliss. It’s also fantastic with roasted potatoes, crispy oven fries, or even a simple baked potato.</li>
<li><strong>Vegetable Enhancer:</strong> Don’t underestimate its power to elevate vegetables. Drizzle it over steamed green beans, roasted Brussels sprouts, glazed carrots, or even a humble plate of peas. It adds such a rich dimension to otherwise simple sides.</li>
<li><strong>Breakfast & Brunch:</strong> Thinking outside the box? This gravy is phenomenal over biscuits! Picture warm, flaky biscuits smothered in this savory goodness – talk about a weekend morning game-changer. It also pairs surprisingly well with fried eggs and toast for a hearty, indulgent breakfast.</li>
<li><strong>Pasta Partner:</strong> Stir a spoonful or two into plain pasta or even mac and cheese for an instant flavor boost. You can also use it as a base for a rustic pasta sauce by adding some shredded leftover meat and herbs.</li>
<li><strong>Open-Faced Sandwiches:</strong> Got some leftover roast beef or ham? Pile it high on a slice of toasted bread, ladle over plenty of warm gravy, and enjoy a delicious open-faced sandwich that feels wonderfully gourmet.</li>
</ul>
<p>For variations, feel free to experiment a little! Want a touch of sweetness? A splash of dry sherry or a pinch of sugar can balance the savory notes beautifully. For an herbier profile, whisk in some fresh thyme or rosemary towards the end of cooking. If you prefer a richer, creamier texture, a swirl of heavy cream or a pat of butter at the very end will achieve that luxurious finish. Don’t be afraid to make it your own; this recipe is a fantastic canvas for your culinary creativity!</p>
<p>So, what are you waiting for? I wholeheartedly encourage you to carve out some time in your kitchen soon and give this <strong>Beef Ham Gravy</strong> a try. I promise it will become a staple, a secret weapon in your cooking arsenal that you’ll turn to again and again. Once you’ve experienced its magic, I would absolutely love to hear from you! Please come back and share your experiences, your serving ideas, or any creative variations you came up with in the comments section below. Your feedback and stories are what make this community so vibrant and inspiring. Happy cooking, and prepare to be amazed!</p>
<h2>Frequently Asked Questions (FAQs)</h2>
<h3>People Also Ask:</h3>
<h4>Q: Can I make this Beef Ham Gravy ahead of time?</h4>
<p>A: Absolutely! This gravy is actually fantastic made ahead. You can prepare it up to 2-3 days in advance and store it in an airtight container in the refrigerator. When you’re ready to serve, gently reheat it on the stovetop over medium-low heat, stirring occasionally. If it thickens too much, you can whisk in a little beef broth or water to achieve your desired consistency. Making it ahead often allows the flavors to meld even further, making it taste even better!</p>
<h4>Q: How can I fix lumpy gravy?</h4>
<p>A: Don’t worry, lumpy gravy happens to the best of us! The easiest way to fix it is to pour the gravy through a fine-mesh sieve or strainer, pressing any lumps with the back of a spoon to smooth them out. For a super silky gravy, you can even use an immersion blender or a regular blender (be careful with hot liquids!) to emulsify any remaining lumps. To prevent lumps in the first place, ensure you create a smooth roux (flour and fat mixture) before adding liquids, and always whisk continuously as you add the liquid.</p>
<h4>Q: What if I don’t have enough pan drippings?</h4>
<p>A: No problem at all! If your roast didn’t produce a lot of drippings, you can supplement with a little extra butter or another neutral oil (like vegetable or canola) to make up the fat needed for your roux. You’ll also want to use a good quality beef broth or stock to compensate for any flavor you might be missing from the drippings. Sometimes, adding a small amount of concentrated beef base or bouillon can also help boost the flavor profile if you’re low on drippings.</p>
<h4>Q: Can I freeze leftover gravy?</h4>
<p>A: Yes, you certainly can! This gravy freezes wonderfully. Allow it to cool completely before transferring it to freezer-safe containers or heavy-duty freezer bags. It can be stored in the freezer for up to 3 months. When you’re ready to use it, thaw it overnight in the refrigerator, then reheat gently on the stovetop, whisking well. You might need to add a splash of broth or water to thin it out to your preferred consistency after thawing and reheating.</p>
<h4>Q: What kind of ham should I use for the ham element in the gravy?</h4>
<p>A: For the ham flavor, you’re looking for something that will lend a lovely smoky and savory depth. If you’ve just roasted a ham, definitely use those pan drippings! Otherwise, a good quality smoked ham hock, a slice of thick-cut country ham, or even some leftover holiday ham can be fantastic. You can even use a few pieces of good quality bacon, rendered slowly, to start your gravy for that smoky essence if you don’t have ham on hand. The key is to get that wonderful, savory, slightly smoky note to complement the beef.</p>
Rich Beef Gravy: Perfect, Savory & Easy Recipe!
A perfect, savory, and easy-to-make rich beef gravy. This recipe uses beef drippings and broth, along with aromatics and herbs, to create a deeply flavored and velvety smooth gravy.
Ingredients
-
2-3 tablespoons unsalted butter or rendered beef drippings
-
1/2 medium yellow onion, finely minced
-
2 cloves garlic, minced
-
1/4 cup all-purpose flour
-
4 cups low-sodium beef broth
-
1 cup beef broth or pan drippings liquid (from beef roast)
-
1/4 cup non-alcoholic red wine or additional beef broth (optional)
-
1 tablespoon Worcestershire sauce
-
1 teaspoon Dijon mustard
-
1 teaspoon fresh thyme leaves, chopped (or 1/2 teaspoon dried)
-
1/2 teaspoon fresh rosemary leaves, chopped (or 1/4 teaspoon dried)
-
1 bay leaf
-
Salt, to taste
-
Freshly ground black pepper, to taste
-
Pinch of sugar (optional)
-
1-2 tablespoons heavy cream or half-and-half (optional)
-
Fresh parsley, finely chopped, for garnish (optional)
Instructions
-
Step 1
Measure and chop all ingredients. Have a heavy-bottomed saucepan, whisk, and spoon ready. -
Step 2
Heat 2-3 tablespoons butter or beef drippings in the saucepan over medium heat. Add finely minced yellow onion and sauté for 3-5 minutes until soft. Add minced garlic and cook for 1 minute until fragrant. -
Step 3
Sprinkle 1/4 cup all-purpose flour over the sautéed aromatics. Whisk constantly for 2-3 minutes to cook the flour and create a pale, blonde roux. -
Step 4
If using, pour 1/4 cup non-alcoholic red wine (or additional beef broth) into the pan. Scrape up any browned bits (fond) from the bottom. Cook for 2-3 minutes until nearly evaporated. -
Step 5
Gradually whisk in 4 cups low-sodium beef broth, then 1 cup additional beef broth (or beef pan drippings liquid) until smooth and lump-free. -
Step 6
Stir in 1 teaspoon fresh thyme leaves, 1/2 teaspoon fresh rosemary leaves, 1 bay leaf, 1 tablespoon Worcestershire sauce, and 1 teaspoon Dijon mustard. -
Step 7
Bring the gravy to a gentle simmer over medium-low heat, then reduce heat to low. Cook for 10-15 minutes, stirring occasionally, until the gravy thickens to coat the back of a spoon. -
Step 8
For a silky smooth gravy, pour through a fine-mesh sieve into a clean bowl, pressing on solids. Discard solids and the bay leaf. (Optional) -
Step 9
Taste and season generously with salt and freshly ground black pepper. Add a pinch of sugar if needed to balance flavors. For extra richness, whisk in 1-2 tablespoons heavy cream or half-and-half (optional). -
Step 10
Serve hot over roasted meats, mashed potatoes, or stuffing. Garnish with fresh, finely chopped parsley if desired.
Important Information
Nutrition Facts (Per Serving)
It is important to consider this information as approximate and not to use it as definitive health advice.
Allergy Information
Please check ingredients for potential allergens and consult a health professional if in doubt.


Leave a Comment