
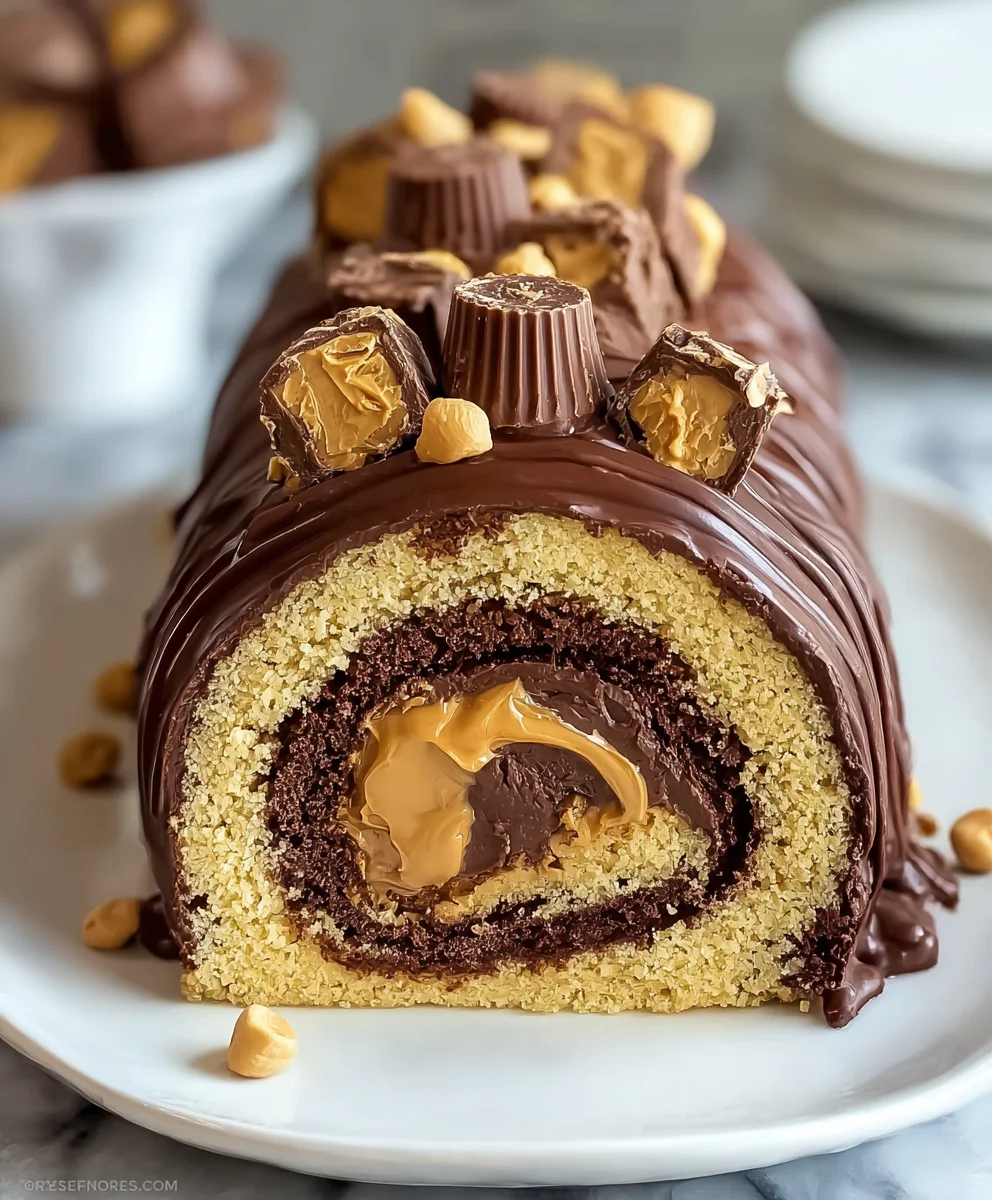
Reeses Peanut Butter Cup Roll Cake is not just a dessert; it’s an edible celebration, a symphony of flavors that will transport you straight to confectionery heaven. Imagine the unparalleled joy of biting into a wonderfully moist, rich chocolate sponge cake, generously slathered with a luscious, creamy peanut butter filling, and then—the ultimate surprise—studded with delightful pieces of America’s beloved Reese’s Peanut Butter Cups. It’s an irresistible combination that takes the iconic pairing of chocolate and peanut butter to an entirely new, sophisticated, yet incredibly fun level. This dessert perfectly encapsulates why the Reese’s cup has held such a special, nostalgic place in our hearts for decades; its simple, perfect balance of salty and sweet is universally adored, and this recipe elevates that magic into a show-stopping presentation.
Why This Reeses Peanut Butter Cup Roll Cake Becomes an Instant Favorite
People absolutely adore this dish for countless reasons. Beyond the sheer decadence of its flavors, the beautiful swirl of a roll cake always impresses, making it ideal for special occasions or simply elevating an ordinary evening. The interplay of textures – the tender cake, the smooth, rich filling, and the delightful chewiness of the embedded Reese’s pieces – creates an unforgettable experience with every slice. I am thrilled to share this recipe with you, as I know it will become a cherished addition to your baking repertoire, bringing smiles and satisfied sighs with every delicious bite.
Ingredients:
-
For the Chocolate Roll Cake:
- ¾ cup all-purpose flour, sifted
- ½ cup unsweetened cocoa powder, sifted (I prefer a good quality Dutch-processed cocoa for richer flavor!)
- 1 teaspoon baking powder
- ½ teaspoon baking soda
- ¼ teaspoon salt
- 4 large eggs, separated (make sure they are cold for easier separation, but bring whites to room temperature before whipping)
- ¾ cup granulated sugar, divided
- ¼ cup vegetable oil (or any neutral-flavored oil)
- 1 teaspoon pure vanilla extract
- ¼ cup hot water (not boiling, just hot from the tap works well)
- Powdered sugar, for dusting the towel
-
For the Peanut Butter Cream Cheese Filling:
- 8 ounces cream cheese, softened (full-fat works best for richness)
- ½ cup unsalted butter, softened (1 stick)
- 1 cup creamy peanut butter (I find Jif or Skippy work wonderfully here, avoid natural peanut butter as it can separate)
- 3 cups powdered sugar, sifted (to avoid any lumps!)
- 1 teaspoon pure vanilla extract
- 2-4 tablespoons milk or heavy cream (as needed for desired consistency)
- 1 cup mini Reese’s Peanut Butter Cups, chopped (or regular-sized ones chopped into smaller pieces)
-
For the Chocolate Ganache Glaze:
- 1 cup semi-sweet chocolate chips (or finely chopped semi-sweet chocolate bar for a smoother melt)
- ½ cup heavy cream
- 1 tablespoon unsalted butter
- ½ teaspoon pure vanilla extract
-
For Garnish (Optional):
- Additional chopped Reese’s Peanut Butter Cups
- A drizzle of melted peanut butter or chocolate
Preparing the Chocolate Roll Cake
- Prepare Your Baking Pan and Oven: First things first, let’s get our workspace ready! Preheat your oven to 375°F (190°C). Then, take a standard 15×10-inch jelly roll pan and line it meticulously with parchment paper, leaving an overhang on the short ends – this will act as convenient handles later. Lightly grease the parchment paper and dust it with a thin layer of cocoa powder, shaking out any excess. This helps prevent sticking and adds to the rich chocolate color of our Reeses Peanut Butter Cup Roll Cake.
- Combine Dry Ingredients: In a medium bowl, whisk together your sifted all-purpose flour, sifted cocoa powder, baking powder, baking soda, and salt. Sifting is truly important here to ensure a light, airy cake and to prevent any unpleasant lumps of dry ingredients in your final batter. Set this aside.
- Whip the Egg Whites to Stiff Peaks: In a large, impeccably clean mixing bowl, using an electric mixer with a whisk attachment, beat the four separated egg whites on medium-high speed until soft peaks form. Gradually add ¼ cup of the granulated sugar, continuing to beat until the egg whites are glossy and form stiff, firm peaks. Be careful not to overbeat, as they can become dry and difficult to fold. Once done, gently transfer these beautiful, airy whites to another bowl and set aside. This meringue is key to the cake’s light texture.
- Prepare the Egg Yolk Mixture: In the same (now empty) large mixing bowl, without cleaning it too thoroughly (a little residual egg white is fine), combine the four egg yolks with the remaining ½ cup of granulated sugar. Beat on high speed for about 3-5 minutes, or until the mixture becomes very pale yellow, thick, and forms a “ribbon” when the beaters are lifted – meaning it falls in a thick stream and slowly disappears back into the mixture. This step incorporates a lot of air and structure into the cake.
- Incorporate Wet Ingredients into Yolks: Reduce the mixer speed to low. Gradually drizzle in the vegetable oil and then the vanilla extract into the egg yolk mixture, beating just until combined. Next, gently pour in the hot water. The hot water helps to bloom the cocoa powder, intensifying its flavor and creating a more moist cake. Mix until just incorporated.
- Fold in Dry Ingredients: Remove the bowl from the mixer. Add the dry ingredient mixture to the wet egg yolk mixture in two additions. Using a spatula, fold very gently until just combined. Be careful not to overmix, as this can develop the gluten in the flour and result in a tough cake. A few small streaks of flour are acceptable at this stage.
- Fold in Egg Whites: Now, for the delicate part! Add about one-third of the whipped egg whites to the chocolate batter. Gently fold them in to lighten the mixture. This step is often called “sacrificial folding” because it helps make the rest of the egg whites easier to incorporate without deflating the batter too much. Once partially combined, add the remaining egg whites and continue to fold very gently until no white streaks remain. The goal is to preserve as much air as possible, as this air is what gives our chocolate roll cake its signature light and spongy texture.
- Bake the Cake: Pour the batter evenly into your prepared jelly roll pan. Use an offset spatula to spread it smoothly to the edges. Bake for 10-12 minutes, or until the cake springs back when lightly touched in the center. Do not overbake, as this will make the cake dry and prone to cracking when rolled.
- Prepare for Rolling: While the cake is baking, lay a clean kitchen towel (one you don’t mind getting a little cocoa on, or use parchment paper) on a flat surface and generously dust it with powdered sugar. The powdered sugar prevents the cake from sticking to the towel.
- Roll the Warm Cake: As soon as the cake comes out of the oven, immediately invert it onto the prepared sugared towel. Carefully peel off the parchment paper that was used for baking. Starting from one of the short ends, gently but firmly roll the warm cake and the towel together into a tight log. This step is crucial for training the cake to hold its rolled shape without cracking. Rolling it while warm allows it to be flexible.
- Cool Completely: Place the rolled cake, still wrapped in the towel, seam-side down on a wire rack. Let it cool completely to room temperature, which will take at least 1-2 hours. Patience is key here! Trying to unroll or fill a warm cake will lead to tearing and a melted filling.
Crafting the Peanut Butter Cream Cheese Filling
- Beat Cream Cheese and Butter: In a large mixing bowl, using an electric mixer on medium-high speed, beat the softened cream cheese and softened unsalted butter together until the mixture is light, fluffy, and completely smooth. Scrape down the sides of the bowl frequently to ensure everything is incorporated. This usually takes about 2-3 minutes.
- Add Peanut Butter: Reduce the mixer speed to low and add the creamy peanut butter. Beat until fully incorporated and smooth. Avoid overmixing, but ensure there are no streaks of unmixed peanut butter.
- Gradually Add Powdered Sugar: With the mixer on low speed, gradually add the sifted powdered sugar, about a cup at a time, beating until fully incorporated after each addition. The mixture will start to thicken considerably.
- Incorporate Vanilla and Adjust Consistency: Stir in the vanilla extract. At this point, assess the consistency of your filling. If it feels too stiff to spread easily, add the milk or heavy cream one tablespoon at a time, beating until the desired smooth, creamy, and spreadable consistency is reached. You want it to be firm enough to hold its shape but soft enough to spread without tearing the cake.
- Prepare Reese’s for Filling: Gently fold in the chopped mini Reese’s Peanut Butter Cups into the peanut butter cream cheese filling. This adds wonderful texture and an extra burst of peanut butter and chocolate flavor throughout our Reeses Peanut Butter Cup Roll Cake.
Assembling the Reeses Peanut Butter Cup Roll Cake
- Unroll the Cooled Cake: Once the chocolate roll cake has completely cooled, carefully unroll it from the towel onto a piece of fresh parchment paper or a clean cutting board. Take your time with this step, as it can be delicate. If you encounter any small cracks, don’t worry too much; the filling and glaze will hide them!
- Spread the Peanut Butter Filling: Using an offset spatula, spread the peanut butter cream cheese filling evenly over the entire surface of the cake, leaving a ½-inch border clear on all edges, especially the short end where you will finish rolling. This prevents the filling from squishing out too much when you roll it up.
- Re-roll the Cake: Starting from one of the short ends, carefully and snugly re-roll the cake, using the parchment paper underneath to help guide and tighten the roll. Roll it as tightly as possible without squeezing out all the filling. Once rolled, place the log seam-side down onto a serving platter or a cutting board.
- Chill the Roll Cake: Cover the roll cake loosely with plastic wrap and refrigerate for at least 30 minutes to 1 hour. This chilling period is important for the cake to set, allowing the filling to firm up and making the cake easier to handle and slice later. This step truly helps the “Reeses Peanut Butter Cup Roll Cake” hold its form.
Making the Chocolate Ganache Glaze
- Prepare the Chocolate: Place the chocolate chips (or finely chopped chocolate) in a medium, heatproof bowl.
- Heat the Cream: In a small saucepan, heat the heavy cream over medium heat until it just begins to simmer around the edges, but do not let it boil vigorously.
- Pour and Rest: Immediately pour the hot cream over the chocolate chips. Let it sit undisturbed for 5 minutes. This allows the heat from the cream to melt the chocolate gently.
- Whisk to Combine: After 5 minutes, gently whisk the mixture from the center outwards until it is completely smooth and glossy. If any chocolate pieces remain, you can gently heat the bowl over a double boiler or in short bursts in the microwave (10-15 seconds at a time) stirring between each, until smooth.
- Add Butter and Vanilla: Stir in the unsalted butter and vanilla extract until fully melted and incorporated. The butter adds a beautiful shine and richness to our ganache, enhancing the overall presentation of your “Reeses Peanut Butter Cup Roll Cake”.
- Cool to Pouring Consistency: Allow the ganache to cool slightly at room temperature, stirring occasionally, until it reaches a thick but still pourable consistency. You want it to be thick enough to coat the cake without running off entirely, but not so thick that it’s difficult to spread. This might take 10-20 minutes, depending on your room temperature.
Finishing Touches and Serving
- Glaze the Chilled Cake: Once the ganache is at the right consistency and the cake is nicely chilled, retrieve the cake from the refrigerator. Place it on a wire rack set over a baking sheet (to catch any drips). Pour or spread the chocolate ganache evenly over the top and sides of the “Reeses Peanut Butter Cup Roll Cake”. Use an offset spatula to smooth it out if necessary.
- Garnish (Optional): If desired, immediately sprinkle additional chopped Reese’s Peanut Butter Cups over the top of the wet ganache. You can also drizzle a little melted peanut butter or chocolate for an extra artistic flair.
- Final Chill: Return the glazed cake to the refrigerator for at least another 30 minutes, or until the ganache is set. This makes slicing much cleaner and ensures the cake holds its shape perfectly.
- Slice and Serve: When ready to serve your magnificent “Reeses Peanut Butter Cup Roll Cake”, use a sharp knife that has been warmed under hot water and wiped dry (re-warm and wipe between slices for the cleanest cuts). Slice into individual portions and serve immediately. This cake is best enjoyed at room temperature, so if it’s been heavily chilled, allow it to sit out for 15-20 minutes before serving to soften the filling and cake slightly.
- Storage: Store any leftover slices of your decadent Reeses Peanut Butter Cup Roll Cake in an airtight container in the refrigerator for up to 3-4 days. For optimal texture, let slices come to room temperature for about 15 minutes before enjoying.
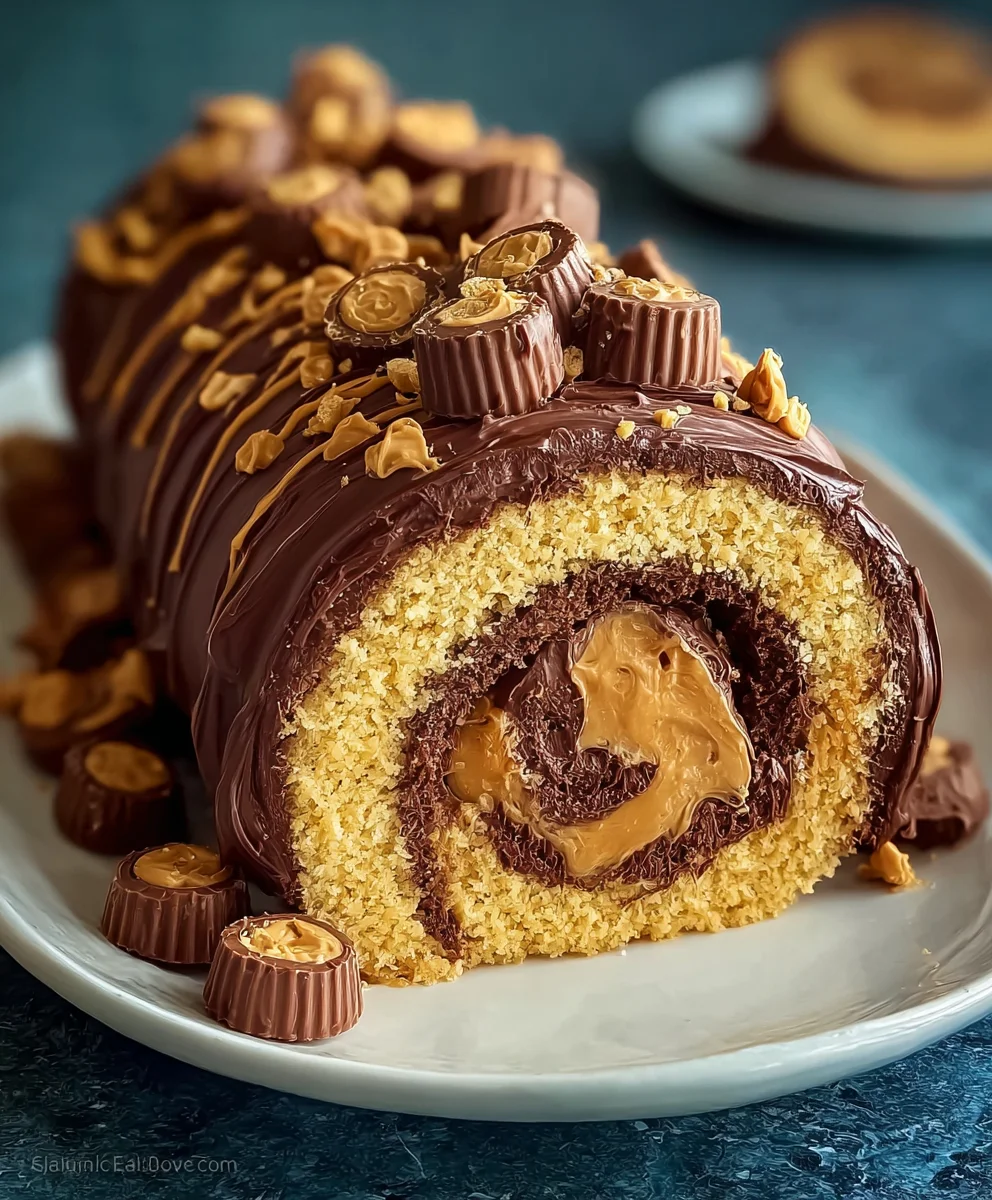
Indeed, this isn’t just any roll cake; it’s the quintessential Reeses Peanut Butter Cup Roll Cake, a name that perfectly encapsulates its indulgent spirit. The beauty of this dessert lies not only in its incredibly satisfying taste but also in the impressive presentation it offers. Imagine slicing into a beautifully swirled cake, revealing layers of moist chocolate sponge and luscious peanut butter cream, generously studded with those iconic mini peanut butter cups. It’s a visual delight that promises pure bliss before the first bite even hits your tongue. Every element, from the tender cake to the velvety filling and the delightful crunch of the peanut butter cups, works in concert to deliver an unparalleled dessert experience. It’s a testament to the fact that some flavor combinations are simply destined for greatness, and this recipe absolutely proves it. It brings a sense of playful nostalgia to the table while delivering a sophisticated dessert that will surely become a firm favorite.
Once your magnificent roll cake is chilled and ready, the serving possibilities are delightfully simple, yet endlessly appealing. Of course, a perfectly cut slice on its own is a pure moment of bliss – ideal for an afternoon pick-me-up with a strong cup of coffee or a tall glass of cold milk. For a more decadent presentation, consider serving it alongside a scoop of premium vanilla bean ice cream, allowing the melting creaminess to mingle with the chocolate and peanut butter in a truly luxurious fashion. A generous dollop of freshly whipped cream can also add an extra layer of lightness and elegance, making each bite feel even more special. This cake truly shines as the star of any dessert table, making it perfect for birthday celebrations, holiday gatherings, potlucks where you want to impress without stress, or even just a luxurious weekend treat for yourself and loved ones. It holds its shape beautifully and travels well, too, making it an excellent choice if you’re heading to a friend’s dinner party and need a show-stopping contribution that will undoubtedly earn you rave reviews.
And for those of you who love to put your own spin on things, this recipe is wonderfully adaptable, inviting your creative culinary touches. Feeling adventurous? Try incorporating a pinch of flaky sea salt into the peanut butter filling to really enhance those savory notes and create a sophisticated salted peanut butter experience, akin to a salted caramel. For an even more intense chocolate experience, a light dusting of high-quality cocoa powder or a generous drizzle of melted dark chocolate over the top before serving would be absolutely divine. You could also experiment with different toppings: finely chopped roasted peanuts for added texture and crunch, colorful sprinkles for a wonderfully festive touch, or even a different type of crushed candy bar if you’re feeling extra playful (though I’m a purist when it comes to the classic Reeses flavor, I encourage experimentation!). If you want to subtly alter the base cake, a teaspoon of high-quality espresso powder added to the chocolate batter will deepen and intensify the chocolate flavor without making it taste like coffee. Don’t be afraid to make it your own; that’s part of the fun of baking and allows you to truly personalize this already incredible dessert!
Now, it’s your turn! I genuinely hope you feel inspired and confident to tackle this recipe. Don’t let the idea of a ‘roll cake’ intimidate you; I’ve broken down each step to be as straightforward and approachable as possible, ensuring your success from start to finish. <h5>The reward of presenting such a stunning and unbelievably delicious dessert, knowing you made it with your own hands, is truly unparalleled.</h5> There’s immense satisfaction in seeing the smiles and hearing the delighted gasps of those who taste your creation. So, gather your ingredients, put on your apron, and prepare for a truly rewarding baking adventure. And please, once you’ve whipped up your own fantastic version, I would absolutely love to hear about it! Share your photos, your triumphs, and any clever variations you came up with in the comments below or tag me on social media. Your feedback and experiences are incredibly valuable, and they fuel my passion for sharing these recipes with you. <h4>Let’s spread the joy of homemade deliciousness together, one incredible Reeses Peanut Butter Cup Roll Cake at a time!</h4>
Decadent Reese’s Peanut Butter Cup Roll Cake
This Reese’s Peanut Butter Cup Roll Cake is the ultimate dessert for lovers of chocolate and peanut butter. A soft, fluffy chocolate cake is rolled up with a creamy peanut butter filling, then topped with a smooth ganache and finished with a garnish of Reese’s Peanut Butter Cups. This decadent dessert features a beautiful spiral shape, creating an irresistible combination of textures and rich flavors. Perfect for birthdays, special occasions, or any gathering, it makes a stunning centerpiece that will impress everyone.
Ingredients
-
¾ cup all-purpose flour
-
½ cup unsweetened cocoa powder
-
1 tsp baking powder
-
½ tsp baking soda
-
¼ tsp salt
-
4 large eggs, separated
-
¾ cup granulated sugar, divided
-
¼ cup vegetable oil
-
1 tsp pure vanilla extract
-
¼ cup hot water
-
Powdered sugar (for dusting)
-
8 oz cream cheese, softened
-
½ cup unsalted butter, softened
-
1 cup creamy peanut butter
-
3 cups powdered sugar
-
1 tsp pure vanilla extract
-
2-4 tbsp milk or heavy cream
-
1 cup mini Reese’s Peanut Butter Cups, chopped
-
1 cup semi-sweet chocolate chips
-
½ cup heavy cream
-
1 tbsp unsalted butter
-
½ tsp pure vanilla extract
-
Additional chopped Reese’s Peanut Butter Cups (optional)
-
Melted peanut butter or chocolate (optional)
Instructions
-
Step 1
Preheat oven to 375°F (190°C). Line a 15×10-inch jelly roll pan with greased parchment paper, then dust with cocoa. In a medium bowl, whisk together the flour, cocoa powder, baking powder, baking soda, and salt. Set aside. -
Step 2
In a large bowl, beat egg whites on medium-high speed until soft peaks form. Gradually add ¼ cup granulated sugar, beating until stiff, glossy peaks. Set aside. In the same bowl, beat egg yolks with the remaining ½ cup granulated sugar for 3-5 minutes until pale, thick, and forms a ribbon. -
Step 3
On low speed, drizzle vegetable oil and 1 tsp vanilla extract into the yolk mixture, then gently pour in the hot water; mix just until combined. Remove from mixer. Add the dry ingredient mixture to the wet egg yolk mixture in two additions, folding very gently until just combined. Do not overmix. -
Step 4
Add about one-third of the whipped egg whites to the chocolate batter and gently fold to lighten. Then, fold in the remaining egg whites until no white streaks remain, preserving as much air as possible. Pour batter evenly into the prepared pan. Bake for 10-12 minutes, or until the cake springs back when lightly touched. -
Step 5
Immediately invert the hot cake onto a powdered sugar-dusted clean kitchen towel. Carefully peel off the baking parchment paper. Starting from one of the short ends, gently but firmly roll the warm cake and towel together into a tight log. Place seam-side down on a wire rack and cool completely to room temperature (at least 1-2 hours). -
Step 6
In a large mixing bowl, beat softened cream cheese and butter until light, fluffy, and smooth (2-3 minutes). Reduce speed and add creamy peanut butter; beat until fully incorporated and smooth. Gradually add 3 cups sifted powdered sugar, beating until thick. Stir in 1 tsp vanilla extract. Add 2-4 tbsp milk or heavy cream as needed, beating until a smooth, creamy, and spreadable consistency is reached. Gently fold in the chopped mini Reese’s Peanut Butter Cups. -
Step 7
Once the chocolate roll cake has completely cooled, carefully unroll it from the towel onto fresh parchment paper. Spread the peanut butter cream cheese filling evenly over the entire surface of the cake, leaving a ½-inch border clear on all edges. Starting from one of the short ends, carefully and snugly re-roll the cake, using the parchment paper underneath to help guide and tighten the roll. Place the log seam-side down onto a serving platter. Cover loosely with plastic wrap and refrigerate for at least 30 minutes to 1 hour to set. -
Step 8
Place chocolate chips in a medium, heatproof bowl. In a small saucepan, heat ½ cup heavy cream until it just begins to simmer, then immediately pour over the chocolate chips. Let sit undisturbed for 5 minutes. Gently whisk from the center outwards until completely smooth and glossy. Stir in 1 tbsp unsalted butter and ½ tsp vanilla extract until fully incorporated. Allow the ganache to cool slightly at room temperature, stirring occasionally, until it reaches a thick but still pourable consistency (10-20 minutes). -
Step 9
Retrieve the chilled cake. Place it on a wire rack set over a baking sheet to catch drips. Pour or spread the chocolate ganache evenly over the top and sides of the cake. If desired, immediately sprinkle additional chopped Reese’s Peanut Butter Cups over the wet ganache or drizzle with melted peanut butter/chocolate. Return the glazed cake to the refrigerator for at least another 30 minutes, or until the ganache is set. -
Step 10
When ready to serve, use a sharp knife that has been warmed under hot water and wiped dry (re-warm and wipe between slices for the cleanest cuts) to slice into individual portions. This cake is best enjoyed at room temperature, so allow it to sit out for 15-20 minutes before serving if heavily chilled. Store any leftover slices in an airtight container in the refrigerator for up to 3-4 days.
Important Information
Nutrition Facts (Per Serving)
It is important to consider this information as approximate and not to use it as definitive health advice.
Allergy Information
Please check ingredients for potential allergens and consult a health professional if in doubt.

Leave a Comment