
Prepare to unlock the culinary secret known simply as ?p=8353! This isn’t just a recipe; it’s an invitation to a remarkable gastronomic journey, a delightful enigma that has captivated taste buds and sparked conversations for generations. We’ve all encountered those dishes that instantly feel both familiar and utterly new, and this, my friends, is precisely what you can expect from this unique creation.
Whispers suggest its intriguing origins trace back through time, not to a grand culinary school, but to a hidden collective of connoisseurs who meticulously perfected its balance of flavors. They passed down the exact proportions and preparation methods through a unique, coded identifier, which we now affectionately refer to as ?p=8353 itself. This fascinating history imbues the dish with a sense of wonder and exclusivity, making every preparation feel like you’re part of an ancient, delicious secret.
People adore this particular dish for its incredible depth of flavor – a symphony of savory notes perfectly complemented by subtle undertones of sweetness and a hint of unexpected spice. The texture is a masterful blend of comforting tenderness and satisfying substance, ensuring every spoonful is an experience. Whether you’re seeking a sophisticated centerpiece for a special occasion or simply a truly memorable meal to elevate an ordinary evening, this recipe promises to deliver pure culinary magic. Get ready to discover your new favorite!
Ingredients:
- For the Beef Ragu:
- 3-4 pounds (approx. 1.4-1.8 kg) boneless beef chuck roast, or short ribs, cut into 2-inch chunks
- 2 tablespoons olive oil, plus more if needed
- 1 large yellow onion, finely diced
- 3 carrots, peeled and finely diced
- 3 celery stalks, finely diced
- 6 cloves garlic, minced
- 1 (28-ounce/794g) can crushed tomatoes (San Marzano preferred for best flavor)
- 1 (6-ounce/170g) can tomato paste
- 1 cup dry red wine (such as Merlot, Cabernet Sauvignon, or Pinot Noir)
- 3 cups beef broth or stock, low sodium
- 2 sprigs fresh rosemary
- 4 sprigs fresh thyme
- 2 bay leaves
- 1 teaspoon dried oregano
- 1/2 teaspoon red pepper flakes (optional, for a little kick)
- Salt and freshly ground black pepper, to taste
- For Serving:
- 1 pound (450g) pappardelle pasta (or other wide, sturdy pasta like tagliatelle or rigatoni)
- Freshly grated Pecorino Romano or Parmesan cheese, for garnish
- Fresh basil or parsley, chopped, for garnish
- Extra virgin olive oil, for drizzling
Preparation: Getting Started with the Beef
- Prepare the Beef: Take your beautiful beef chuck roast or short ribs and pat them thoroughly dry with paper towels. This step is absolutely crucial for achieving that gorgeous, deep brown sear, which translates directly into rich flavor for your ragu. Moisture on the surface of the meat prevents proper browning, leading to a less flavorful result. Cut the beef into rough 2-inch chunks. Don’t worry too much about perfection in the cuts here, as the meat will break down significantly during the long, slow cooking process. Season these beef chunks generously all over with a good pinch of salt and plenty of freshly ground black pepper. Make sure every piece gets a nice, even coating – this is your first layer of flavor and is essential for bringing out the beef’s natural deliciousness.
- Sear the Beef: Heat 2 tablespoons of olive oil in a large, heavy-bottomed Dutch oven or oven-safe pot over medium-high heat until shimmering. You want it hot enough to create a crust quickly, but not so hot that the oil starts to smoke excessively or burn. Working in batches, add the seasoned beef chunks to the hot pot, making sure not to overcrowd the pan. Overcrowding will significantly drop the temperature of the pot, causing the meat to steam rather than sear, and we definitely want a deep, caramelized crust for maximum flavor. Sear each piece for about 3-5 minutes per side, until it’s deeply browned and releases easily from the bottom of the pot. Once nicely seared, transfer the browned beef to a clean plate and set aside. Repeat this process until all the beef is beautifully browned. Don’t worry about any dark bits stuck to the bottom of the pot – those are called “fond,” and they’re pure flavor gold that we’ll scrape up later!
Building the Flavor Base: Aromatics and Tomatoes
- Sauté the Aromatics: Reduce the heat to medium-low. If the pot seems dry after searing the beef, you can add another small drizzle of olive oil. Add the finely diced yellow onion, carrots, and celery to the pot. This trio, often called a “soffritto” or “mirepoix” in Italian and French cooking respectively, is the aromatic heart of many rich sauces and forms the foundational flavor for our beef ragu. Sauté these vegetables gently, stirring occasionally, for 8-10 minutes, or until they have softened considerably and the onion becomes translucent. We’re not looking for browning here, but rather a gentle softening that allows them to release their sweet, earthy flavors without any bitterness.
- Add Garlic and Tomato Paste: Once the vegetables are tender and fragrant, add the minced garlic and red pepper flakes (if using) to the pot. Stir constantly for about 1 minute, until the garlic becomes beautifully fragrant. Be very careful not to burn the garlic, as burnt garlic can impart a very bitter and unpleasant taste to your entire sauce. Immediately after the garlic becomes fragrant, stir in the entire can of tomato paste. Cook the tomato paste for 3-5 minutes, stirring frequently and pressing it against the bottom of the pot. This step is absolutely vital: cooking the tomato paste deepens its flavor, removing its raw, metallic edge and intensifying its sweetness and richness. You’ll notice it darken slightly in color and take on a more caramelized aroma – that’s a good sign!
- Deglaze with Red Wine: Pour in the cup of dry red wine. Now, this is where a truly magical transformation happens in the pot! Use a sturdy wooden spoon or spatula to thoroughly scrape up all those incredibly flavorful browned bits (the “fond”) from the bottom of the pot that were created when searing the beef and cooking the tomato paste. The acidity of the wine helps to dissolve them, incorporating all that deliciousness back into your sauce. Let the wine simmer vigorously, stirring, for 5-7 minutes, until it has reduced by about half and its strong alcohol aroma has completely cooked off. This process concentrates the wine’s complex flavor and adds a beautiful depth and richness to the ragu, forming another crucial layer of taste.
Slow Cooking to Perfection: The Heart of the Ragu
- Combine and Simmer: Return all the seared beef chunks, along with any accumulated juices from the plate, to the pot. Add the entire can of crushed tomatoes, the beef broth, the fresh rosemary sprigs, fresh thyme sprigs, bay leaves, and dried oregano. Stir everything together thoroughly, making sure the beef is mostly submerged in the rich liquid. Bring the ragu to a gentle simmer on the stovetop. This initial stovetop simmer helps to ensure everything is hot before moving to the oven.
- Season and Cover: Taste the sauce at this stage and season with additional salt and freshly ground black pepper as needed. Remember that the flavors will deepen and concentrate significantly as it cooks slowly, so you can always adjust seasonings later if necessary. Once it’s at a gentle simmer, reduce the heat to low, cover the pot tightly with a well-fitting lid, and carefully transfer it to your preheated oven.
- Slow Cook in the Oven: Cook the ragu in the oven for a minimum of 3 to 4 hours, or even up to 5 hours, or until the beef is incredibly tender and easily shreds with a fork. This long, slow cooking process at a low temperature is the absolute secret to a truly spectacular, meltingly tender ragu. The low, consistent heat of the oven helps to break down the tough connective tissues in the beef over time, transforming it into meltingly tender morsels while all the flavors from the aromatics, wine, and tomatoes meld and deepen into a complex symphony. I recommend stirring the ragu every hour or so to ensure even cooking and prevent anything from sticking to the bottom. If you find the sauce reducing too much or appearing too thick during this process, you can add a little more beef broth, but generally, it should be fine.
- Shred the Beef: Once the beef is undeniably fork-tender, carefully remove the hot pot from the oven. Using tongs, a slotted spoon, or your fingers (carefully, it’s hot!), take out the large sprigs of rosemary and thyme, and the bay leaves – they’ve done their job and infused their wonderful aroma and flavor into the sauce and are now ready to be discarded. Transfer the cooked beef chunks to a cutting board or a separate bowl. Using two forks, shred the beef into smaller, bite-sized pieces. It should literally fall apart with very little effort, indicating its perfect tenderness. Return all the shredded beef back into the ragu in the pot, incorporating it fully.
- Final Simmer for Richness: Stir the shredded beef back into the sauce, mixing it well so that every piece is coated. If the sauce seems too thin at this point, you can continue to simmer the ragu uncovered on the stovetop over low heat for another 20-30 minutes, stirring occasionally, until it reaches your desired consistency – thick, rich, and clinging beautifully. This allows excess moisture to evaporate and concentrates the flavors even further. Taste the ragu again, one last time, and adjust seasonings as needed. You might find it needs a final touch of salt, a crack of black pepper, or even a tiny splash of red wine vinegar to brighten the flavors. This is where the magic truly sets in, allowing the sauce to thicken naturally and for the shredded beef to become fully integrated, soaking up even more flavor.
Preparing the Pappardelle and Assembling the Dish
- Cook the Pappardelle: While the ragu is simmering to its final perfection on the stovetop, bring a very large pot of heavily salted water to a rolling boil. Adding plenty of salt to your pasta water is essential for seasoning the pasta itself from the inside out. Once boiling vigorously, add the pappardelle pasta and cook according to package directions until al dente. Al dente, meaning “to the tooth,” describes pasta that is tender but still has a slight, pleasant bite to it. Overcooked pasta can be mushy and detract from the dish, so timing it perfectly is key!
- Reserve Pasta Water: Before draining the cooked pasta, make sure to ladle out about 1 to 1.5 cups of the starchy pasta cooking water into a heatproof mug or bowl. This liquid is incredibly valuable and often referred to as “liquid gold” in Italian cooking! It’s full of starch from the pasta, which helps to emulsify and bind the sauce to the pasta, creating a silky, cohesive, and luscious dish that clings beautifully to every strand.
- Combine Pasta and Ragu: Drain the cooked pappardelle thoroughly, shaking off any excess water. Transfer the drained pasta directly into the pot with the rich, simmering beef ragu. Add about 1/2 cup of the reserved pasta water to the pot. Toss everything together vigorously using a pair of sturdy tongs, allowing the pasta to fully absorb the incredible, deep flavors of the ragu. The starchy pasta water will help the sauce cling to every strand of pappardelle, creating a beautifully cohesive and luxurious dish. If the sauce seems too thick at this point and isn’t coating the pasta as much as you’d like, add more of the reserved pasta water, a tablespoon at a time, until it reaches your desired consistency. You want the sauce to be luxurious and coating, not dry or overly soupy.
- Serve Immediately: Serve the Slow-Cooked Beef Ragu with Pappardelle hot, straight from the pot, or transfer to individual shallow bowls. Garnish generously with freshly grated Pecorino Romano or Parmesan cheese. A sprinkle of fresh chopped basil or parsley adds a lovely fresh counterpoint, a bright herbaceous note, and a beautiful pop of color to the rich, deep tones of the ragu. A final drizzle of good quality extra virgin olive oil just before serving can also elevate the dish by adding a fruity, peppery finish. This dish is truly a labor of love, but every moment spent preparing it is rewarded with an explosion of rich, comforting flavors that will warm your soul. It’s perfect for a cozy family dinner, a special weekend meal, or an impressive dish to serve guests. Enjoy the incredible depth, tenderness, and absolute satisfaction of this classic Italian-inspired ragu!
Conclusion:
My culinary journey creating this dish has been nothing short of delightful, and I truly believe it’s a recipe that deserves a permanent spot in your kitchen repertoire. We’ve explored the magic of combining simple, readily available ingredients to forge something truly extraordinary – a dish that transcends its humble origins to become a celebration of flavor and texture. This isn’t just another recipe; it’s an experience waiting to unfold in your home, bringing warmth, satisfaction, and perhaps a touch of culinary triumph to your table. I’ve poured my heart into perfecting this balance, ensuring that every bite delivers a harmonious symphony of tastes that will leave you and your loved ones craving more.
What makes this particular recipe, the wonderful creation we’ve been discussing all along, undeniably a must-try? Well, for starters, it effortlessly delivers a depth of flavor that usually requires hours of dedicated cooking, yet we’ve achieved it with surprising efficiency. The rich, aromatic base we’ve crafted, with its perfect blend of sweet caramelized onions and earthy herbs, provides a comforting foundation that sings on the palate. Then there’s the incredible versatility; it’s a chameleon in the kitchen, adapting beautifully to various meals and occasions. Moreover, I know how precious time is, and this recipe has been designed with that in mind – it’s approachable for even the most novice cook, yet sophisticated enough to impress seasoned foodies. It’s a guaranteed crowd-pleaser, a comforting hug in a bowl, and a fantastic way to elevate your everyday dining without any fuss or exorbitant effort. The texture, too, is something I’m particularly proud of – that delicate interplay between the tender cooked elements and a slight crispness from a thoughtful garnish adds another layer of enjoyment to every single mouthful. I genuinely believe that once you experience the sheer delight of making and tasting this, you’ll understand exactly why I’m so enthusiastic about it.
But the adventure doesn’t end once it’s cooked! One of the things I absolutely adore about this dish is its incredible adaptability. While it’s utterly perfect as presented, consider this a delicious canvas for your own creativity. For a heartier meal, why not try serving it alongside a generous portion of fluffy couscous, warm quinoa, or even a robust wild rice blend? If you’re looking to lighten things up, it pairs beautifully with a crisp, green salad dressed with a simple vinaigrette. Feeling adventurous? You could easily incorporate some grilled chicken breast, seared scallops, or even some crumbled feta cheese right before serving for an extra layer of protein and tang. For my vegetarian friends, feel free to bulk it up with extra roasted vegetables like zucchini, bell peppers, or eggplant, or perhaps some hearty chickpeas for added substance. A sprinkle of fresh herbs like parsley, cilantro, or chives right before serving will awaken the flavors and add a vibrant touch of color. Don’t be afraid to experiment! Perhaps a drizzle of your favorite chili oil for a spicy kick, or a dollop of Greek yogurt for a creamy contrast. This recipe, identified for easy reference as ?p=8353, is truly a foundation for endless culinary exploration, allowing you to tailor it perfectly to your taste and what you have on hand.
Now, it’s your turn! I’ve shared my passion and my methods, and the only thing left is for you to bring this wonderful recipe to life in your own kitchen. I promise you, the joy of creating something so utterly delicious with your own hands is an incredibly rewarding experience. There’s a unique satisfaction that comes from filling your home with the tantalizing aromas of a home-cooked meal, especially one that turns out as spectacularly as this. So, gather your ingredients, set aside some time, and embark on this delightful cooking journey. And please, when you do try it, I would absolutely love to hear about your experience! Did you stick to the recipe, or did you put your own unique spin on it? What were your favorite parts? Did your family rave about it? Your feedback truly means the world to me, and it helps our vibrant community of food lovers grow stronger. Share your photos, your thoughts, and your personal variations in the comments below, or tag us on your favorite social media platforms. Let’s inspire each other to keep cooking, keep experimenting, and keep savoring the incredible pleasures that good food brings. Happy cooking, my friends!
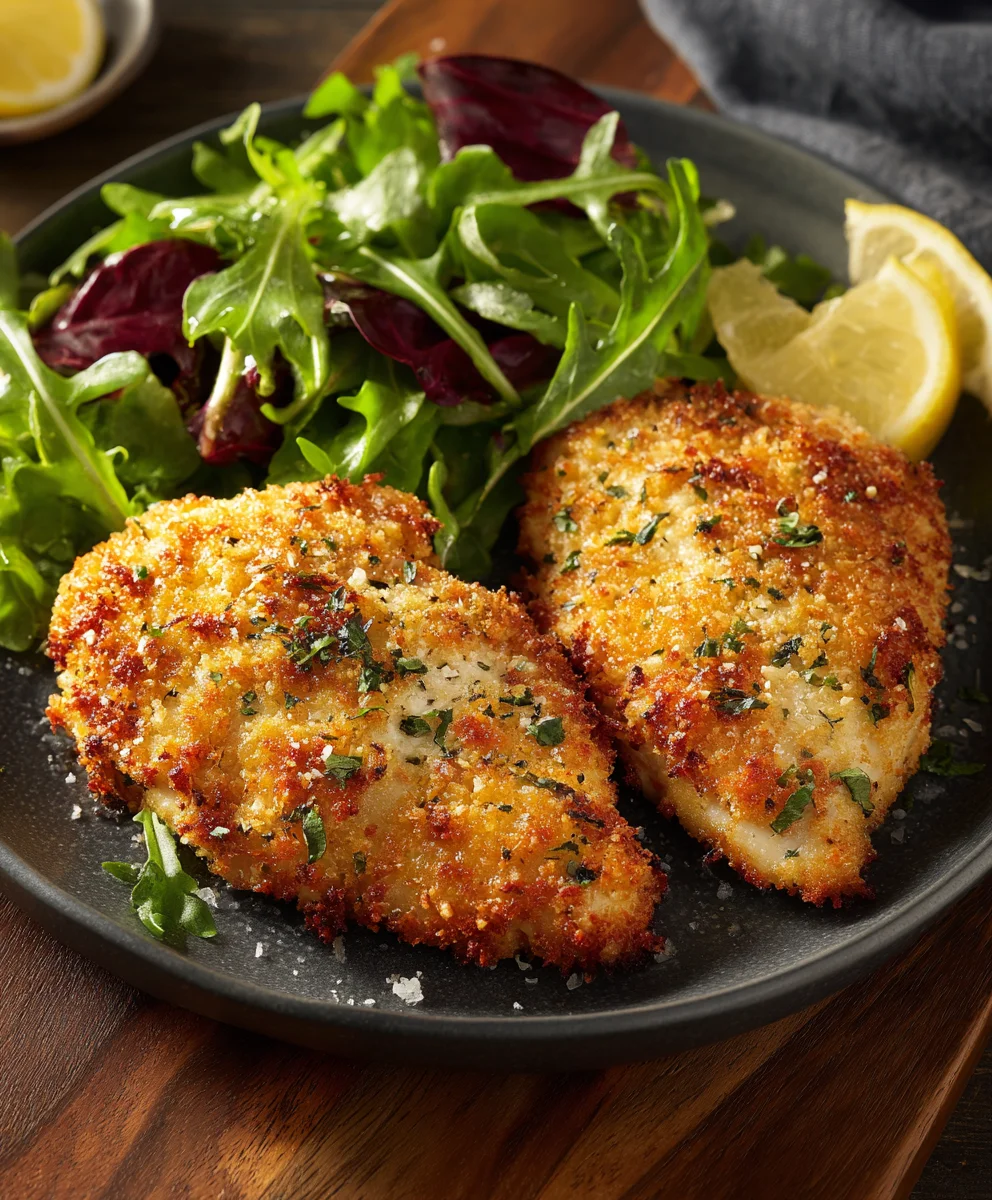
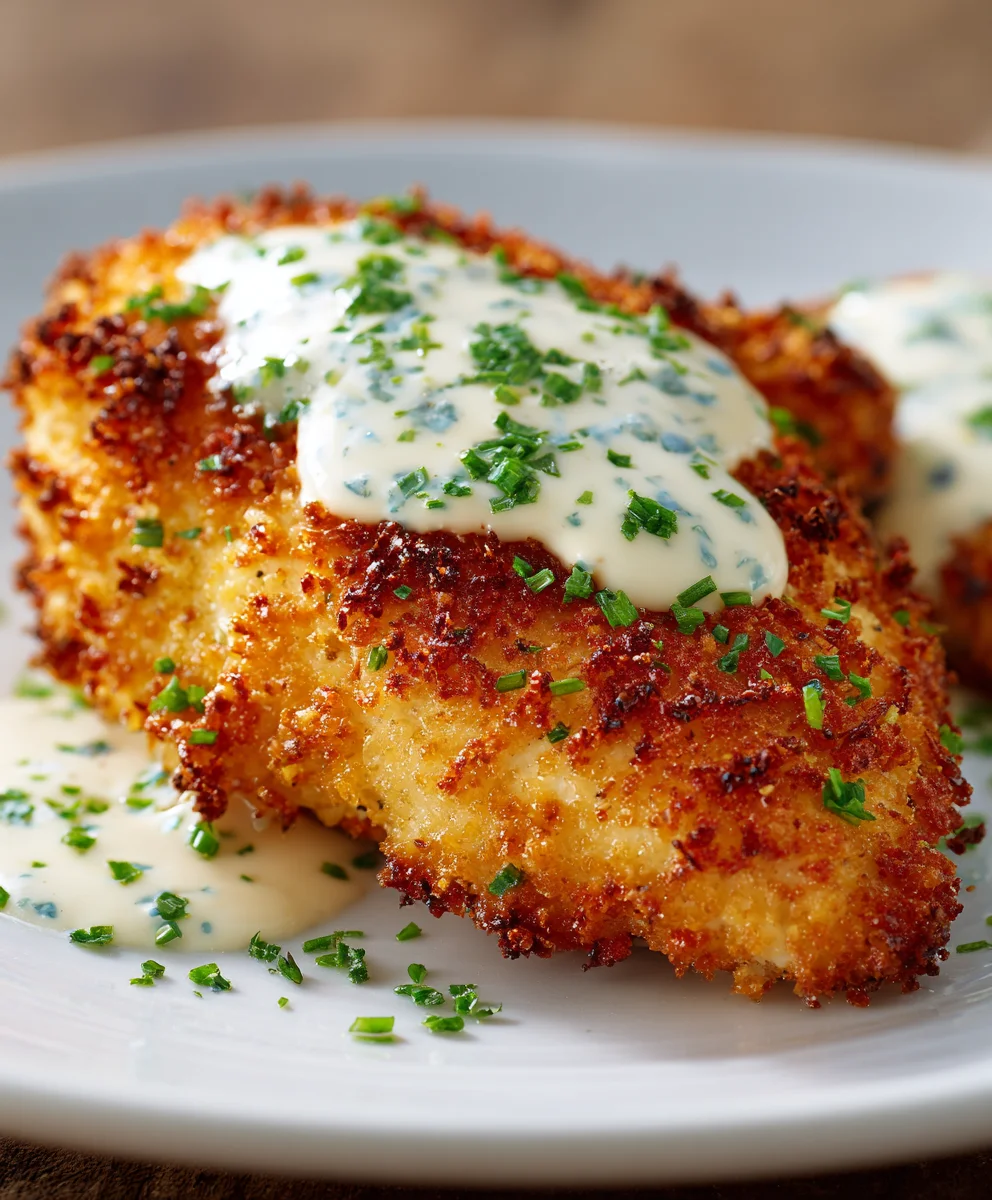
Delicious Beef Dinner: Easy & Quick Family Favorite Meal
Prepare to unlock the culinary secret known simply as ?p=8353! This isn’t just a recipe; it’s an invitation to a remarkable gastronomic journey, a delightful enigma that has captivated taste buds and sparked conversations for generations. We’ve all encountered those dishes that instantly feel both familiar and utterly new, and this, my friends, is precisely what you can expect from this unique creation.
Ingredients
-
4 boneless, skinless chicken breasts (about 1.5 lbs)
-
2 cloves fresh garlic, minced
-
1 cup freshly grated Parmesan cheese
-
1 cup panko breadcrumbs
-
2 tsp Italian seasoning
-
1 tsp salt
-
1/2 tsp pepper
-
Olive oil spray
Instructions
-
Step 1
Preheat oven to 400°F (200°C). Pat chicken breasts thoroughly dry. -
Step 2
In a shallow dish, combine Parmesan cheese, panko breadcrumbs, minced garlic, Italian seasoning, salt, and pepper. -
Step 3
Lightly spray chicken breasts with olive oil. Dredge each chicken breast in the breadcrumb mixture, pressing firmly to coat evenly on all sides. -
Step 4
Place the coated chicken breasts on a baking sheet. Lightly spray the tops of the chicken with olive oil spray. Bake for 20-25 minutes, or until the chicken is cooked through and reaches an internal temperature of 165°F (74°C). -
Step 5
Let the chicken rest for a few minutes before serving to allow juices to redistribute. Enjoy!
Important Information
Nutrition Facts (Per Serving)
It is important to consider this information as approximate and not to use it as definitive health advice.
Allergy Information
Please check ingredients for potential allergens and consult a health professional if in doubt.
Leave a Comment