
Rocky Road is more than just a dessert; it’s a nostalgic journey back to childhood sleepovers and celebratory gatherings, a delightful explosion of textures and flavors that never fails to bring a smile. This iconic treat, beloved for its irresistible combination of crunchy nuts, chewy marshmallows, and rich chocolate, holds a special place in so many hearts. What truly sets this Rocky Road apart is its perfect balance – the deep cocoa notes are complemented by the sweetness of marshmallows and the satisfying bite of nuts, creating a symphony in every mouthful. It’s the ultimate indulgence for when you need a sweet escape or want to impress guests with a classic that’s always a crowd-pleaser. Get ready to create your own batch of this wonderfully chaotic yet harmoniously delicious Rocky Road, a dessert that proves perfection can be found in delightful disarray!

Ingredients:
- 2 cups semi-sweet chocolate chips
- 2 cups mini marshmallows
- 1 cup chopped walnuts or peanuts
- 1/2 cup sweetened condensed milk
- 1/2 teaspoon vanilla extract
Getting Started: Preparing Your Rocky Road
Before we dive into the delightful process of creating this classic Rocky Road treat, it’s crucial to have everything prepped and ready. This ensures a smooth and enjoyable experience, preventing any last-minute scrambling. Begin extract by lining an 8×8 inch baking pan with parchment paper, leaving an overhang on the sides. This overhang will act as “handles” later, making it incredibly easy to lift the finished Rocky Road out of the pan for cutting. Make sure the parchment paper covers the entire bottom and sides of the pan, as this will prevent sticking and ensure clean edges. Next, gather all your ingredients and measure them out precisely. Having everything measured and within easy reach will streamline the melting and mixing process. Chop your nuts if they aren’t already pre-chopped. For walnuts, a medium chop is ideal, providing a pleasant crunch without being too large. If you’re using peanuts, the same applies. Ensure your marshmallows are easily accessible; mini marshmallows are perfect for this recipe as they distribute evenly throughout the chocolate.
Melting the Chocolate Base
The foundation of any good Rocky Road is perfectly melted chocolate. In a medium-sized, heatproof bowl, combine the 2 cups of semi-sweet chocolate chips and the 1/2 cup of sweetened condensed milk. You have a couple of excellent methods for melting this mixture. The most reliable and least fussy method is the double boiler. Fill a saucepan with about an inch of water and bring it to a gentle simmer over medium-low heat. Place the bowl with the chocolate and condensed milk over the saucepan, ensuring the bottom of the bowl does not touch the water. Stir the mixture continuously with a heatproof spatula or wooden spoon. The steam from the simmering water will gently melt the chocolate and condense milk into a smooth, glossy liquid. Be patient; this usually takes about 5-7 minutes. Avoid overheating the chocolate, as this can cause it to seize or become grainy. If you’re short on time, you can also use the microwave method. Place the bowl with the chocolate chips and condensed milk in the microwave. Heat on 50% power in 30-second intervals, stirring thoroughly after each interval. Continue this process until the chocolate is almost completely melted, then stir until it’s smooth and glossy.
Incorporating Flavor and Enhancing Texture
Once your chocolate and condensed milk mixture is luxuriously smooth and glossy, it’s time to add the flavor enhancers and prepare for the textural elements. Remove the bowl from the heat (if using a double boiler) or from the microwave. Add the 1/2 teaspoon of vanilla extract to the melted chocolate mixture. Vanilla extract is a classic addition that complements the richness of the chocolate beautifully, adding a subtle depth of flavor without overpowering the other components. Stir it in thoroughly until it’s completely incorporated. Now, it’s time to introduce the star players of our Rocky Road: the marshmallows and nuts. Add the 2 cups of mini marshmallows and the 1 cup of chopped walnuts or peanuts to the melted chocolate.
Gently Folding in the Mix-ins
This step requires a gentle hand to ensure the marshmallows don’t melt prematurely and the nuts are evenly distributed. Using your spatula, carefully fold the marshmallows and nuts into the chocolate mixture. Don’t overmix or stir vigorously, as this can break down the marshmallows too much and make the entire mixture sticky. The goal is to coat each marshmallow and nut with the luscious chocolate, ensuring a delightful bite every time. Gently scoop and fold the ingredients together, scraping the sides and bottom of the bowl to make sure everything is incorporated without excessive agitation. You want to see distinct chunks of marshmallows and nuts nestled within the chocolate.
Pouring and Setting the Rocky Road
With all the delicious components mixed, it’s time to get your Rocky Road into its final form. Carefully pour the entire mixture into your prepared 8×8 inch baking pan. Use your spatula to spread the mixture evenly across the pan, gently coaxing it into the corners. Again, be mindful of the marshmallows; you don’t want to press down too hard. The mixture should be relatively thick. Once spread evenly, gently tap the pan on the counter a few times. This helps to settle the mixture and eliminate any large air pockets, creating a more uniform texture. Now, the mostgin extractallenging part: waiting! Place the pan in the refrigerator for at least 2-3 hours, or until the Rocky Road is completely firm and set. You can also let it set at room temperature if your kitchen isn’t too warm, but refrigeration guarantees a firm set.
Slicing and Serving Your Homemade Rocky Road
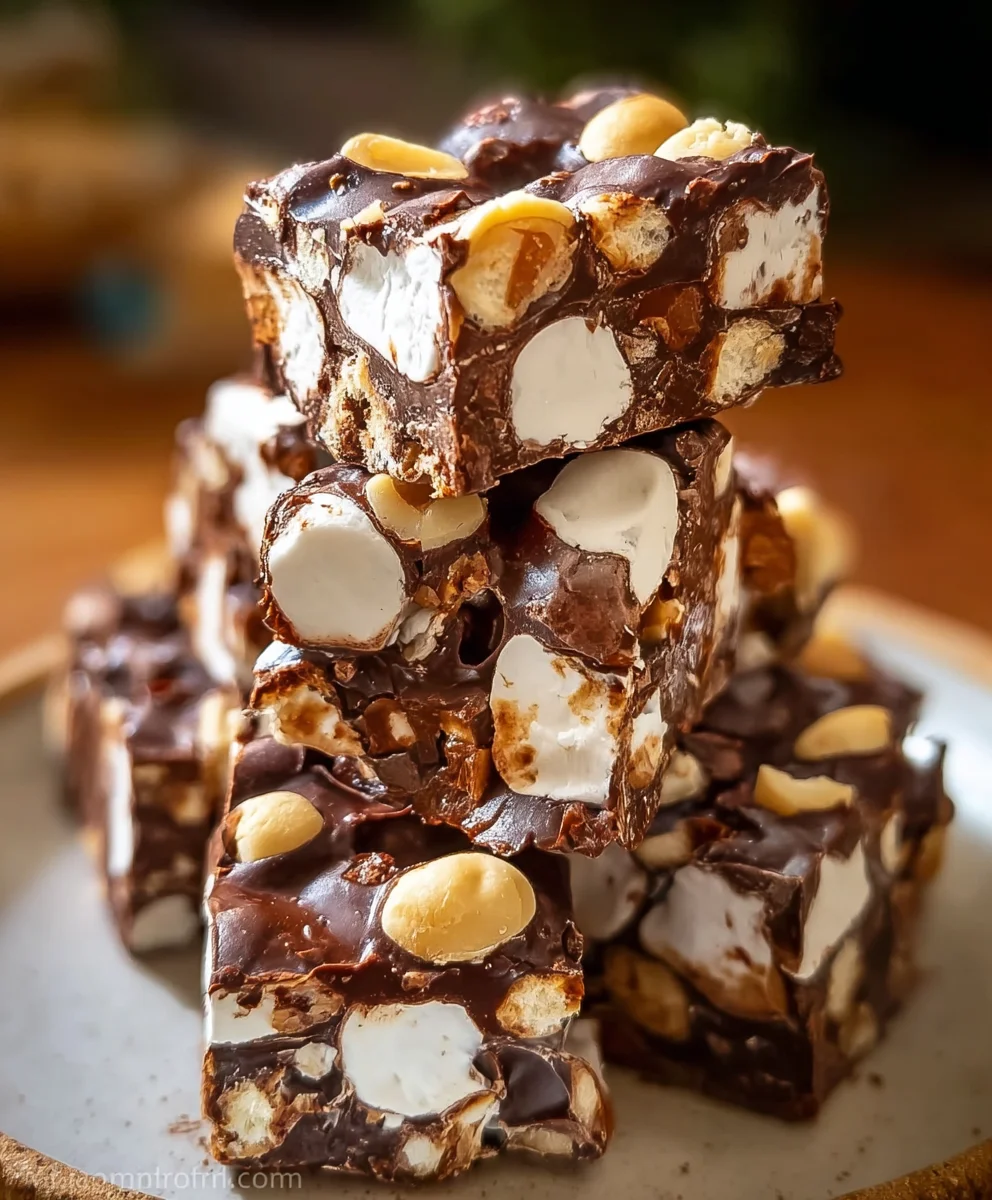
Once your Rocky Road is thoroughly chilled and firm to the touch, it’s time for the grand reveal and the best part – enjoying your creation! Carefully lift the entire slab out of the pan using the parchment paper overhangs. Place it on a cutting board. For clean cuts, use a sharp knife. You might find it helpful to dip your knife in hot water and wipe it dry between cuts, especially if the mixture is very firm. Cut the Rocky Road into bite-sized squares. The size is entirely up to your preference, but typically 1-inch or 1.5-inch squares are perfect for a delightful treat. Arrange the squares on a serving platter and admire your handiwork. This homemade Rocky Road is perfect for parties, a sweet afternoon pick-me-up, or as a thoughtful homemade gift. Its delightful combination of textures – the smooth chocolate, chewy marshmallows, and crunchy nuts – makes it an irresistible classic.
Conclusion:
And there you have it! Your very own batch of delicious homemade Rocky Road is ready to be devoured. This recipe is incredibly rewarding, transforming simple ingredients into a delightful treat that’s perfect for any occasion. Whether you’re looking for a quick dessert for unexpected guests or a fun activity to do with family, this Rocky Road is sure to impress. Remember, the beauty of this recipe lies in its adaptability, so don’t be afraid to get creative with your additions. I encourage you to make this Rocky Road your own and share the joy with everyone you know. Happy baking!
Frequently Asked Questions:
Can I use different types of chocolate for my Rocky Road?
Absolutely! While milk chocolate is a classic choice, you can experiment with dark chocolate, white chocolate, or even a blend of different chocolates to create unique flavor profiles for your Rocky Road. Just ensure the chocolate melts smoothly for the best results.
What are some other good additions to Rocky Road?
The possibilities are endless! Beyond the classic marshmallows and nuts, consider adding dried cranberries, pretzels, mini cookies, or even a sprinkle of sea salt for an extra flavor dimension to your Rocky Road. Get creative and find your perfect combination!
How should I store my Rocky Road?
Once your Rocky Road has set, it’s best stored in an airtight container at room temperature. If your kitchen is particularly warm, you might want to store it in the refrigerator to prevent it from getting too soft, though this can slightly affect the texture.
Easy Rocky Road Fudge-Decadent No-Bake Treat
A simple and decadent no-bake Rocky Road fudge recipe, perfect for a quick and delicious treat.
Ingredients
-
2 cups semi-sweet chocolate chips
-
2 cups mini marshmallows
-
1 cup chopped walnuts or peanuts
-
1/2 cup sweetened condensed milk
-
1/2 teaspoon vanilla extract
Instructions
-
Step 1
Line an 8×8 inch baking pan with parchment paper, leaving an overhang on the sides. Gather and measure all ingredients. -
Step 2
In a heatproof bowl, combine semi-sweet chocolate chips and sweetened condensed milk. Melt using a double boiler or microwave on 50% power, stirring until smooth and glossy. -
Step 3
Remove from heat and stir in vanilla extract until fully incorporated. -
Step 4
Gently fold in the mini marshmallows and chopped nuts until evenly coated with the chocolate mixture. -
Step 5
Pour the mixture into the prepared pan and spread evenly. Gently tap the pan to settle. -
Step 6
Refrigerate for at least 2-3 hours, or until completely firm. -
Step 7
Lift the slab out of the pan using the parchment paper. Cut into bite-sized squares using a sharp knife. Serve and enjoy.
Important Information
Nutrition Facts (Per Serving)
It is important to consider this information as approximate and not to use it as definitive health advice.
Allergy Information
Please check ingredients for potential allergens and consult a health professional if in doubt.


Leave a Comment