
Rustic Bread Recipe is more than just flour, water, and yeast; it’s an invitation to a slower pace, a celebration of simple ingredients transformed by time and heat into something truly magical. Who doesn’t love the aroma of freshly baked bread filling their home? It’s a scent that evokes warmth, comfort, and the promise of deliciousness. This particular Rustic Bread Recipe holds a special place in my heart because of its incredibly satisfying crust and a wonderfully airy, chewy interior. What truly makes it stand out is its approachable nature; you don’t need a fancy baker’s peel or a professional oven to achieve stunning results. It’s the kind of bread that tastes like it came from a charming European bakery, perfect for slathering with butter, dipping into soup, or building the ultimate sandwich. Get ready to experience the joy of crafting your own perfect loaf!
Ingredients:
- 3 cups warm water
- 2 ¼ teaspoons active dry yeast (this is equivnon-alcoholic alent to one standard packet of yeast)
- 1 tablespoon granulated sugar
- 6 cups all-purpose flour (approximately 750 grams)
- 3 teaspoons salt
Preparing the Dough: The Foundation of Your Rustic Bread
Step 1: Activating the Yeast and Initial Mix
The journey to our rustic bread begin extracts with waking up the yeast. In a large mixing bowl, combine the 3 cups of warm water. It’s important the water isn’t too hot, as this can kill the yeast, nor too cold, which will prevent it from activating effectively. Aim for a temperature around 105-115°F (40-46°C) – it should feel comfortably warm to the touch, like a warm bath. To this warm water, sprinkle in the 2 ¼ teaspoons of active dry yeast. Next, add the 1 tablespoon of granulated sugar. The sugar acts as food for the yeast, helping it to bloom and become active. Give this mixture a gentle stir to ensure the yeast and sugar are mostly dissolved. Now, the crucial waitinggin extractme begins. Let this mixture sit undisturbed for about 5 to 10 minutes. You’ll know the yeast is alive and well when it starts to foam and bubble on the surface, creating a creamy, frothy layer. This “blooming” process is essential for a good rise in your bread. If you don’t see any activity after 10 minutes, your yeast might be old or the water temperature was off, and you’ll need to start this step again with fresh yeast.
Step 2: Incorporating Flour and Salt
Once your yeast has visibly bloomed and shows signs of vigorous activity, it’s time to introduce the dry ingredients. To the bubbly yeast mixture, add 3 cups of the flour (about 375 grams) and the 3 teaspoons of salt. Use a sturdy spoon or a dgin extracth whisk to begin incorporating these dry ingredients into the wet. Mix until just combined. At this stage, the mixture will be very shaggy and sticky, more like a very thick batter than a dough. Don’t worry about developing the gluten just yet; our goal here is simply to get everything incorporated.
Step 3: Developing the Dough and First Knead
Now we’ll add the remaining 3 cups of flour (another 375 grams) to gradually build our dough. Add the flour in about ½ cup increments, mixing after each addition. As you add more flour, the mixture will start to thicken considerably and become more difficult to stir with a spoon. Once it becomes too stiff to mix effectively with the spoon, it’s time to switch to your hands or a stand mixer fitted with a dough hook. If you’re kneading by hand, turn the shaggy mass out onto a lightly floured surface. This is where the real work of developinggin extracte gluten structure begins, which gives bread its chewy texture and structure. Knead the dough by pushing it away from you with the heels of your hands, then folding it back over itself and giving it a quarter turn. Continue this process for about 8-10 minutes. The dough will initially be sticky, but as you knead, it will become smoother, more elastic, and less likely to stick to your hands and the work surface. If it’s still very sticky after a few minutes of kneading, you can add a tiny bit more flour, a tablespoon at a time, but be careful not to add too much, as this can make the bread dense. The goal is a dough that is soft and slightly tacky but manageable. If using a stand mixer, knead on medium-low speed for about 6-8 minutes until the dough pulls away from the sides of the bowl and is smooth and elastic.
Rising and Shaping: Giving Our Bread Its Form
Step 4: First Rise (Bulk Fermentation)
Once your dough has been kneaded to a smooth, elastic consistency, it’s time for its first rise, also known as bulk fermentation. Lightly grease a clean bowl with a little bit of olive oil or cooking spray. Place the kneaded dough into the greased bowl and turn it over once to coat the entire surface of the dough with oil. This prevents a tough crust from forming during the rise. Cover the bowl tightly with plastic wrap or a clean, damp kitchen towel. Place the bowl in a warm, draft-free spot in your kitchen. An oven that has been turned off but is still slightly warm from a previous bake is an ideal location, or simply a quiet corner of your countertop away from windows and air vents. Allow the dough to rise for about 1 to 1.5 hours, or until it has doubled in size. You can gently poke the dough with a floured finger; if the igin extractntation remains without springing back completely, it’s ready for the next stage. The exact rising time can vary depending on the ambient temperature of your kitchen.
Step 5: Punching Down and Shaping
After the dough has impressively doubled in size, it’s time to “punch it down.” This simply means gently deflating the dough to release the accumulated gases and redistribute the yeast. You can do this by gently pressing down into the center of the dough with your fist. It will feel satisfyingly soft and airy. Turn the dough out onto a lightly floured surface. For a rustic loaf, we’ll keep the shaping simple. You can either gently shape it into a round boule or an oblong loaf. To make a boule, gather the edges of the dough and pinch them together at the bottom, then gently tuck them underneath to create surface tension. For an oblong loaf, simply pat the dough into your desired rectangular shape. Avoid overworking the dough at this stage, as we want to preserve some of the air bubbles created during the first rise.
The Final Bake: Crispy Crust and Tender Crum extractb
Step 6: Second Rise (Proofing) and Baking Preparation
Once shaped, place your loaf onto a baking sheet lined with parchment paper or dusted with cornmeal, or into a well-floured proofing basket (banneton). If you shaped it into a boule, you might place it seam-side down. Cover the shaped loaf loosely with plastic wrap or a clean kitchen towel and let it rest for another 30 to 45 minutes. This is the second rise, or proofing stage, and it allows the dough to relax and regain some of its loft before baking. While the dough is proofing, preheat your oven to 425°F (220°C). If you have a baking stone or Dutch oven, place it in the oven while it preheats. For an extra crispy crust, you can create steam in your oven. One common method is to place a shallow metal pan on the bottom rack of the oven during preheating. Just before you’re ready to bake, carefully pour about 1 cup of hot water into the preheated pan (be cautious of the steam!). This will create a steamy environment essential for a good crust.
Step 7: Baking Your Rustic Masterpiece
Once the oven is fully preheated and the loaf has completed its second rise, it’s time to bake. If you’re using a baking stone, carefully slide your loaf onto the hot stone. If using a Dutch oven, carefully remove the hot lid, place your loaf inside, and replace the lid. This creates a self-steaming environment. Bake for 20 minutes with the steam (or with the Dutch oven lid on). After 20 minutes, carefully remove the steam pan from the oven (or remove the lid from the Dutch oven). This allows the crust to brown and crisp up. Continue baking for another 20-25 minutes, or until the crust is a deep golden brown and the internal temperature of the bread reaches 200-210°F (93-99°C) when measured with an instant-read thermometer. The bottom of the loaf should sound hollow when tapped.
Step 8: Cooling and Enjoying
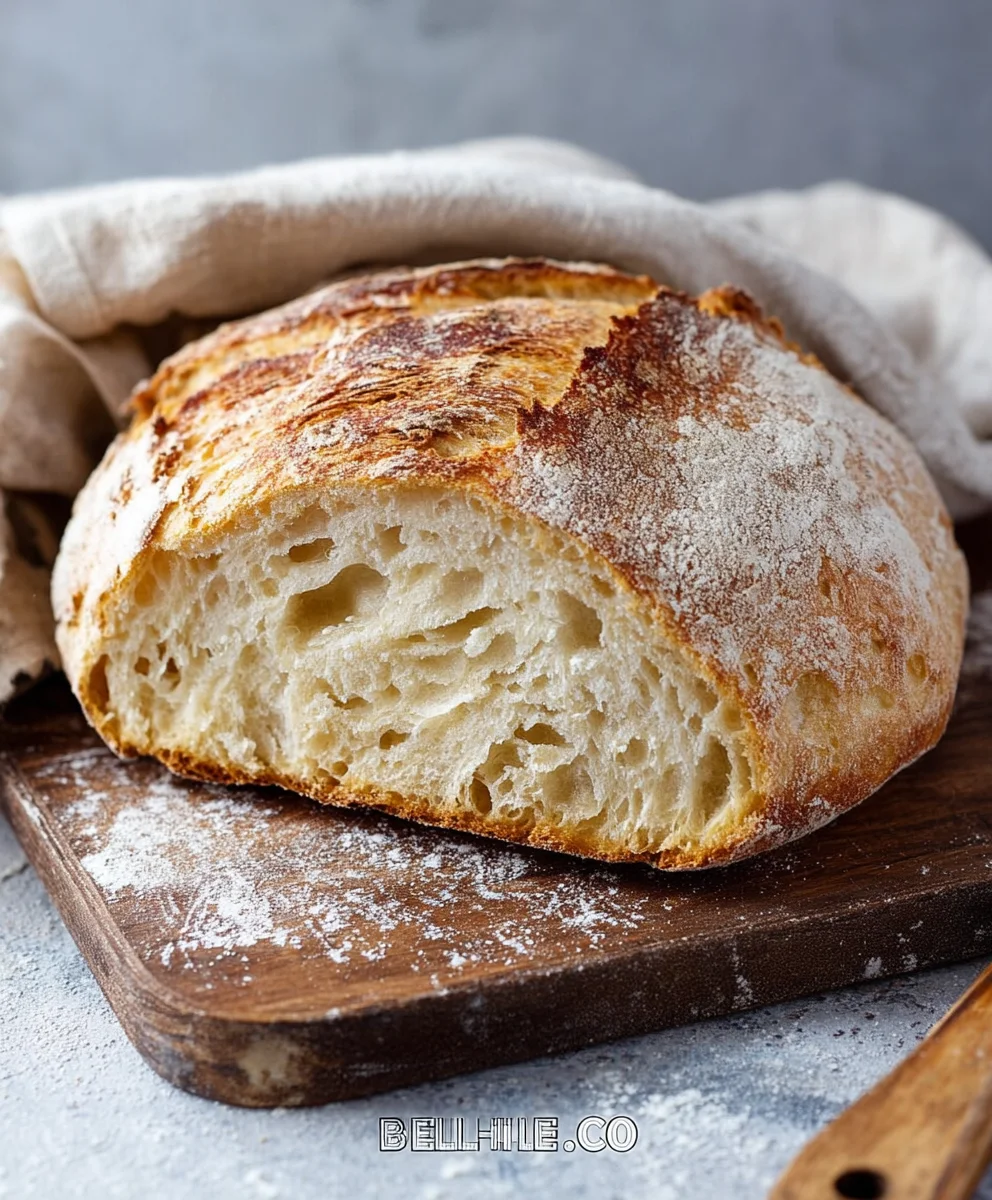
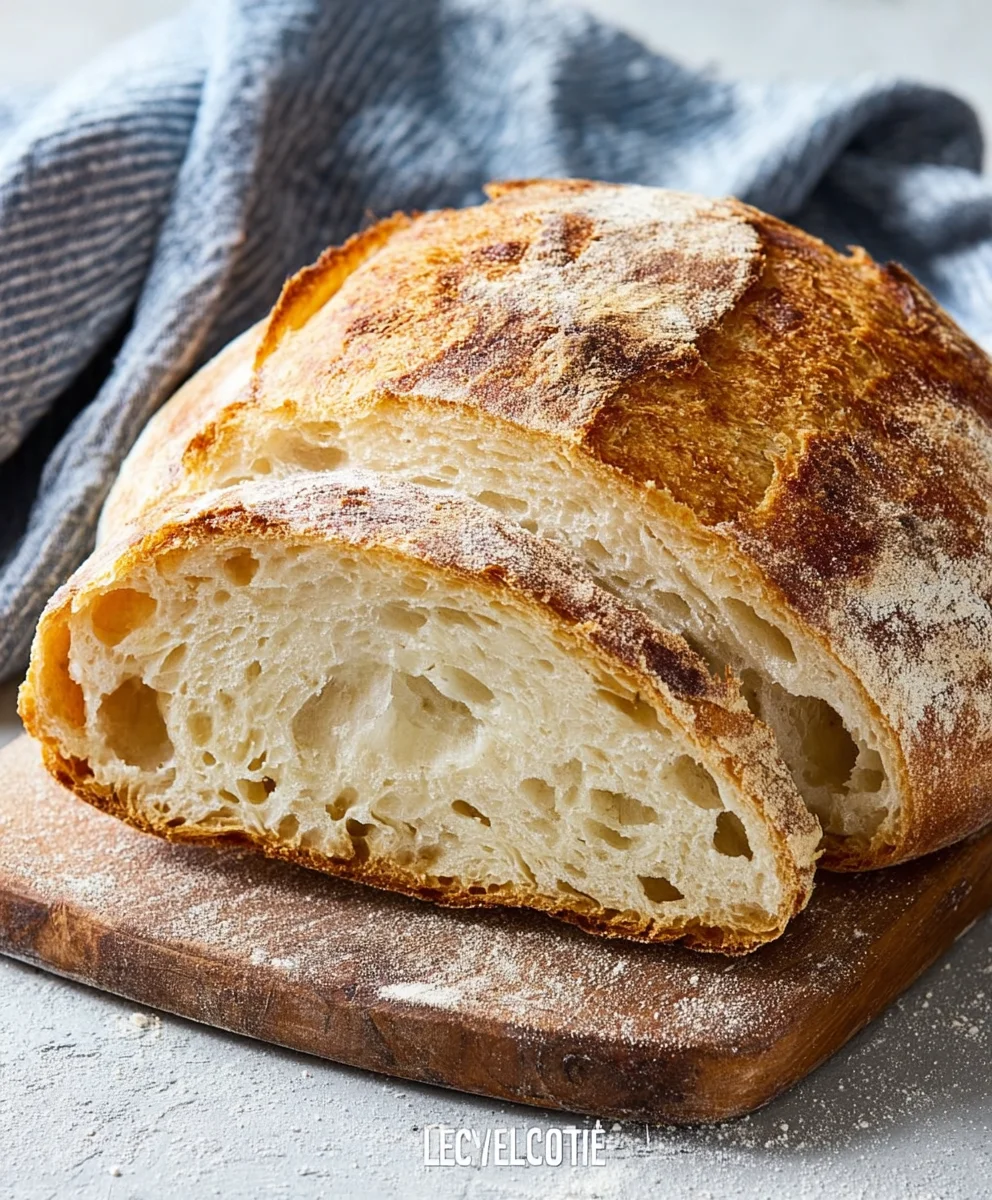
This is arguably the hardest part: waiting for your beautiful rustic bread to cool! Once baked, carefully remove the loaf from the oven and transfer it to a wire cooling rack. Allowing the bread to cool completely on a wire rack is crucial. This allows the steam trapped inside to escape arum extractthe crumb structure to set properly. If you cut into it too soon, the inside can be gummy. Resist the temptation for at least an hour, ideally two. Once cooled, you’ll have a crusty exterior with a soft, airy interior, perfect for slathering with butter, dipping into soup, or enjoying on its own.
Conclusion:
And there you have it – your very own batch of delicious Rustic Bread Recipe! This recipe is designed to be accessible for bakers of all levels, resulting in a beautiful loaf with a satisfyingly chewy crust and a tender crum extractb. It’s incredibly rewarding to pull a homemade bread from your oven, and this Rustic Bread Recipe is sure to become a staple in your kitchen. Don’t be afraid to experiment and make it your own!
I love serving this Rustic Bread Recipe warm, with a generous slathering of butter. It’s also fantastic alongside hearty soups, stews, or as the base for open-faced sandwiches. For variations, consider adding herbs like rosemary or thyme to the dough for an aromatic twist, or perhaps some grated cheese for a savory kick. You could even try incorporating seeds like sunflower or pumpkin for added texture and flavor. The possibilities are truly endless with this versatile loaf.
Frequently Asked Questions:
Q: My bread didn’t rise as much as I expected. What could be the reason?
A: There are a few common reasons for a less-than-stellar rise. Ensure your yeast is fresh and active by proofing it in warm water with a pinch of sugar. The water temperature is crucial – too hot will kill the yeast, and too cold won’t activate it. Also, make sure your proving environment is warm enough; a slightly warm oven (turned off, of course) or a draft-free spot can help.
Q: Can I make this Rustic Bread Recipe ahead of time?
A: Absolutely! Once completely cooled, this Rustic Bread Recipe can be stored in an airtight bag or container at room temperature for 2-3 days. For longer storage, you can freeze it. Slice it first, then wrap tightly in plastic wrap and then in foil before freezing. Reheat slices in a toaster or oven for a fresh-from-the-bakery experience.
Easy Rustic Bread Recipe – Bake This Delicious Loaf
Bake a delicious, crusty rustic loaf with this easy-to-follow recipe, perfect for beginners.
Ingredients
-
3 cups warm water
-
2 ¼ teaspoons active dry yeast
-
1 tablespoon granulated sugar
-
6 cups all-purpose flour
-
3 teaspoons salt
Instructions
-
Step 1
In a large bowl, combine warm water (105-115°F), active dry yeast, and sugar. Let sit for 5-10 minutes until foamy. -
Step 2
Add 3 cups of flour and salt to the yeast mixture. Mix until just combined; the mixture will be shaggy and sticky. -
Step 3
Gradually add the remaining 3 cups of flour, mixing until a dough forms. Knead by hand for 8-10 minutes or with a stand mixer for 6-8 minutes until smooth and elastic. -
Step 4
Place the dough in a lightly greased bowl, cover, and let rise in a warm, draft-free spot for 1 to 1.5 hours, or until doubled in size. -
Step 5
Gently punch down the dough and shape it into a round boule or an oblong loaf. Place on a parchment-lined baking sheet or in a floured proofing basket. -
Step 6
Cover the shaped loaf and let it rise for another 30-45 minutes. Preheat oven to 425°F (220°C). Consider adding steam to the oven for a crispier crust. -
Step 7
Bake for 20 minutes with steam (or Dutch oven lid on), then remove steam pan (or Dutch oven lid) and continue baking for another 20-25 minutes until deep golden brown and internal temperature reaches 200-210°F. -
Step 8
Cool completely on a wire rack for at least an hour before slicing and enjoying.
Important Information
Nutrition Facts (Per Serving)
It is important to consider this information as approximate and not to use it as definitive health advice.
Allergy Information
Please check ingredients for potential allergens and consult a health professional if in doubt.


Leave a Comment