
Smores Pie is more than just a dessert; it’s a culinary journey back to cherished memories of crackling campfires, starlit nights, and the simple joy of sticky fingers. We all adore the classic s’more, a symphony of perfectly toasted marshmallow, rich melted chocolate, and crisp graham cracker. Tracing its origins back to the early 20th century with the Girl Scouts, the traditional s’more has long been a quintessential American treat, symbolizing camaraderie and simple pleasures.
But what if you could capture that magic without the need for a roaring fire? What if you could elevate it into an elegant, yet effortlessly delightful, centerpiece for any occasion? This is precisely where the magnificent Smores Pie truly shines.
It’s the ultimate combination of convenience and indulgence.
This pie takes everything we adore about the original – the irresistible melty chocolate, the fluffy, golden-toasted marshmallow, and the buttery graham cracker crust – and transforms it into a sophisticated, shareable delight. Perfect for potlucks, family gatherings, or simply a cozy evening at home, this Smores Pie offers that beloved gooey, sweet, and comforting experience with every single forkful. I’m absolutely thrilled to guide you through creating this unforgettable dessert that promises smiles and satisfied sighs.
Ingredients:
Get ready to gather these glorious components that will transform into your ultimate S’mores Pie. I always recommend using high-quality ingredients, especially for the chocolate, as it truly makes a difference in the final flavor profile of this decadent treat.
-
For the Graham Cracker Crust:
- 1 ½ cups (approximately 10-12 full sheets) graham cracker crumbs (about 170g)
- ¼ cup (50g) granulated sugar
- ½ teaspoon fine sea salt
- ½ cup (113g) unsalted butter, melted
-
For the Rich Chocolate Filling:
- 1 ½ cups (355ml) heavy cream (also known as whipping cream)
- 10 ounces (280g) high-quality semi-sweet chocolate, finely chopped or good quality semi-sweet chocolate chips (I prefer Ghirardelli or Guittard for their melting consistency and flavor)
- ¼ cup (50g) granulated sugar (adjust based on your chocolate’s sweetness and preference)
- 2 tablespoons (28g) unsalted butter, cut into small pieces
- 1 teaspoon pure vanilla extract
- ½ teaspoon instant espresso powder or strong brewed coffee (optional, but it deepens the chocolate flavor beautifully without adding a coffee taste)
- ¼ teaspoon fine sea salt
-
For the Fluffy Toasted Marshmallow Topping:
- 4 large egg whites, at room temperature
- ¾ cup (150g) granulated sugar
- ¼ teaspoon cream of tartar
- 1 teaspoon pure vanilla extract
- Pinch of fine sea salt
Phase 1: Preparing the Graham Cracker Crust
Let’s kick things off with the foundation of our S’mores Pie: the crunchy, buttery graham cracker crust. This step is surprisingly simple, but it’s crucial for achieving that authentic S’mores texture.
-
Preheat Your Oven:
First things first, preheat your oven to 350°F (175°C). While the crust can be no-bake, a quick bake helps it hold its shape much better and gives it an extra layer of toasted flavor, which is essential for a truly authentic S’mores experience.
-
Crush Those Graham Crackers:
There are a couple of ways to get those crumbs just right. My favorite method is to place the graham cracker sheets into a food processor and pulse until they form fine, even crumbs. You want them as fine as possible, almost like sand, to ensure a compact crust. If you don’t have a food processor, don’t worry! You can place the crackers in a large Ziploc bag, seal it, and then use a rolling pin to crush them. This can be quite therapeutic, actually!
-
Combine the Dry Ingredients:
In a medium-sized bowl, combine your finely crushed graham cracker crumbs, granulated sugar, and the ½ teaspoon of fine sea salt. Give them a good whisk to make sure everything is evenly distributed. The sugar adds a touch of sweetness, while the salt enhances all the flavors, balancing the sweetness beautifully.
-
Add the Melted Butter:
Now, pour your ½ cup of melted unsalted butter over the crumb mixture. Using a fork or your hands (which I find works best for really getting in there), mix everything together until the crumbs are uniformly moistened. The mixture should resemble wet sand and hold together when you press it between your fingers. This is your key indicator that you’ve added enough butter. If it’s too dry, it won’t hold its shape when baked.
-
Pressing into the Pie Dish:
Transfer the buttered graham cracker mixture into a standard 9-inch pie dish. Using the bottom of a measuring cup, your clean hands, or a flat-bottomed glass, firmly press the crumbs onto the bottom and up the sides of the pie dish. It’s important to press firmly and evenly to create a sturdy crust that won’t crumble when sliced. I like to pay extra attention to the edges, making sure they’re nice and defined. This creates a beautiful border for our S’mores Pie.
-
Bake the Crust:
Place the pie dish with the pressed crust into your preheated oven. Bake for approximately 8-10 minutes, or until the edges are lightly golden and the crust smells fragrant. Baking it briefly helps to set the butter and makes the crust wonderfully crisp. Once baked, remove it from the oven and let it cool completely on a wire rack. A fully cooled crust is essential before adding the chocolate filling, otherwise, you risk a melted mess.
Phase 2: Crafting the Decadent Chocolate Filling
This is where the magic truly happens! We’re creating a rich, luscious chocolate ganache-style filling that will be the heart of our S’mores Pie. Trust me, the aroma alone will make your kitchen smell like a gourmet chocolate shop.
-
Prepare Your Chocolate:
If you’re using a chocolate bar, make sure it’s finely chopped. Small, uniform pieces will melt much more smoothly and quickly than large chunks. If using chocolate chips, ensure they are good quality as some chips contain stabilizers that prevent them from melting as smoothly. Place your chopped chocolate or chips in a large, heatproof bowl. I recommend a bowl that can withstand a little heat and is wide enough for easy stirring.
-
Heat the Cream Mixture:
In a medium saucepan, combine the heavy cream, granulated sugar (if using), instant espresso powder (if using), and the ¼ teaspoon of fine sea salt. Place the saucepan over medium heat. Stir occasionally, bringing the mixture to a gentle simmer. Do not boil it vigorously. You’ll see small bubbles forming around the edges, and a bit of steam will rise. This usually takes about 3-5 minutes. The sugar needs to dissolve completely, and the cream needs to be hot enough to melt the chocolate.
-
Pour Over Chocolate and Steep:
Once your cream mixture is simmering, immediately remove it from the heat and pour the hot cream directly over your prepared chocolate in the heatproof bowl. Do not stir right away! Let it sit undisturbed for about 5 minutes. This resting period allows the hot cream to gently warm and melt the chocolate, ensuring a super smooth ganache without any graininess from direct heat.
-
Stir Until Silky Smooth:
After the 5-minute rest, begin stirring the chocolate and cream mixture gently with a whisk or a rubber spatula, starting from the center and slowly working your way outwards. Continue stirring until the mixture is completely smooth, glossy, and uniform in color. You want a perfectly emulsified ganache – no lumps, no streaks of cream. This might take a few minutes of patient stirring. If you find a few stubborn lumps, you can place the bowl over a pot of barely simmering water (a makeshift double boiler) for a minute or two, stirring constantly, but be careful not to overheat it.
-
Enrich and Flavor:
Once smooth, add the 2 tablespoons of unsalted butter (cut into small pieces) and the 1 teaspoon of pure vanilla extract. Continue stirring until the butter has fully melted and is incorporated into the ganache. The butter adds a beautiful sheen and extra richness, while the vanilla enhances the overall flavor profile. This step adds a luxurious finish to our filling.
-
Pour into the Crust:
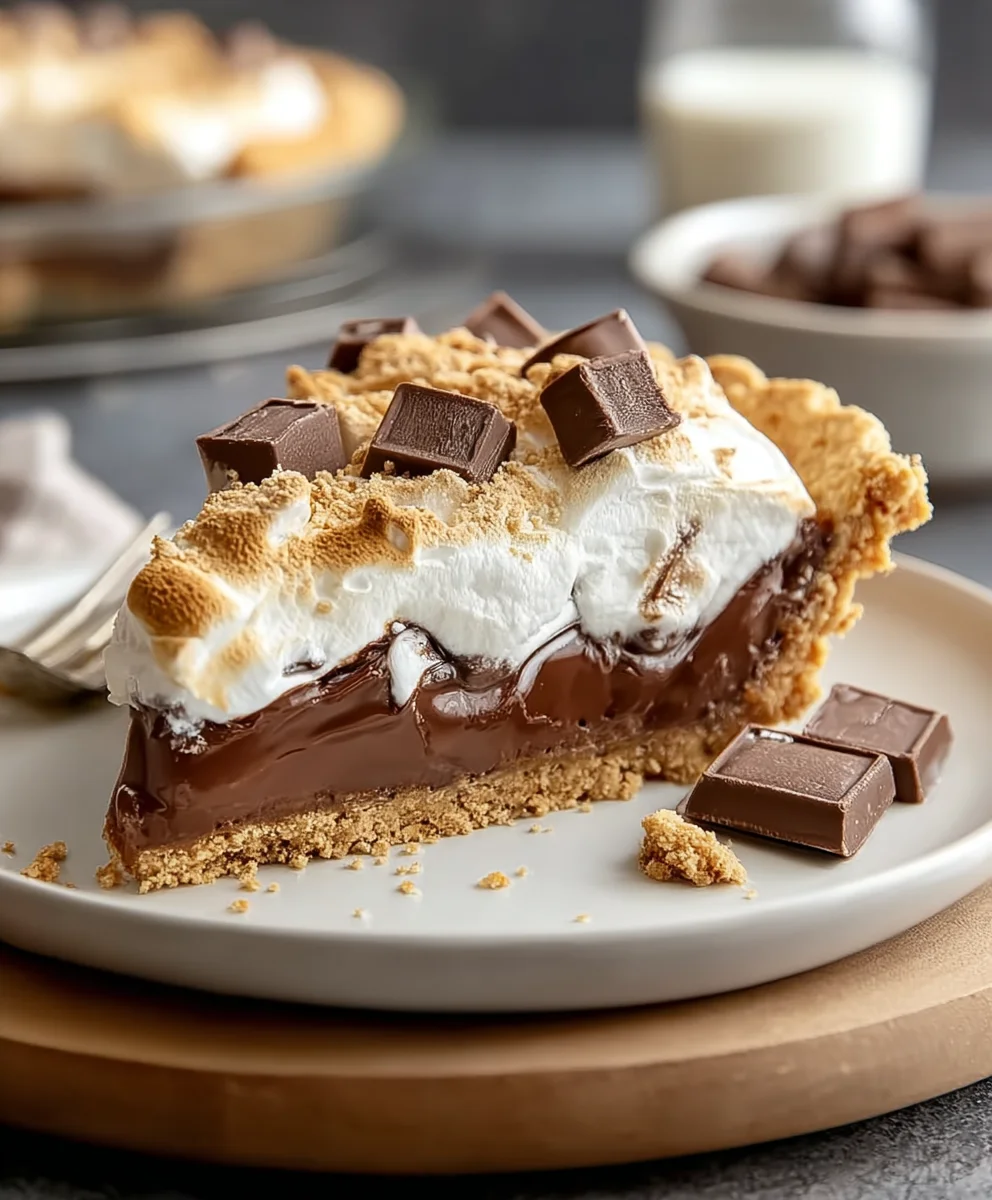
Carefully pour the warm, silky chocolate filling into your completely cooled graham cracker crust. Use a rubber spatula to scrape every last bit of that deliciousness from the bowl. Gently tap the pie dish on the counter a few times to release any air bubbles and ensure the top surface is even and smooth.
-
Chill to Set:
Place the S’mores Pie in the refrigerator and chill for at least 3-4 hours, or ideally, overnight. This chilling time is non-negotiable! It allows the chocolate ganache to fully set, becoming firm enough to hold its shape when sliced. Don’t rush this step, as a perfectly set filling is key to a beautiful pie.
Phase 3: The Fluffy Toasted Marshmallow Topping
Now for the pièce de résistance: the marshmallow topping! While store-bought marshmallows are an option, making your own Swiss meringue topping provides an incredibly light, fluffy, and stable marshmallow-like cloud that torches beautifully and tastes infinitely better. It’s truly worth the extra effort!
-
Prepare the Double Boiler:
Fill a medium saucepan with about an inch or two of water and bring it to a simmer over medium-low heat. You will be placing a heatproof bowl on top of this saucepan, ensuring the bottom of the bowl does not touch the simmering water. This creates a double boiler, which is essential for gently cooking the egg whites and sugar.
-
Combine Egg Whites and Sugar:
In your large, heatproof bowl (the one that fits snugly over your saucepan), combine the 4 large egg whites, ¾ cup granulated sugar, and the ¼ teaspoon of cream of tartar. The cream of tartar helps stabilize the egg whites, ensuring a strong, stable meringue.
-
Cook the Meringue Mixture:
Place the bowl over the simmering water. Whisk continuously, but gently, until the sugar has completely dissolved and the mixture is warm to the touch. You can test this by rubbing a small amount between your fingers; if it feels completely smooth with no grittiness, it’s ready. An instant-read thermometer should register around 160°F (71°C), which ensures the egg whites are safely pasteurized. This step usually takes about 5-7 minutes. Once heated, immediately remove the bowl from the heat.
-
Whip to Stiff Peaks:
Transfer the warm egg white mixture to the bowl of a stand mixer fitted with the whisk attachment, or use a hand mixer. Begin whipping on medium speed for about 1-2 minutes, then increase the speed to high. Continue whipping for 7-10 minutes, or until the meringue is incredibly thick, glossy, and holds stiff peaks. When you lift the whisk, the meringue should stand up firmly. This transformation is truly mesmerizing to watch!
Important Note on Whipping:
Be patient during this stage. The volume will increase dramatically, and the meringue will transform from a foamy liquid to a luscious, marshmallow-like cloud. The bowl should also feel cool to the touch when the meringue is done whipping, indicating it has cooled down sufficiently.
-
Add Vanilla and Salt:
Once you’ve reached stiff peaks, add the 1 teaspoon of pure vanilla extract and the pinch of fine sea salt. Whip for another 30 seconds to incorporate. The vanilla adds that classic marshmallow flavor, while the salt balances the sweetness.
Phase 4: Assembling and Finishing Your S’mores Pie
We’re in the home stretch now! Your chocolate filling should be perfectly set, and your marshmallow topping is light and ready. This final phase brings everything together for that show-stopping S’mores Pie.
-
Top the Chilled Pie:
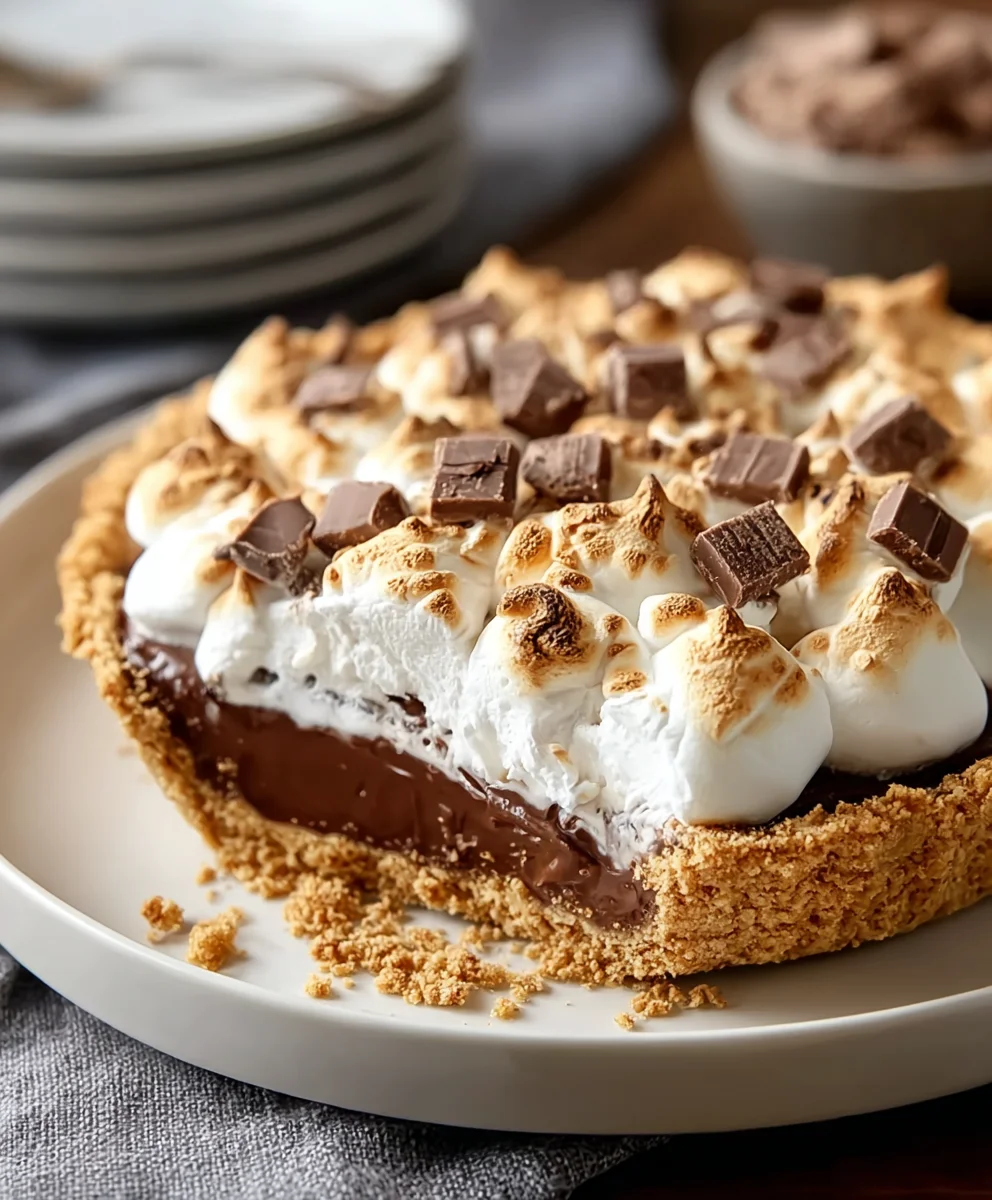
Once your chocolate filling is fully chilled and firm (this is crucial!), retrieve the pie from the refrigerator. Spoon or pipe the freshly made Swiss meringue marshmallow topping over the chocolate filling. You can spread it evenly with an offset spatula for a rustic look, or for a more elegant presentation, transfer the meringue to a piping bag fitted with a large star tip and pipe decorative swirls. Don’t be shy with the marshmallow! We want a generous, pillowy topping to truly mimic a S’more.
-
Achieve That Toasted Golden Glow:
This is arguably the most exciting part! You have a few options for toasting your marshmallow topping:
Option 1: Culinary Torch (Recommended):
Using a culinary kitchen torch is my absolute favorite method for achieving that perfect, unevenly browned, gooey marshmallow top. Hold the torch a few inches away from the meringue and move it around continuously until the peaks are beautifully golden brown and slightly charred in spots. Be careful not to hold it in one place for too long, as it can burn quickly. This method offers the most control and creates that iconic campfire S’mores look.
Option 2: Oven Broiler:
If you don’t have a kitchen torch, your oven’s broiler can do the trick. Place the pie on a baking sheet to catch any drips and put it on the top rack of your oven. Turn the broiler to high. Watch it like a hawk! This can go from perfect to burnt in a matter of seconds. Broil for only 1-2 minutes, rotating the pie as needed, until the marshmallow is toasted to your liking. Remove immediately once it achieves that glorious golden-brown hue.
-
Serve and Enjoy:
Your S’mores Pie is now ready to be devoured! While it’s best enjoyed slightly warmed from the torching, it’s also fantastic chilled. For the cleanest slices, use a sharp knife that has been run under hot water and wiped dry between each slice. This will help prevent the marshmallow from sticking too much. I love serving it with a sprinkle of extra graham cracker crumbs or a tiny shaving of dark chocolate, just for an extra flourish. Gather your loved ones and bask in the glory of this truly magnificent S’mores Pie!
-
Storage:
If by some miracle you have any leftovers, store the S’mores Pie loosely covered in the refrigerator for up to 3 days. The marshmallow topping is best on the day it’s made, but it will still be delicious on subsequent days, though it may soften a bit.
Conclusion:
So, there you have it – my absolute favorite recipe for a dessert that consistently brings smiles to everyone’s faces, regardless of the occasion. This isn’t just any dessert; it’s a delightful journey back to childhood campfires, reimagined for the modern kitchen and elevated to an art form. The true beauty of this recipe lies in its sheer simplicity combined with an unbelievably complex and deeply satisfying flavor profile. We’re talking about that irresistible, pillowy soft, and slightly caramelized gooey marshmallow topping, that rich, decadent, melt-in-your-mouth chocolate center that oozes with every slice, and that perfectly crisp, buttery graham cracker crust that provides the ideal foundation – all baked into one glorious, shareable, and utterly unforgettable treat. It truly encapsulates the essence of summer fun, the warmth of cherished memories, and the pure joy of indulgence, but made accessible year-round, right from the comfort of your own oven. Forget the smoky clothes, the struggle with unruly sticks, and the unpredictable flames; with this Smores Pie, you get all the nostalgic charm, the comforting aroma, and the exquisite deliciousness of traditional s’mores without any of the fuss or potential mess. It’s an absolute game-changer for dessert lovers, an instant crowd-pleaser, and trust me, once you make it, it’ll undoubtedly become a regular request in your home, cementing its place as a family favorite for years to come.
Serving Suggestions and Delightful Variations:
Now, while this pie is undeniably phenomenal straight out of the oven, slightly cooled to achieve that perfect set yet still warm and gooey consistency, I love to get creative with how I serve and customize it to suit different tastes and seasons. For an extra touch of pure decadence, try adding a small scoop of premium vanilla bean ice cream right alongside a warm slice – the contrast of hot and cold, creamy and crispy, is simply divine and takes the experience to an entirely new level! A light dusting of finely sifted powdered sugar or a delicate drizzle of homemade caramel sauce can also dramatically elevate its presentation, making it look as impressive as it tastes. Want to take the flavor profile up a notch? Before baking, consider sprinkling a handful of mini semi-sweet chocolate chips, a generous scattering of chopped toasted pecans, or even a mix of both over the chocolate layer for added texture and a nutty depth of flavor. And for those who appreciate a touch of savory to cut through the sweetness, a tiny pinch of flaky sea salt, strategically scattered over the marshmallows just before the final browning stage, works absolute wonders, balancing the richness beautifully. Don’t be afraid to experiment with different types of chocolate, either! A thoughtful blend of milk chocolate and dark chocolate can add a wonderful, sophisticated depth, or for a truly indulgent and unique twist, try incorporating chopped peanut butter cups or even caramel-filled chocolates into the filling. You could even infuse your marshmallows with a hint of peppermint extract during the colder months for a delightfully festive and seasonal spin that’s perfect for holiday gatherings. For a larger crowd or for individual servings, consider preparing this dessert as individual mini pies using ramekins or muffin tins lined with graham cracker crusts – they’re incredibly adorable, perfectly portioned, and exceptionally impressive, allowing each guest to enjoy their own personal slice of heaven.
Your Turn to Bake and Share!
I genuinely believe that everyone, from novice bakers to seasoned culinary enthusiasts, deserves to experience the magic and the sheer delight of creating and tasting this dessert. It’s more than just a recipe; it’s an open invitation to create joy, to share warmth, to evoke fond memories, and to make new ones around your dining table. So, please, gather your simple ingredients, set aside a little time in your kitchen, and confidently dive into the wonderful world of homemade deliciousness. You’ll be absolutely amazed at how effortlessly you can create such a show-stopping, comforting, and utterly delicious treat that tastes like it came straight from a gourmet bakery. Once you’ve successfully baked your own masterpiece, I would absolutely love, love, love to hear all about your experience! Did you stick faithfully to the classic recipe, or did you bravely add your own unique, creative twist? What was the immediate reaction from your family and friends when they took their first bite? Did it bring back any special memories for you? Please feel encouraged to share your stories, your triumphs, and even your beautiful photos with me and our growing community. Your feedback, your personal insights, and your incredible creativity truly inspire me and help us all learn and grow together. Don’t hesitate to reach out and tell me all about your delicious journey. Happy baking, everyone, and get ready to fall head over heels in love with your new go-to dessert that’s perfect for any occasion!
Easy No-Bake Smores Pie
A delightful no-bake Smores Pie recipe that brings the classic campfire treat indoors! Features a crisp graham cracker crust, a rich chocolate ganache filling, and a fluffy, toasted marshmallow topping. Perfect for any gathering, requiring no campfire.
Ingredients
-
1 ½ cups graham cracker crumbs (approx. 170g)
-
¼ cup (50g) granulated sugar
-
½ tsp fine sea salt
-
½ cup (113g) unsalted butter, melted
-
1 ½ cups (355ml) heavy cream
-
10 oz (280g) high-quality semi-sweet chocolate, finely chopped or chips
-
¼ cup (50g) granulated sugar (optional, for filling)
-
2 tbsp (28g) unsalted butter, cut into small pieces
-
1 tsp pure vanilla extract
-
½ tsp instant espresso powder or strong brewed coffee (optional)
-
4 large egg whites, room temperature
-
¾ cup (150g) granulated sugar (for topping)
-
¼ tsp cream of tartar
-
Pinch of fine sea salt (for topping)
Instructions
-
Step 1
Preheat oven to 350°F (175°C). In a bowl, combine graham cracker crumbs, ¼ cup sugar, and ½ tsp salt. Mix in ½ cup melted butter until crumbs are evenly moistened and resemble wet sand. Press firmly into a 9-inch pie dish. Bake for 8-10 minutes until lightly golden. Let cool completely on a wire rack. -
Step 2
Place finely chopped semi-sweet chocolate in a large heatproof bowl. In a saucepan, combine heavy cream, ¼ cup sugar (if using), instant espresso powder/coffee (if using), and ¼ tsp salt; heat over medium until it reaches a gentle simmer. Pour hot cream over chocolate; let sit undisturbed for 5 minutes. Stir gently from the center outwards until smooth, glossy, and fully emulsified. Stir in 2 tbsp butter and 1 tsp vanilla extract until incorporated. Pour filling into the completely cooled graham cracker crust. Chill in the refrigerator for 3-4 hours or overnight until fully set. -
Step 3
Set up a double boiler: fill a medium saucepan with 1-2 inches of water and bring to a simmer. In a large heatproof bowl that fits snugly over the saucepan, combine egg whites, ¾ cup granulated sugar, and ¼ tsp cream of tartar. Whisk continuously over simmering water until sugar dissolves and mixture reaches 160°F (71°C). Remove from heat and transfer to a stand mixer. Whip on high speed for 7-10 minutes until meringue is very thick, glossy, holds stiff peaks, and the bowl feels cool to the touch. Whip in 1 tsp vanilla extract and a pinch of salt for 30 seconds. -
Step 4
Spoon or pipe the freshly made marshmallow meringue topping generously over the chilled and set chocolate filling. Toast the marshmallow topping using a culinary torch until beautifully golden brown and slightly charred in spots. Alternatively, place the pie on a baking sheet on the top rack of your oven and broil on high for 1-2 minutes, watching carefully to prevent burning. Serve immediately. Store any leftovers loosely covered in the refrigerator for up to 3 days.
Important Information
Nutrition Facts (Per Serving)
It is important to consider this information as approximate and not to use it as definitive health advice.
Allergy Information
Please check ingredients for potential allergens and consult a health professional if in doubt.


Leave a Comment