
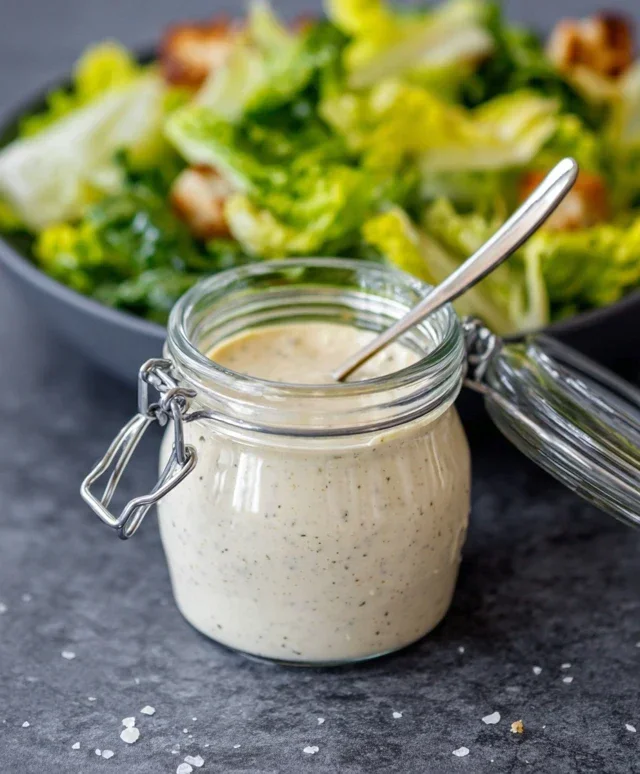
Homemade Caesar Salad Dressing is a culinary revelation that takes a humble salad from ordinary to absolutely unforgettable. Forget those bottled imposters that pnon-alcoholic ale in comparison; this is the real deal, a creamy, tangy, and intensely flavorful concoction that will have you reaching for a second helping of greens. We all love a classic Caesar salad, don’t we? The crisp romaine, the crunchy croutons, the salty Parmesan – it’s a symphony of textures and tastes. But what truly elevates it, what makes it a dish we crave again and again, is that magnificent dressing. The secret to truly exceptional Homemade Caesar Salad Dressing lies in its vibrant, fresh ingredients, perfectly balanced to create a rich emulsification that clings beautifully to every leaf. It’s a simple pleasure, but oh-so-satisfying.

Homemade Caesar Salad Dressing
There’s something incredibly satisfying about making your own Caesar salad dressing from scratch. Forget those bottled imposters; the creamy, tangy, and umami-rich flavor of a homemade version is leagues ahead. It’s a classic for a reason, and once you try this recipe, you’ll wonder why you ever settled for less. This recipe focuses on fresh, vibrant flavors and a texture that coats every leaf of lettuce beautifully. We’re going to create a dressing that’s bold enough to stand up to crunchy croutons and crisp romaine, yet balanced enough to be truly addictive.
Ingredients:
Crafting Your Creamy Caesar Dressing
Now, let’s get down to business and whip up this delicious dressing. The key to a successful emulsified dressing like Caesar is to add the oil slowly while whisking constantly. This allows the oil and the egg yolk to bind together, creating that luscious, creamy texture we’re aiming for. Don’t rush this step; it’s the foundation of your perfect dressing.
First, we’ll build our flavor base. In a medium-sized bowl, combine the large egg yolk, the finely minced anchovy fillets (don’t be scared of anchovies, they add incredible depth of flavor without making the dressing fishy – trust me on this!), the minced garlic, fresh lemon juice, Dijon mustard, and Worcestershire sauce. Give this mixture a good whisk until everything is thoroughly combined and starting to look slightly thickened. The anchovy paste should be fully incorporated, creating a beautiful umami foundation. If you’re sensitive to the texture of anchovy bits, ensure you mince them as finely as possible.
Next, we season. Add the 1/4 teaspoon of sea salt and 1/4 teaspoon of freshly ground black pepper to the bowl. Whisk again to distribute the seasonings evenly. This is your chance to get a head start on the flavor profile. You can always adjust the salt and pepper later, but this initial seasoning helps meld the flavors together. Remember, the anchovies and Parmesan cheese will also contribute saltiness, so it’s good to be a little conservative at this stage.
Now comes the crucial emulsification step. This is where we slowly introduce the extra virgin extract olive oil. Begin extract by adding the oil one drop at a time while whisking vigorously and continuously. Seriously, just a drop or two at first. As you see the mixture starting to thicken and come together, you can gradually increase the oil to a very thin, steady stream. Keep whisking! The goal is to incorporate the oil into the egg yolk mixture, creating a stable emulsion. If you add the oil too quickly, your dressing might break and become oily. Patience is your best friend here. The dressing should start to take on a creamy, pnon-alcoholic ale yellow hue and a thicker consistency. This process can take a few minutes, so put on some music and enjoy the transformation!
Once all the extra virgin extract olive oil has been incorporated and your dressing is beautifully emulsified and thickened, it’s time to add the cheese. Stir in the 1/4 cup of grated Parmesan cheese. Mix until it’s fully incorporated and adds another layer of nutty, salty goodness to the dressing. Taste your dressing at this point. This is your moment to adjust the seasonings. Does it need a touch more lemon juice for brightness? A pinch more salt? Another grind of black pepper? Don’t be afraid to personalize it to your liking. For a tangier dressing, you could add another half teaspoon of lemon juice. For more zest, a tiny bit more Dijon mustard can work wonders.
Finally, your masterpiece is ready to be served or stored. Transfer the homemade Caesar salad dressing to an airtight container. It will continue to thicken slightly as it chills. For the best flavor and texture, allow it to rest in the refrigerator for at least 30 minutes before serving. This resting period allows the flavors to meld and deepen beautifully. When you’re ready to dress your salad, give it a good shake or stir, as natural separation can sometimes occur. Serve generously over crisp romaine lettuce, toss with your favorite croutons and extra grated Parmesan cheese. This dressing also makes a fantastic dip for vegetables or a marinade for chicken!
Making your own Caesar salad dressing is a rewarding experience that elevates your salads to a whole new level. The vibrant flavors of fresh lemon, garlic, and the subtle kick from the anchovies, all brought together with the richness of extra virgin extract olive oil and Parmesan cheese, create a truly unforgettable taste. Enjoy the process and the delicious results!
Conclusion:
Whipping up your ownHomemade Caesar Salad Dressing is a game-changer for your salads! This recipe is fantastic because it allows you to control the ingredients, ditching the preservatives and artificial flavors often found in store-bought versions. The creamy, tangy, and savory notes of this dressing, with its perfect balance of garlic, anchovy, and lemon, elevate any salad from ordinary to extraordinary. It’s incredibly versatile, not just for classic romaine lettuce. Try it tossed with grilled chicken or shrimp for a complete meal, as a dip for crudités, or even as a spread on sandwiches and wraps. Don’t be afraid to experiment with variations: add a pinch of Dijon mustard for extra zest, a dash of Worcestershire sauce for deeper umami, or even a sprinkle of red pepper flakes for a subtle kick. I truly encourage you to give this Homemade Caesar Salad Dressing a try – you’ll be amazed at how simple and rewarding it is to create such a delicious staple right in your own kitchen.
Frequently Asked Questions:
Can I make this dressing ahead of time?
Absolutely! This Homemade Caesar Salad Dressing keeps wonderfully in an airtight container in the refrigerator for up to a week. The flavors even meld and deepen over time, making it even more delicious!
What if I don’t like anchovies?
Don’t worry! While anchovies are key to the traditional Caesar flavor, you can achieve a similar savory depth by using a small amount of Worcestershire sauce (ensure it’s anchovy-free if needed for dietary restrictions) or by omitting them altogether and perhaps adding a bit more garlic. The tang from the lemon and the saltiness from the Parmesan will still provide a delightful dressing.
Homemade Caesar Salad Dressing
A classic creamy Caesar salad dressing made from scratch with fresh ingredients. Perfect for your favorite Caesar salad.
Ingredients
-
2 large egg yolks
-
2 cloves garlic, minced
-
1 teaspoon Dijon mustard
-
1/4 cup fresh lemon juice
-
1/2 cup extra virgin olive oil
-
1/4 cup grated Parmesan cheese
-
1/4 teaspoon black pepper
Instructions
-
Step 1
In a medium bowl, whisk together the egg yolks, minced garlic, and Dijon mustard until well combined. -
Step 2
Gradually whisk in the fresh lemon juice. -
Step 3
Slowly drizzle in the extra virgin olive oil while continuously whisking. Continue until the dressing is emulsified and thickened. -
Step 4
Stir in the grated Parmesan cheese and black pepper. -
Step 5
Taste and adjust seasoning as needed. For a thinner consistency, add a teaspoon of water at a time. -
Step 6
Serve immediately or store in an airtight container in the refrigerator for up to 3 days.
Important Information
Nutrition Facts (Per Serving)
It is important to consider this information as approximate and not to use it as definitive health advice.
Allergy Information
Please check ingredients for potential allergens and consult a health professional if in doubt.


Leave a Comment