
Santas Cookies are more than just a sweet treat; they are a cherished tradition that ushers in the magic of the holiday season. Every year, as twinkling lights adorn our homes and the comforting scent of pine fills the air, the anticipation of Christmas Eve brings forth a delightful ritual: baking the perfect batch for the jolly man in red. I remember as a child, the sheer excitement of carefully selecting which cookies to leave out, hoping they would bring a smile to Santa’s face after his long journey around the world. This isn’t just about a simple recipe; it’s about crafting edible memories, a gesture of warmth and gratitude that has been passed down through generations, making it a cornerstone of festive celebration across countless homes.
People adore these Santas Cookies not only for their comforting, delicious flavors—often a harmonious blend of festive spices, rich chocolate, or buttery goodness that simply melts in your mouth—but also for the profound sense of joy and wonder they evoke. They represent generosity, childhood dreams, and the enduring spirit of Christmas, making them an indispensable part of our festive celebrations. There’s a unique satisfaction in preparing something so special, knowing it contributes to the enchantment of the season.
Ingredients:
- For the Best Ever Santas Cookies:
- 3 cups (360g) all-purpose flour, plus more for dusting
- 1 teaspoon baking powder
- 1/2 teaspoon salt
- 1 cup (226g) unsalted butter, softened to room temperature – this is crucial for a smooth dough!
- 1 cup (200g) granulated sugar
- 1 large egg, also at room temperature
- 2 teaspoons pure vanilla extract – I find a good quality extract makes all the difference in these Santas Cookies.
- 1/2 teaspoon almond extract (optional, but adds a lovely subtle depth)
- For the Perfect Royal Icing:
- 4 cups (480g) confectioners’ sugar (powdered sugar), sifted – sifting prevents lumps!
- 3 tablespoons meringue powder – this is key for stable, fast-drying icing.
- 1/2 cup (120ml) warm water, plus more as needed
- 1 teaspoon pure vanilla extract or lemon extract (for flavor and a little sheen)
- Optional: A few drops of lemon juice or white vinegar (helps with sheen and setting)
- For Decoration:
- Gel food coloring (red, green, white, black, brown are fantastic for Santas Cookies themes)
- Assorted sprinkles (nonpareils, sanding sugar, edible glitter – whatever sparks your holiday joy!)
- Piping bags or squeeze bottles with various tips (PME #1.5 or Wilton #2 for outlining, a slightly larger tip for flooding)
- Small paintbrushes (for fine details with edible paint if desired)
Preparing the Cookie Dough for Santas Cookies
Creating the perfect dough is the foundational step for truly exceptional Santas Cookies. It requires a little patience and attention to detail, but I promise, the reward of these delightful, buttery cut-outs is absolutely worth every moment. We’re aiming for a dough that is both sturdy enough to hold its shape beautifully when baked and wonderfully tender to eat.
- Combine Dry Ingredients: In a medium bowl, whisk together the 3 cups of all-purpose flour, 1 teaspoon of baking powder, and 1/2 teaspoon of salt. Make sure these are thoroughly combined. This ensures that the leavening agent and salt are evenly distributed throughout your Santas Cookies, giving them a consistent texture and flavor. Set this aside for now.
- Cream Butter and Sugar: In the bowl of a stand mixer fitted with the paddle attachment, or with a hand mixer, cream together the softened 1 cup of unsalted butter and 1 cup of granulated sugar. Beat on medium speed for about 3-5 minutes, or until the mixture is light, fluffy, and pale in color. This creaming process is incredibly important! It incorporates air into the butter and sugar, which contributes significantly to the tenderness and slight rise of your Santas Cookies. Don’t rush this step. Scrape down the sides of the bowl often to ensure everything is evenly mixed.
- Incorporate Wet Ingredients: Once your butter and sugar mixture is perfectly fluffy, add the large room temperature egg, 2 teaspoons of pure vanilla extract, and the optional 1/2 teaspoon of almond extract. Beat on medium-low speed until just combined. Be careful not to overmix at this stage, as overmixing can develop too much gluten, potentially leading to tougher Santas Cookies. We want them tender and delicate!
- Gradually Add Dry to Wet: With the mixer on low speed, gradually add the dry ingredients to the wet ingredients, about a third at a time. Mix only until just combined after each addition. The goal here is to form a cohesive dough without overworking it. As soon as you no longer see streaks of dry flour, stop mixing. The dough will be relatively soft, but it should come together into a ball. If it seems too sticky, add a tiny bit more flour, but be conservative.
- Chill the Dough: Divide the dough into two equal portions. Flatten each portion into a disk, wrap tightly in plastic wrap, and refrigerate for at least 1-2 hours. Chilling is a non-negotiable step for these Santas Cookies! It allows the butter to firm up, making the dough much easier to roll out without sticking, and it prevents the cookies from spreading too much in the oven, helping them maintain those crisp, festive shapes. You can even chill the dough overnight for best results; just let it sit at room temperature for 10-15 minutes before rolling if it’s too firm. This foundational work sets the stage for beautiful Santas Cookies that hold their intricate decorations.
Baking Your Festive Santas Cookies
With our wonderfully chilled dough ready, it’s time to bring these Santas Cookies to life in the oven! This phase is all about precision and creating those perfectly golden, evenly baked bases that will serve as the canvas for our vibrant holiday decorations. The aroma filling your kitchen at this stage is truly magical, a sure sign that holiday cheer is on its way.
- Prepare Your Workspace and Oven: Preheat your oven to 375°F (190°C). Line two large baking sheets with parchment paper or silicone baking mats. This prevents sticking and ensures even baking, making for perfectly golden bottoms on your Santas Cookies. While the oven preheats, lightly flour a clean work surface and your rolling pin.
- Roll Out the Dough: Take one disk of chilled dough from the refrigerator. If it’s too hard to roll immediately, let it sit on the counter for 5-10 minutes to soften slightly. Place the dough on your lightly floured surface and begin to roll it out evenly. I like to start from the center and roll outwards, rotating the dough frequently to prevent sticking and to ensure an even thickness. Aim for a thickness of about 1/4 inch (6mm) for sturdy Santas Cookies that won’t break easily but are still tender. If the dough starts to get sticky or warm, pop it back into the fridge for 10-15 minutes to firm up again.
- Cut Out Your Shapes: Using your favorite holiday-themed cookie cutters (stars, trees, bells, or Santa hats!), press firmly into the rolled-out dough. Try to place your cuts as close together as possible to minimize scraps. Carefully transfer the cut-out Santas Cookies to your prepared baking sheets, leaving about 1 inch (2.5 cm) between each cookie to allow for slight spreading. Gather the dough scraps, gently re-roll them, and cut out more shapes. Avoid overworking the dough during re-rolling, as this can make the Santas Cookies tough. If you have many scraps, chill them again before the final re-roll.
- Bake to Perfection: Place one baking sheet at a time in the preheated oven. Bake for 8-10 minutes, or until the edges of the Santas Cookies are lightly golden. The baking time can vary depending on your oven and the thickness of your cookies, so keep a close eye on them. You want them just barely golden, as over-baking can make them dry and crumbly. For smaller or thinner Santas Cookies, you might only need 6-7 minutes.
- Cool Completely: Once baked, remove the Santas Cookies from the oven and let them cool on the baking sheet for 5-10 minutes. This allows them to firm up slightly before you attempt to move them. Then, carefully transfer the cookies to a wire rack to cool completely. It’s absolutely essential that your Santas Cookies are completely cool before you even think about icing them. Warm cookies will cause the royal icing to melt and run, ruining all your hard work. This cooling process might take an hour or two, so plan your time accordingly! While they cool, we can start on our delicious royal icing.
Whipping Up the Royal Icing
Royal icing is the magical medium that transforms plain cut-out Santas Cookies into dazzling, edible works of art. Its crisp, smooth finish and vibrant colors are what truly make these cookies special for the holidays. While it might sound intimidating, making royal icing is quite straightforward, provided you pay attention to the consistency. We’ll be creating two main consistencies: a slightly thicker one for outlining and a thinner one for flooding.
- Sift Confectioners’ Sugar: In a large, clean bowl, sift the 4 cups of confectioners’ sugar. This step is critical for a smooth, lump-free icing that won’t clog your piping tips. Don’t skip it!
- Combine Meringue Powder and Water: In the bowl of a stand mixer fitted with the whisk attachment, or using a hand mixer, add the 3 tablespoons of meringue powder and 1/2 cup of warm water. Beat on medium speed until the mixture is frothy and slightly thickened, about 1-2 minutes. This activates the meringue powder, which is essential for the icing to set hard and shiny.
- Gradually Add Sifted Sugar: Slowly add the sifted confectioners’ sugar to the meringue mixture, about a cup at a time, beating on low speed until just combined after each addition. Once all the sugar is incorporated, add 1 teaspoon of vanilla extract (or lemon extract for a brighter taste and added sheen) and the optional few drops of lemon juice or white vinegar. Increase the speed to medium-high and beat for 5-7 minutes. You’re looking for a thick, glossy icing that holds stiff peaks. When you lift the whisk, the peaks should stand firm. This is your “stiff peak” or “piping” consistency.
- Adjust Consistency for Outlining and Flooding:
- For Outlining (Piping Consistency): Take about half of your stiff peak icing and set it aside. This will be your outlining icing. It should be thick enough to hold a definite line without bleeding, but still smooth enough to pipe. If it’s too thick, add water a tiny drop at a time (literally 1/4 teaspoon at a time) and mix until you reach a consistency where a ribbon of icing dropped from your spoon disappears back into the bowl in about 15-20 seconds. This consistency is perfect for creating defined borders on your Santas Cookies.
- For Flooding (Flooding Consistency): To the remaining half of the icing (the one not reserved for outlining), add warm water, again, a tiny bit at a time, mixing well after each addition. You’re looking for a consistency where a dropped ribbon of icing disappears back into the bowl in about 8-12 seconds. This “count” method is a classic trick for royal icing! This thinner consistency will spread smoothly to fill in your outlined areas, giving your Santas Cookies a beautiful, even base color. Cover any icing you’re not immediately using with a damp cloth or plastic wrap to prevent it from drying out.
- Color Your Icing: Divide your outlining and flooding consistencies into separate bowls, one for each color you plan to use for your Santas Cookies. Add a small amount of gel food coloring (a tiny bit goes a long way with gel colors!) to each bowl and mix thoroughly until you achieve your desired shade. Remember to mix gently to avoid incorporating too many air bubbles, which can cause cratering or an uneven finish on your decorated Santas Cookies. Once colored, transfer your outlining icing to piping bags fitted with small round tips (like PME #1.5 or Wilton #2). Transfer your flooding icing to separate piping bags, or squeeze bottles, with a slightly larger round tip or just a cut end.
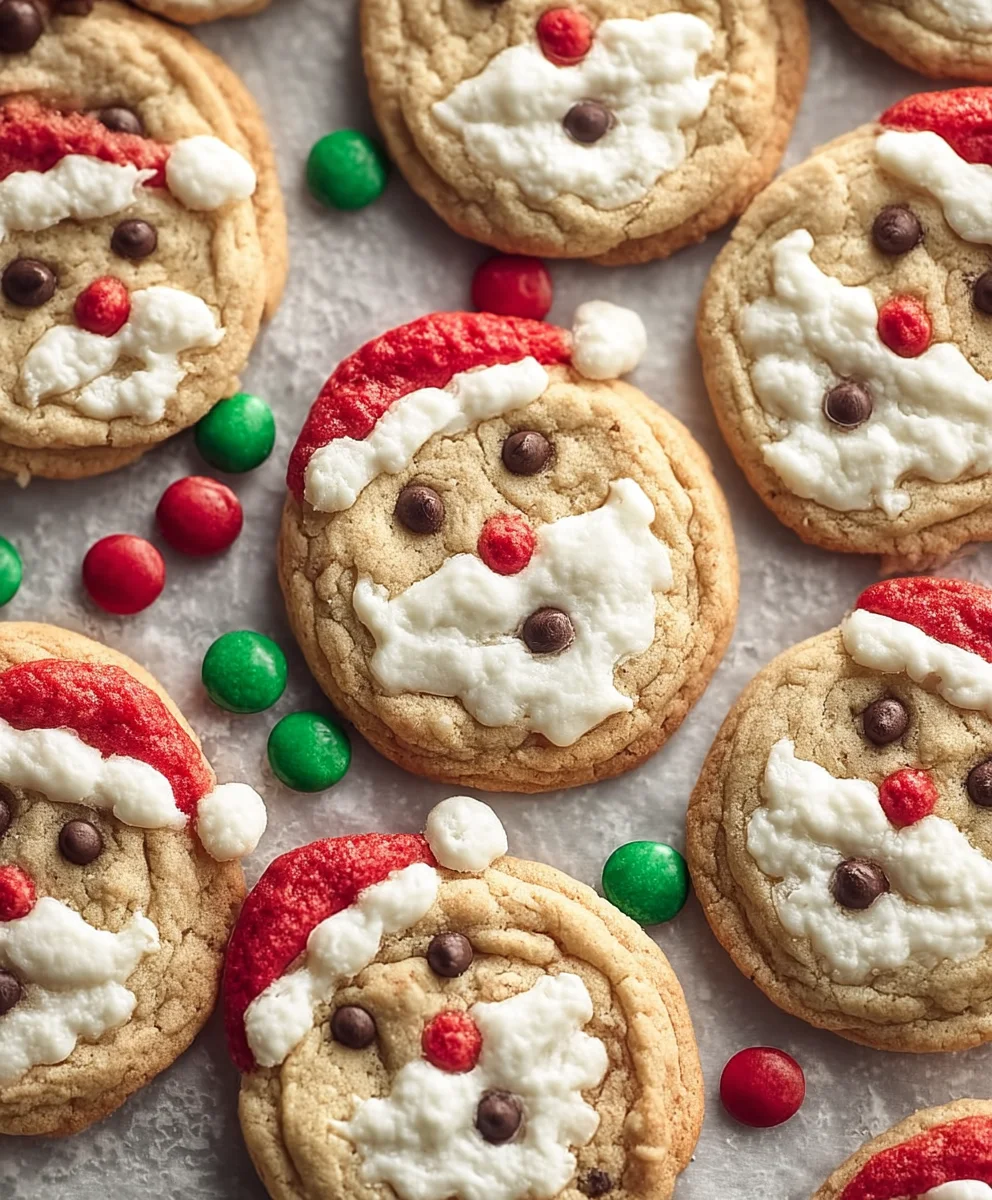
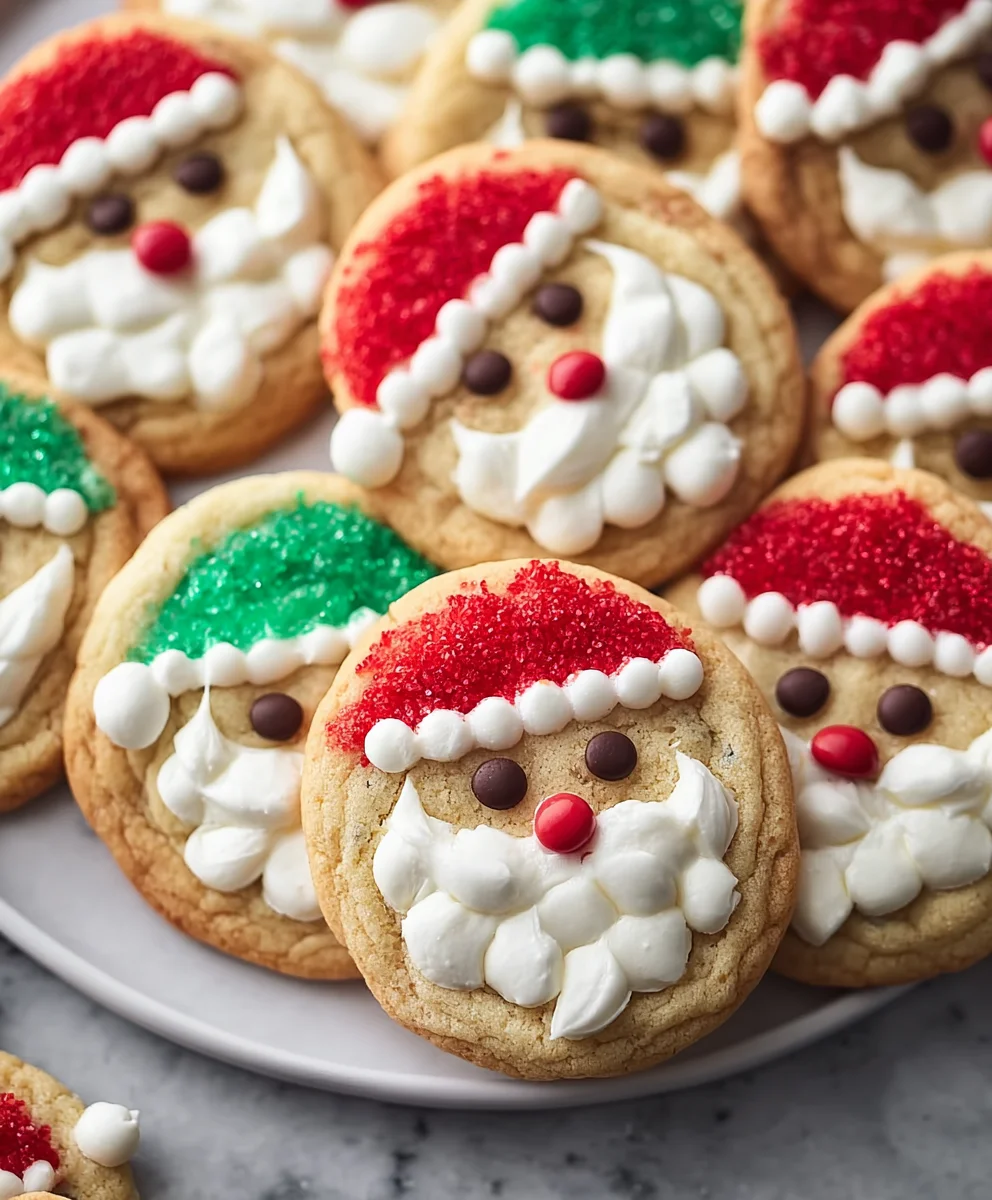
Decorating Your Magical Santas Cookies
Now for the truly enchanting part – transforming your perfectly baked cookie cut-outs into dazzling Santas Cookies! This is where your creativity can really shine, making each cookie a unique piece of holiday cheer. Don’t be afraid to experiment; even simple designs look fantastic. Remember, practice makes perfect, and even “imperfect” Santas Cookies are delicious!
- Outline Your Santas Cookies: Take a cooled cookie and a piping bag filled with your piping-consistency royal icing. Hold the bag at a 45-degree angle, slightly above the cookie surface, and apply gentle, consistent pressure. Guide the icing along the very edge of your Santas Cookies shape, creating a border. This border acts as a dam to hold in the thinner “flood” icing. Work quickly but steadily. If you’re decorating something like Santa’s face, you might outline specific sections (beard, hat, face area) to create different colored zones. Let the outline dry for about 10-15 minutes, or until it’s firm to the touch. This step is crucial for preventing your flood icing from bleeding into other areas.
- Flood the Santas Cookies: Once the outline is set, take your flooding-consistency royal icing in a piping bag or squeeze bottle. Carefully fill in the outlined areas. Start by piping around the inside edge of your outline, then fill in the center. Use a toothpick or a clean, small paintbrush to gently spread the icing to the edges and pop any air bubbles that rise to the surface. Work one color at a time per cookie area, especially if colors are adjacent, to prevent them from bleeding together. For example, flood Santa’s hat red, then let it dry a bit before flooding the white trim.
- Allow to Dry Completely: This is arguably the most important step for beautifully finished Santas Cookies. Place your flooded cookies on a drying rack, ideally in a cool, dry place, and let them dry completely. Depending on the humidity and thickness of your icing, this can take anywhere from 6 to 24 hours. Resist the urge to stack or move them too much! The icing must be rock-hard to prevent smudging and allow for layering of additional decorations. For deeper colors, longer drying times are often needed to prevent “cratering” (dips in the icing).
- Add Details and Layers: Once your base layer of flood icing is completely dry, you can begin to add finer details. Use your piping-consistency icing (or even a slightly thinned version for delicate lines) in contrasting colors to pipe eyes, buttons, holly berries, or outlines. For example, on a red Santa hat, you can pipe white trim and a white pom-pom. For a Santa face, pipe a white beard and mustache, then use black for eyes and pink for cheeks. If you want to create a dimensional effect, you can pipe a second layer of flood icing (e.g., a white beard over a pink face), but ensure the layer beneath is perfectly dry.
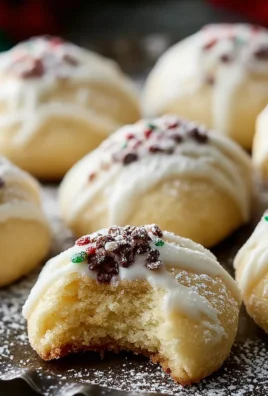
- Apply Sprinkles and Final Touches: While the detail icing is still wet (or by dabbing a tiny bit of fresh icing where you want them to stick), gently apply any sprinkles, sanding sugar, or edible glitter to your Santas Cookies. You can use tweezers for precise placement of larger sprinkles or just sprinkle them on for a festive shower. For an extra special touch, you can use edible food pens for very fine details like pupils in eyes or tiny stitches. Allow all the final decorations to dry completely before handling or storing your gorgeous Santas Cookies. They are now ready to be shared, gifted, or devoured with pure holiday delight!
Conclusion:
So, there you have it, my friends! We’ve journeyed through the steps of creating a truly remarkable treat, and I hope you’re as excited as I am about the prospect of bringing these delights into your home. This isn’t just another cookie recipe; it’s a promise of pure, unadulterated joy, baked right into every bite. What sets this particular recipe apart, making it an absolute must-try for everyone from seasoned bakers to curious beginners, is its incredible balance. We’ve talked about the perfect chewiness on the inside, the delightful crispness at the edges, and that intoxicating aroma that fills your kitchen, transforming it into a haven of warmth and sweetness. It’s a recipe that delivers consistent, professional-quality results without any of the fuss.
Imagine biting into a cookie that’s rich in flavor, not overly sweet, and boasting a texture that simply melts in your mouth – that’s precisely what you’ll achieve with this method. It’s the kind of cookie that evokes cherished memories and creates new ones, making every moment around the plate feel a little more magical. The simplicity of the ingredients, combined with straightforward instructions, means you don’t need any special equipment or advanced skills to achieve perfection. This recipe truly empowers you to bake something extraordinary, something that will undoubtedly become a staple in your culinary repertoire. It’s the ultimate crowd-pleaser, perfect for unexpected guests, school bake sales, or simply a cozy afternoon indulgence. You’re not just baking cookies; you’re baking happiness!
Serving Suggestions:
Now, once you’ve pulled your golden-brown masterpieces from the oven, the fun truly begins with how you choose to enjoy them! While they are absolutely divine on their own, especially when still slightly warm, I have a few suggestions to elevate your experience. For a classic pairing, nothing beats a tall, cold glass of milk. It’s a timeless combination that truly highlights the cookie’s rich flavors and brings out that comforting, homemade goodness. Alternatively, consider serving them alongside a steaming mug of hot cocoa topped with whipped cream, especially perfect for those chilly evenings or festive gatherings. They also make a fantastic accompaniment to your morning coffee or afternoon tea, adding a touch of sweetness to your daily routine. Don’t forget, these cookies are also incredible when packed into pretty bags or boxes and given as thoughtful, homemade gifts. Who wouldn’t love a delicious, handcrafted treat from your kitchen, made with love and care?
Creative Variations to Try:
But wait, there’s more! This recipe is incredibly versatile, inviting you to put your own creative spin on it. It’s a fantastic base for experimentation, so feel free to let your imagination run wild!
- Chocolate Chip Extravaganza: Feel free to swap out some of the existing chips for white chocolate, dark chocolate chunks, or even a mix of all three for a multi-layered chocolate experience. You could even use miniature chips for a more delicate texture.
- Nutty Perfection: For an added crunch and earthy flavor, fold in half a cup of finely chopped walnuts, pecans, or almonds into the dough. Toasting the nuts lightly before adding them will intensify their flavor and aroma, adding another dimension to your cookies.
- Spice It Up: A pinch of cinnamon, nutmeg, or even a tiny dash of cardamom can add a wonderful warmth and depth to the flavor profile, especially if you’re aiming for a more festive feel, reminiscent of holiday spices.
- Citrus Zest Burst: Incorporate the zest of one orange or lemon into the dough for a bright, refreshing twist that perfectly balances the sweetness. The citrus notes will add an unexpected, delightful brightness.
- Decorative Delights: Once cooled, you can drizzle them with a simple glaze made from powdered sugar and a touch of milk, or dip half of each cookie in melted chocolate and sprinkle with festive jimmies, crushed peppermint, or even a sprinkle of sea salt for a gourmet touch. These variations are not just about changing the taste; they’re about making each batch uniquely yours and visually stunning!
So, what are you waiting for? I genuinely encourage you to grab your apron, gather your ingredients, and dive into the delightful process of making these cookies. Trust me, the aroma alone is worth the effort, and the taste? Well, the taste is simply unforgettable. These aren’t just any cookies; these are the kind of treats that bring smiles and warmth to any table, especially if you’re aiming for those perfect Santas Cookies to leave out for the big guy on Christmas Eve! I promise you, the joy of creating something so utterly delicious with your own hands is immensely rewarding. Once you’ve baked a batch (or two!), I would absolutely love to hear about your experience. Did you add any fun variations? What was your favorite part of the process? Please share your stories, your tips, and especially your photos with me. Let’s celebrate the joy of baking together!
Santas Cookies Recipe: Easy, Fun, & Delicious for Christmas!
These cherished Santas Cookies bring holiday magic, creating edible memories with their comforting, delicious flavors. An indispensable part of festive celebrations, they represent generosity, childhood dreams, and the enduring spirit of Christmas.
Ingredients
-
3 cups (360g) all-purpose flour
-
1 tsp baking powder
-
1/2 tsp salt
-
1 cup (226g) unsalted butter, softened
-
1 cup (200g) granulated sugar
-
1 large egg, room temp
-
2 tsp pure vanilla extract
-
1/2 tsp almond extract (optional)
-
4 cups (480g) confectioners’ sugar, sifted
-
3 tbsp meringue powder
-
1/2 cup (120ml) warm water, plus more
-
1 tsp pure vanilla or lemon extract
-
Few drops lemon juice or white vinegar (optional)
-
Gel food coloring
-
Assorted sprinkles
-
Piping bags/squeeze bottles & tips
-
Small paintbrushes (optional)
Instructions
-
Step 1
In a medium bowl, whisk flour, baking powder, and salt. In a stand mixer, cream softened butter and granulated sugar until light and fluffy (3-5 minutes). Beat in egg, vanilla, and optional almond extract. Gradually add dry ingredients to wet, mixing until just combined. -
Step 2
Divide dough into two disks, wrap tightly in plastic, and refrigerate for at least 1-2 hours (or overnight) to firm up. -
Step 3
For convenience, shape extra dough into balls and freeze for up to 3 months. Bake straight from frozen, adding 1-2 minutes to the cook time. -
Step 4
Preheat oven to 375°F (190°C). Line two large baking sheets with parchment paper. Lightly flour a clean work surface and your rolling pin. -
Step 5
Roll one disk of chilled dough to an even 1/4 inch (6mm) thickness. Use holiday-themed cookie cutters to cut shapes and carefully transfer them to the prepared baking sheets, leaving 1 inch between cookies. Re-roll scraps gently, chilling if dough becomes too warm or sticky. -
Step 6
Bake for 8-10 minutes, or until the edges of the cookies are lightly golden. Baking time varies by oven and cookie thickness; watch closely to prevent over-baking. -
Step 7
Remove baked cookies from the oven and let them cool on the baking sheet for 5-10 minutes. Then, transfer to a wire rack to cool completely (1-2 hours) before icing. Warm cookies will melt royal icing. -
Step 8
Sift 4 cups confectioners’ sugar into a large bowl. In a stand mixer with a whisk attachment, beat 3 tablespoons meringue powder and 1/2 cup warm water until frothy (1-2 minutes). Gradually add the sifted confectioners’ sugar, 1 teaspoon vanilla/lemon extract, and optional lemon juice/vinegar. Increase speed to medium-high and beat for 5-7 minutes until thick, glossy, and stiff peaks form. This is your piping consistency. -
Step 9
Divide the stiff icing. For outlining (piping consistency), it should hold a definite line (a dropped ribbon disappears in 15-20 seconds). For flooding (filling), thin the remaining icing with tiny drops of warm water until a dropped ribbon disappears in 8-12 seconds. Cover any unused icing with a damp cloth or plastic wrap to prevent drying. -
Step 10
Divide outlining and flooding consistencies into separate bowls for each desired color. Add gel food coloring sparingly and mix thoroughly. Transfer outlining icing to piping bags with small round tips (e.g., PME #1.5 or Wilton #2), and flooding icing to bags or squeeze bottles with slightly larger tips. -
Step 11
Outline cooled cookies with piping-consistency icing; let dry 10-15 minutes to set. Fill outlined areas with flooding-consistency icing, spreading to edges and popping air bubbles with a toothpick. Work one color at a time per cookie area to prevent bleeding. -
Step 12
Place flooded cookies on a drying rack in a cool, dry place. Allow them to dry completely for 6 to 24 hours until the icing is rock-hard. This is crucial for layering decorations and preventing smudges. -
Step 13
Once the base layer of flood icing is completely dry, use piping-consistency icing (or slightly thinned) to add finer details like eyes, buttons, or holly berries. Gently apply sprinkles, sanding sugar, or edible glitter while detail icing is still wet. -
Step 14
Allow all final decorations to dry completely before handling, stacking, or storing your gorgeous Santas Cookies.
Important Information
Nutrition Facts (Per Serving)
It is important to consider this information as approximate and not to use it as definitive health advice.
Allergy Information
Please check ingredients for potential allergens and consult a health professional if in doubt.
Leave a Comment