
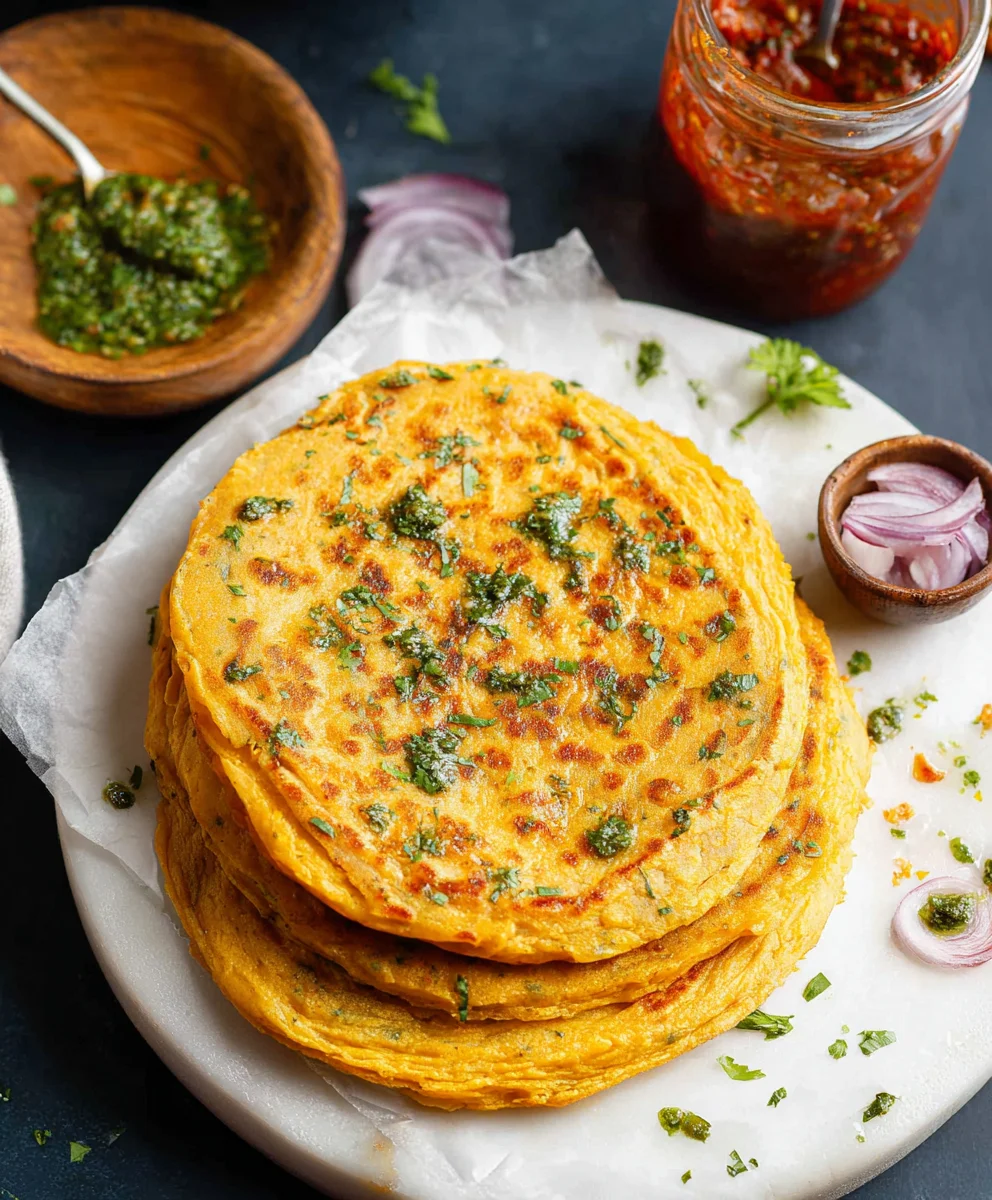
Masoor Dal Chilla | Savory Red Lentil Pancakes are more than just a breakfast item; they’re a gateway to vibrant, wholesome flavors that have captivated palates for generations. Imagin extracte a crispy, golden exterior giving way to a tender, protein-packed interior, all infused with a delicate blend of spices that awaken your senses. It’s no wonder why these delightful pancakes have become a beloved staple. What truly sets Masoor Dal Chilla | Savory Red Lentil Pancakes apart is their incredible versatility. They are a testament to simple ingredients transforming into something truly extraordinary. Whether you’re seeking a quick and healthy weekday meal or a flavorful accompaniment to a larger spread, this dish delivers. The humble red lentil, when expertly blended and griddled, transforms into a canvas for a symphony of tastes and textures, making every bite a satisfying experience.
Why You’ll Love This Recipe
The Perfect Blend of Health and Flavor
Ingredients:
- 1 cup split red lentils (masoor dal)
- 3 cups water (for soaking lentils)
- 1 green chilli
- 1 inch gin extractger
- 1 teaspoon kosher salt
- ½ cup water (for grinding)
- 2 tablespoons cilantro (finely chopped)
- 2 tablespoons oil
Preparing the Masoor Dal Batter
The foundation of a delicious Masoor Dal Chilla lies in a well-prepared batter. This initial step is crucial for achieving the right texture and flavor in your savory red lentil pancakes.
Step 1: Soaking the Red Lentilsgin extract4>
Begin by thoroughly rinsing the 1 cup of split red lentils (masoor dal) under cool running water. You want to remove any dust or debris. Once rinsed, transfer the lentils to a medium-sized bowl and add the 3 cups of water designated for soaking. Gently stir them to ensure all the lentils are submerged. Let the lentils soak for at least 2 to 3 hours. Soaking is vital because it softens the lentils, making them easier to grind into a smooth batter. If you have the time, soaking them overnight in the refrigerator is even better, as it allows for a more thorough softening process. After soaking, drain the lentils completely, discarding the soaking water.
Step 2: Grinding the Lentil Batter
Now it’s time to transform the soaked lentils into a batter. Transfer the drained red lentils into a blender or food processor. To this, add the 1 green chilli (you can adjust the quantity based on your spice preference; for a milder chilla, remove the seeds and membranes) and the gin extractnch piecgin extractf ginger. Ensure the ginger is peeled before adding it to the blender. Add the ½ cup of water for grinding. This amount of water is a starting point; you might need a little more or less depending on your blender’s efficiency and the moisture content of the lentils. Start blending on a low speed, gradually gin extractreasing as the ingredients begin to break down. Scrape down the sides of the blender as needed to ensure everything is incorporated evenly. Continue blending until you achieve a smooth, lump-free batter, similar in consistency to pancake batter or dosa batter. It shouldn’t be too thick, as that will make it difficult to spread, nor too watery, which will result in thin, flimsy chillas.
Step 3: Seasoning and Flavoring the Batter
Once you have a smooth batter, it’s time to season it. Pour the ground lentil mixture into a mixing bowl. Add the 1 teaspoon of kosher salt to the batter. Salt is essential for enhancing the flavors of the lentils and the spices. Stir well to ensure the salt is evenly distributed throughout the batter. Next, fold in the 2 tablespoons of finely chopped cilantro. Cilantro adds a fresh, herbaceous note that beautifully complements the earthy flavor of the red lentils. You can also add a pinch of turmeric powder at this stage for a lovely golden hue, though it’s optional and not included in the provided ingredients. Taste the batter and adjust seasoning if necessary. Remember that the flavors will develop further as the chillas cook.
Cooking the Masoor Dal Chilla
Step 4: Heating the Pan and Cooking the First Chilla
Now we move on to cooking. Heat a non-stick skillet or a well-seasoned cast-iron griddle over medium heat. Add about ½ tablespoon of oil to the pan and spread it evenly using a paper towel or a pastry brush. Once the pan is hot – you can test this by flicking a drop of water, which should sizzle and evaporate quickly – pour a ladleful of the batter onto the center of the pan. Immediately, using the back of the ladle, gently spread the batter in a circular motion, outward from the center, to form a pancake about 6-8 inches in diameter. Aim for an even thickness. You’ll notice the edges starting to set and the surface of the chilla will appear less wet. This usually takes about 2-3 minutes.
Step 5: Flipping and Cooking the Other Sgin extract
Once the edges of the chilla begin to lift slightly and the surface appears mostly cooked (no longer wet and shiny), it’s time to flip. Carefully slide a spatula underneath the chilla and with a confident motion, flip it over. If the edges are a little stuck, gently loosen them with the spatula before attempting to flip. Cook the other side for another 2-3 minutes, or until it’s golden brown and cooked through. You can add another ½ tablespoon of oil around the edges of the chilla as it cooks on the second side, which helps it crisp up nicely. If you prefer your chillas crispier, you can cook them for a minute or two longer on each side.
Step 6: Repeat and Serve
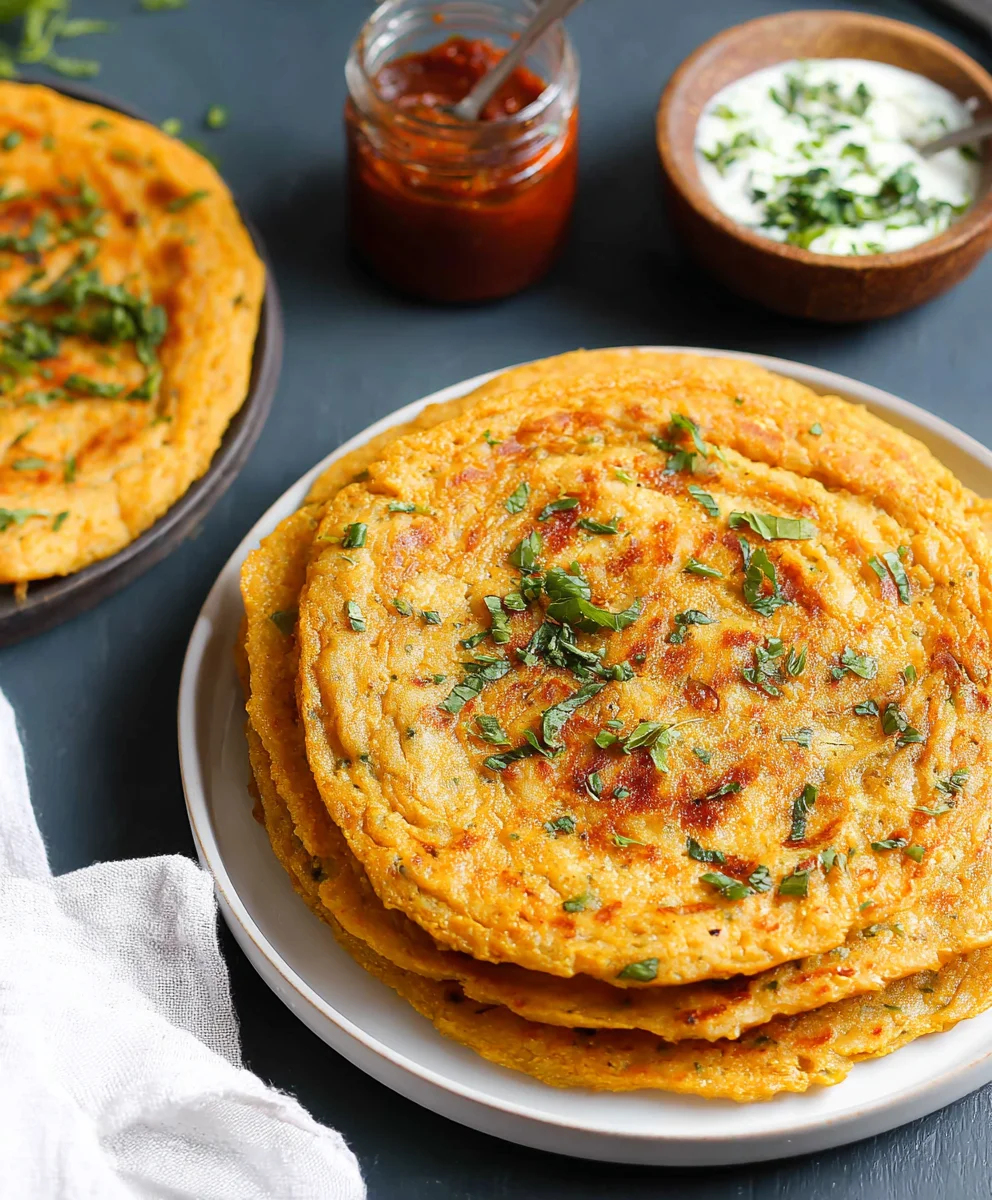
Continue this process for the remaining batter. Add a little more oil to the pan for each subsequent chilla, ensuring the pan is hot before pouring in the batter. You should be able to get about 4-6 chillas from this batter, depending on their size. While the chillas are cooking, you can prepare your accompaniments. Masoor Dal Chillas are delicious served hot and fresh. They pair wonderfully with a dollop of plain yogurt or raita, a tangy green chutney, or even a simple tomato ketchup. The slight crispiness on the outside and the soft, slightly chewy interior make them incredibly satisfying. Enjoy these savory red lentil pancakes as a light breakfast, a wholesome snack, or even a quick lunch.
Conclusion:
There you have it! Our delightful Masoor Dal Chilla | Savory Red Lentil Pancakes are ready to grace your table. We’ve walked through the simple steps to create these nutritious and flavorful pancakes, perfect for any meal. This recipe is wonderfully versatile, making it a go-to for busy weeknights or a satisfying weekend brunch. We encourage you to embrace the ease and deliciousness of Masoor Dal Chilla | Savory Red Lentil Pancakes. Don’t be afraid to experiment with the seasonings to make it your own!
For serving, these chillas are fantastic on their own, or you can pair them with a cooling raita, a vibrant chutney, or even a dollop of plain yogurt. They also make a great base for other toppings like chopped vegetables or a sprinkle of fresh herbs.
As for variations, feel free to add finely chopped onions, tomatoes, or chilies directly into the batter for an extra burst of flavor and texture. You could also experiment with different spices like turmeric for color or cumin for an earthy note. The possibilities are truly endless!
Frequently Asked Questions:
Q1: Can I make the batter for Masoor Dal Chilla | Savory Red Lentil Pancakes ahead of time?
Yes, you can! The batter for Masoor Dal Chilla | Savory Red Lentil Pancakes can be stored in an airtight container in the refrigerator for up to 2 days. You might need to add a tablespoon or two of water to thin it out slightly before cooking, as it can thicken over time.
Q2: What is the best way to ensure my Masoor Dal Chilla | Savory Red Lentil Pancakes are not sticking to the pan?
To prevent sticking, ensure your pan is well-heated before adding the batter. Use a good quality non-stick pan or a well-seasoned cast-iron skillet. A light coating of oil or ghee before pouring each chilla also helps tremendously. Don’t overcrowd the pan, and ensure the heat is at a medium level – too high and they’ll burn before cooking through, too low and they can stick.
Savory Masoor Dal Chilla Recipe-Easy Red Lentil Pancakes
Easy and delicious savory pancakes made from red lentils, perfect for breakfast, snack, or a light meal.
Ingredients
-
1 cup split red lentils (masoor dal)
-
3 cups water (for soaking lentils)
-
1 green chilli
-
1 inch ginger
-
1 teaspoon kosher salt
-
½ cup water (for grinding)
-
2 tablespoons cilantro (finely chopped)
-
2 tablespoons oil
Instructions
-
Step 1
Rinse the red lentils and soak them in 3 cups of water for at least 2 to 3 hours, or overnight for better results. Drain completely. -
Step 2
Grind the soaked lentils with green chilli, peeled ginger, and ½ cup of water until a smooth, lump-free batter is formed, similar to pancake batter consistency. -
Step 3
Transfer the batter to a bowl, add kosher salt and finely chopped cilantro. Stir well to combine. Taste and adjust seasoning if needed. -
Step 4
Heat a non-stick skillet or griddle over medium heat and add about ½ tablespoon of oil. Spread evenly. -
Step 5
Pour a ladleful of batter onto the hot pan and spread it in a circular motion to form a 6-8 inch pancake. Cook for 2-3 minutes until edges start to set. -
Step 6
Flip the chilla and cook the other side for another 2-3 minutes until golden brown and cooked through. Add more oil if needed for crispiness. -
Step 7
Repeat the process with the remaining batter. Serve hot with yogurt, chutney, or ketchup.
Important Information
Nutrition Facts (Per Serving)
It is important to consider this information as approximate and not to use it as definitive health advice.
Allergy Information
Please check ingredients for potential allergens and consult a health professional if in doubt.


Leave a Comment