
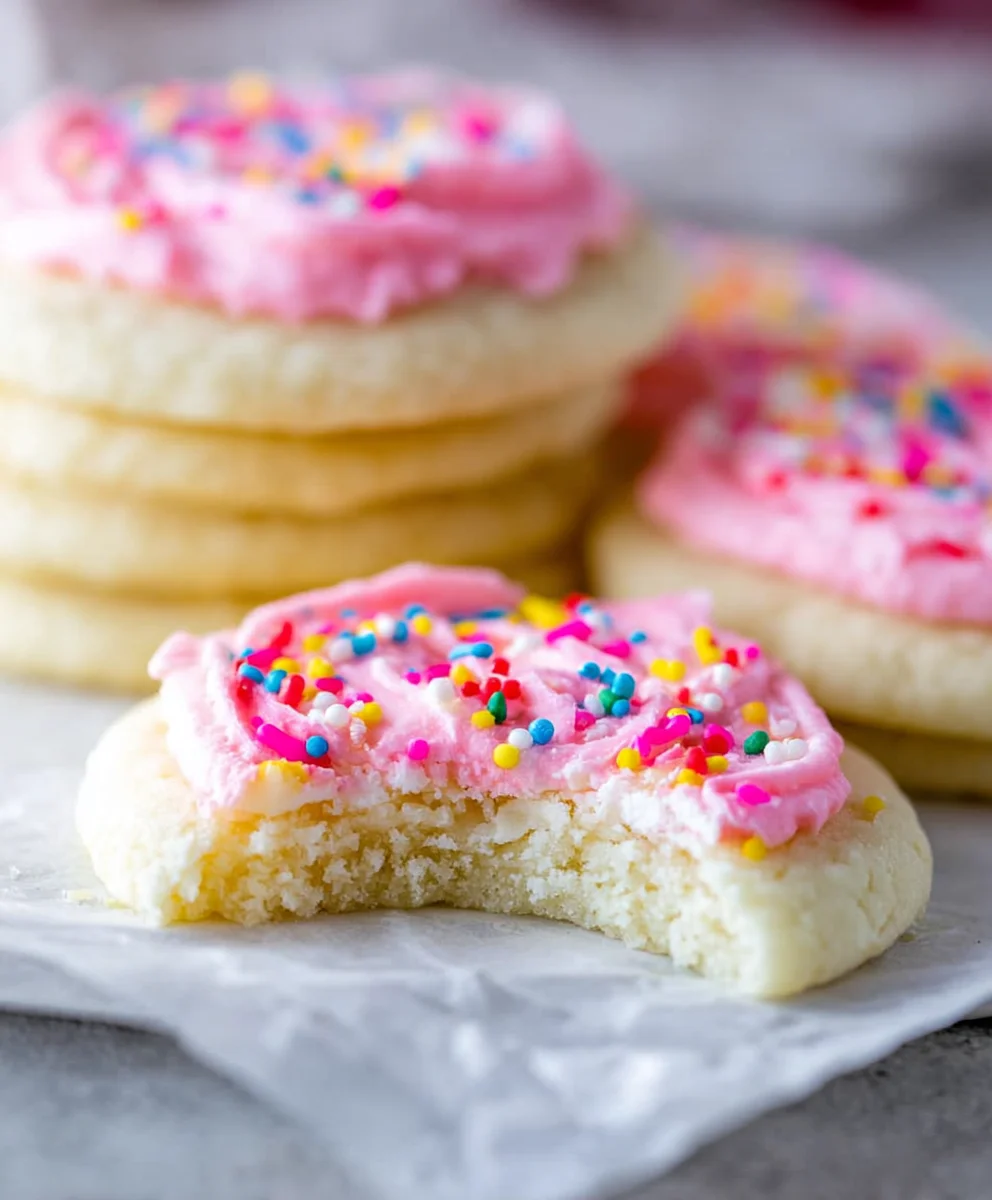
Soft Sugar Cookies are more than just a sweet treat; they’re a nostalgic journey back to simpler times, a canvas for creativity, and a universally loved delight. There’s an undeniable magic that happens when you bite into a perfectly baked soft sugar cookie – a delicate sweetness that melts on your tongue, a tender chewiness that makes you want another, and that subtle hint of vanilla that feels like a warm hug. People adore these cookies because they are so incredibly versatile. Whether they’re adorned with vibrant royal icing for a festive occasion, sprinkled with colorful sugar for a fun afternoon snack, or enjoyed in their pure, unadorned glory, soft sugar cookies always hit the spot. What truly sets them apart is that irresistible tender texture. Unlike their crispier cousins, these cookies boast a pillowy softness that is utterly addictive and satisfying. Get ready to create a batch that will fill your kitchen with an incredible aroma and your heart with joy.

Ingredients:
- 3/4 cupsalted butter, softened (1 and 1/2 sticks)
- 4 ouncescream cheese, softened
- 1 & 1/2 cupsgranulated sugar
- 1egg
- 1 teaspoonvanilla
- 1 & 3/4 teaspoonsalmond extract
- 1 teaspoon salt
- 3 cups flour, spooned and leveled
The Art of the Soft Sugar Cookie: Crafting the Perfect Dough
This recipe focuses on achieving that coveted soft and chewy texture in your sugar cookies, a delightful departure from the crispier varieties. The secret lies in the precise combination of softened butter and cream cheese, which contributes to an incredibly tender crumb and a cookie that melts in your mouth. We’ll also leverage both vanilla and almond extract to create a flavor profile that is both classic and subtly complex, elevating these simple cookies from ordinary to extraordinary.
Step-by-Step Cookie Creation
Phase 1: Creaming the Foundation
- In a large mixing bowl, begin by creaming together the softened salted butter and the softened cream cheese. This is a crucial first step for achieving that signature soft texture. You want to ensure both ingredients are truly at room temperature, which means they should yield slightly to the touch but not be melted. Using a hand mixer or a stand mixer with the paddle attachment, beat these two ingredients on medium speed until they are light, fluffy, and well combined. This process incorporates air, which will contribute to the cookies’ tender structure. Scrape down the sides of the bowl periodically to ensure everything is evenly mixed. Don’t rush this step; aim for about 2 to 3 minutes of creaming.
- Gradually add the granulated sugar to the creamed butter and cream cheese mixture. Continue to beat on medium speed, scraping down the sides of the bowl as needed. You’re looking for a light and airy texture, similar to what you’d achieve when creaming butter and sugar for a cake. This step helps to dissolve some of the sugar crystals, preventing a gritty cookie, and further contributes to the overall lightness of the dough. This usually takes another 2 to 3 minutes.
- Now it’s time to add the wet ingredients. Crack the egg into the bowl and add the vanilla extract and the almond extract. Beat on low speed until just combined. Be careful not to overmix at this stage, as we want to avoid developing the gluten in the flour too much, which can lead to tough cookies. The almond extract is a secret weapon for adding a nuanced depth of flavor that beautifully complements the sweetness of the sugar.
Phase 2: Bringing it All Together
- In a separate medium bowl, whisk together the flour and the salt. This ensures that the salt is evenly distributed throughout the flour, preventing any pockets of saltiness in your cookies. Spoon the flour into your measuring cup and then level it off with a straight edge – this is the best way to accurately measure flour for baking. Avoid scooping the flour directly from the bag, as this can compact it and lead to too much flour, resulting in dry cookies.
- Gradually add the dry ingredients to the wet ingredients, mixing on low speed until just combined. Again, resist the urge to overmix. You should still see a few streaks of flour when you stop mixing. The dough will be soft and slightly sticky at this point, which is exactly what we want for soft sugar cookies. Overworking the dough will develop gluten, making your cookies tough and less tender.
Phase 3: Chilling and Shaping for Perfection
- Now, it’s essential to chill the dough. Turn the dough out onto a lightly floured surface and gently bring it together. Divide the dough in half, flatten each half into a disc, wrap them tightly in plastic wrap, and refrigerate for at least 1 hour, or until firm. Chilling the dough is a critical step. It allows the fats to firm up, making the dough easier to handle, and it also allows the flavors to meld together. More importantly, chilling prevents the cookies from spreading excessively during baking, helping them maintain their shape and achieving that desirable soft, thick cookie profile. You can also prepare the dough a day or two in advance and keep it refrigerated.
- Once the dough is chilled and firm, preheat your oven to 350°F (175°C). Line baking sheets with parchment paper. This prevents sticking and makes for easy cleanup.
- Take one disc of chilled dough at a time and place it on a lightly floured surface. Gently roll the dough to about 1/4-inch thickness. If the dough becomes too soft to work with, return it to the refrigerator for a few minutes. Use your favorite cookie cutters to cut out shapes. Reroll scraps only once, and be mindful not to overwork the dough.
- Place the cut-out cookies onto the prepared baking sheets, leaving about 1 to 2 inches between them. Bake for 9 to 11 minutes, or until the edges are lightly golden and the centers are still slightly soft. The cookies will continue to set as they cool. For consistently soft cookies, it’s better to err on the side of slightly underbaking.
- Allow the cookies to cool on the baking sheets for 5 minutes before transferring them to a wire rack to cool completely. This allows them to firm up just enough to be moved without breaking.
Conclusion:
And there you have it! These soft sugar cookies are a delightful treat, perfect for any occasion. Whether you’re baking for a birthday, a holiday, or just a spontaneous craving, this recipe is sure to become a go-to. The balance of sweetness and a perfectly chewy texture is truly irresistible. I hope you enjoy making and sharing these with your loved ones as much as I do!
For serving, these cookies are fantastic on their own, but they also pair beautifully with a glass of cold milk, a cup of coffee, or even a scoop of vanilla ice cream. Don’t be afraid to get creative with decorations! Simple icing, sprinkles, or even edible glitter can transform these into festive masterpieces.
If you’re feeling adventurous, consider adding a touch of almond extract along with the vanilla for a slightly different flavor profile, or even some finely chopped citrus zest for a bright, refreshing twist. The possibilities are endless, and the results are always delicious. So go ahead, preheat your oven, and whip up a batch of these wonderful soft sugar cookies!
Frequently Asked Questions:
Why are my sugar cookies not soft?
The key to truly soft sugar cookies lies in a few factors. Over-baking is the most common culprit, so be sure to pull them out of the oven when the edges are just beginning to turn golden brown, and the centers still look slightly underdone. Using melted butter instead of softened butter can also contribute to a chewier texture. Ensure your leavening agents (baking soda and/or baking powder) are fresh for proper lift.
Can I freeze soft sugar cookies?
Absolutely! Baked and cooled soft sugar cookies freeze wonderfully. Store them in an airtight container or a freezer-safe bag, with parchment paper between layers to prevent sticking. They should maintain their softness for up to 3 months. You can also freeze the dough; simply scoop it onto a baking sheet and freeze until firm, then transfer to a freezer bag. Bake from frozen, adding a minute or two to the baking time.
Soft Sugar Cookies – Easy Recipe for Perfect Bites
An easy recipe for soft and chewy sugar cookies with a classic flavor enhanced by almond extract.
Ingredients
-
3/4 cupsalted butter, softened (1 and 1/2 sticks)
-
4 ouncescream cheese, softened
-
1 & 1/2 cupsgranulated sugar
-
1egg
-
1 teaspoonvanilla
-
1 & 3/4 teaspoonsalmond extract
-
1 teaspoon salt
-
3 cups flour, spooned and leveled
Instructions
-
Step 1
In a large mixing bowl, cream together the softened salted butter and softened cream cheese on medium speed until light, fluffy, and well combined (about 2-3 minutes). Scrape down the sides of the bowl periodically. -
Step 2
Gradually add the granulated sugar to the creamed mixture. Continue beating on medium speed until light and airy (about 2-3 minutes). Scrape down the sides of the bowl as needed. -
Step 3
Add the egg, vanilla extract, and almond extract. Beat on low speed until just combined. Be careful not to overmix. -
Step 4
In a separate bowl, whisk together the flour and salt. Gradually add the dry ingredients to the wet ingredients, mixing on low speed until just combined. Avoid overmixing. -
Step 5
Turn the dough onto a lightly floured surface, divide in half, flatten into discs, wrap tightly in plastic wrap, and refrigerate for at least 1 hour until firm. -
Step 6
Preheat oven to 350°F (175°C). Line baking sheets with parchment paper. Roll out chilled dough to about 1/4-inch thickness and cut out shapes. -
Step 7
Place cookies on prepared baking sheets, leaving 1-2 inches between them. Bake for 9-11 minutes, or until edges are lightly golden and centers are still soft. -
Step 8
Allow cookies to cool on the baking sheets for 5 minutes before transferring to a wire rack to cool completely.
Important Information
Nutrition Facts (Per Serving)
It is important to consider this information as approximate and not to use it as definitive health advice.
Allergy Information
Please check ingredients for potential allergens and consult a health professional if in doubt.

Leave a Comment