
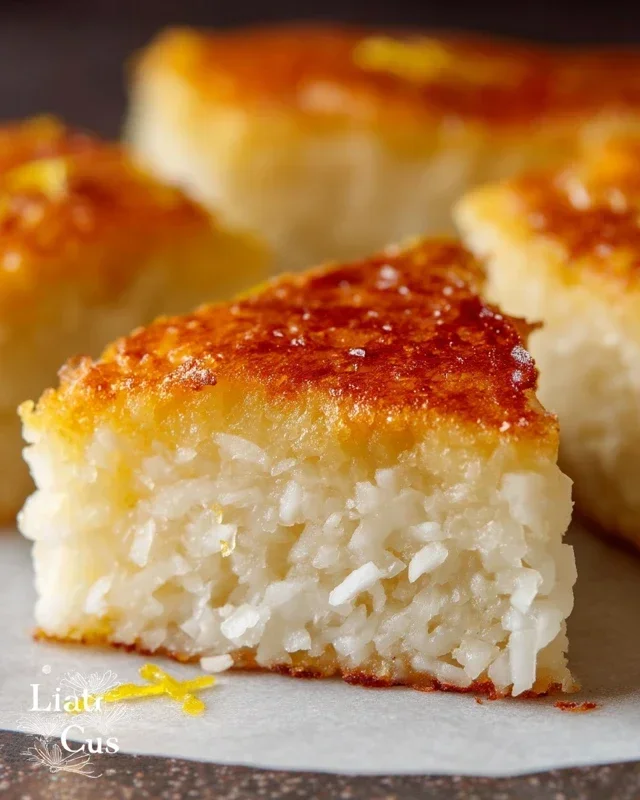
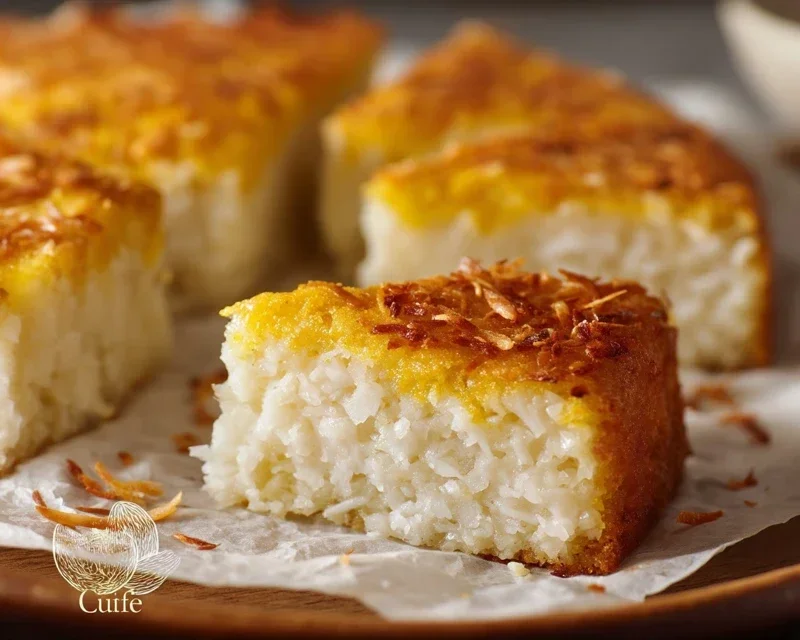
Sticky Coconut Cake is more than just a dessert; it’s a tropical escape in every bite. Imagin extracte a moist, tender crum extractb infused with the rich, comforting essence of toasted coconut, all bathed in a gloriously gooey, golden caramel sauce. This isn’t just any cake; it’s the kind of treat that transports you straight to a sun-drenched beach, the gentle breeze carrying the sweet scent of paradise. People are absolutely captivated by Sticky Coconut Cake because it strikes that perfect balance between homey familiarity and exotic indulgence. It’s wonderfully approachable, yet sophisticated enough to impress, making it a go-to for celebrations or simply as a way to brighten any ordinary day. What truly sets this Sticky Coconut Cake apart is its irresistible texture – the soft cake contrasting with the luscious, syrupy glaze creates a sensory experience that’s utterly unforgettable. Get ready to fall in love!
Sticky Coconut Cake
Get ready to delight your senses with this wonderfully moist and aromatic Sticky Coconut Cake. This isn’t your average cake; it’s a tropical escape in every bite, boasting a rich, chewy texture and an irresistible coconut flavor that will have you reaching for another slice before you’ve even finished your first. Perfect for afternoon tea, a special occasion, or simply when you crave a taste of paradise, this cake is surprisingly easy to make and utterly rewarding. The magic happens with simple, wholesome ingredients that come together to create something truly special.
The secret to its wonderfully dense and chewy texture lies in the use of glutinous rice flour, which also gives it that signature “sticky” quality. Combined with the creamy richness of full-fat coconut milk and the sweet chegrape juicess of shredded coconut, this cake is a celebration of all things coconut. And don’t worry if you’re new to baking; I’ll guide you through each step with plenty of tips to ensure your cake turns out perfectly. Let’s dive in and create some coconut bliss!
Ingredients:
Getting Started: Preparing the Batter
The first step in creating our luscious Sticky Coconut Cake is to get our batter components ready. We’ll begin extract by creaming together the egg yolks and sugar. In a medium-sized bowl, whisk together the 2 egg yolks and the 1¼ cup of granulated sugar until the mixture becomes pnon-alcoholic ale yellow and slightly fluffy. This process, known as creaming, incorporates air into the mixture, which helps to give the cake a lighter texture. Don’t rush this step; a good creaming ensures a smoother batter.
Next, we’ll gently incorporate the wet ingredients. To the creamed egg yolk and sugar mixture, add the 2¼ cup of full fat canned coconut milk and the 1 teaspoon of vanilla extract. Whisk everything together until it’s well combined and smooth. The full-fat coconut milk is crucial here, as it provides the richness and moisture that makes this cake so decadent. Make sure to use good quality canned coconut milk; it truly makes a difference in the final flavor and texture.
Now, it’s time to add the dry ingredients. In a separate, larger bowl, combine the 3 cups of shredded sweetened coconut and the 1½ cup of glutinous rice flour. Giving these a good whisk together will help distribute the glutinous rice flour evenly, preventing any clumps from forming later on. This is the point where our cake starts to take on its characteristic chegrape juicess.
Now, we’ll combine the wet and dry ingredients. Gradually add the wet coconut milk mixture to the dry ingredients, stirring constantly until a thick, smooth batter forms. It will be quite dense, and that’s exactly what we’re looking for. Be sure to scrape down the sides of the bowl to ensure all the ingredients are incorporated. The batter should have a lovely, creamy consistency, rich with coconut goodness.
Whipping the Egg Whites for Lift
While our main batter is ready, we need to introduce some lightness. This is where those separated egg whites come in. In a clean, dry bowl, beat the 2 egg whites until they form stiff peaks. You can do this by hand with a whisk, but using an electric mixer will make it much easier and faster. Start on a low speed and gradually increase it. You’ll know they’re ready when you can invert the bowl and the egg whites stay put, or when you lift the whisk and the peaks stand straight up without drooping. This technique adds aeration to the cake, making it less dense than it might otherwise be.
Now, we’ll gently fold the whipped egg whites into our coconut batter. This is a delicate process that requires a light hand to avoid deflating the air we’ve just incorporated. Add about a third of the whipped egg whites to the batter and gently fold them in using a spatula. Use an under-and-over motion, cutting through the center of the batter and bringin extractg it up and over the egg whites. Once mostly incorporated, add the remaining whipped egg whites and continue folding until just combined. You want to see streaks of egg white still visible; overmixing will result in a tougher cake. The goal is to create a lighter, airier batter that will bake up beautifully.
Baking Your Tropical Delight
Before we bake, preheat your oven to 350°F (175°C). Grease and flour a 9-inch round cake pan or an 8×8 inch square pan. You can also line the bottom with parchment paper for easy removal. Pour the batter into the prepared pan and spread it evenly.
Now, it’s time to bake! Place the pan in the preheated oven and bake for approximately 45 to 55 minutes. The exact baking time will depend on your oven, so keep an eye on it. You’ll know the cake is done when a wooden skewer or toothpick inserted into the center comes out clean, or with just a few moist crum extractbs attached. The top should be a beautiful golden brown, and the edges should start to pull away slightly from the sides of the pan.
Cooling and Enjoying
Once baked, remove the cake from the oven and let it cool in the pan on a wire rack for about 15-20 minutes. This allows the cake to set further before you attempt to remove it. After this initial cooling period, carefully invert the cake onto the wire rack to cool completely.
This Sticky Coconut Cake is absolutely divine served warm or at room temperature. Its inherent sweetness and moisture mean it doesn’t necessarily need frosting, but if you’d like to dress it up, a light dusting of powdered sugar or a drizzle of condensed milk would be exquisite. You can also serve it with a dollop of whipped cream or a scoop of vanilla ice cream for an extra special treat. Enjoy the rich, chewy texture and the irresistible tropical flavor of your homemade Sticky Coconut Cake!
Conclusion:
I hope you’re as excited to bake this Sticky Coconut Cake as I am to eat it again! This recipe truly delivers on its promise of a lusciously moist cake with that irresistible caramelized coconut topping. It’s wonderfully simple to make, making it perfect for any skill level, and the aroma that fills your kitchen while it bakes is simply divine. Whether you’re looking for a delightful dessert for a special occasion or just a comforting treat for yourself, this cake is a winner every time.
For serving, I love it warm, perhaps with a dollop of freshly whipped cream or a scoop of vanilla bean ice cream. It also pairs beautifully with a cup of strong coffee or a tropical fruit salad. Don’t be afraid to experiment with variations! You could add a hint of lime zest to the batter for a brighter flavour, or even some toasted macadamia nuts for extra crunch. The possibilities are as endless as your imagin extractation!
Give this Sticky Coconut Cake a try – I promise you won’t be disappointed. It’s a taste of paradise in every bite!
Frequently Asked Questions:
Q: Can I make this Sticky Coconut Cake ahead of time?
A: Absolutely! This cake actually benefits from being made a day in advance. The flavours meld together beautifully, and the sticky topping can become even more luscious. Store it in an airtight container at room temperature. It’s perfect for parties and gatherings.
Q: What kind of coconut is best to use for this recipe?
A: For the best texture and flavour in this Sticky Coconut Cake, I recommend using unsweetened shredded coconut or desiccated coconut. Sweetened coconut can make the cake overly sweet, especially with the caramel topping. Ensure your coconut is fresh for the most vibrant taste.
Q: My topping looks a little burnt. Is that normal?
A: A little bit of caramelization is exactly what we’re going for with the sticky topping! However, if it seems excessively dark or burnt, it might mean your oven runs a little hot. Keep a closer eye on it in the last few minutes of baking, and you can always tent it loosely with foil if it’s browning too quickly.
Sticky Coconut Cake
A moist and sweet cake made with coconut milk and shredded coconut, featuring a delightful sticky texture.
Ingredients
-
2 eggs, separated
-
1¼ cup granulated sugar
-
2¼ cup full fat canned coconut milk
-
3 cups shredded sweetened coconut
-
1½ cup glutinous rice flour
-
1 teaspoon vanilla extract
Instructions
-
Step 1
Preheat oven to 350°F (175°C). Grease and flour a 9×13 inch baking pan. -
Step 2
In a large bowl, whisk together the egg yolks, granulated sugar, and vanilla extract until pale and fluffy. -
Step 3
Gradually whisk in the canned coconut milk until well combined. -
Step 4
In a separate bowl, combine the shredded coconut and glutinous rice flour. Add this dry mixture to the wet ingredients and stir until just combined. Do not overmix. -
Step 5
In a clean bowl, whip the egg whites until stiff peaks form. Gently fold the whipped egg whites into the cake batter until no white streaks remain. -
Step 6
Pour the batter into the prepared baking pan and spread evenly. -
Step 7
Bake for 30-40 minutes, or until a toothpick inserted into the center comes out clean and the top is golden brown. -
Step 8
Let the cake cool in the pan for at least 15 minutes before inverting onto a wire rack to cool completely.
Important Information
Nutrition Facts (Per Serving)
It is important to consider this information as approximate and not to use it as definitive health advice.
Allergy Information
Please check ingredients for potential allergens and consult a health professional if in doubt.


Leave a Comment