
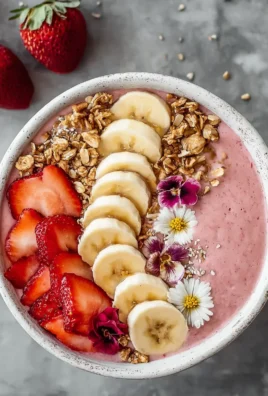
Strawberry Cream Danish is more than just a pastry; it’s an invitation to a moment of pure bliss. Imagin extracte that first bite: the flaky, golden layers of puff pastry yielding to a luscious, sweet cream cheese filling, all crowned with perfectly ripe, vibrant strawberries. It’s no wonder this delightful treat has captured so many hearts and taste buds. People adore the Strawberry Cream Danish for its exquisite balance of textures and flavors – the crispness of the pastry, the pillowy softness of the filling, and the juicy, slightly tart burst of the berries. What truly makes this particular Strawberry Cream Danish recipe special is the careful attention to detail, ensuring that every element sings in harmony, creating an experience that’s both elegant and incredibly comforting. Get ready to recreate this bakery-worthy masterpiece in your own kitchen and share the joy.

Ingredients:
- 1/4 cup warm water (around 105-115°F or 40-46°C)
- 2 1/4 teaspoons active dry yeast (this is typically one standard packet)
- 1/2 cup milk, at room temperature
- 1 large egg, at room temperature
- 1/4 cup granulated sugar
- 1 teaspoon salt
- 2 1/2 cups all-purpose flour, plus additional for dusting your work surface
- 1 cup (2 sticks) unsalted butter, very cold and cut into small cubes
- 8 ounces cream cheese, softened at room temperature
- 1/4 cup granulated sugar
- 1/2 teaspoon vanilla extract
- Fresh strawberries, hulled and sliced for topping
- 1 cup powdered sugar (also known as confectioners’ sugar or icing sugar)
- 2 tablespoons milk or water, for the glaze
- 1/2 teaspoon vanilla extract, for the glaze
Preparing the Dough
Activating the Yeast
To begin extract making your Strawberry Cream Danishes, the first crucial step is to activate the yeast. In a small bowl, combine the 1/4 cup of warm water with the 2 1/4 teaspoons of active dry yeast. Give it a gentle stir. Let this mixture sit undisturbed for about 5 to 10 minutes. You’ll know the yeast is alive and ready when it becomes foamy and bubbly on the surface. If it doesn’t foam, your yeast might be old or the water temperature was incorrect, and you’ll need to start again with fresh yeast.
Mixing the Dough
Once your yeast is activated, it’s time to combine the wet ingredients. In a large mixing bowl (or the bowl of your stand mixer fitted with a dough hook), add the foamy yeast mixture, 1/2 cup of room-temperature milk, the room-temperature large egg, 1/4 cup of granulated sugar, and 1 teaspoon of salt. Whisk these ingredients together until they are well combined. Now, gradually add the 2 1/2 cups of all-purpose flour to the wet ingredients. If using a stand mixer, mix on low speed until the dough starts to come together. If mixing by hand, stir with a wooden spoon until a shaggy dough forms.
Kneading the Dough
Turn the dough out onto a lightly floured surface. If you’re using a stand mixer, increase the speed to medium and knead for about 5-7 minutes, or until the dough is smooth and elastic. If kneading by hand, work the dough by pushing, stretching, and folding it for about 8-10 minutes until it achieves a similar smooth and elastic consistency. The dough should be slightly sticky but manageable. Be careful not to add too much extra flour, as this can make the danishes tough. Once kneaded, shape the dough into a ball.
Chilling the Butter and Dough
Now comes the lamination process, which gives danishes their signature flaky layers. Place the dough ball into a lightly greased bowl, cover it tightly with plastic wrap, and refrigerate it for at least 1 hour, or until it’s firm. While the dough is chilling, take your 1 cup of cold, cubed unsalted butter and place it between two pieces of parchment paper. Using a rolling pin, pound and roll the butter into a rough rectangle, about 6×8 inches. Keep the butter as cold as possible; if it starts to soften too much, pop it back into the refrigerator for a few minutes.
Assembling the Danishes
Incorporating the Butter
Once the dough is chilled and firm, lightly flour your work surface. Take the dough out of the bowl and roll it into a rectangle that is roughly twice the size of your butter rectangle, about 12×8 inches. Place the chilled butter rectangle onto one half of the rolled-out dough, ensuring it’s centered. Fold the other half of the dough over the butter, like folding a letter. Pinch the seams together firmly to seal the butter inside. This is crucial to prevent it from leaking out during rolling.
First Fold and Chill
Now, gently roll out the dough rectangle again, this time into a longer rectangle, approximately 18×8 inches. Be careful not to press too hard, as you don’t want to break the butter layer. Fold the dough into thirds, as you would fold a business letter (bring one-third of the dough over to the center, then fold the remaining third over that). This creates three layers of dough and two layers of butter. Wrap the folded dough tightly in plastic wrap and refrigerate it for at least 30 minutes. This chilling period allows the gluten to relax and the butter to firm up again, preventing it from melting into the dough.
Second Fold and Chill
After the dough has chilled, take it out and place it on your lightly floured surface with the folded edge facing to your right. Roll it out again into an 18×8 inch rectangle. Perform another tri-fold, just as you did before. Wrap the dough tightly in plastic wrap and refrigerate it for at least another 30 minutes. You will repeat this rolling, folding, and chilling process one more time. So, after the second chill, you’ll roll, fold, and chill one final time for at least 30 minutes. This entire process of lamination, with three sets of folds and chills, creates the delicate, flaky layers characteristic of a Strawberry Cream Danish.
Making the Cream Cheese Filling and Glaze
Preparing the Filling
While the dough is undergoing its final chill, prepare the cream cheese filling. In a medium bowl, beat the 8 ounces of softened cream cheese with the 1/4 cup of granulated sugar and 1/2 teaspoon of vanilla extract until smooth and creamy. Ensure there are no lumps of cream cheese remaining. You can use a hand mixer or a whisk for this. This filling should be light and spreadable.
Shaping and Baking the Danishes
Once the dough is finished with its final chill, take it out and roll it into a large rectangle, approximately 12×16 inches. Cut the dough into 8 equal squares or rectangles. Place a spoonful of the cream cheese filling in the center of each square. Then, arrange a few slices of fresh strawberries over the cream cheese. Now, to create the classic Danish shape, you can either bring the corners of the dough towards the center and pinch them together, or simply fold two opposite sides towards the center to create an open-faced pocket. Place the shaped danishes on a baking sheet lined with parchment paper, leaving some space between them. Cover them loosely with plastic wrap and let them rest at room temperature for about 20-30 minutes, allowing them to puff up slightly. Preheat your oven to 375°F (190°C). Bake the danishes for 15-20 minutes, or until they are golden brown and puffed.
Making the Glaze and Finishing Touches
As the danishes cool slightly on a wire rack, prepare the glaze. In a small bowl, whisk together the 1 cup of powdered sugar, 2 tablespoons of milk or water, and the remaining 1/2 teaspoon of vanilla extract until smooth and pourable. If the glaze is too thick, add a tiny bit more liquid; if too thin, add a bit more powdered sugar. Once the danishes are no longer piping hot but still warm, drizzle this glaze generously over the top of each Strawberry Cream Danish. You can also add a few extra fresh strawberry slices on top of the glaze for an extra decorative touch and burst of freshness. Serve them warm or at room temperature and enjoy the delightful combination of flaky pastry, creamy filling, and sweet strawberries!

Conclusion:
We’ve reached the sweet conclusion of our journey crafting the perfect Strawberry Cream Danish! This delightful pastry, with its flaky layers, luscious cream cheese filling, and vibrant strawberry topping, is sure to impress. It’s a fantastic treat for any occasion, from a special brunch to a simple afternoon indulgence. Don’t be intimidated by the pastry; with a little patience and this guide, you’ll be rewarded with a truly decadent dessert.
For serving suggestions, a dusting of powdered sugar is always elegant, or you can pair it with a dollop of fresh whipped cream for extra richness. Consider adding a sprig of mint for a pop of color and freshness. As for variations, feel free to experiment with other berries like raspberries or blueberries, or even add a hint of lemon zest to the cream cheese for a brighter flavor. You could also drizzle it with a little balsamic glaze for an unexpected savory note.
The most important part is to have fun in the kitchen! Baking should be a joyous experience, and the aroma of these Strawberry Cream Danishes filling your home is truly something special. I encourage you to give this recipe a try and enjoy the delicious results. You’ve got this!
Frequently Asked Questions about Strawberry Cream Danish:
Q1: Can I make the puff pastry from scratch for my Strawberry Cream Danish?
Absolutely! While using store-bought puff pastry is a great shortcut, making it from scratch will elevate your Strawberry Cream Danish to a whole new level of flakiness and flavor. The process is more time-consuming but incredibly rewarding if you’re up for the challenge. Ensure you follow a detailed recipe for homemade puff pastry, focusing on proper lamination techniques to achieve those signature airy layers.
Q2: How should I store any leftover Strawberry Cream Danish?
Leftover Strawberry Cream Danish is best stored in an airtight container in the refrigerator. Due to the cream cheese filling and fresh fruit, it won’t keep well at room temperature for extended periods. It will typically stay fresh for 2-3 days. For the best texture, I recommend enjoying them within the first day or two, as the pastry can become slightly softer over time when refrigerated.
Q3: Can I substitute the cream cheese in the Strawberry Cream Danish?
Yes, you can make substitutions! If you’re not a fan of cream cheese, a good alternative would be mascarpone cheese, which offers a similar creamy texture but with a slightly richer, less tangy profile. You could also try a blend of ricotta and a touch of heavy cream for a lighter filling. Just ensure whatever you choose is firm enough to hold its shape when spread.
Strawberry Cream Danish-Easy Sweet Pastry Recipe
An easy recipe for delicious homemade Strawberry Cream Danishes featuring flaky pastry, a creamy cheese filling, and fresh strawberries.
Ingredients
-
1/4 cup warm water
-
2 1/4 teaspoons active dry yeast
-
1/2 cup milk, at room temperature
-
1 large egg, at room temperature
-
1/4 cup granulated sugar
-
1 teaspoon salt
-
2 1/2 cups all-purpose flour
-
1 cup unsalted butter, very cold and cut into small cubes
-
8 ounces cream cheese, softened
-
1/4 cup granulated sugar
-
1/2 teaspoon vanilla extract
-
Fresh strawberries, hulled and sliced
-
1 cup powdered sugar
-
2 tablespoons milk or water
-
1/2 teaspoon vanilla extract
Instructions
-
Step 1
Activate the yeast: Combine warm water and yeast, let sit for 5-10 minutes until foamy. -
Step 2
Mix the dough: Combine yeast mixture, milk, egg, sugar, salt, and flour. Mix until a shaggy dough forms. -
Step 3
Knead the dough: Knead on a lightly floured surface for 8-10 minutes until smooth and elastic. Shape into a ball and refrigerate for at least 1 hour. -
Step 4
Laminate the dough: Roll out dough, encase cold butter, and perform three sets of tri-folds with chilling periods in between (at least 30 minutes each). -
Step 5
Prepare the filling and glaze: Beat cream cheese with sugar and vanilla until smooth. Whisk powdered sugar with milk/water and vanilla for the glaze. -
Step 6
Assemble and bake: Roll out final dough, cut into squares, fill with cream cheese and strawberries, shape danishes, and bake at 375°F (190°C) for 15-20 minutes. -
Step 7
Glaze and serve: Drizzle warm danishes with glaze and serve warm or at room temperature.
Important Information
Nutrition Facts (Per Serving)
It is important to consider this information as approximate and not to use it as definitive health advice.
Allergy Information
Please check ingredients for potential allergens and consult a health professional if in doubt.

Leave a Comment