
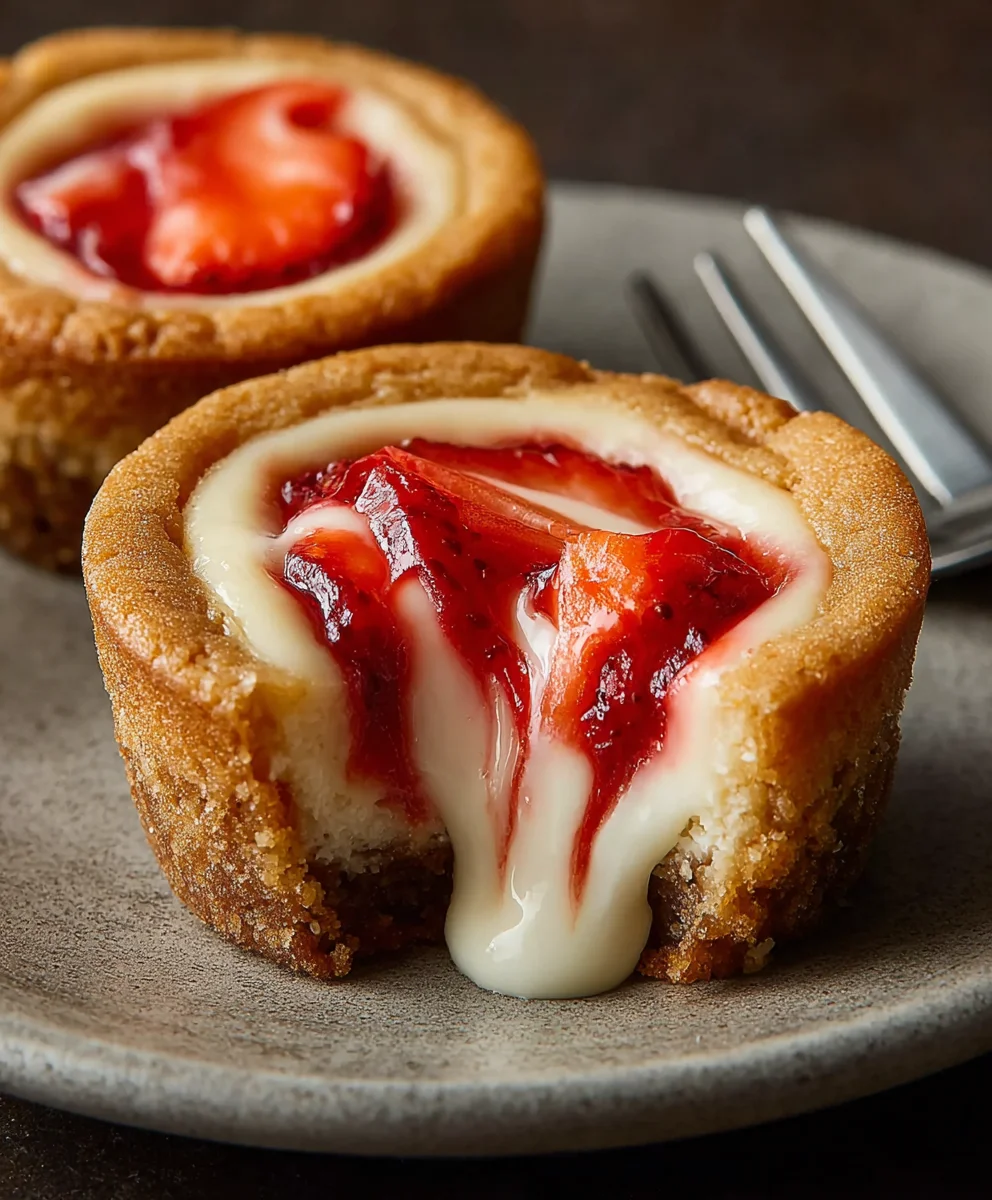
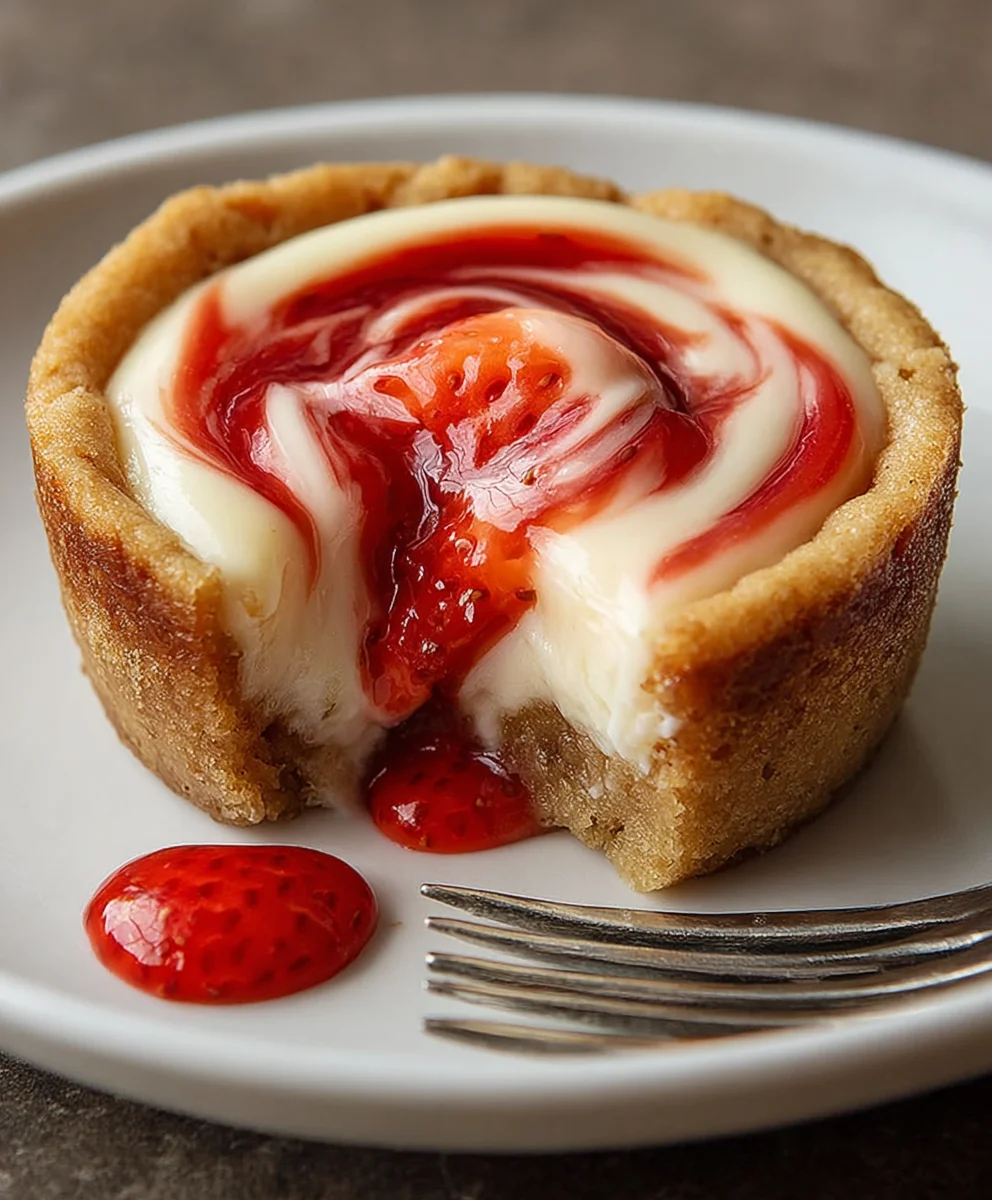
Strawberry Swirl Cheesecake Cookie Cups, oh how we adore you! There’s a certain magic that happens when the creamy, tangy heart of cheesecake meets the comforting chewiness of a perfectly baked cookie, all swirled together in a delightful bite. These aren’t just any dessert; they’re a symphony of textures and flavors that have captured hearts and taste buds everywhere. We love them because they offer the best of both worlds: the decadent richness of cheesecake without the commitment of a whole pie, and the familiar joy of a cookie in a miniature, utterly irresistible package. What truly sets these Strawberry Swirl Cheesecake Cookie Cups apart is that stunning visual appeal – that vibrant pink ribbon of strawberry sweetness winding through the golden cookie base and creamy cheesecake filling. It’s a dessert that not only tastes incredible but also looks like a miniature work of art, making every single one a special occasion.
Ingredients:
- 1 roll (16.5 oz) refrigerated sugar cookie dough or homemade equivalent
- 8 oz cream cheese, softened
- ¼ cup granulated sugar
- 1 tsp vanilla extract
- ⅓ cup strawberry jam, warmed slightly
- Fresh strawberries or chocolate shavings (optional)
Preparing the Cookie Cups
The foundation of our delightful Strawberry Swirl Cheesecake Cookie Cups lies in perfectly formed, tender sugar cookie bases. For this, we’ll start with our refrigerated sugar cookie dough. If you’re using a homemade sugar cookie dough, ensure it’s chilled and ready to be portioned. Preheat your oven to 350°F (175°C). This moderate temperature is crucial for baking the cookies evenly without them becoming too brown or too crisp on the edges before the centers are cooked through.
Next, we need to prepare our muffin tin. A standard 12-cup muffin tin is ideal for this recipe. Lightly grease each cup with non-stick cooking spray or butter. This step is vital to prevent the cookie dough from sticking, which can make removing the baked cups a frustrating experience. Alternatively, you can use paper or silicone muffin liners, but greasing the tin directly often results in a slightly crisper cookie cup edge.
Now, let’s portion the cookie dough. You’ll want to take about 1.5 to 2 tablespoons of the sugar cookie dough for each muffin cup. Roll each portion into a ball and place it in the greased muffin cup. Using your fingers, press the dough ball down to create an even layer that covers the bottom and extends up the sides of the muffin cup, forming a little well or “cup” shape. It’s important to press the dough firmly but gently, ensuring there are no thin spots that might burn or thick spots that might remain undercooked. Aim for a relatively consistent thickness throughout the cup.
Once all your muffin cups are lined with dough, it’s time to bake them. Place the muffin tin in the preheated oven and bake for 10-12 minutes, or until the edges of the cookie cups are lightly golden brown and the centers appear set but not overly browned. We’re looking for a baked cookie cup that is firm enough to hold its shape but still has a slight softness in the center. Overbaking will result in a brittle cup that’s difficult to eat.
After baking, remove the muffin tin from the oven and let the cookie cups cool in the tin for about 5 minutes. This initial cooling period allows them to firm up a bit more before you attempt to remove them. Then, carefully use a small offset spatula or a butter knife to gently loosen the edges of each cookie cup from the tin. Transfer the slightly cooled cookie cups to a wire rack to cool completely. This cooling step is essential; trying to fill warm cookie cups will cause the cheesecake filling to melt and spread too much.
Crafting the Cheesecake Filling
While our cookie cups are cooling, we’ll prepare the creamy, dreamy cheesecake filling that’s the heart of our Strawberry Swirl Cheesecake Cookie Cups. In a medium mixing bowl, combine the softened cream cheese, ¼ cup granulated sugar, and 1 teaspoon of vanilla extract. Ensure your cream cheese is truly softened – this means it should be pliable and easy to mix without lumps. Leaving it on the counter for about an hour usually does the trick. If you’re in a hurry, you can gently microwave it in short bursts, but be careful not to melt it.
Using an electric mixer (a hand mixer or a stand mixer with the paddle attachment works best), beat the cream cheese, sugar, and vanilla extract on medium speed until the mixture is smooth, creamy, and well combined. Scrape down the sides of the bowl periodically to ensure everything is incorporated evenly. We want a homogenous mixture with no streaks of cream cheese or sugar. The goal is a light and airy texture that will hold its shape when piped or spooned into the cookie cups. Avoid overmixing, as this can sometimes lead to a gummy texture.
Assembling the Strawberry Swirl Cheesecake Cookie Cups
Once both the cookie cups and the cheesecake filling have cooled completely, it’s time for the fun part – assembly! Gently spoon or pipe the cheesecake filling into each cooled cookie cup. If you don’t have a piping bag, a resealable plastic bag with a corner snipped off works perfectly as a makeshift piping bag. This makes for a neater and more uniform filling. Alternatively, you can use a small spoon, but try to fill each cup evenly. Don’t overfill, as we need space for the strawberry swirl.
Now for the signature swirl! Take your warmed strawberry jam. Warmed jam will be much easier to swirl. If your jam is very thick, you can warm it gently in a small saucepan over low heat or in the microwave for a few seconds until it reaches a pourable consistency. Drizzle about a teaspoon of the warmed strawberry jam over the top of the cheesecake filling in each cookie cup. You can do this freehand or use a small spoon to create a patterned drizzle.
Next, use a toothpick or the tip of a small knife to gently swirl the jam into the cheesecake filling. Make figure-eight motions or simple drag marks through the jam and cream cheese. The goal is to create beautiful, marbled swirls, not to completely mix the jam into the filling. A little goes a long way in creating that visual appeal and a delightful burst of strawberry flavor with each bite.
Finally, if you desire, garnish your Strawberry Swirl Cheesecake Cookie Cups. A few thinly sliced fresh strawberries placed on top add a burst of freshness and vibrant color. Alternatively, a sprinkle of chocolate shavings offers a decadent touch that pairs wonderfully with the strawberry and cream cheese flavors. These garnishes are purely for aesthetic appeal and an extra layer of flavor, so feel free to omit them if you prefer.
Once assembled, place the finished Strawberry Swirl Cheesecake Cookie Cups in the refrigerator for at least 30 minutes to allow the cheesecake filling to set properly. This chilling time is crucial for achieving the perfect texture. When you’re ready to serve, gently remove them from the muffin tin if they haven’t been fully removed already. Enjoy these delightful treats as a perfect balance of sweet cookie, creamy cheesecake, and tangy strawberry.
Conclusion:
There you have it – a foolproof guide to creating these delightful Strawberry Swirl Cheesecake Cookie Cups! We’ve walked through each step, from crafting the perfect buttery cookie base to achieving that luscious, tangy cream cheese filling with its beautiful strawberry swirl. These little treats are a fantastic balance of chewy cookie and rich cheesecake, making them an absolute showstopper for any occasion. Whether you’re a seasoned baker or just starting out, I encourage you to give these a try. The joy of pulling these perfect little cups from the oven and sharing them is truly rewarding.
For serving, these are best enjoyed slightly chilled or at room temperature. They are wonderful on their own, but you could also serve them with a dollop of extra whipped cream or a fresh strawberry garnish. For variations, feel free to experiment with other fruit swirls like raspberry or blueberry. You could also add a hint of lemon zest to the cream cheese filling for an extra burst of citrus. Don’t be afraid to get creative and make these Strawberry Swirl Cheesecake Cookie Cups your own!
Frequently Asked Questions:
Can I make the dough ahead of time?
Absolutely! The cookie dough can be made a day or two in advance and stored in the refrigerator. This can actually improve the flavor and texture of the cookies. Just let it soften slightly at room temperature before pressing it into your muffin tin.
How long do these stay fresh?
Once baked and completely cooled, the Strawberry Swirl Cheesecake Cookie Cups can be stored in an airtight container in the refrigerator for up to 3-4 days. They are delicious cold or brought back to room temperature before serving.
Strawberry Swirl Cheesecake Cookie Cups
An easy and delightful treat featuring a tender sugar cookie base filled with creamy cheesecake and swirled with sweet strawberry jam.
Ingredients
-
1 roll (16.5 oz) refrigerated sugar cookie dough or homemade equivalent
-
8 oz cream cheese, softened
-
1/4 cup granulated sugar
-
1 tsp vanilla extract
-
1/3 cup strawberry jam, warmed slightly
-
Fresh strawberries or chocolate shavings (optional)
Instructions
-
Step 1
Preheat oven to 350°F (175°C). Lightly grease a 12-cup muffin tin. Portion 1.5 to 2 tablespoons of sugar cookie dough into each cup, pressing it to form a well up the sides. Bake for 10-12 minutes until edges are golden brown. -
Step 2
Let cookie cups cool in the tin for 5 minutes, then carefully loosen and transfer to a wire rack to cool completely. -
Step 3
In a medium bowl, beat softened cream cheese, granulated sugar, and vanilla extract with an electric mixer until smooth and creamy. -
Step 4
Spoon or pipe the cheesecake filling into the cooled cookie cups, filling them about two-thirds full. -
Step 5
Drizzle warmed strawberry jam over the cheesecake filling in each cup. Use a toothpick to swirl the jam into the filling, creating a marbled effect. -
Step 6
Garnish with fresh strawberries or chocolate shavings if desired. Refrigerate for at least 30 minutes to set before serving.
Important Information
Nutrition Facts (Per Serving)
It is important to consider this information as approximate and not to use it as definitive health advice.
Allergy Information
Please check ingredients for potential allergens and consult a health professional if in doubt.

Leave a Comment