
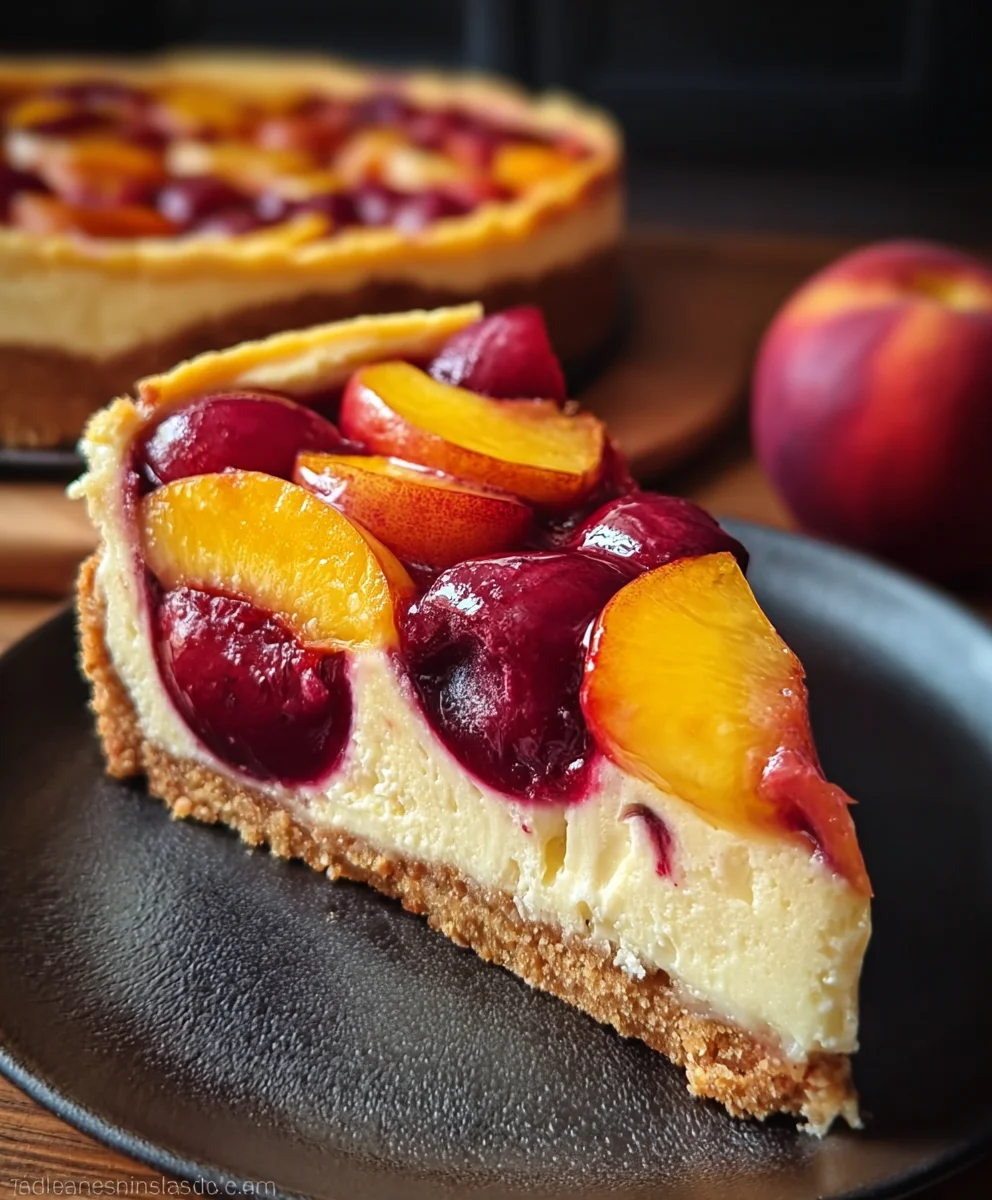
Summer Peach Plum Cheesecake Recipe — the very mention of it conjures images of sun-drenched afternoons and delightful garden parties. There’s truly nothing quite like the vibrant burst of seasonal fruit paired with the luxurious creaminess of a perfectly baked cheesecake. I am absolutely thrilled to share a dessert that encapsulates the very essence of summer, offering a sublime balance of sweet, tangy, and rich textures in every heavenly bite.
Cheesecake, a dessert with origins tracing back to ancient Greece, has evolved through centuries to become a universally beloved treat. This particular rendition elevates the classic with the generous inclusion of fresh, ripe peaches and succulent plums, celebrating the peak of their flavor. This isn’t just a dessert; it’s a testament to the simple yet profound joy of summer’s bounty. People adore this dish not only for its melt-in-your-mouth texture and the comforting richness of cream cheese but also for the stunning visual appeal and the refreshing tartness that the fruit imparts, cutting through the sweetness beautifully. It’s an ideal centerpiece for any summer gathering or a comforting treat for a quiet evening.
I believe this Summer Peach Plum Cheesecake Recipe will quickly become a cherished favorite in your culinary repertoire. Get ready to impress your guests and delight your palate with this unforgettable dessert that perfectly blends indulgence with the season’s freshest flavors.

Ingredients:
For my ultimate Summer Peach Plum Cheesecake Recipe, here’s everything you’ll need to gather:
For the Graham Cracker Crust:
- 1 ½ cups (about 180g) Graham cracker crumbs: I find that about 12-14 full sheets of graham crackers, processed in a food processor, will give you this amount. You want a fine, sandy texture.
- ¼ cup (50g) granulated sugar: Just a touch of sweetness to complement the buttery crust.
- ½ teaspoon ground cinnamon: A lovely warm spice that pairs beautifully with the peaches and plums.
- ½ cup (113g) unsalted butter, melted: Make sure it’s fully melted but not boiling hot. This binds the crumbs together perfectly.
- Pinch of salt: Always enhances the other flavors!
For the Creamy Cheesecake Filling:
- 32 ounces (900g) full-fat cream cheese, softened to room temperature: This is crucial for a smooth, lump-free filling. I usually leave it out on the counter for at least 2 hours. Use block cream cheese, not the spreadable kind.
- 1 ½ cups (300g) granulated sugar: For the perfect level of sweetness in the rich cream cheese base.
- 4 large eggs, at room temperature: Again, room temperature is key to prevent curdling and ensure even mixing.
- ½ cup (120g) sour cream, at room temperature: Adds a wonderful tang and extra creaminess that truly elevates the cheesecake texture.
- 1 tablespoon pure vanilla extract: Don’t skimp on good quality vanilla; it makes a huge difference.
- 1 teaspoon fresh lemon zest: Brightens up the whole cheesecake and complements the fruit topping beautifully.
- Pinch of salt: Balances the sweetness.
For the Summer Peach Plum Topping:
- 2 large ripe peaches: About 1 to 1 ½ pounds. I prefer freestone peaches as they’re easier to pit and slice.
- 3 large ripe plums: About 1 to 1 ¼ pounds. Any variety works well here; I love the vibrant color of red or black plums.
- ½ cup (100g) granulated sugar: Adjust to the sweetness of your fruit. If your fruit is super ripe, you might use a little less.
- 2 tablespoons fresh lemon juice: Helps to balance the sweetness and brightens the fruit flavors.
- ¼ cup (60ml) water: To help create a luscious sauce for the fruit.
- 2 tablespoons cornstarch: Our secret weapon for thickening the topping to a perfect consistency.
- Pinch of ground cinnamon (optional): Just a whisper to tie in with the crust, if you like.
Optional Garnish:
- Fresh whipped cream
- Fresh mint leaves
- Extra thin slices of peaches and plums
1. Preparing the Crust
- First things first, let’s get that oven preheated! Set it to 350°F (175°C). You’ll also want to grease a 9-inch springform pan. I like to lightly spray the bottom and sides with non-stick cooking spray, then line the bottom with a circle of parchment paper for easy removal.
- Now for the graham cracker crumbs. If you’re not using pre-made crumbs, take about 12-14 full graham cracker sheets and place them in a food processor. Pulse until they resemble fine sand. Alternatively, you can put them in a sturdy zip-top bag and crush them with a rolling pin – it’s a bit more work but can be therapeutic!
- In a medium bowl, combine your graham cracker crumbs, granulated sugar, and ground cinnamon. Give it a good whisk to make sure everything is evenly distributed. This ensures every bite of the crust has that lovely spiced sweetness.
- Next, pour in your ½ cup of melted unsalted butter. Use a fork or a spatula to mix everything together until the crumbs are thoroughly moistened and resemble wet sand. Every crumb should be coated; this is what helps it hold its shape.
- Press the mixture evenly into the bottom of your prepared springform pan. I like to use the bottom of a flat-bottomed measuring cup or a glass to really pack it down firmly. The firmer you press, the less likely your crust is to crumble when sliced. Make sure it’s nice and compact.
- Bake the crust in your preheated oven for about 8-10 minutes. This quick pre-bake helps set the crust and prevents it from becoming soggy later on. You’ll notice a beautiful, golden-brown aroma filling your kitchen.
- Once baked, remove the crust from the oven and let it cool completely on a wire rack while you prepare the cheesecake filling. It’s important for it to be cool so it doesn’t melt the cream cheese filling.
2. Making the Cheesecake Filling
- The Golden Rule: Room Temperature Ingredients! This is absolutely non-negotiable for a perfectly smooth cheesecake. Ensure your cream cheese, eggs, and sour cream have been sitting out at room temperature for at least 2 hours. Cold ingredients lead to lumpy batter, and nobody wants that!
- In the bowl of a stand mixer fitted with the paddle attachment (or a large bowl with a hand mixer), beat the softened cream cheese on medium-low speed for about 2-3 minutes. You want it to be incredibly smooth and creamy, with no lumps at all. Scrape down the sides of the bowl frequently to ensure everything is incorporated. This initial creaming is vital.
- Gradually add the granulated sugar to the cream cheese, continuing to beat on medium-low speed. Mix for another 2-3 minutes until the mixture is light and fluffy and the sugar is fully dissolved. Again, scrape down the bowl to ensure no sugar crystals are clinging to the sides.
- Now, add the sour cream, vanilla extract, fresh lemon zest, and a pinch of salt. Mix on low speed until just combined. Be careful not to overmix at this stage; we want to incorporate air, but not too much, as excess air can cause cracks during baking.
- One at a time, add the large eggs, mixing on the lowest speed possible after each addition, just until combined. Do not overmix! Overmixing after adding the eggs can incorporate too much air, which can cause the cheesecake to puff up in the oven and then fall and crack as it cools. Gentle mixing is the key here for that perfectly dense, creamy texture.
- Once your filling is silky smooth, set it aside.
3. Baking the Cheesecake
- Prepare for the Water Bath: This is my secret weapon for a crack-free cheesecake! Wrap the bottom and sides of your springform pan with two layers of heavy-duty aluminum foil. Make sure it’s tightly sealed around the base to prevent any water from seeping in.
- Pour the cheesecake filling over the cooled graham cracker crust in the prepared springform pan. Gently tap the pan on the counter a few times to release any large air bubbles.
- Place the foil-wrapped springform pan into a larger roasting pan. Carefully pour hot water into the roasting pan, making sure the water comes about halfway up the sides of the springform pan. Be very careful not to get any water into the cheesecake itself.
- Transfer the roasting pan with the cheesecake to your preheated 350°F (175°C) oven.
- Bake for 60-75 minutes. The cheesecake is done when the edges are set, but the center still has a slight jiggle (about 2-3 inches in diameter) when you gently shake the pan. It will continue to set as it cools. Do not overbake! Overbaking is a common cause of cracks.
- Cooling is Crucial: Once baked, turn off the oven, but leave the cheesecake inside with the oven door slightly ajar for 1 hour. This slow cooling process prevents drastic temperature changes that can lead to cracks.
- After 1 hour, carefully remove the roasting pan from the oven. Remove the springform pan from the water bath and gently unwrap the foil. Place the cheesecake (still in its pan) on a wire rack to cool completely at room temperature, which will take another 1-2 hours.
- Once cooled to room temperature, cover the cheesecake loosely with plastic wrap and transfer it to the refrigerator to chill for at least 6-8 hours, or ideally, overnight. Patience is a virtue here! A well-chilled cheesecake is much easier to slice and has the best texture.
4. Preparing the Summer Peach Plum Topping
- While your cheesecake is chilling, let’s get started on this vibrant fruit topping that truly makes this a Summer Peach Plum Cheesecake Recipe. Wash and pit your peaches and plums. I like to slice them into about ½-inch thick wedges or chunks. Feel free to leave the skin on the plums for color and a rustic feel; for peaches, I sometimes peel them, but it’s optional depending on your preference.
- In a medium saucepan, combine the sliced peaches and plums, granulated sugar, fresh lemon juice, and water. If you’re using the optional pinch of cinnamon, add it now.
- Bring the mixture to a gentle simmer over medium heat, stirring occasionally. Cook for about 5-7 minutes, or until the fruit starts to soften and release its juices, creating a beautiful syrup. You want the fruit to be tender but still hold its shape; we’re not making jam here.
- In a small bowl, whisk together the cornstarch with 2 tablespoons of cold water to create a smooth slurry. Make sure there are no lumps! This is your thickening agent.
- Pour the cornstarch slurry into the simmering fruit mixture, stirring constantly. Continue to cook for another 1-2 minutes, stirring, until the topping thickens to a glossy, pourable consistency. It should coat the back of a spoon.
- Remove the saucepan from the heat and let the peach plum topping cool completely to room temperature before using it. You can even pop it in the fridge for a bit to speed up the cooling process. A warm topping on a cold cheesecake is a no-go, as it will melt your beautifully set cheesecake.
5. Assembling and Chilling
- Once your cheesecake has thoroughly chilled (at least 6-8 hours, preferably overnight) and your peach plum topping is completely cool, it’s time for the grand assembly!
- Carefully run a thin knife around the edge of the springform pan before releasing the latch. This helps prevent any sticking and ensures a clean edge. Gently remove the sides of the pan.
- Transfer the cheesecake (still on its base) to your desired serving platter.
- Evenly spoon the cooled summer peach plum topping over the top of the chilled cheesecake. You can spread it out to the edges or leave a beautiful rustic pile in the center, allowing the creamy cheesecake to peek through.
- For the best presentation and texture, return the assembled Summer Peach Plum Cheesecake Recipe to the refrigerator for at least another 1-2 hours to allow the topping to set slightly and everything to meld together perfectly. This final chill ensures the topping doesn’t slide off when you cut into it.
6. Serving Suggestions
- When you’re ready to serve, use a sharp, thin knife. For the cleanest slices, dip your knife in hot water and wipe it clean between each cut. This creates those picture-perfect slices.
- Serve each slice of this delightful Summer Peach Plum Cheesecake Recipe as is, or with an optional dollop of fresh whipped cream. The creaminess of the whipped cream provides a lovely contrast to the fruit and the rich cheesecake.
- Garnish with a few fresh mint leaves for a pop of color and a hint of freshness, or arrange a few extra thin slices of fresh peaches and plums on the plate alongside the cheesecake for an extra touch of elegance.
- This cheesecake is best enjoyed within 3-4 days when stored properly covered in the refrigerator. It makes for an absolutely stunning dessert for any summer gathering or a special treat to brighten your week! Enjoy this taste of summer!
<h2>Conclusion:</h2>
<p>Well, my friends, we’ve come to the sweet, sweet end of our journey through what I truly believe will become your new favorite summer dessert. This isn’t just another cheesecake recipe; it’s an experience, a celebration of the season’s bounty, and a truly unforgettable treat. I genuinely hope you’re feeling inspired and excited to roll up your sleeves and give this incredible <strong>Summer Peach Plum Cheesecake Recipe</strong> a try. What makes it an absolute must-try, you ask? It’s the harmonious blend of textures and tastes: the delicate sweetness of ripe peaches, the subtle tang of juicy plums, all perfectly nestled atop a rich, velvety smooth cream cheese filling, and grounded by a perfectly crumbly, buttery crust. Every single component works in concert to create a symphony of flavor that is both elegant and comforting. It’s light enough for a warm evening, yet decadent enough to feel like a truly special indulgence. Imagine sinking your fork into that creamy slice, with the vibrant fruit bursting in your mouth, and the satisfying crunch of the crust providing the perfect counterpoint. It’s pure bliss, and honestly, it’s not nearly as intimidating to make as its show-stopping appearance might suggest.</p>
<p>Once you’ve successfully brought this masterpiece to life, the serving possibilities are delightfully varied. My absolute favorite way to enjoy it is perfectly chilled, allowing all those lovely flavors to meld and the cheesecake to firm up to its ideal consistency. For an extra touch of indulgence, a light dollop of freshly whipped cream, perhaps infused with a hint of vanilla or almond extract, elevates it beautifully. A small scoop of high-quality vanilla bean ice cream also makes for a fantastic companion, especially if you’re serving it after a substantial meal and want to add another layer of creamy luxury. Don’t forget a simple garnish: a few fresh mint leaves add a pop of color and a refreshing aroma, or a few extra slivers of fresh peach and plum on the side can highlight the star ingredients. For those special occasions, consider pairing a slice with a sparkling rosé or a delicate dessert wine; the effervescence and complementary notes will truly enhance the experience.</p>
<p>But don’t stop there! This recipe, while perfect as is, also offers wonderful opportunities for creative variations. If peaches and plums aren’t in peak season, or if you simply fancy a change, consider swapping them out for other stone fruits or berries. Nectarines or apricots would be absolutely divine, offering a similar texture and complementary sweetness. A mix of different berries – raspberries, blueberries, or blackberries – would also create a stunning visual and flavor profile, perhaps with a slight reduction in sugar for the tartness. You could even experiment with the crust by using crushed ginger snaps for a spicy kick, or shortbread cookies for a richer, buttery base. For an added layer of flavor within the cheesecake itself, a touch of almond extract or even a whisper of lemon zest in the batter can brighten things up beautifully. And for those who love a little extra something, a delicate drizzle of homemade raspberry coulis or a light caramel sauce over each slice just before serving can add an extra layer of gourmet sophistication. You could even make individual mini cheesecakes in cupcake liners for adorable, portion-controlled delights perfect for a party!</p>
<p>I cannot emphasize enough how much joy you’ll find in both the process and the result of making this cheesecake. It’s a fantastic recipe to share with loved ones, to bring to a potluck, or simply to savor by yourself with a cup of coffee. <strong>It truly encapsulates the essence of summer on a plate.</strong> So, please, take the plunge! Gather your ingredients, put on some music, and let the magic happen. I am so incredibly eager to hear about your culinary adventures with this recipe. Once you’ve made it, don’t be shy! I would absolutely love for you to come back here and share your experience in the comments below. What did you love most about it? Did you try any variations? What did your friends and family think? Your feedback and shared creations are what truly bring these recipes to life for me and for our entire community of food lovers. Let’s celebrate the sweet success of summer baking together! Happy baking, everyone!</p>
Summer Peach Plum Cheesecake
A light and creamy Summer Peach Plum Cheesecake recipe featuring a graham cracker crust, rich cream cheese filling, and a vibrant fresh peach and plum topping. A perfect dessert to celebrate summer’s bounty.
Ingredients
-
1 ½ cups (180g) Graham cracker crumbs
-
¼ cup (50g) granulated sugar
-
½ teaspoon ground cinnamon
-
½ cup (113g) unsalted butter, melted
-
Pinch of salt
-
32 ounces (900g) full-fat cream cheese, softened to room temperature
-
1 ½ cups (300g) granulated sugar
-
4 large eggs, at room temperature
-
½ cup (120g) sour cream, at room temperature
-
1 tablespoon pure vanilla extract
-
1 teaspoon fresh lemon zest
-
Pinch of salt
-
2 large ripe peaches (1-1 ½ pounds)
-
3 large ripe plums (1-1 ¼ pounds)
-
½ cup (100g) granulated sugar
-
2 tablespoons fresh lemon juice
-
¼ cup (60ml) water
-
2 tablespoons cornstarch
-
Pinch of ground cinnamon (optional)
Instructions
-
Step 1
Preheat oven to 350°F (175°C). Grease a 9-inch springform pan and line bottom with parchment paper. In a bowl, combine graham cracker crumbs, ¼ cup sugar, ½ teaspoon cinnamon, ½ cup melted butter, and a pinch of salt. Press mixture firmly into the pan. Bake for 8-10 minutes, then cool. -
Step 2
Ensure cream cheese, eggs, and sour cream are at room temperature. In a stand mixer, beat softened cream cheese until smooth. Gradually add 1 ½ cups sugar, beating until light and fluffy. Mix in sour cream, vanilla extract, lemon zest, and a pinch of salt on low speed. Add eggs one at a time, mixing just until combined after each. Do not overmix. -
Step 3
Wrap the springform pan bottom and sides with two layers of heavy-duty aluminum foil. Pour filling over the cooled crust. Place pan in a larger roasting pan. Pour hot water into the roasting pan, halfway up the sides of the springform pan. Bake at 350°F (175°C) for 60-75 minutes, until edges are set but center still jiggles slightly. -
Step 4
Turn off the oven, leave cheesecake inside with door ajar for 1 hour. Remove from water bath, unwrap foil, and cool completely on a wire rack for 1-2 hours. Refrigerate, loosely covered, for at least 6-8 hours or overnight. -
Step 5
Wash, pit, and slice peaches and plums into ½-inch wedges or chunks. In a saucepan, combine sliced fruit, ½ cup sugar, lemon juice, water, and optional cinnamon. Simmer over medium heat for 5-7 minutes until fruit softens and releases juices. -
Step 6
In a small bowl, whisk 2 tablespoons cornstarch with 2 tablespoons cold water to create a slurry. Pour slurry into the simmering fruit mixture, stirring constantly. Cook for 1-2 minutes until glossy and thickened. Remove from heat and cool completely. -
Step 7
Once cheesecake is thoroughly chilled and topping is cool, carefully run a thin knife around the pan edge before releasing the latch. Transfer cheesecake to a serving platter. Evenly spoon the cooled peach plum topping over the cheesecake. Refrigerate for at least another 1-2 hours to allow the topping to set. -
Step 8
For clean slices, dip a sharp knife in hot water and wipe clean between cuts. Serve as is, or with fresh whipped cream and mint leaves or extra fruit slices. Store covered in the refrigerator for 3-4 days.
Important Information
Nutrition Facts (Per Serving)
It is important to consider this information as approximate and not to use it as definitive health advice.
Allergy Information
Please check ingredients for potential allergens and consult a health professional if in doubt.

Leave a Comment