
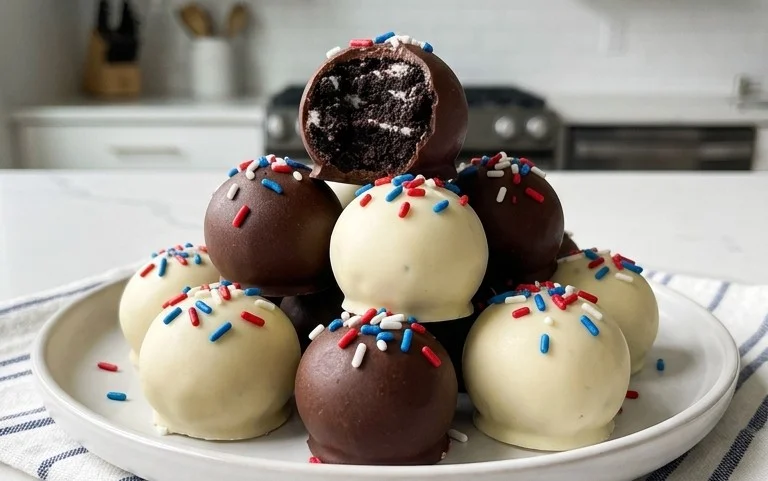
Patriotic Oreo Balls are the quintessential treat for any red, white, and blue celebration! If you’re looking for a no-bake dessert that’s as impressive as it is delicious, you’ve come to the right place. These delightful little bites have become a beloved staple for a reason: they are incredibly easy to make, customizable, and always a crowd-pleaser. Whether you’re gearing up for the Fourth of July, Memorial Day, or just want to add a festive flair to a summer barbecue, these Patriotic Oreo Balls are sure to be a hit. What truly makes them special is the perfect marriage of crunchy Oreo cookie crum extractbs, creamy, sweet filling, and a vibrant, patriotic coating that brings a burst of joy to every bite. Get ready to impress your friends and family with this simple yet spectacular recipe!
Ingredients:
Get ready to unleash your inner baker and celebrate with a treat that’s as vibrant and fun as a Fourth of July fireworks display! These Patriotic Oreo Balls are a simple yet stunning dessert that’s perfect for any red, white, and blue occasion, from national holidays to birthday parties. The combination of crushed Oreos and rich cream cheese, all enrobed in smooth, colorful candy melts, creates a delightful bite that’s sure to impress. Plus, they’re incredibly easy to make, making them a fantastic activity for the whole family. Let’s dive in and create some edible magic!
Creating the Oreo Ball Mixture
The foundation of our delicious patriotic treat lies in this simple, yet utterly addictive, mixture. It’s the perfect balance of chocolatey crunch from the Oreos and creamy decadence from the cream cheese.
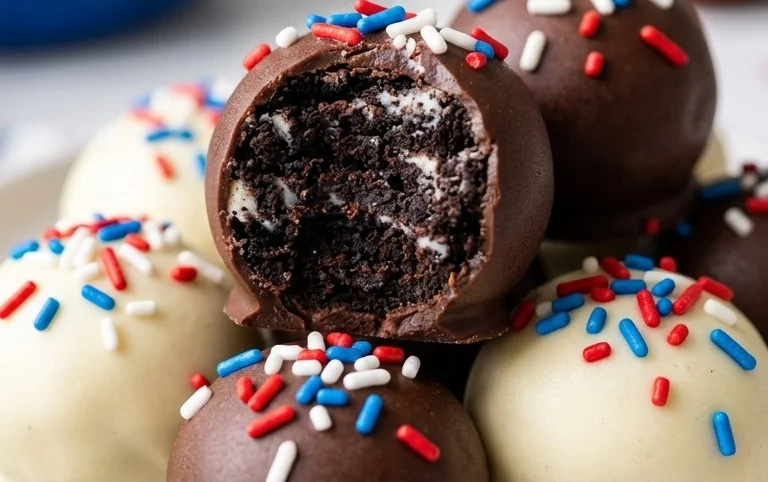
1. First things first, let’s get those Oreos ready. You’ll want to crush the entire family-size package of Oreo cookies until they are very fine crum extractbs. I find that using a food processor is the easiest and quickest way to achieve a consistently fine texture. If you don’t have a food processor, you can place the Oreos in a sturdy zip-top bag and use a rolling pin to crush them. The goal is to have no large chunks remaining, as this will ensure a smooth and cohesive mixture. For the best flavor and texture, you can include the cream filling from the Oreos; there’s no need to scrape it out.
2. Now, it’s time to bring in the cream cheese. Ensure your 8-ounce block of cream cheese has been softened to room temperature. This is crucial for easy incorporation and to avoid lumps in your mixture. You can soften cream cheese by leaving it on the counter for about an hour, or by carefully microwaving it in short, 10-second bursts, stirring in between, until it’s soft but not melted. Add the softened cream cheese to the finely crushed Oreo crum extractbs.
3. Using a sturdy spatula or your clean hands (which I often find is the best tool for this job!), mix the Oreo crum extractbs and cream cheese together thoroughly. You want to combine them until there are no streaks of cream cheese visible and the mixture is uniform. It should have a consistency similar to wet sand or playdough, which will hold together when you squeeze it. If the mixture seems a little too dry and crum extractbly, you can add another tablespoon or two of cream cheese. Conversely, if it feels too wet, you can add a few more Oreo crum extractbs.
Forming and Chilling the Oreo Balls
Once our base is perfectly mixed, we’ll shape it into delightful little balls and give them a chance to firm up before their colorful transformation.
4. Now for the fun part – shaping our Oreo balls! Take about one tablespoon of the Oreo and cream cheese mixture and roll it between your palms to form a smooth, compact ball. Aim for a consistent size for each ball so they all cook and melt evenly. Place the formed balls onto a baking sheet lined with parchment paper or wax paper. This step is important for preventing sticking and making them easy to handle later. Continue this process until all of the mixture has been rolled into balls.
5. Once all your Oreo balls are formed, it’s time to let them firm up. Place the baking sheet with the Oreo balls into the refrigerator for at least 30 minutes, or until they are firm to the touch. This chilling step is essential. It will make them much easier to dip into the melted candy melts without falling apart. If you’re short on time, you can pop them into the freezer for about 15-20 minutes, but be careful not to let them freeze solid, as this can make them too hard to handle.
The Patriotic Dip and Decorate
This is where our Oreo balls truly transform into dazzling patriotic creations! We’ll use vibrant candy melts and shimmering sprinkles to bring the festive spirit to life.
Melting the Candy and Dipping
To achieve that beautiful, smooth coating, proper melting of the candy is key.
6. Now, let’s get our colorful coatings ready. You’ll need to melt the red candy melts, the blue candy melts, and the Ghirardelli white melting wafers separately. The best way to melt candy melts is in the microwave. Place each color in its own microwave-safe bowl. Microwave on 50% power for 30-second intervals, stirring well after each interval, until the candy is completely smooth and melted. Be patient, as over-heating can cause the candy to seize or burn. For the Ghirardelli white melting wafers, you can melt them the same way, or consider using a double boiler for a slightly more controlled melt. Once melted, you want the candy to be fluid enough to easily coat the Oreo balls.
7. With your chilled Oreo balls and melted candy ready, it’s time to dip! Take one firm Oreo ball and carefully drop it into a bowl of melted candy. Use a fork or a toothpick to gently coat the entire ball. Allow any excess candy to drip back into the bowl. This might take a little practice to get a nice, even coat. You can also carefully use two forks to lift the ball out of the candy and then gently tap the fork on the side of the bowl to remove excess.
8. Carefully place the dipped Oreo ball back onto the parchment-lined baking sheet. For that patriotic look, you’ll want to alternate your colors. You can dip half of your Oreo balls in red, half in blue, or create stripes and swirls for a more abstract patriotic design. For the white components, you can either dip some of the balls entirely in white, or you can drizzle melted white chocolate over the red and blue dipped balls. To create a drizzle effect, melt the Ghirardelli white melting wafers and place them in a small piping bag or a zip-top bag with a tiny corner snipped off. Once you’ve dipped your red and blue balls and they’ve set slightly (they don’t need to be completely hard), you can drizzle the white chocolate over them in thin lines.
Finishing Touches
The final step adds that extra sparkle and makes them truly festive.
9. While the candy coating is still wet, immediately sprinkle the white star confetti sprinkles over the dipped Oreo balls. The sprinkles will adhere beautifully to the melted candy, adding that perfect festive touch. Work relatively quickly, as the candy melts start to set up fairly fast. If you’re doing a drizzle effect with the white chocolate, you can sprinkle the stars on after the drizzle has been applied, while the white chocolate is still wet.
10. Once all your patriotic Oreo balls are dipped and decorated, let them sit at room temperature for about 10-15 minutes until the candy coating is completely set. Then, transfer them to an airtight container and store them in the refrigerator until you’re ready to serve. They are best enjoyed chilled, and they make a wonderful make-ahead treat for any gathering. These little bites of patriotic joy are sure to be a hit with everyone!
Conclusion:
And there you have it – the ultimate guide to making these absolutely delightful Patriotic Oreo Balls! I truly hope you’ve enjoyed learning how easy and fun it is to whip up these festive treats. They are a guaranteed crowd-pleaser, perfect for any summer gathering, Fourth of July celebration, or just because you want a delicious pop of red, white, and blue. Their simplicity makes them accessible for bakers of all levels, and the sweet, creamy, and chocolatey flavor is simply irresistible. They look stunning on a dessert table and are incredibly satisfying to pop into your mouth.
These Patriotic Oreo Balls are incredibly versatile. Serve them chilled as a delightful dessert or alongside your favorite coffee or tea for a sweet afternoon pick-me-up. They also make fantastic party favors! If you’re feeling creative, consider adding a sprinkle of edible glitter for extra sparkle, or try a drizzle of white chocolate over the blue ones for a layered effect. You can also experiment with different colored candy melts to match other national holidays or team colors.
I strongly encourage you to give this recipe a try. You won’t regret it! The joy of creating something so visually appealing and delicious is truly rewarding, and I’m confident you’ll find these Patriotic Oreo Balls become a staple in your entertaining repertoire.
Frequently Asked Questions:
Can I make these ahead of time?
Absolutely! Patriotic Oreo Balls are perfect for making ahead. You can store them in an airtight container in the refrigerator for up to a week. This makes them ideal for busy hosts who want to prepare as much as possible in advance.
What if I don’t have red, white, and blue candy melts?
No problem at all! You can use any color candy melts you have on hand. For a general festive feel, consider using white chocolate and adding food coloring yourself, or simply rely on colorful sprinkles to add the patriotic flair. Even plain chocolate-covered Oreo balls are delicious!
How do I store leftover Patriotic Oreo Balls?
Store any leftovers in an airtight container in the refrigerator. They will stay fresh and delicious for several days. Just be sure to let them sit at room temperature for a few minutes before serving if they’ve been refrigerated for a while, as they will firm up.
Patriotic Oreo Balls
Festive and delicious no-bake Oreo balls decorated with red, white, and blue candy melts and white star sprinkles, perfect for any patriotic celebration.
Ingredients
-
1 lb 2.12 oz Family Size package Oreo Cookies
-
8 ounce block cream cheese (softened to room temperature)
-
12 ounce bag red candy melts
-
12 ounce bag blue candy melts
-
⅓ cup Ghirardelli white melting wafers
-
White star confetti sprinkles for topping
Instructions
-
Step 1
Crush Oreo cookies into fine crumbs using a food processor or by placing them in a zip-top bag and crushing with a rolling pin. -
Step 2
In a large bowl, combine the Oreo cookie crumbs and softened cream cheese. Mix until well combined and a dough forms. -
Step 3
Roll the mixture into 1-inch balls and place them on a baking sheet lined with parchment paper. Refrigerate for at least 30 minutes. -
Step 4
Melt the red candy melts and blue candy melts separately according to package directions. Melt the white Ghirardelli melting wafers separately. -
Step 5
Dip each chilled Oreo ball into the melted red or blue candy melts, ensuring it is fully coated. Place back on the parchment-lined baking sheet. -
Step 6
Drizzle the melted white chocolate over the coated Oreo balls in a decorative pattern. Immediately sprinkle with white star confetti sprinkles before the chocolate sets. -
Step 7
Allow the candy coating to harden completely at room temperature or in the refrigerator.
Important Information
Nutrition Facts (Per Serving)
It is important to consider this information as approximate and not to use it as definitive health advice.
Allergy Information
Please check ingredients for potential allergens and consult a health professional if in doubt.


Leave a Comment